For any aspiring guitar player, there comes a point where simply strumming chords isn’t enough. While learning songs through chord charts and tabs is a great starting point, truly understanding your instrument and elevating your playing requires a deeper dive. One of the most impactful steps you can take to supercharge your guitar skills is learning the Fingerboard Guitar Notes. Knowing the name of each note you play across the fretboard unlocks a greater understanding of music theory and opens up a world of possibilities for your playing.
While the prospect of memorizing every note on the fingerboard might seem overwhelming at first, it’s achievable with the right approach. This guide will break down effective strategies and essential tips to make learning fingerboard guitar notes easier and more efficient, setting you on the path to guitar mastery.
Understanding the Guitar Fingerboard
Before diving into memorization techniques, let’s familiarize ourselves with the layout of the guitar fingerboard. The fingerboard, also known as the fretboard, is the playing surface of the guitar neck where the frets are located. Each fret represents a semitone, and moving up one fret increases the pitch of a note by a half step.
The diagram below illustrates the notes across a standard guitar fretboard:
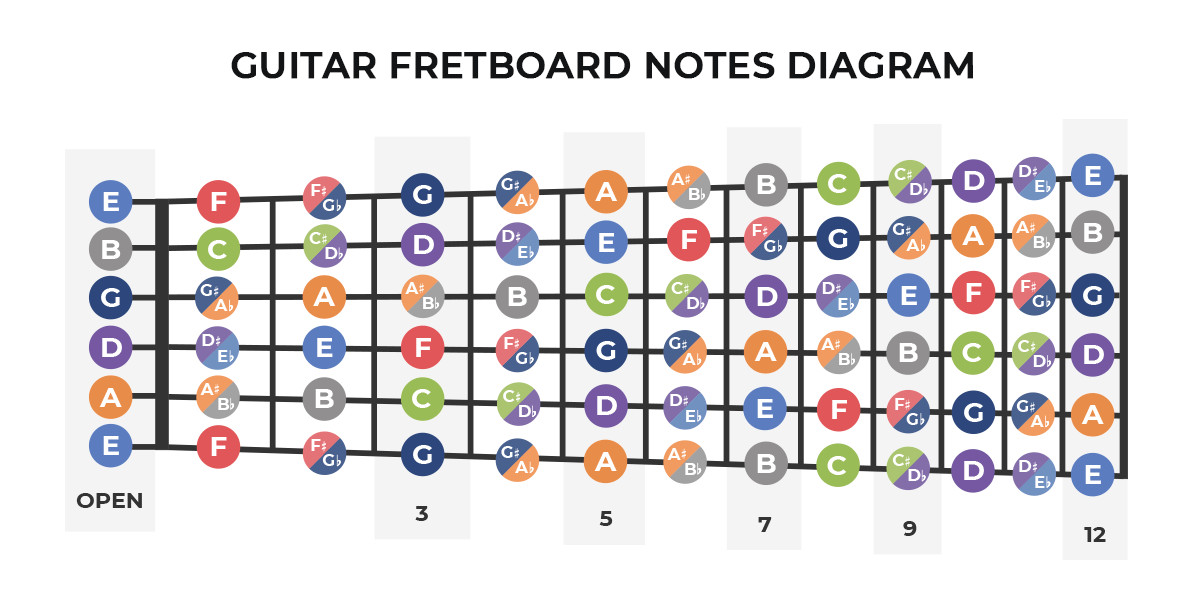 Guitar Fingerboard Notes Diagram
A detailed diagram of a guitar fretboard showing all notes up to the 12th fret, illustrating the note names and positions on each string.
You’ll notice some notes are represented with two names, such as C#/Db or D#/Eb. This is due to enharmonic equivalents – notes that sound the same but are written differently depending on the musical context. The sharp (#) indicates a note raised by a half step, while the flat (b) indicates a note lowered by a half step.
For example, consider the note on the 6th fret of the A string. Moving up two frets from the D at the 5th fret brings you to E at the 7th fret. The note in between, at the 6th fret, can be called either D# (D sharp, raised from D) or Eb (E flat, lowered from E). Both names refer to the exact same pitch at that position on the fingerboard. Understanding this duality is key to navigating music theory and the fingerboard effectively.
Tip 1: Leverage the Chromatic Scale
The chromatic scale is your fundamental tool for understanding the sequence of notes on the fingerboard.
What is the Chromatic Scale?
In Western music, the chromatic scale includes all 12 distinct musical notes within an octave. Starting on any note, the chromatic scale progresses in half steps until you return to the octave. Starting on C, the chromatic scale is:
C – C#/Db – D – D#/Eb – E – F – F#/Gb – G – G#/Ab – A – A#/Bb – B – C
Each interval between consecutive notes in the chromatic scale is a semitone, which corresponds to one fret on the guitar. This consistent pattern is crucial for learning fingerboard notes.
How the Chromatic Scale Aids Fingerboard Learning:
Let’s say you know the open G string note (6th string, open). If you move up three frets, the chromatic scale tells you exactly which note you’ll land on. Starting from G and counting three half steps up in the chromatic scale (G – G#/Ab – A – A#/Bb), you arrive at A#/Bb. Therefore, the note at the 3rd fret of the G string is A#/Bb.
By memorizing the chromatic scale, you gain a framework for figuring out notes anywhere on the fingerboard. Start by anchoring yourself to known notes (like open strings) and then use the chromatic scale to navigate fret by fret. This method transforms fretboard learning from rote memorization to a logical, step-by-step process.
Tip 2: Master Octave Shapes
Understanding octaves provides another powerful shortcut for learning fingerboard notes.
What is an Octave?
An octave is the interval between one musical note and another with double its frequency. Notes an octave apart share the same letter name but sound higher or lower in pitch. For example, a D note an octave higher than another D note will vibrate twice as fast.
Octave Patterns on the Guitar:
Playing the open D string and then the 12th fret of the D string demonstrates an octave. Both are D notes, but the 12th fret D is an octave higher. Crucially, octave relationships create consistent patterns across the fingerboard.
Knowing these patterns is incredibly useful. If you know that the note four frets above an open D string is F#/Gb, then the same four-fret interval applies to any D note on the fretboard. For example, there’s a D note on the 3rd fret of the B string. Count four frets up from there, and you’ll find F#/Gb at the 7th fret of the B string.
The diagrams below illustrate common octave shapes on the guitar, showing you where to find the same notes in different octaves across the neck:
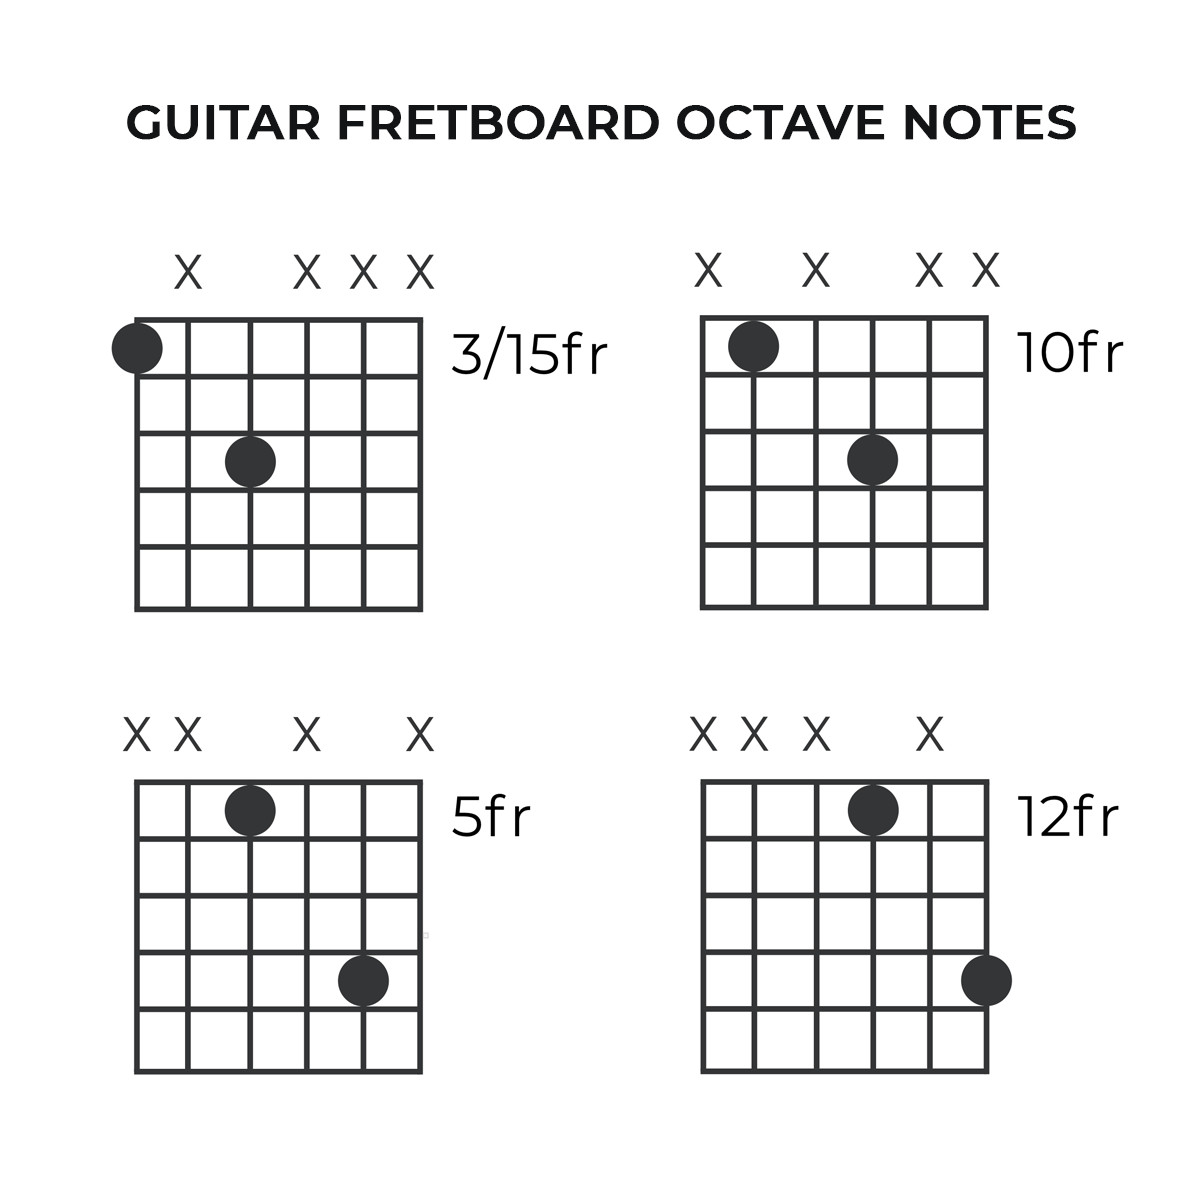 Guitar Octave Notes
Diagrams showing common guitar octave shapes, highlighting the consistent patterns for locating octave equivalents of notes across different strings.
By memorizing these octave shapes, you drastically reduce the amount of information you need to memorize. Instead of learning every note individually, you learn patterns that repeat across the fingerboard.
Tip 3: Adopt a String-by-String Approach
Learning the entire fingerboard at once can be daunting. A more manageable strategy is to focus on memorizing notes string by string, starting with the most frequently used strings.
Prioritize the Low E and A Strings:
Many guitarists find it effective to begin by learning the notes on the low E (6th) and A (5th) strings. These strings are fundamental because they often serve as the root notes for chords, especially barre chords.
For example, knowing that the 8th fret of the low E string is a C note is incredibly useful when playing C barre chords rooted on the 6th string. Similarly, recognizing that the 3rd fret of the A string is also a C note helps with playing C barre chords rooted on the 5th string.
Expanding Your Knowledge Systematically:
Once you’re comfortable with the notes on the low E and A strings, gradually expand to the D, G, B, and high E strings. As you learn each string, look for patterns and relationships to the strings you already know.
For instance, after mastering the low E string, observe the high E string. You’ll notice a direct correlation: the notes on the high E string correspond to the same note names on the low E string, just two octaves higher. This kind of pattern recognition significantly accelerates the learning process.
Making Fingerboard Mastery a Reality
Learning fingerboard guitar notes is about recognizing patterns and relationships, not just rote memorization. It’s a process that takes time and consistent practice, but the payoff is immense.
Practical Tips for Effective Learning:
- Start Slowly and Consistently: Dedicate a few minutes each day to fingerboard study. Consistency is more effective than infrequent, long sessions.
- Use Visual Aids: Fretboard diagrams, apps, and online tools can be invaluable resources for visualizing and practicing notes.
- Practice in Context: Apply your fingerboard knowledge while learning scales, chords, and songs. This practical application reinforces your learning and makes it more meaningful.
- Test Yourself Regularly: Quiz yourself on note names in different positions. Flashcards or interactive apps can make this process engaging.
The journey of learning fingerboard guitar notes is a crucial step towards becoming a more proficient and versatile guitar player. Don’t be discouraged if it feels challenging at first. By breaking it down into manageable steps, utilizing effective strategies like the chromatic scale and octave patterns, and practicing consistently, you’ll unlock the secrets of the fingerboard and take your guitar playing to new heights.
Ready to put your knowledge into practice?
Explore songs and exercises to reinforce your fingerboard knowledge with Yousician. Try Premium+ free for 7 days and start your musical journey today!
Start your free trial