
If you’re a guitarist with a growing collection of pedals, you know the struggle of keeping them organized and accessible. Instead of letting your stompboxes sprawl across the floor, why not build your own Diy Guitar Pedal Board? It’s a rewarding project that’s both cost-effective and allows for complete customization. For a while, I was juggling between a small portable board and a massive stage-ready one, never quite finding that perfect in-between size for home use. That’s when the idea struck: “Why not just make one myself?”
And so I did.
Now, let me be clear – I’m no master craftsman. My woodworking skills are definitely in the beginner zone, and this diy pedal board isn’t going to win any professional awards for finesse. But you know what? It works perfectly. It keeps my pedals tidy, and it was surprisingly easy to build. If I can manage it, trust me, you can too!
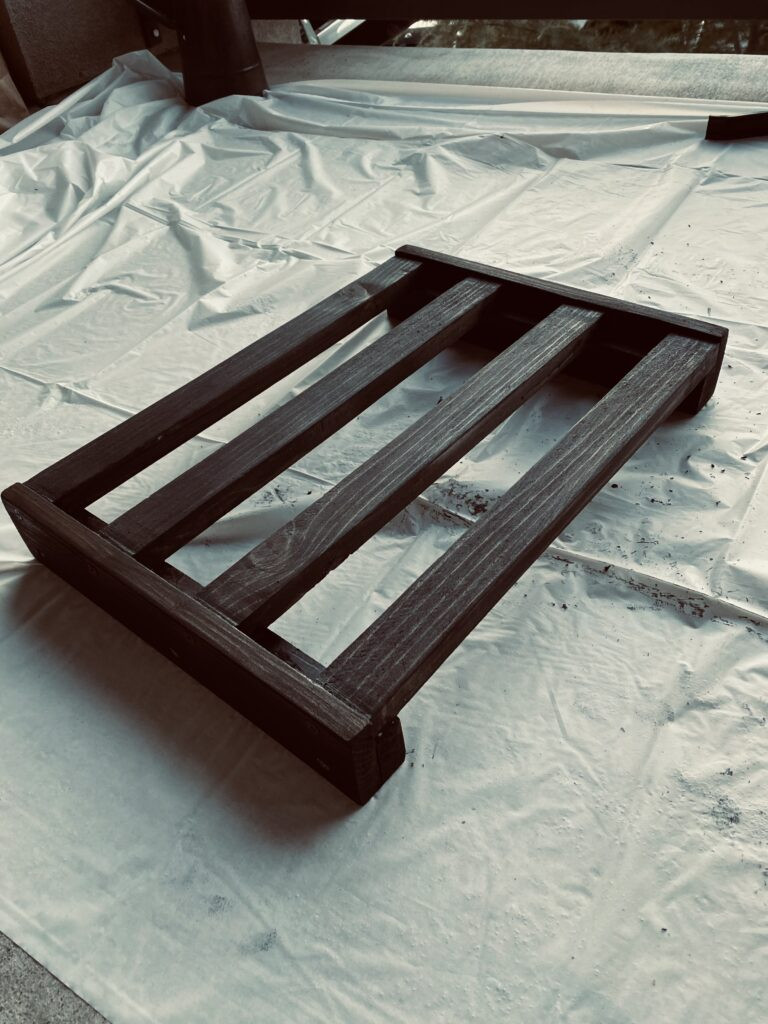 Close-up of a finished DIY guitar pedalboard made from wood, showcasing the stained finish and velcro strips for pedal attachment.
The whole project came together much smoother than I anticipated. That’s why I wanted to share a simple guide on how to build your own homemade pedalboard. If you’re considering a guitar pedal board DIY project, this is for you. The best part? The wood for this project cost me a mere $8 at Home Depot because I already had basic tools at home.
Even if you’re starting from scratch tool-wise, you can likely gather everything you need for under $100. Sure, you could buy a budget pedalboard for around that price, but where’s the fun and personal satisfaction in that? Building your own wooden pedalboard is a great way to personalize your guitar setup and enjoy a hands-on project.
Let’s get building!
Materials You’ll Need for Your DIY Pedal Board
Here’s a list of what I used to build my simple diy wooden pedalboard. You can adjust these based on your desired size and the materials available to you:
-
Wood:
- One 1×3 inch board (8 feet long) – for the sides
- One 1×2 inch board (8 feet long) – for the support slats and top pieces
- Note: Pine or any softwood is perfectly suitable and budget-friendly for a diy guitar pedal board.
-
Fasteners:
- Wood screws (1 1/4 inch or 1 5/8 inch) – make sure they are long enough to securely join the wood but not too long that they poke through.
-
Finishing (Optional):
- Wood stain, paint, or sealant of your choice
- Sandpaper (80, 120, and 220 grit recommended for a smooth finish)
-
Pedal Attachment & Grip:
- Velcro strips (industrial strength for pedals, standard for board)
- Rubber feet
-
Tools:
- Saw (hand saw, circular saw, or miter saw)
- Drill
- Screwdriver or drill with screwdriver bit
- Measuring tape
- Pencil
- Safety glasses
- Work gloves (optional but recommended)
How To Build Your Homemade Pedalboard: Step-by-Step
The actual construction of this homemade pedalboard is surprisingly quick. I had mine assembled in under an hour. The key is accurate measuring and cutting to ensure a snug fit and minimal adjustments later. Proper measurements will save you a lot of sanding time!
Here’s the plan I loosely followed for my 18”x12.5” diy pedal board. Feel free to adjust the dimensions to perfectly fit your pedal collection.
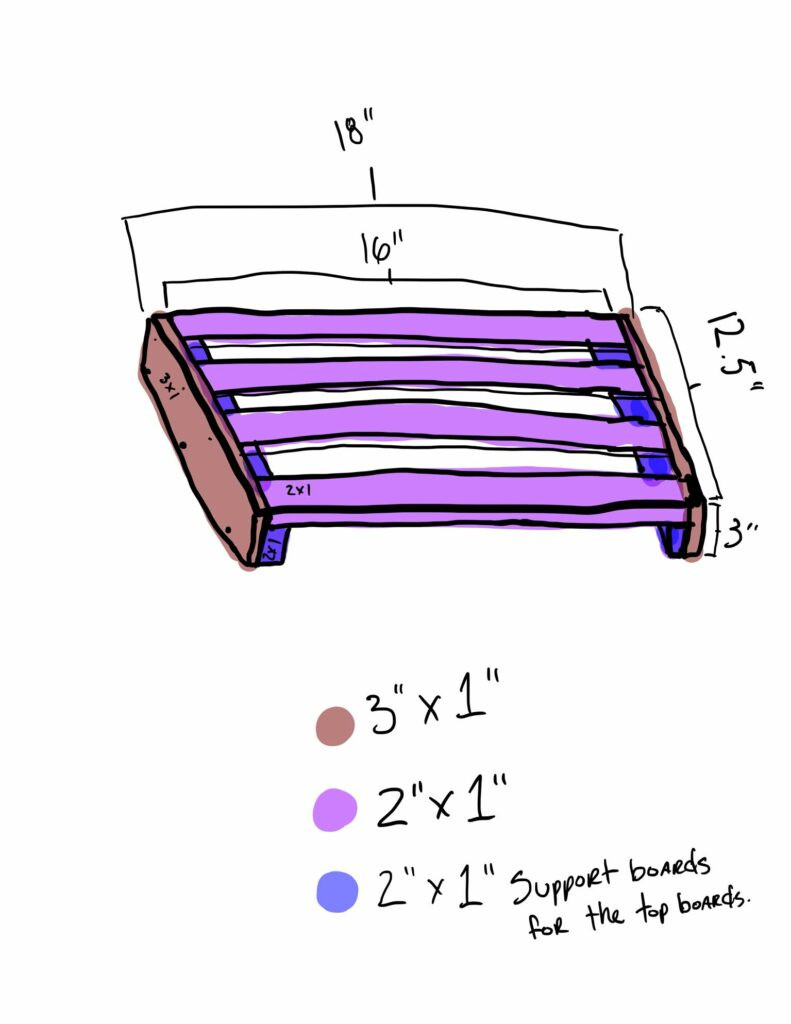 Simple hand-drawn diagram illustrating the basic construction plan for a DIY wooden guitar pedalboard, showing dimensions and component breakdown.
Step 1: Planning and Measuring Your DIY Pedal Board
Before you cut anything, decide on the size of your diy guitar pedal board. Lay out your pedals to get a visual idea of the space you’ll need. Measure the total area required, adding a little extra room for cables and comfortable spacing.
Once you have your dimensions, plan out the cuts. For my 18”x12.5” board, I cut:
- Two 12.5” pieces from the 1×3 board (sides)
- Two 18” pieces from the 1×3 board (front and back)
- Two 12.5” pieces from the 1×2 board (internal supports)
- Several pieces from the 1×2 board to act as top slats – the number will depend on the spacing you want between slats. I used about five 18” pieces.
Step 2: Cutting the Wood for Your Pedalboard
Carefully measure and cut all the wood pieces according to your plan. Accuracy is important here for a clean and professional-looking diy pedal board. Use safety glasses and appropriate safety measures when using any saw.
Step 3: Assembling the Pedalboard Frame
Now it’s time to put the frame together.
- Pilot Holes: Pre-drill pilot holes at each screw location. This is crucial, especially with softwood, to prevent the wood from splitting when you drive in the screws.
- Attach Sides to Supports: Take the 12.5” side pieces (1×3) and attach them to the 12.5” support pieces (1×2) from the inside, forming the sides of the frame.
- Assemble the Frame: Screw the front and back pieces (18” 1×3) to the side sections to create the rectangular frame of your wooden pedalboard.
- Attach Top Slats: Evenly space and screw the 1×2 slats across the top of the frame to create the surface where your pedals will sit.
Step 4: Sanding and Finishing Your DIY Pedal Board
Once assembled, sand down all edges and surfaces of your diy guitar pedal board.
- Rough Sanding: Start with 80-grit sandpaper to smooth out any rough cuts and sharp corners.
- Medium Sanding: Follow with 120-grit sandpaper to further refine the surface.
- Fine Sanding (Optional): For a super smooth finish, use 220-grit sandpaper for the final sanding.
- Finishing: Wipe away all sawdust. Now you can stain, paint, or seal your homemade pedalboard. I used two coats of stain for a richer color. You could also use spray paint for a quicker finish or just apply a clear sealant for a natural wood look.
Step 5: Adding Velcro and Rubber Feet
The final steps to make your diy pedal board functional:
- Velcro: Cut strips of the loop side of the Velcro and attach them to the top slats of your pedalboard. Use staples or tacks if the adhesive isn’t strong enough.
- Rubber Feet: Flip the board over and attach rubber feet to the bottom corners. This will prevent scratching and provide a non-slip grip.
Customization Ideas for Your DIY Pedal Board
Want to take your diy guitar pedal board to the next level? Here are a few customization ideas:
- Angled Pedalboard: Cut the side pieces at an angle before assembly to create a tilted pedal surface for better pedal access.
- Cable Management: Drill holes in the top or sides to run cables underneath the board for a cleaner setup. You can also add cable ties or clips underneath.
- Handle: Attach a handle to the side for easier transport.
- Two-Tier Pedalboard: Build a second tier to elevate some pedals for easier access and to maximize space, especially useful for larger pedal collections.
Conclusion
Building your own diy guitar pedal board is a satisfying and straightforward project. It’s a fantastic way to organize your pedals, save money, and customize your rig exactly to your needs. It’s also a really enjoyable weekend project that any guitarist can tackle, regardless of their woodworking experience.
So, grab some wood, gather your tools, and start building your personalized wooden pedalboard today! Once you’re done, share a picture of your creation – I’d love to see it! And if you run into any questions along the way, feel free to reach out. Happy building!