Are you enchanted by the vibrant world of Disney’s Coco? Do you dream of bringing Miguel’s iconic guitar to life? You’re in the right place! This easy-to-follow DIY tutorial will guide you through creating your very own Coco Miguel Guitar, perfect for completing a Miguel costume or simply celebrating your love for the film. Using affordable materials and simple crafting techniques, you can transform a basic ukulele or thrift store guitar into a stunning replica that captures the magic of Coco.
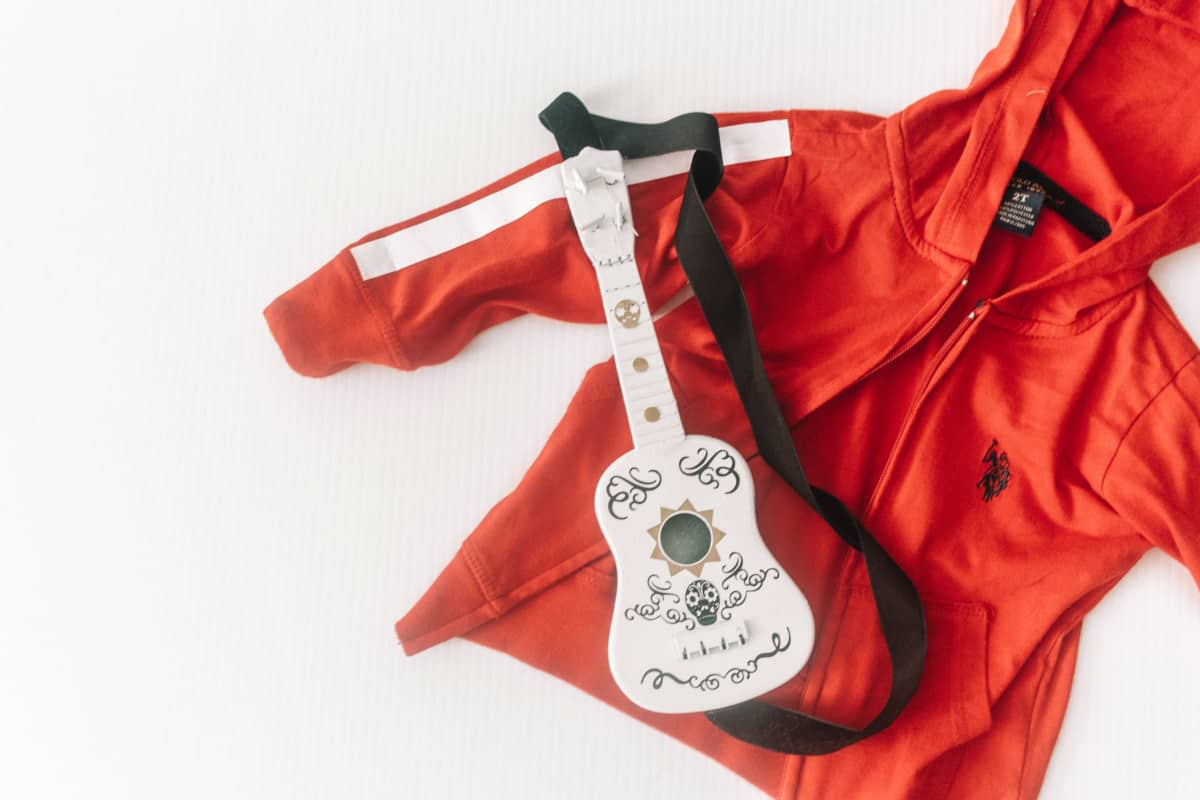 Red jacket that looks like Miguels from Coco
This project is not only fun but also a fantastic way to add an authentic touch to your Miguel costume for Halloween, cosplay events, or themed parties. Let’s dive into the steps and get crafting your Coco guitar!
Materials You’ll Need to Make a DIY Coco Guitar
Before we begin, gather these supplies to ensure a smooth crafting experience:
- A Ukulele or Toy Guitar: A dollar store ukulele or a small, inexpensive guitar from a thrift store works perfectly. The size is ideal for a child’s costume and easy to handle for decoration.
- White Spray Paint: Choose a white spray paint suitable for plastic or wood, depending on your guitar material.
- Black and Gold Vinyl: You’ll need vinyl in black and gold to create the intricate Coco-inspired designs.
- Cricut Machine (or Craft Knife): A Cricut cutting machine is highly recommended for precise and intricate vinyl cuts. However, a steady hand and a craft knife can also work for those experienced with hand-cutting vinyl.
- Cricut Design Space File (Optional): For Cricut users, using a pre-designed file will simplify the process. A link is provided below in the instructions.
- Weeding Tools: Essential for removing excess vinyl after cutting, especially for detailed designs.
- Transfer Tape: To transfer the delicate vinyl designs from the backing sheet to the guitar surface.
- BrightPad or Lightbox (Optional but Recommended): A BrightPad or lightbox is incredibly helpful for weeding intricate black vinyl designs, making the process much easier and more accurate.
- Scotch Tape: For transferring vinyl decals, especially if you want a less sticky option to protect the white paint.
- Velvet Ribbon (Optional): If you want to add a strap for easy carrying, velvet ribbon adds a nice touch.
- Glue Gun or Strong Adhesive: To attach the velvet ribbon strap, if desired.
- Scissors or Craft Knife: For trimming vinyl and ribbon.
- Standard Cutting Mat (Green): For use with the Cricut machine.
Step-by-Step Directions to Create Your Coco Mariachi Guitar
Let’s bring your Coco Miguel guitar to life with these detailed instructions:
1. Prepare Your Vinyl Decals
The heart of the Coco guitar lies in its detailed vinyl designs. Here’s how to prepare them:
- Cricut Design Space File: Open this Cricut Design Space file: Coco Guitar Bottom Vinyl Cutout. This file contains the designs you need for the guitar.
- Resize if Necessary: Measure your guitar or ukulele and resize the design in Cricut Design Space to ensure it fits appropriately.
- Prepare to Cut: In Cricut Design Space, click “MAKE IT.” The designs are pre-set to separate onto two mats – one for black and one for gold. If you want to keep the designs grouped for easier placement, you can “attach” the black elements together and the gold elements together before proceeding.
- Cutting Settings: Select your Cricut machine from the dropdown menu and set your material to “Vinyl.”
- Load and Cut Black Vinyl: Place your black vinyl onto a StandardGrip Mat (Green), load it into your Cricut machine, and press the flashing ‘C’ button to start cutting.
- Load and Cut Gold Vinyl: Repeat the process with your gold vinyl on a fresh mat.
2. Weed the Vinyl Decals
Weeding is the process of removing the excess vinyl around your design, leaving only the desired decals on the backing sheet. This can be intricate, especially with black vinyl:
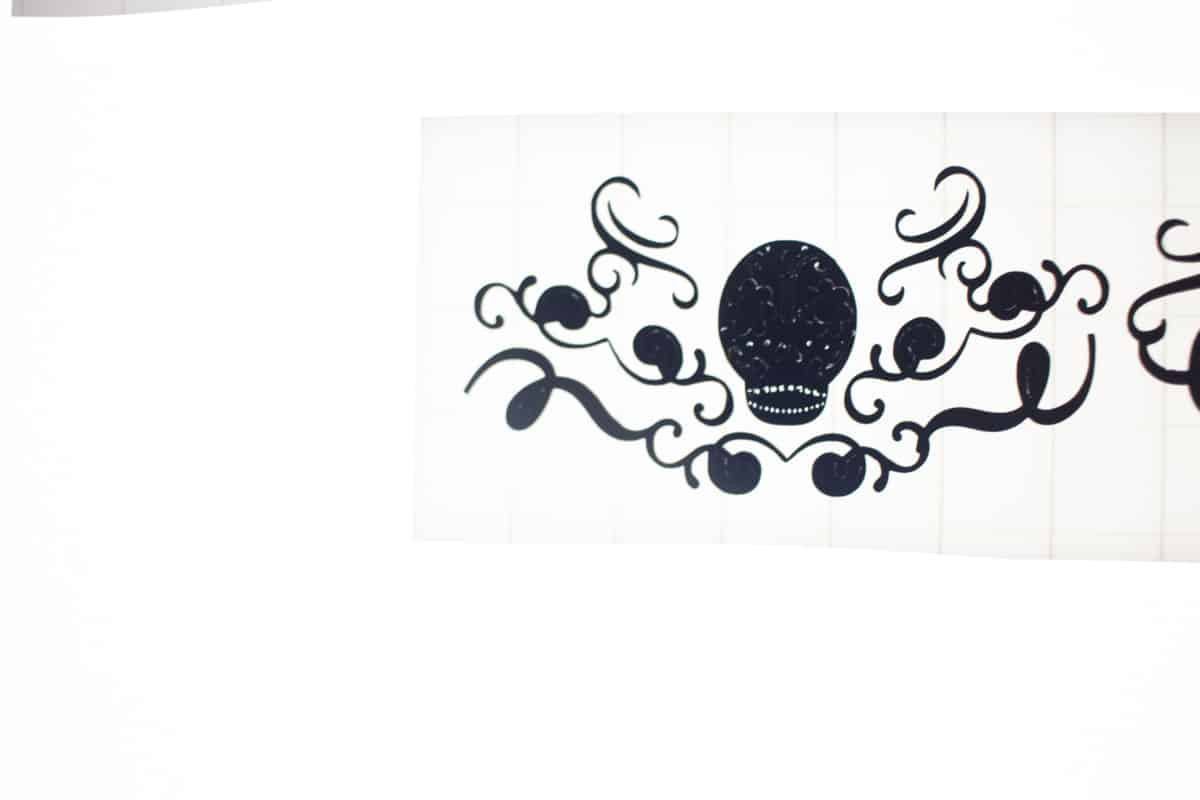 Weeding Black Vinyl on the Cricut BrightPad
- Use a BrightPad (Recommended): A BrightPad or lightbox is invaluable for weeding black vinyl, especially for intricate designs like those on the Coco guitar. The backlight illuminates the cut lines, making it much easier to see what to weed.
- Weeding Tools: Use your weeding tools to carefully remove the excess vinyl from both the black and gold designs. Take your time to ensure you don’t accidentally remove any part of the intended design.
3. Prepare and Paint the Guitar
While you’re weeding your vinyl, you can prepare and paint your guitar:
 Spray Painting a white guitar for the Coco Guitar
- Prepare the Guitar: If your ukulele or guitar has strings, you might find it easier to remove them before painting, especially if they are getting in the way.
- Spray Paint in Light Coats: Apply several light coats of white spray paint to the guitar. Light coats prevent drips and streaks and ensure even coverage. Allow each coat to dry completely before applying the next.
- Drying Time: Ensure the paint is completely dry before proceeding to the next step. This is crucial for the vinyl decals to adhere properly.
4. Apply the Vinyl Decals
Once the paint is fully dry, you can apply the vinyl decals to transform your guitar into a Coco Miguel guitar:
 Coco Guitar in process of placing Vinyl Decals
- Transfer with Tape: Due to the delicate paint, using scotch tape as transfer tape is recommended as it’s less sticky and less likely to pull off the paint. Apply scotch tape over a weeded vinyl decal.
- Position and Apply: Carefully position the vinyl decal on the guitar where desired. Refer to images of Miguel’s guitar from Coco for accurate placement. Gently press the decal onto the guitar, starting from the center and working outwards to avoid bubbles.
- Peel Away Transfer Tape: Slowly peel away the scotch tape, ensuring the vinyl decal remains adhered to the guitar. If any part of the vinyl lifts, gently press it back down.
- Repeat for All Decals: Repeat this process for all the black and gold vinyl decals, layering them as needed to recreate the Coco guitar design. You might need to adjust placement based on the shape and size of your guitar.
5. Add a Ribbon Strap (Optional)
To make the guitar easier to carry as part of a costume, consider adding a velvet ribbon strap:
- Cut Ribbon: Cut a length of velvet ribbon long enough to comfortably sling over a shoulder.
- Attach Ribbon: Use a glue gun or strong adhesive to attach the ends of the ribbon to the guitar. Attach one end to the top of the neck and the other to the bottom part of the guitar body. Ensure the glue is secure but be mindful of not damaging the paint.
Complete Your Miguel Coco Costume
Congratulations, your DIY Coco Miguel guitar is complete! This handcrafted guitar is the perfect accessory to elevate your Miguel costume.
 Red jacket that looks like Miguel from Coco
To complete the full Miguel look, don’t forget to check out the DIY tutorial for Miguel’s jacket on Practical and Pretty. With the jacket and your Coco guitar, you’ll have an amazing and recognizable costume that’s sure to impress.
This Coco Miguel guitar DIY is a fun and rewarding project for any Coco fan. Whether you’re creating it for a Halloween costume, a cosplay event, or simply as a decorative piece, this handmade guitar will bring a touch of Disney magic to your life. Enjoy crafting and get ready to strum your way into the Land of the Dead – or at least, your next costume party!