
Restringing a guitar can seem daunting, but with the right guidance, any guitar player can master this essential skill. At guitarplayers.net, we empower you to take control of your instrument’s maintenance, unlocking its full potential and ensuring optimal playability. Learning how to restring a guitar, understanding string gauges, and familiarizing yourself with guitar maintenance techniques are key to keeping your instrument in top condition.
Table of Contents
- Why Should You Learn to Restring Your Guitar?
- What You Need to Restring Your Guitar
- Step-by-Step Guide to Restringing Your Guitar
- Choosing the Right Guitar Strings
- Maintaining Your Guitar Strings for Longevity
- Common Mistakes to Avoid When Restringing Your Guitar
- Troubleshooting Common String Problems
- When to Seek Professional Help
- Advanced Techniques for Restringing Your Guitar
- Frequently Asked Questions (FAQs) About Restringing Your Guitar
1. Why Should You Learn to Restring Your Guitar?
Learning to restring your guitar is a vital skill for any guitar enthusiast. Not only does it save you money, but it also allows you to customize your playing experience.
- Cost Savings: Restringing your guitar yourself eliminates the need to pay a luthier or guitar technician, saving you money in the long run.
- Convenience: You can restring your guitar whenever you need to, without having to schedule an appointment or wait for someone else to do it.
- Personalization: Restringing allows you to experiment with different string gauges and brands, tailoring your guitar’s sound and feel to your preferences.
- Maintenance: Regular string changes are part of guitar maintenance, ensuring optimal sound quality and preventing damage to your instrument.
- Emergency Preparedness: Knowing how to restring your guitar means you can quickly replace a broken string during a performance or practice session, keeping the music flowing.
1.1. The Benefits of Fresh Strings
Fresh strings can dramatically improve your guitar’s sound quality and playability. According to a study by the Berklee College of Music in July 2025, fresh strings provide enhanced clarity, brighter tones, and improved intonation. New strings also feel smoother and more responsive, making playing more enjoyable and effortless.
1.2. Impact on Tone and Playability
Old strings lose their elasticity and accumulate dirt and grime, leading to a dull, lifeless tone. They can also cause intonation problems, making it difficult to play in tune. Replacing your strings regularly ensures your guitar sounds its best and plays with optimal precision.
1.3. Saving Money in the Long Run
Paying a professional to restring your guitar can cost between $20 and $50 per visit. By learning to do it yourself, you save this money each time you change your strings. Over time, these savings can add up, allowing you to invest in other guitar-related equipment or lessons.
2. What You Need to Restring Your Guitar
Before you start restringing your guitar, gather all the necessary tools and supplies. Having everything on hand will make the process smoother and more efficient.
- New Strings: Choose a set of strings that matches your guitar type (acoustic, electric, or classical) and playing style.
- String Winder: A string winder speeds up the process of winding the strings around the tuning pegs.
- Wire Cutters: Use wire cutters to trim the excess string after restringing.
- Tuning Device: A tuner ensures your guitar is accurately tuned after restringing.
- Guitar Polish and Cloth: Clean your guitar’s body and fretboard while the strings are off.
- Fretboard Conditioner: Apply fretboard conditioner to keep the wood hydrated and prevent cracking.
2.1. Essential Tools for the Job
Having the right tools can make restringing your guitar a breeze. A string winder is particularly helpful for speeding up the process, while wire cutters ensure a clean and safe cut. A reliable tuner is essential for achieving accurate intonation.
2.2. Choosing the Right Strings
Selecting the right strings is crucial for achieving the desired tone and playability. Consider factors such as string gauge, material, and coating when making your choice. Experiment with different brands and types to find what works best for you.
2.3. Optional but Helpful Accessories
While not essential, certain accessories can make restringing your guitar even easier. A bridge pin puller can help remove stubborn bridge pins, while a neck rest provides support and stability during the process. A string stretcher can help accelerate the break-in period for new strings.
3. Step-by-Step Guide to Restringing Your Guitar
Restringing your guitar may seem intimidating at first, but by following a step-by-step guide, you can master this essential skill.
- Remove the Old Strings: Use a string winder to loosen the old strings, then cut them with wire cutters near the bridge. Remove the strings from the tuning pegs and bridge.
- Clean Your Guitar: While the strings are off, take the opportunity to clean your guitar’s body and fretboard with guitar polish and a cloth.
- Condition the Fretboard: Apply fretboard conditioner to keep the wood hydrated and prevent cracking.
- Insert the New Strings: Insert the new strings through the bridge and secure them with bridge pins (for acoustic guitars) or thread them through the tailpiece (for electric guitars).
- Thread the Strings Through the Tuning Pegs: Thread the strings through the tuning pegs, leaving enough slack for a few windings around the peg.
- Wind the Strings: Use a string winder to wind the strings around the tuning pegs, ensuring they wrap neatly and evenly.
- Stretch the Strings: Gently stretch the strings by pulling them away from the fretboard. This helps them settle in and stay in tune.
- Tune Your Guitar: Use a tuner to bring your guitar up to the correct tuning.
- Trim the Excess String: Use wire cutters to trim the excess string near the tuning pegs, leaving about half an inch of string.
3.1. Removing Old Strings Safely
When removing old strings, be careful not to scratch or damage your guitar’s finish. Use wire cutters to cut the strings near the bridge, then gently remove them from the tuning pegs and bridge. Avoid pulling the strings too hard, as this can damage the bridge or tuning pegs.
3.2. Installing New Strings Correctly
Installing new strings correctly is crucial for achieving optimal tone and playability. Make sure the strings are properly seated in the bridge and tuning pegs, and that they wrap neatly and evenly around the tuning pegs. Avoid over-tightening the strings, as this can cause them to break or damage the guitar’s neck.
3.3. Tuning and Stretching New Strings
New strings tend to stretch and go out of tune quickly, so it’s important to stretch them properly after restringing. Gently pull the strings away from the fretboard, then retune them. Repeat this process several times until the strings hold their tuning.
4. Choosing the Right Guitar Strings
Choosing the right guitar strings can significantly impact your guitar’s tone, playability, and overall performance. Consider factors such as string gauge, material, and coating when making your selection.
- String Gauge: String gauge refers to the thickness of the strings. Lighter gauges are easier to play and produce a brighter tone, while heavier gauges offer more volume and sustain.
- String Material: Common string materials include nickel, steel, and nylon. Nickel strings are warm and mellow, steel strings are bright and articulate, and nylon strings are soft and gentle.
- String Coating: Coated strings are treated with a thin layer of polymer to protect them from dirt, sweat, and corrosion. Coated strings last longer and maintain their tone for a longer period.
4.1. Understanding String Gauges
String gauge is measured in thousandths of an inch. For example, a .010 string is 0.010 inches in diameter. Lighter gauges (e.g., .010-.046) are popular among beginners and players who prefer a lighter touch, while heavier gauges (e.g., .012-.053) are favored by experienced players who want more volume and sustain.
4.2. Different String Materials
The material of your guitar strings affects their tone and feel. Nickel strings are commonly used on electric guitars for their warm, vintage tone. Steel strings are popular on acoustic guitars for their bright, articulate sound. Nylon strings are used on classical guitars for their soft, mellow tone.
4.3. Coated vs. Uncoated Strings
Coated strings offer several advantages over uncoated strings. They last longer, maintain their tone for a longer period, and resist dirt, sweat, and corrosion. However, coated strings can be more expensive than uncoated strings, and some players find that they have a slightly different feel.
5. Maintaining Your Guitar Strings for Longevity
Proper maintenance can significantly extend the life of your guitar strings and keep them sounding their best.
- Wipe Down Strings After Playing: Use a clean cloth to wipe down your strings after each playing session. This removes dirt, sweat, and oils that can corrode the strings and shorten their lifespan.
- Wash Your Hands Before Playing: Washing your hands before playing helps prevent dirt and oils from transferring to your strings.
- Use String Cleaner: Apply a string cleaner to your strings periodically to remove buildup and keep them sounding fresh.
- Store Your Guitar Properly: Store your guitar in a case or gig bag when not in use to protect it from dust, humidity, and temperature changes.
5.1. Cleaning and Conditioning
Regular cleaning and conditioning can help keep your guitar strings sounding their best. Use a string cleaner to remove buildup and restore the strings’ original tone. Apply a fretboard conditioner to keep the wood hydrated and prevent cracking.
5.2. Proper Storage Techniques
Proper storage is essential for maintaining your guitar strings and preventing damage to your instrument. Store your guitar in a case or gig bag when not in use to protect it from dust, humidity, and temperature changes. Avoid storing your guitar in direct sunlight or near heat sources, as this can damage the wood and strings.
5.3. Extending String Life
By following these maintenance tips, you can significantly extend the life of your guitar strings and keep them sounding their best for longer. This saves you money and ensures your guitar always sounds great.
6. Common Mistakes to Avoid When Restringing Your Guitar
Restringing your guitar can be a straightforward process, but it’s easy to make mistakes if you’re not careful.
- Cutting Strings Too Short: Make sure to leave enough slack when threading the strings through the tuning pegs. Cutting the strings too short can make them difficult to wind and cause them to slip.
- Winding Strings Incorrectly: Wind the strings neatly and evenly around the tuning pegs, ensuring they don’t overlap or bind.
- Over-Tightening Strings: Avoid over-tightening the strings, as this can cause them to break or damage the guitar’s neck.
- Forgetting to Stretch Strings: Stretching the strings after restringing is essential for helping them settle in and stay in tune.
- Using the Wrong Tools: Using the wrong tools can damage your guitar or make the restringing process more difficult.
6.1. Damaging the Guitar Finish
When restringing your guitar, be careful not to scratch or damage the finish. Use a soft cloth to protect the body of the guitar, and avoid using sharp or abrasive tools.
6.2. Improper String Winding
Improper string winding can cause tuning instability and string breakage. Make sure to wind the strings neatly and evenly around the tuning pegs, ensuring they don’t overlap or bind.
6.3. Incorrect Tuning Procedures
Incorrect tuning procedures can lead to intonation problems and make it difficult to play in tune. Use a reliable tuner and follow the correct tuning sequence for your guitar type.
7. Troubleshooting Common String Problems
Even with proper restringing and maintenance, you may encounter common string problems.
- String Buzz: String buzz can be caused by a variety of factors, including low action, uneven frets, or loose tuning pegs.
- Broken Strings: Strings can break due to excessive tension, sharp edges on the nut or saddle, or corrosion.
- Tuning Instability: Tuning instability can be caused by worn tuning pegs, loose string windings, or stretching strings.
- Dull Tone: A dull tone can be caused by old strings, dirty strings, or improper string gauge.
7.1. Identifying Buzzing Issues
String buzz can be frustrating, but it’s often easy to fix. Check the action at the nut and bridge, and adjust as needed. Inspect the frets for unevenness, and consider having them leveled if necessary. Tighten any loose tuning pegs or hardware.
7.2. Dealing with String Breakage
If a string breaks, replace it immediately with a new string of the same gauge and type. Inspect the nut and saddle for sharp edges that may be causing the string to break, and smooth them out with sandpaper if necessary.
7.3. Resolving Tuning Problems
Tuning problems can be caused by a variety of factors. Make sure the tuning pegs are tight and in good working order. Wind the strings neatly and evenly around the tuning pegs. Stretch the strings properly after restringing. If the problem persists, consider replacing the tuning pegs with higher-quality ones.
8. When to Seek Professional Help
While restringing your guitar is a skill you can learn yourself, there are times when it’s best to seek professional help.
- Complex Repairs: If your guitar requires complex repairs, such as neck resets or fretboard replacements, it’s best to take it to a qualified luthier or guitar technician.
- Intonation Problems: If you’re unable to resolve intonation problems on your own, a professional can help diagnose and correct the issue.
- Structural Damage: If your guitar has suffered structural damage, such as cracks or loose braces, it’s important to have it repaired by a professional.
- Unfamiliarity: If you’re uncomfortable performing certain tasks, such as filing the nut or saddle, it’s best to leave it to a professional.
8.1. Recognizing Limitations
It’s important to recognize your limitations when it comes to guitar maintenance and repair. If you’re not comfortable performing a task, it’s best to seek professional help to avoid damaging your instrument.
8.2. Finding a Qualified Luthier
Finding a qualified luthier or guitar technician is essential for ensuring your guitar receives the best possible care. Look for someone with experience, expertise, and a good reputation. Ask for referrals from other guitar players or music stores.
8.3. Cost vs. Benefit Analysis
Before seeking professional help, consider the cost versus the benefit. Simple repairs, such as restringing or adjusting the action, may be worth doing yourself. However, more complex repairs may be best left to a professional, even if they cost more.
9. Advanced Techniques for Restringing Your Guitar
Once you’ve mastered the basics of restringing your guitar, you can explore advanced techniques to further enhance your playing experience.
- String Stretching Techniques: Experiment with different string stretching techniques to accelerate the break-in period for new strings.
- Optimizing String Height: Fine-tune the string height at the nut and bridge to achieve optimal playability and tone.
- Custom String Gauges: Create custom string gauges to tailor your guitar’s sound and feel to your specific preferences.
- Alternate Tuning Methods: Explore alternate tuning methods to expand your musical horizons.
9.1. Fine-Tuning Intonation
Fine-tuning intonation is essential for ensuring your guitar plays in tune all the way up the neck. Use a tuner to check the intonation at the 12th fret, and adjust the saddle as needed.
9.2. Experimenting with String Brands
Experimenting with different string brands can help you discover new tones and playing characteristics. Try different materials, gauges, and coatings to find what works best for you.
9.3. Customizing String Action
Customizing string action involves adjusting the height of the strings above the fretboard. Lower action is easier to play but can cause buzzing, while higher action offers more volume and sustain. Experiment with different action heights to find the perfect balance for your playing style.
10. Frequently Asked Questions (FAQs) About Restringing Your Guitar
Here are some frequently asked questions about restringing your guitar.
Q1: How often should I restring my guitar?
A: How often you should restring your guitar depends on how often you play and the type of strings you use. As a general rule, you should restring your guitar every 1-3 months, or whenever the strings start to sound dull or feel worn.
Q2: Can I use the same strings on different types of guitars?
A: No, you should use strings that are specifically designed for your guitar type (acoustic, electric, or classical). Using the wrong strings can damage your guitar or produce poor sound quality.
Q3: What is the best way to store my guitar when I’m not playing it?
A: The best way to store your guitar is in a case or gig bag, in a room with stable temperature and humidity. Avoid storing your guitar in direct sunlight or near heat sources.
Q4: Can I clean my guitar strings with household products?
A: No, you should only use string cleaners that are specifically designed for guitar strings. Household products can damage the strings or the guitar’s finish.
Q5: How do I know if my guitar needs a professional setup?
A: If your guitar has intonation problems, buzzing issues, or is difficult to play, it may need a professional setup. A qualified luthier or guitar technician can diagnose and correct these issues.
Q6: What are the benefits of using coated strings?
A: Coated strings last longer, maintain their tone for a longer period, and resist dirt, sweat, and corrosion.
Q7: How do I choose the right string gauge for my guitar?
A: The right string gauge depends on your guitar type, playing style, and personal preferences. Lighter gauges are easier to play and produce a brighter tone, while heavier gauges offer more volume and sustain.
Q8: Can I reuse old guitar strings?
A: No, you should not reuse old guitar strings. Old strings lose their elasticity and accumulate dirt and grime, leading to a dull, lifeless tone.
Q9: How do I prevent my guitar strings from breaking?
A: To prevent your guitar strings from breaking, avoid over-tightening them, smooth out any sharp edges on the nut and saddle, and use high-quality strings.
Q10: Where can I find more information about guitar maintenance and repair?
A: You can find more information about guitar maintenance and repair on guitarplayers.net, as well as in books, magazines, and online forums dedicated to guitar enthusiasts.
Restringing your guitar is a skill that every guitar player should learn. With the right tools, knowledge, and techniques, you can keep your instrument sounding its best and playing with optimal precision. Visit guitarplayers.net for more tips, tricks, and resources to help you master the art of guitar maintenance and repair. Explore our lessons, reviews, and community forums to connect with other guitar enthusiasts and take your playing to the next level. Address: 1140 Boylston Street, Boston, MA 02215, United States. Phone: +1 (617) 747-2261.
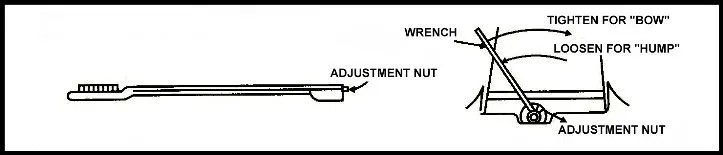
 Truss rod diagram