
For bass players of all levels, a deep understanding of the Bass Guitar Fretboard is absolutely crucial. It’s the map to your musical ideas, the key to effortless improvisation, and the foundation for reading music and playing with confidence. Yet, surprisingly many bassists, even those with years of experience, find themselves still struggling to confidently navigate their fretboard and instantly recall note names across the neck. If you’ve ever felt lost on your fretboard, you’re definitely not alone.
But here’s the good news: learning your bass guitar fretboard notes doesn’t have to be a daunting or lengthy process. The fretboard isn’t random; it’s built on a logical system. Once you grasp this underlying logic, the fretboard will begin to make sense, and those elusive notes will fall into place much faster than you might think.
In this comprehensive guide, we’ll break down a proven, step-by-step method to help you truly master your bass guitar fretboard. This is the same approach I’ve successfully used with countless students to unlock their fretboard knowledge in a relatively short amount of time. We’ll move beyond rote memorization and dive into the core principles that make fretboard learning intuitive and lasting.
Let’s get started and transform your understanding of the bass guitar fretboard!
Step 1: Unlocking the Interval Logic of Musical Notes
The first step to mastering your bass guitar fretboard is understanding the fundamental building blocks of Western music: musical notes and their intervals. Fortunately, the system is quite straightforward. In most musical styles, you only need to learn 12 distinct notes. And the key to learning these efficiently is understanding the logical, almost alphabetical, way they are organized.
Tip: Think Alphabetically (A to G): If you know your alphabet, specifically the letters A through G, you’re already well on your way. Musical notes follow an alphabetical sequence: A, B, C, D, E, F, and G. These seven notes are known as the “natural notes” and correspond to the white keys on a piano.
This alphabetical sequence simply repeats itself as you go higher or lower in pitch: …, F, G, A, B, C, D, E, F, G, A, B, C, … and so on.
Now, what about those other notes? In addition to the natural notes, there are five more, known as sharps and flats. These are the notes “in between” the natural notes and correspond to the black keys on a piano. They are: A♯/B♭, C♯/D♭, D♯/E♭, F♯/G♭, and G♯/A♭. Notice that each of these notes has two names – a sharp and a flat. This is called enharmonic spelling. While they represent the same pitch, the “spelling” depends on the musical context. For now, don’t worry too much about when to use sharps or flats. Focus on learning the locations, and the spelling nuances will become clearer as you progress.
Whole Steps and Half Steps: The Fretboard’s Blueprint
Think about a piano keyboard again. You’ll notice black keys situated between most white keys, but there are two exceptions.
Crucial Tip: No Black Keys Between E-F and B-C: There’s no black key between the white keys E and F, and also no black key between B and C. This is a fundamental rule in music, and it directly translates to your bass guitar fretboard and guitar fretboards too!
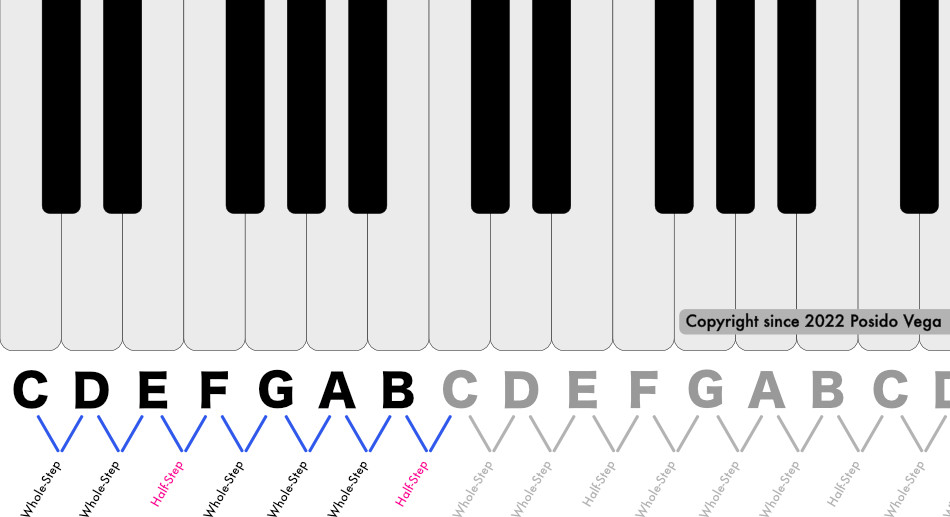 Piano keys – Whole-Step and Half-Step Diagram
This “no black key” rule defines the concept of whole steps and half steps. The distance between E and F is a half step, as is the distance between B and C. All other natural notes (like A to B, C to D, D to E, F to G, G to A) are a whole step apart.
On your bass guitar fretboard, a half step equals one fret, and a whole step equals two frets. This is the essential blueprint for navigating your fretboard. Let’s put this knowledge into practice and explore how it applies directly to your bass.
Step 2: Decoding the Logic of the Bass Guitar Fretboard
Let’s recap the key principles we just learned:
- Alphabetical Note Spelling: Musical notes are named in alphabetical order (A-G).
- Half-Step Intervals (E-F and B-C): The note pairs E-F and B-C are always a half step (one fret) apart.
- Whole-Step Intervals (Other Natural Notes): All other natural note pairs are a whole step (two frets) apart.
Now, here’s the core fretboard logic you absolutely need to internalize:
- Each Fret = Half Step: Moving one fret on your bass guitar fretboard always represents a half-step interval.
- Two Frets = Whole Step: Moving two frets always represents a whole-step interval.
On a standard four-string bass guitar, your open string notes, starting from the thickest string to the thinnest, are E, A, D, and G.
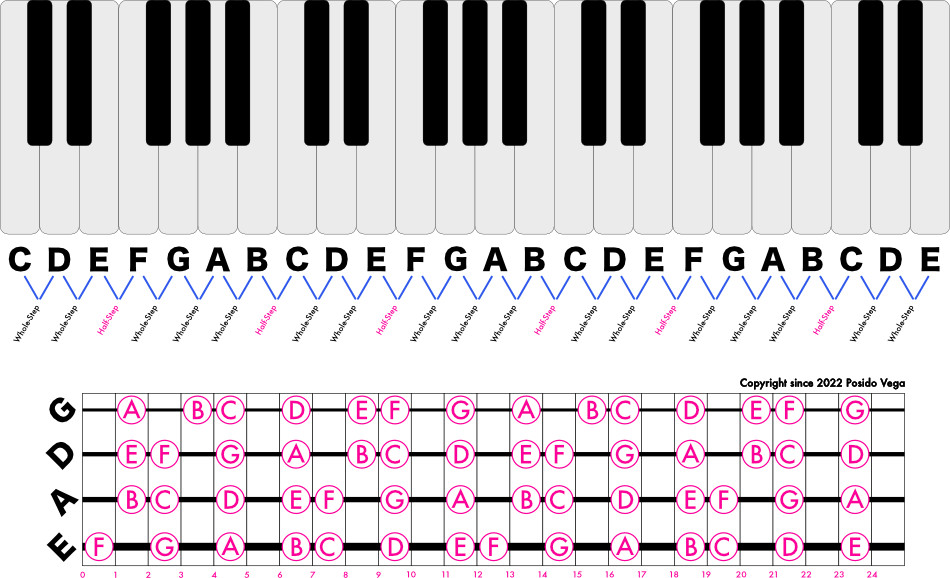 Bass Guitar Fretboard Notes and Piano Notes Diagram
Let’s start with the lowest string, the E string, to learn the notes. Remember the rule: E-F and B-C are half steps (one fret).
Finding the Notes on Your E-String (The Easy Way)
Starting with your open E-string as the note E, let’s find the other natural notes along this string.
- 1st Fret: One fret up from E is F (half step).
- 3rd Fret: Two frets up from F is G (whole step).
- 5th Fret: Two frets up from G is A (whole step).
- 7th Fret: Two frets up from A is B (whole step).
- 8th Fret: One fret up from B is C (half step).
- 10th Fret: Two frets up from C is D (whole step).
- 12th Fret: Two frets up from D is E (whole step).
And just like that, the pattern repeats! The 12th fret E is an octave higher than your open E-string.
Now, let’s apply the same logic to the A-string.
Finding the Notes on Your A-String (The Easy Way)
Starting with your open A-string as the note A:
- 2nd Fret: Two frets up from A is B (whole step).
- 3rd Fret: One fret up from B is C (half step).
- 5th Fret: Two frets up from C is D (whole step).
- 7th Fret: Two frets up from D is E (whole step).
- 8th Fret: One fret up from E is F (half step).
- 10th Fret: Two frets up from F is G (whole step).
- 12th Fret: Two frets up from G is A (whole step).
Again, the pattern repeats at the 12th fret, an octave higher than the open A-string.
Let’s continue with the D-string.
Finding the Notes on Your D-String (The Easy Way)
Starting with your open D-string as the note D:
- 2nd Fret: Two frets up from D is E (whole step).
- 3rd Fret: One fret up from E is F (half step).
- 5th Fret: Two frets up from F is G (whole step).
- 7th Fret: Two frets up from G is A (whole step).
- 9th Fret: Two frets up from A is B (whole step).
- 10th Fret: One fret up from B is C (half step).
- 12th Fret: Two frets up from C is D (whole step).
And finally, the G-string.
Finding the Notes on Your G-String (The Easy Way)
Starting with your open G-string as the note G:
- 2nd Fret: Two frets up from G is A (whole step).
- 4th Fret: Two frets up from A is B (whole step).
- 5th Fret: One fret up from B is C (half step).
- 7th Fret: Two frets up from C is D (whole step).
- 9th Fret: Two frets up from D is E (whole step).
- 10th Fret: One fret up from E is F (half step).
- 12th Fret: Two frets up from F is G (whole step).
By now, you should see the consistent patterns emerging across all strings. Understanding these whole-step and half-step relationships is the real key to unlocking your bass guitar fretboard.
Step 3: Leveraging Octaves as Fretboard Signposts
This next step is crucial for accelerating your bass guitar fretboard mastery. Octaves act like signposts, making navigation much faster and more intuitive. While other intervals can also be used as guides, octaves are particularly useful for beginners because they represent the same note, just at a higher or lower pitch, simplifying things initially.
An octave is a perfect interval representing the same note at double (or half) the frequency. Essentially, it’s the “same” note, just higher or lower. There are many octaves available on your bass guitar fretboard, and learning their locations is a game-changer.
Here are some easy-to-remember octave shapes on the fretboard:
- Shape 1: 2 Up, 2 Up: From any note, go two frets higher and two strings towards the thinner strings to find an octave higher.
- Shape 2: 2 Down, 2 Down: Conversely, from any note, go two frets lower and two strings towards the thicker strings for an octave lower.
- Shape 3: 3 Down, 3 Up: From any note, go three frets lower and three strings towards the thinner strings for an octave higher.
- Shape 4: 3 Up, 3 Down: From any note, go three frets higher and three strings towards the thicker strings for an octave lower.
- Shape 5: 5 Down, 1 Up: From any note, go five frets lower and one string towards the thinner strings for an octave higher.
- Shape 6: 5 Up, 1 Down: From any note, go five frets higher and one string towards the thicker strings for an octave lower.
- Shape 7: 7 Up, 1 Up: From any note, go seven frets higher and one string towards the thinner strings for an octave higher.
- Shape 8: 7 Down, 1 Down: From any note, go seven frets lower and one string towards the thicker strings for an octave lower.
Practice these octave shapes across the fretboard. Start with a known note, like open E, find its octave using different shapes, and then identify the note name at the octave location. This exercise will solidify your understanding of both note locations and octave relationships.
Step 4: Practical Application in Musical Contexts
While understanding the logic and octave shapes is essential, the real breakthrough in bass guitar fretboard mastery comes from applying this knowledge in actual musical situations. Step 4 is all about taking your theoretical understanding and making it practical and intuitive.
Key Tip: Play, Play, Play! There’s simply no substitute for putting in the practice time on your bass. You need to actively engage with the fretboard, applying the logic and octave shapes you’ve learned.
The more you practice applying your fretboard knowledge, the more ingrained it will become. Eventually, note recognition will become second nature, allowing you to focus on musicality and expression rather than searching for notes.
Incorporate fretboard practice into your regular routine. Use simple bass lines, scales, and arpeggios as exercises. As you play, consciously think about the note names, intervals, and octave relationships.
For example, practice a simple bass line in one octave, then immediately try playing it an octave higher or lower, utilizing the octave shapes you learned. Use a metronome to keep time and develop your rhythmic accuracy while simultaneously working on fretboard knowledge.
By actively applying your knowledge while playing music, you’ll rapidly accelerate your fretboard learning and transform your ability to navigate the bass guitar fretboard with confidence and ease.
(Bonus) Step 5: Verbalize Your Fretboard Knowledge
Here’s a bonus tip that can significantly enhance your fretboard learning: actively say the note names aloud as you practice.
Each time you practice, dedicate a few minutes to consciously naming each note you play. Practice slowly and deliberately, prioritizing accuracy over speed.
Focus on Accuracy, Not Speed: The goal is to build a solid connection between the fretboard locations, note names, and your auditory recognition of the notes.
This technique reinforces your learning in multiple ways: you engage your visual memory (seeing the fretboard), kinesthetic memory (muscle memory of playing), and auditory memory (hearing the notes), and verbal memory (saying the names). This multi-sensory approach significantly speeds up the learning process.
When learning to read music notation, verbalizing note names is particularly helpful in connecting the written notes to their fretboard positions. Even during band rehearsals, jam sessions, or live performances (when appropriate), mentally naming the notes you are playing can be a powerful way to reinforce your fretboard knowledge in real-time musical contexts. This forces you to think on your feet and strengthens your fretboard recall under pressure.
Your Journey to Fretboard Mastery Starts Now
Understanding the logic of the bass guitar fretboard and utilizing octave signposts are powerful tools. But ultimately, the real progress comes from consistent practice and application.
Mastering your bass guitar fretboard is essential for unlocking your full potential as a bassist. It empowers you to improvise freely, read music fluently, and confidently play along to chord charts while maintaining solid timing and groove.
So, take these steps, start practicing, and you’ll be amazed at how quickly your fretboard knowledge grows. Dedicate time and effort, and you’ll see significant progress in weeks, not years.
For more resources and in-depth bass lessons, explore My Sandbox.
Frequently Asked Questions About the Bass Guitar Fretboard
What are the Notes on a Bass Guitar in Standard Tuning?
The open strings of a standard 4-string bass guitar, from thickest to thinnest, are tuned to the notes E, A, D, and G.
For a 5-string bass, the strings are tuned to B, E, A, D, and G (adding a low B string).
A 6-string bass typically adds both a low B and a high C string, resulting in the tuning B, E, A, D, G, and C.
Standard bass tuning is in fourths, meaning the interval between each consecutive open string is a perfect fourth. Understanding fourth intervals can also be a helpful pattern for navigating the fretboard across strings, similar to octaves.
What’s the Most Effective Way to Memorize Bass Guitar Notes?
A common question is, “How do I memorize all the notes on the bass guitar?” However, rote memorization isn’t the most effective approach.
Instead of focusing on sheer memorization, prioritize understanding the underlying logic of note spellings and the fretboard layout. Once you grasp these principles, the note locations will naturally make sense and become easier to recall.
Develop good practice habits: pay attention to patterns, recognize shapes (like octave shapes), and consistently name the notes you play. Trust the learning process.
True “memorization” arises organically when you find meaning and relationships in the information. Recognizing patterns and shapes on the bass guitar fretboard is key to establishing these mental connections.
How Can I Quickly Find Any Note on the Bass Guitar?
The key to quickly finding notes on your bass guitar fretboard is to understand the instrument’s layout. Remember that a standard 4-string bass is tuned E-A-D-G. The fretboard, like a piano, is organized by whole and half steps. All natural notes are a whole step apart, except for E and F (half step) and B and C (half step). Every fret represents a half step. By combining your knowledge of open string notes, whole/half step intervals, and octave shapes, you can quickly locate any note on your bass guitar fretboard.