
The A# minor chord (A#m) is a fundamental chord for guitarists across various genres. As part of the minor chord family, A#m adds depth and emotion to your playing. This comprehensive guide will break down the A#m chord, covering its construction, various positions on the fretboard, and practical tips to help you master it.
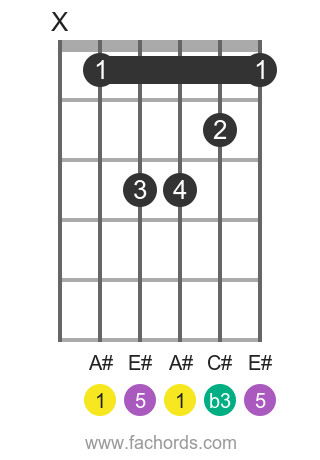 A#m position 1 guitar chord diagram
Understanding the theory behind the A#m chord will significantly enhance your learning process. The A#m chord is built upon three notes: A#, C#, and E#. These notes are derived from specific intervals: the root (1), the minor third (b3), and the perfect fifth (5). If you’re interested in delving deeper into chord construction and interval stacking, explore our detailed guide on building chords with intervals. This knowledge will provide a solid foundation for understanding not just A#m, but all guitar chords.
Once you grasp the theoretical framework, learning to play the A#m chord becomes much more intuitive. We’ll guide you through various positions using chord diagrams and fretboard patterns. These visual tools clearly illustrate finger placement on the fretboard. If you’re unfamiliar with reading chord diagrams, our tutorial on chord notation will provide the necessary clarity.
The A#m chord is a versatile tool in your musical arsenal. It’s frequently used in rock, pop, blues, and even jazz music. Once you’re comfortable with A#m, consider exploring jazz chord progressions, where this chord often plays a key role.
Remember, learning guitar chords is a progressive journey. Each new chord you master is a step forward in your musical development. Let’s dive into the specifics of the A#m chord and get you playing!
The Notes of the A#m Chord:
- A# (Root)
- C# (Minor Third)
- E# (Perfect Fifth)
Understanding Minor Chord Construction:
Minor chords, like A#m, are defined by their characteristic minor third interval. Here’s a breakdown of the intervals that create a minor chord:
| Interval | Degree |
|---|---|
| Root | 1 |
| Minor Second | b2 |
| Major Second | 2 |
| Minor Third | b3 |
| Major Third | 3 |
| Perfect Fourth | 4 |
| Diminished Fifth | b5 |
| Perfect Fifth | 5 |
| Augmented Fifth | #5 |
| Major Sixth | 6 |
| Minor Seventh | b7 |
| Major Seventh | 7 |
The chord diagrams below are arranged from easiest to more challenging positions. If you’re new to reading these diagrams, refer to our guide on how to read chord diagrams. For players who find barre chords difficult, our Bar Chords Tips tutorial offers valuable techniques and exercises. Additionally, you can explore our accessible chords page for textual instructions and diagrams.
Position 1: Open Position (Movable Shape)
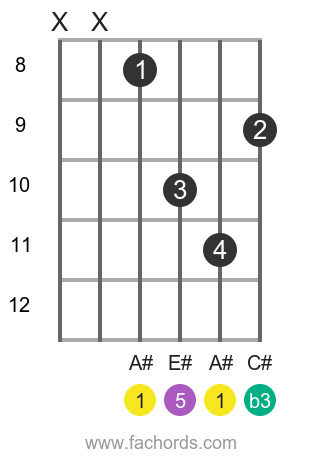 A#m position 3 guitar chord diagram
This position, while displayed here at the 4th fret to represent A#m, utilizes a movable minor chord shape. To play A#m in this position, place your index finger on the 4th fret of the B string, your middle finger on the 5th fret of the D string, and your ring finger on the 5th fret of the G string. Strum all six strings, but be mindful to mute the low E string with the side of your index finger if needed for cleaner sound. This shape can be moved up and down the neck to create other minor chords.
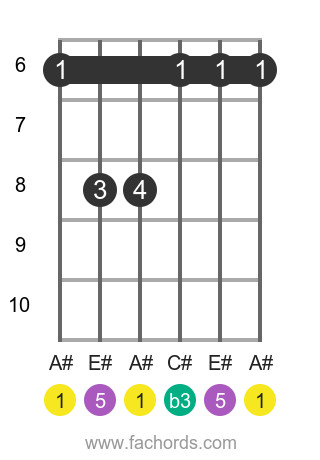
Position 2: Barre Chord (Movable Shape)
 A#m position 4 guitar chord diagram
Position 2 utilizes a barre chord shape, also movable. For A#m, barre across all six strings at the 6th fret with your index finger. Then, place your middle finger on the 7th fret of the B string, your ring finger on the 8th fret of the D string, and your pinky finger on the 8th fret of the G string. This is a powerful and versatile barre chord shape that can be transposed to create various minor chords across the fretboard.
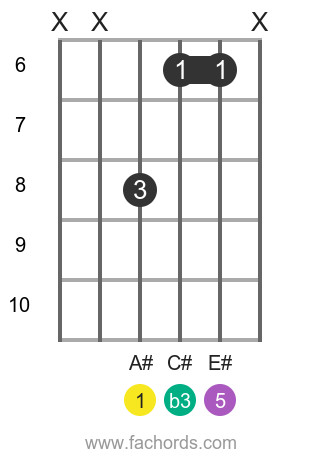
Position 3: Barre Chord (Movable Shape)
A#m position 1 guitar chord diagram
Position 3 is another common barre chord shape. Barre across the 1st fret with your index finger. Place your ring finger on the 3rd fret of the A string and your pinky finger on the 3rd fret of the D string. Strum from the A string downwards (strings 5-1). This shape is also movable and is rooted on the 5th string.
Position 4: Barre Chord (Movable Shape)
 A#m position 2 guitar chord diagram
Position 4 employs another barre chord variation. Barre across all six strings at the 6th fret. Place your middle finger on the 7th fret of the G string, your ring finger on the 8th fret of the low E string, and your pinky finger on the 8th fret of the A string. This shape provides a fuller, lower register voicing of the A#m chord.
Explore our extensive guitar chords library for even more chord shapes and variations. For a handy reference, download our Free Guitar Chords Chart PDF.
Explore A#m with Different Roots:
Broaden your musical vocabulary by playing minor chords with different root notes. Here are some common minor chords to explore:
Cm | Dm | Em | Fm | Gm | Am | Bm | C#m | D#m | F#m | G#m | A#m | Abm | Bbm | Dbm | Ebm | Gbm
Experiment with the fretboard map below to discover new voicings and inversions of the A#m chord.
[Fretboard Map Image – Consider adding an interactive fretboard map if feasible, or a static image if not. Since I cannot create interactive elements, I will omit this and the related text below as it requires an image I cannot generate effectively within this text-based response.]
Mastering the A#m Guitar Chord opens up a world of musical possibilities. Practice these positions, understand the theory, and you’ll be incorporating this essential chord into your playing in no time. Happy playing!