3D printing an electric guitar was a long-held ambition, yet fraught with uncertainties. Could a 3D-printed body withstand string tension? Would it warp over time? Were specialized pickups necessary? And crucially, could a plastic body produce a sound comparable to traditional tonewoods? Online resources offered limited answers, fueling more questions than resolutions.
While not the first to explore this frontier, many existing 3D printed guitar projects fell short. Some designs, though visually appealing, lacked playability. Others, despite their promise, were hindered by unavailable 3D models, absent instructions, excessive complexity, or prohibitive costs.
This landscape sparked a decisive thought: I will design my own 3D printable electric guitar from the ground up.
Design Priorities for a 3D Printed Guitar
My design process centered around accessibility for the 3D printing community. The goal was to create a project easily replicable, empowering others to build their own exceptional guitars. Before commencing design work, I established a clear set of priorities:
- Simplicity:
- Avoid intricate assemblies with numerous parts.
- Prioritize straightforward construction.
- Eliminate non-essential hardware like metal reinforcement rods.
- Affordability:
- Keep costs low. A high budget would negate the DIY appeal, making a traditional guitar purchase more sensible.
- Hardware Accessibility:
- Utilize components readily available with global shipping.
- Printability on Common 3D Printers:
- Ensure all parts fit within the build volume of an Original Prusa i3 MK3S+ (25×21×21 cm). This constraint, while challenging, maximizes accessibility for home users.
- Playability and Tuning Accuracy:
- The final product must be a genuinely playable instrument, capable of maintaining tune across its entire range, not just a novelty item.
- Aesthetically Appealing Design:
- The guitar should have a visually striking and cool aesthetic.
Simplifying the 3D Printed Guitar Design
The primary concern from the outset was the considerable force exerted by the strings on the guitar body and neck. While sources vary slightly, the consensus points to approximately 50 kg of load, contingent on string gauge (thickness). This force attempts to fold the guitar, pull the bridge from the body, and severely bow the neck.
The neck issue presented a straightforward solution: utilizing a real wooden neck. While deviating slightly from a purely 3D-printed instrument, the neck’s critical role and delicate nature justified this compromise. Printing a neck, while technically feasible, could jeopardize the entire project. Wooden necks offer superior smoothness, straightness, durable metal frets, and an integrated truss rod for relief adjustment.
Addressing the bridge presented a more complex challenge. The bridge, a small metal component, anchors the strings at the body’s lower end, typically secured with screws. Examining common guitar designs, the Telecaster bridge emerged as the ideal candidate for a 3D printed guitar. Can you guess why?
Most common guitar bridges are compact, often held by just two screws. However, the Telecaster bridge stands apart. This substantial metal plate not only secures the strings but also incorporates the bridge pickup and boasts up to five mounting holes with widely spaced screws. This design distributes leverage effectively across the plate and the underlying printed body section.
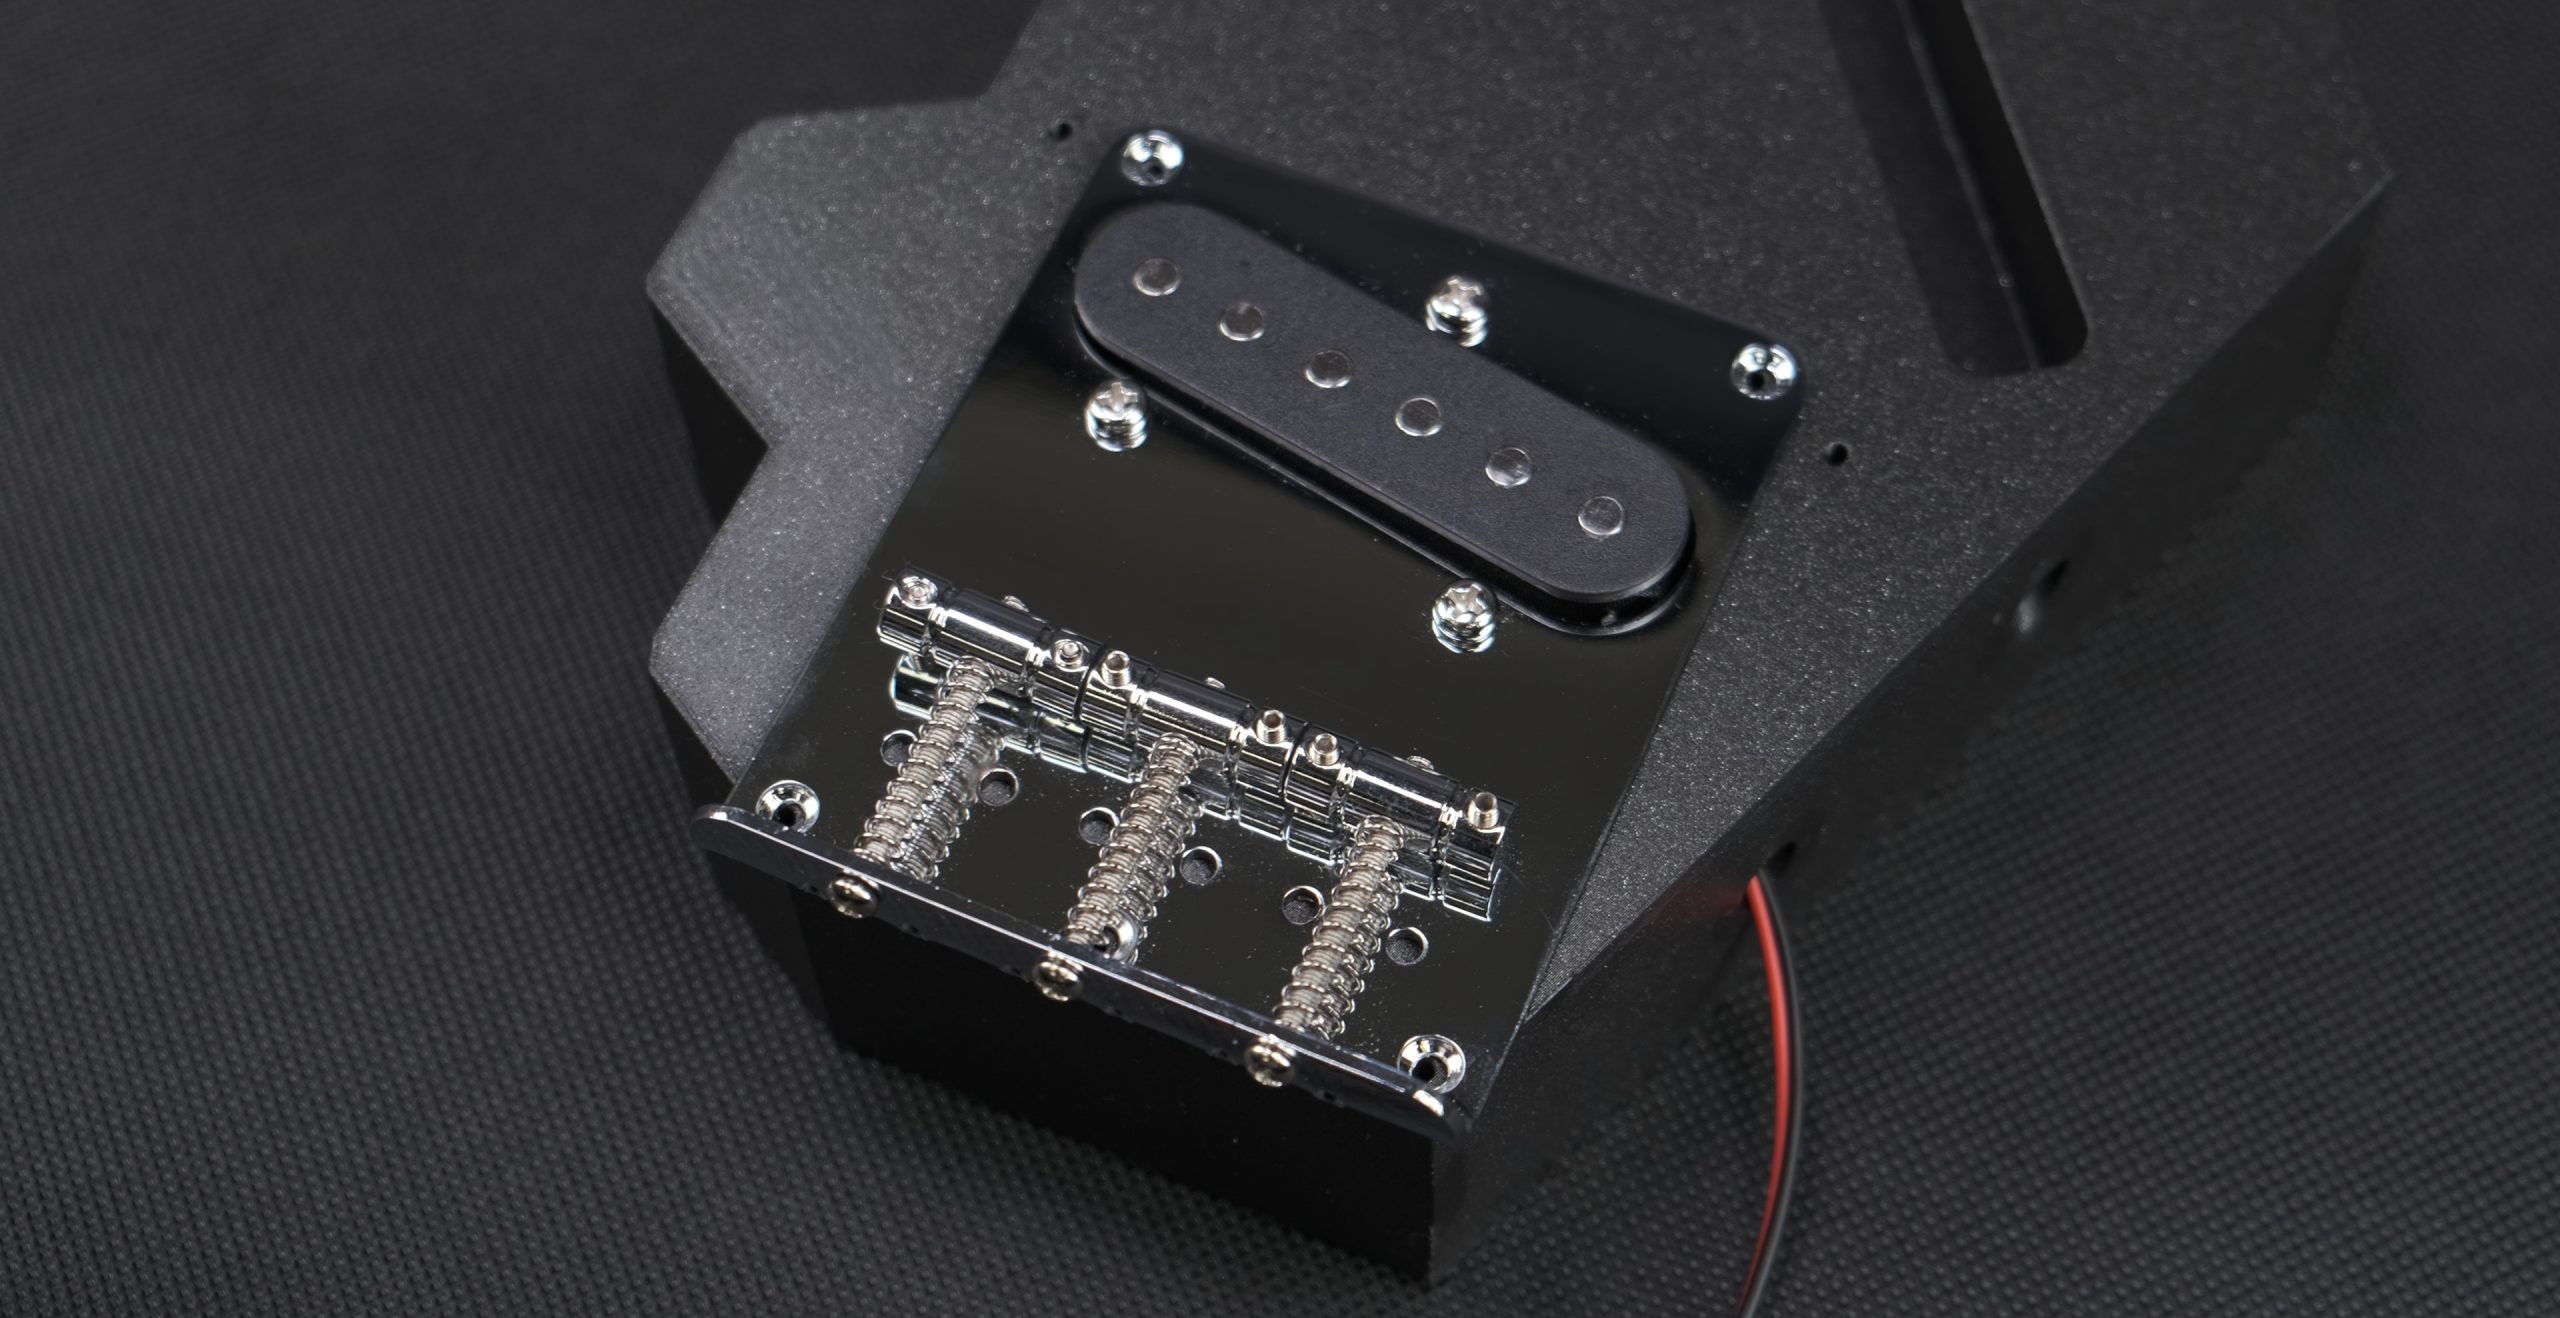
Image alt: Telecaster Guitar Bridge Design for 3D Printed Guitar Body
Furthermore, the Telecaster’s single additional pickup simplifies wiring and design. The volume and tone knobs, along with the pickup selector switch, are also mounted on a separate metal plate, attached to the body with just two screws. This significantly streamlines the project by avoiding individual integration of multiple knobs and switches.
Previous explorations at Prusa Research included successful 3D printed guitar picks and various guitar accessories like capos and strap locks, demonstrating the potential of 3D printing for guitar components. These prior projects informed the current endeavor.
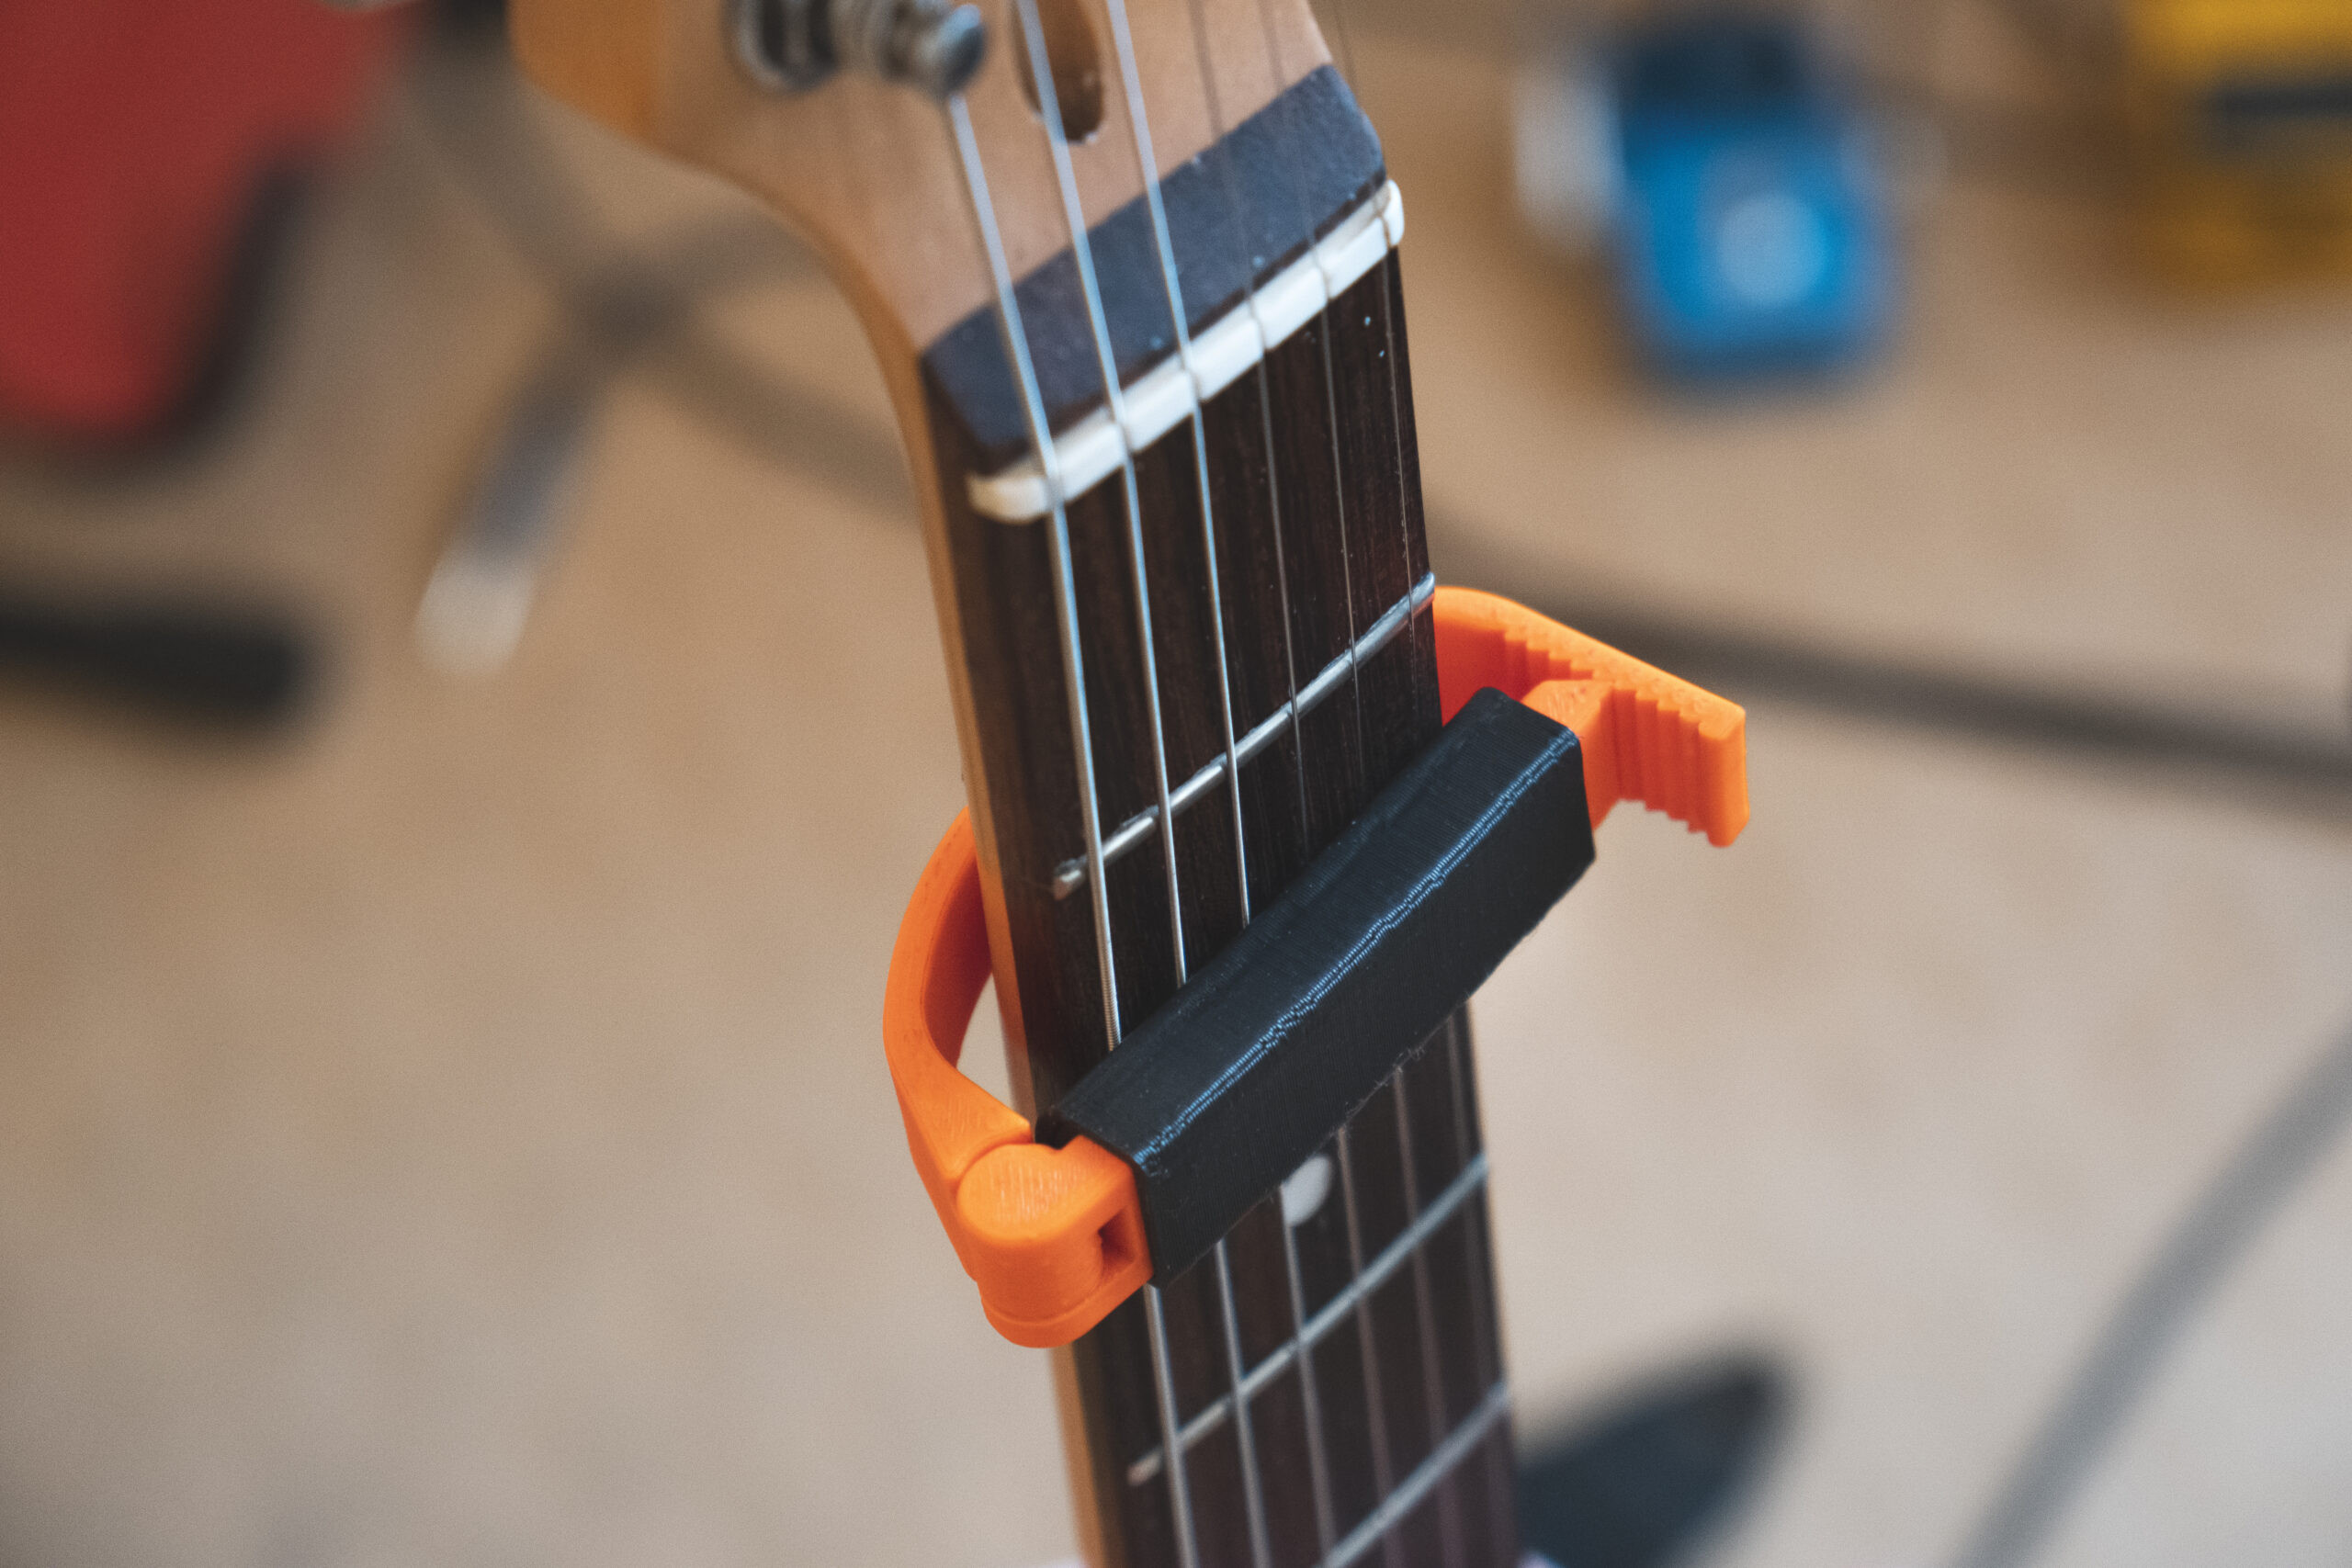
Image alt: 3D Printed Guitar Accessories Including Picks and Capos
Sourcing Hardware for Your 3D Printed Guitar
Choosing Telecaster-style hardware necessitates sourcing the components. Generally, three options exist:
- Dismantle a budget Telecaster guitar for parts.
- Purchase components individually.
- Acquire a Telecaster hardware kit.
Disassembling a functional guitar solely for parts seems wasteful, except perhaps when salvaging a severely damaged instrument with intact hardware and neck.
Buying individual components is viable but can become expensive. Essential parts include:
- Guitar neck with tuners
- Standalone single-coil pickup
- Bridge with integrated single-coil pickup
- Telecaster control plate with 3-way switch and two knobs
- Output jack
The drawback is the cumulative cost. Even with budget options, individual component purchases can easily reach several hundred dollars.
The game-changer for this project was discovering The Harley Benton Electric Guitar Kit T-Style! At a mere $79, this kit includes all necessary hardware, pre-wired with simple snap-together connectors. Offered by Musikhaus Thomann, a major global music retailer based in Germany, the kit also meets the requirement of worldwide shipping.
Its affordability and convenience were compelling, making it an essential purchase. This kit transformed the project into a remarkably simple “order and print” endeavor. The Harley Benton kit includes a basic, unpainted wooden body. While surprisingly included at this price point, it was deemed expendable in favor of a 3D-printed body.
Basic Design of the 3D Printed Guitar Body
Fusion 360 was used to design the guitar body, prioritizing accurate placement of screw holes, neck mounting interface, and electronics cavities.
The included wooden body from the kit proved invaluable. By photographing it with a ruler from a distance (minimizing perspective distortion), and utilizing Fusion 360’s “Calibrate” feature, a precise template was created. Calibrating across the 50cm ruler length maximized accuracy.
Hole positions were traced in a 2D drawing, and digital calipers verified feature distances, comparing them to the drawing. Bridge position accuracy was paramount, ensuring alignment with the neck for string centering and correct distance for proper intonation – the 12th fret precisely bisecting the string length. Telecaster bridges offer intonation adjustability, but accurate initial positioning is crucial.
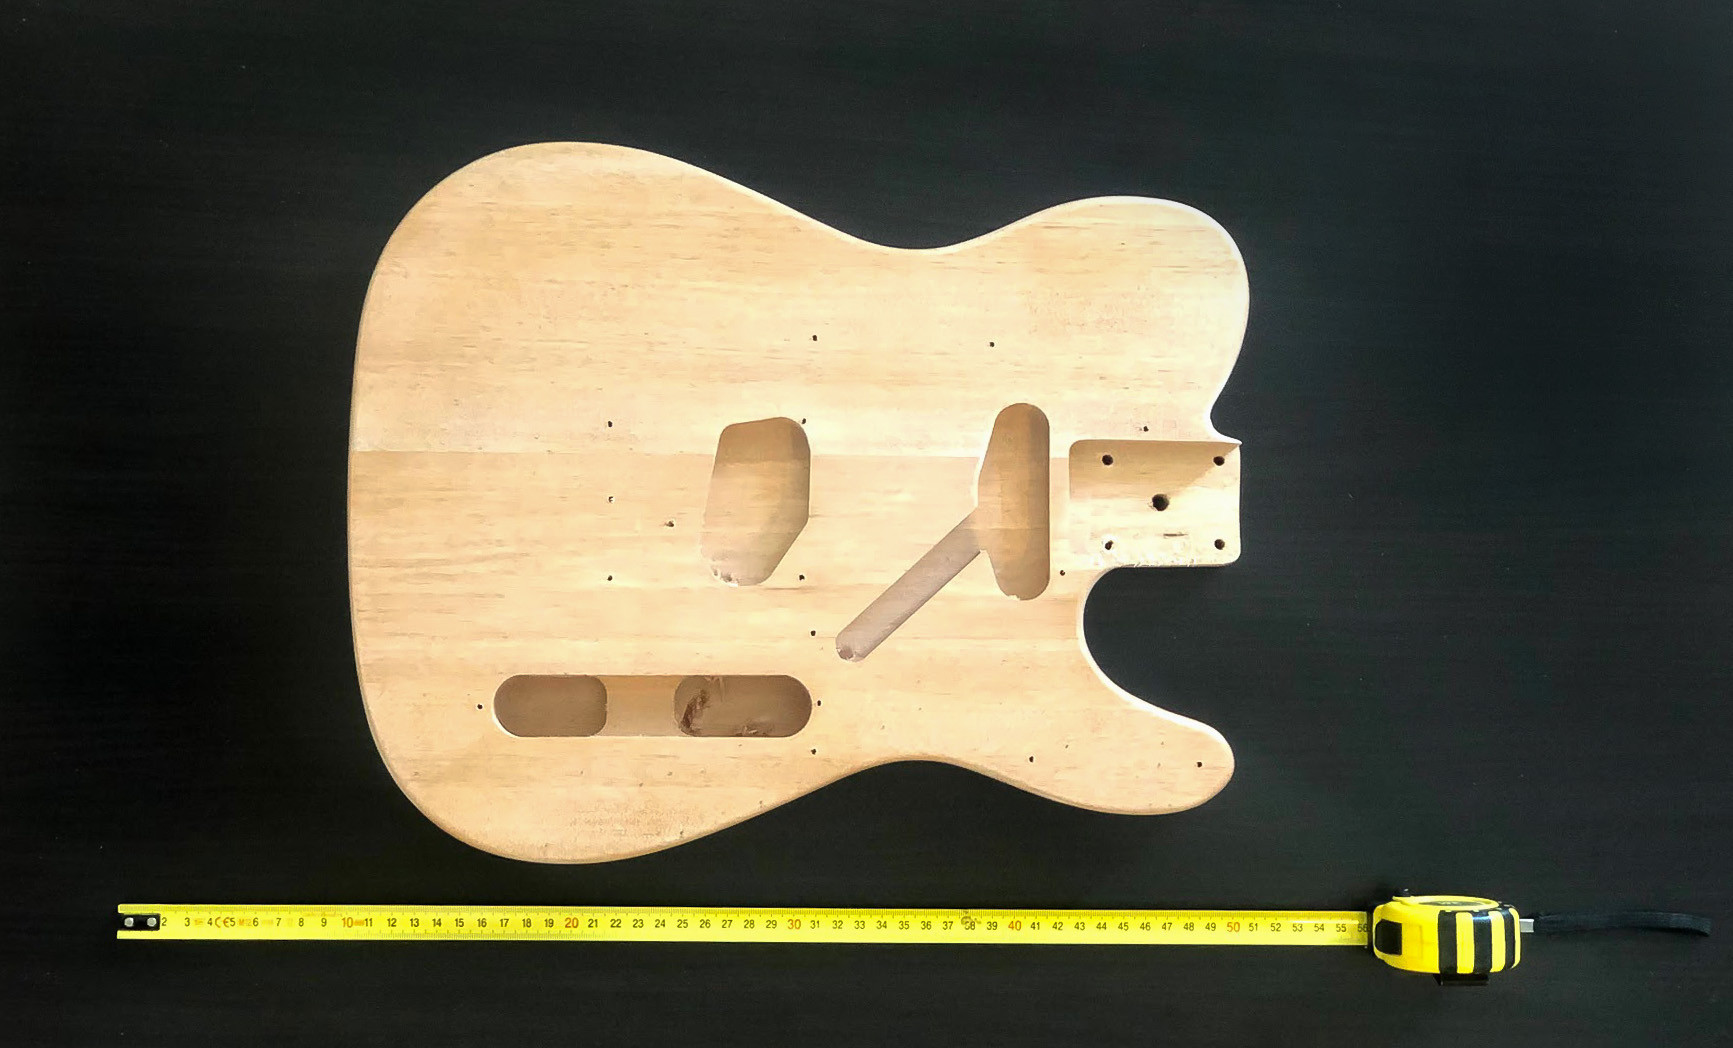
Image alt: Measuring Guitar Body Dimensions for 3D Print Design
With mounting holes defined, creative design could commence. While utilizing Telecaster hardware, a departure from the traditional Telecaster shape was desired. 3D printing allows for limitless shapes, making imitation unnecessary.
Inspired by Fender Jazzmaster and Mustang guitars, the Spline tool in Fusion 360 facilitated a similar body contour.
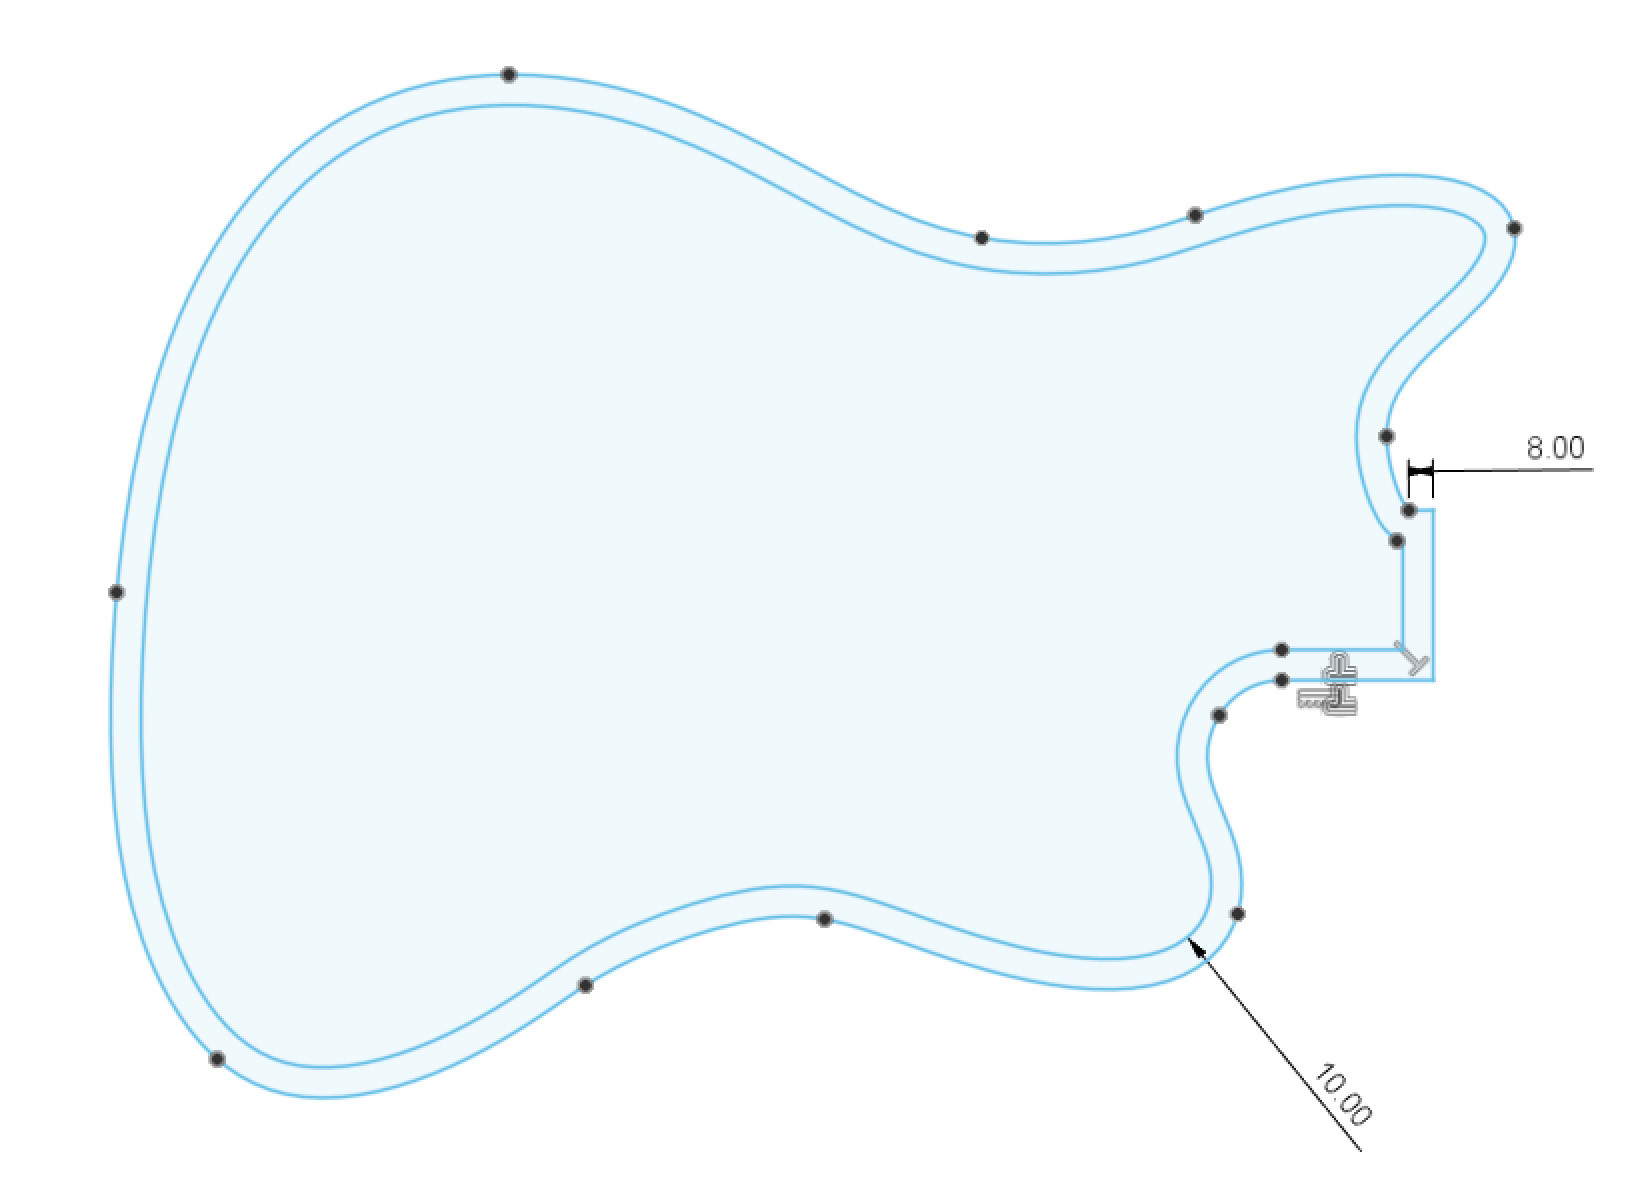
Image alt: Basic Guitar Body Shape Design in Fusion 360 for 3D Printing
A standard guitar body thickness of 45mm was extruded from the sketch. Holes and electronics slots were then extruded using the prepared template. Considering wiring needs, cylindrical subtractions created “tunnels” between cavities. Pickup slots were made slightly oversized, as the bridge and pickguard would cover them. A larger hole connected to the control plate slot for the output jack. This completed the basic guitar model.
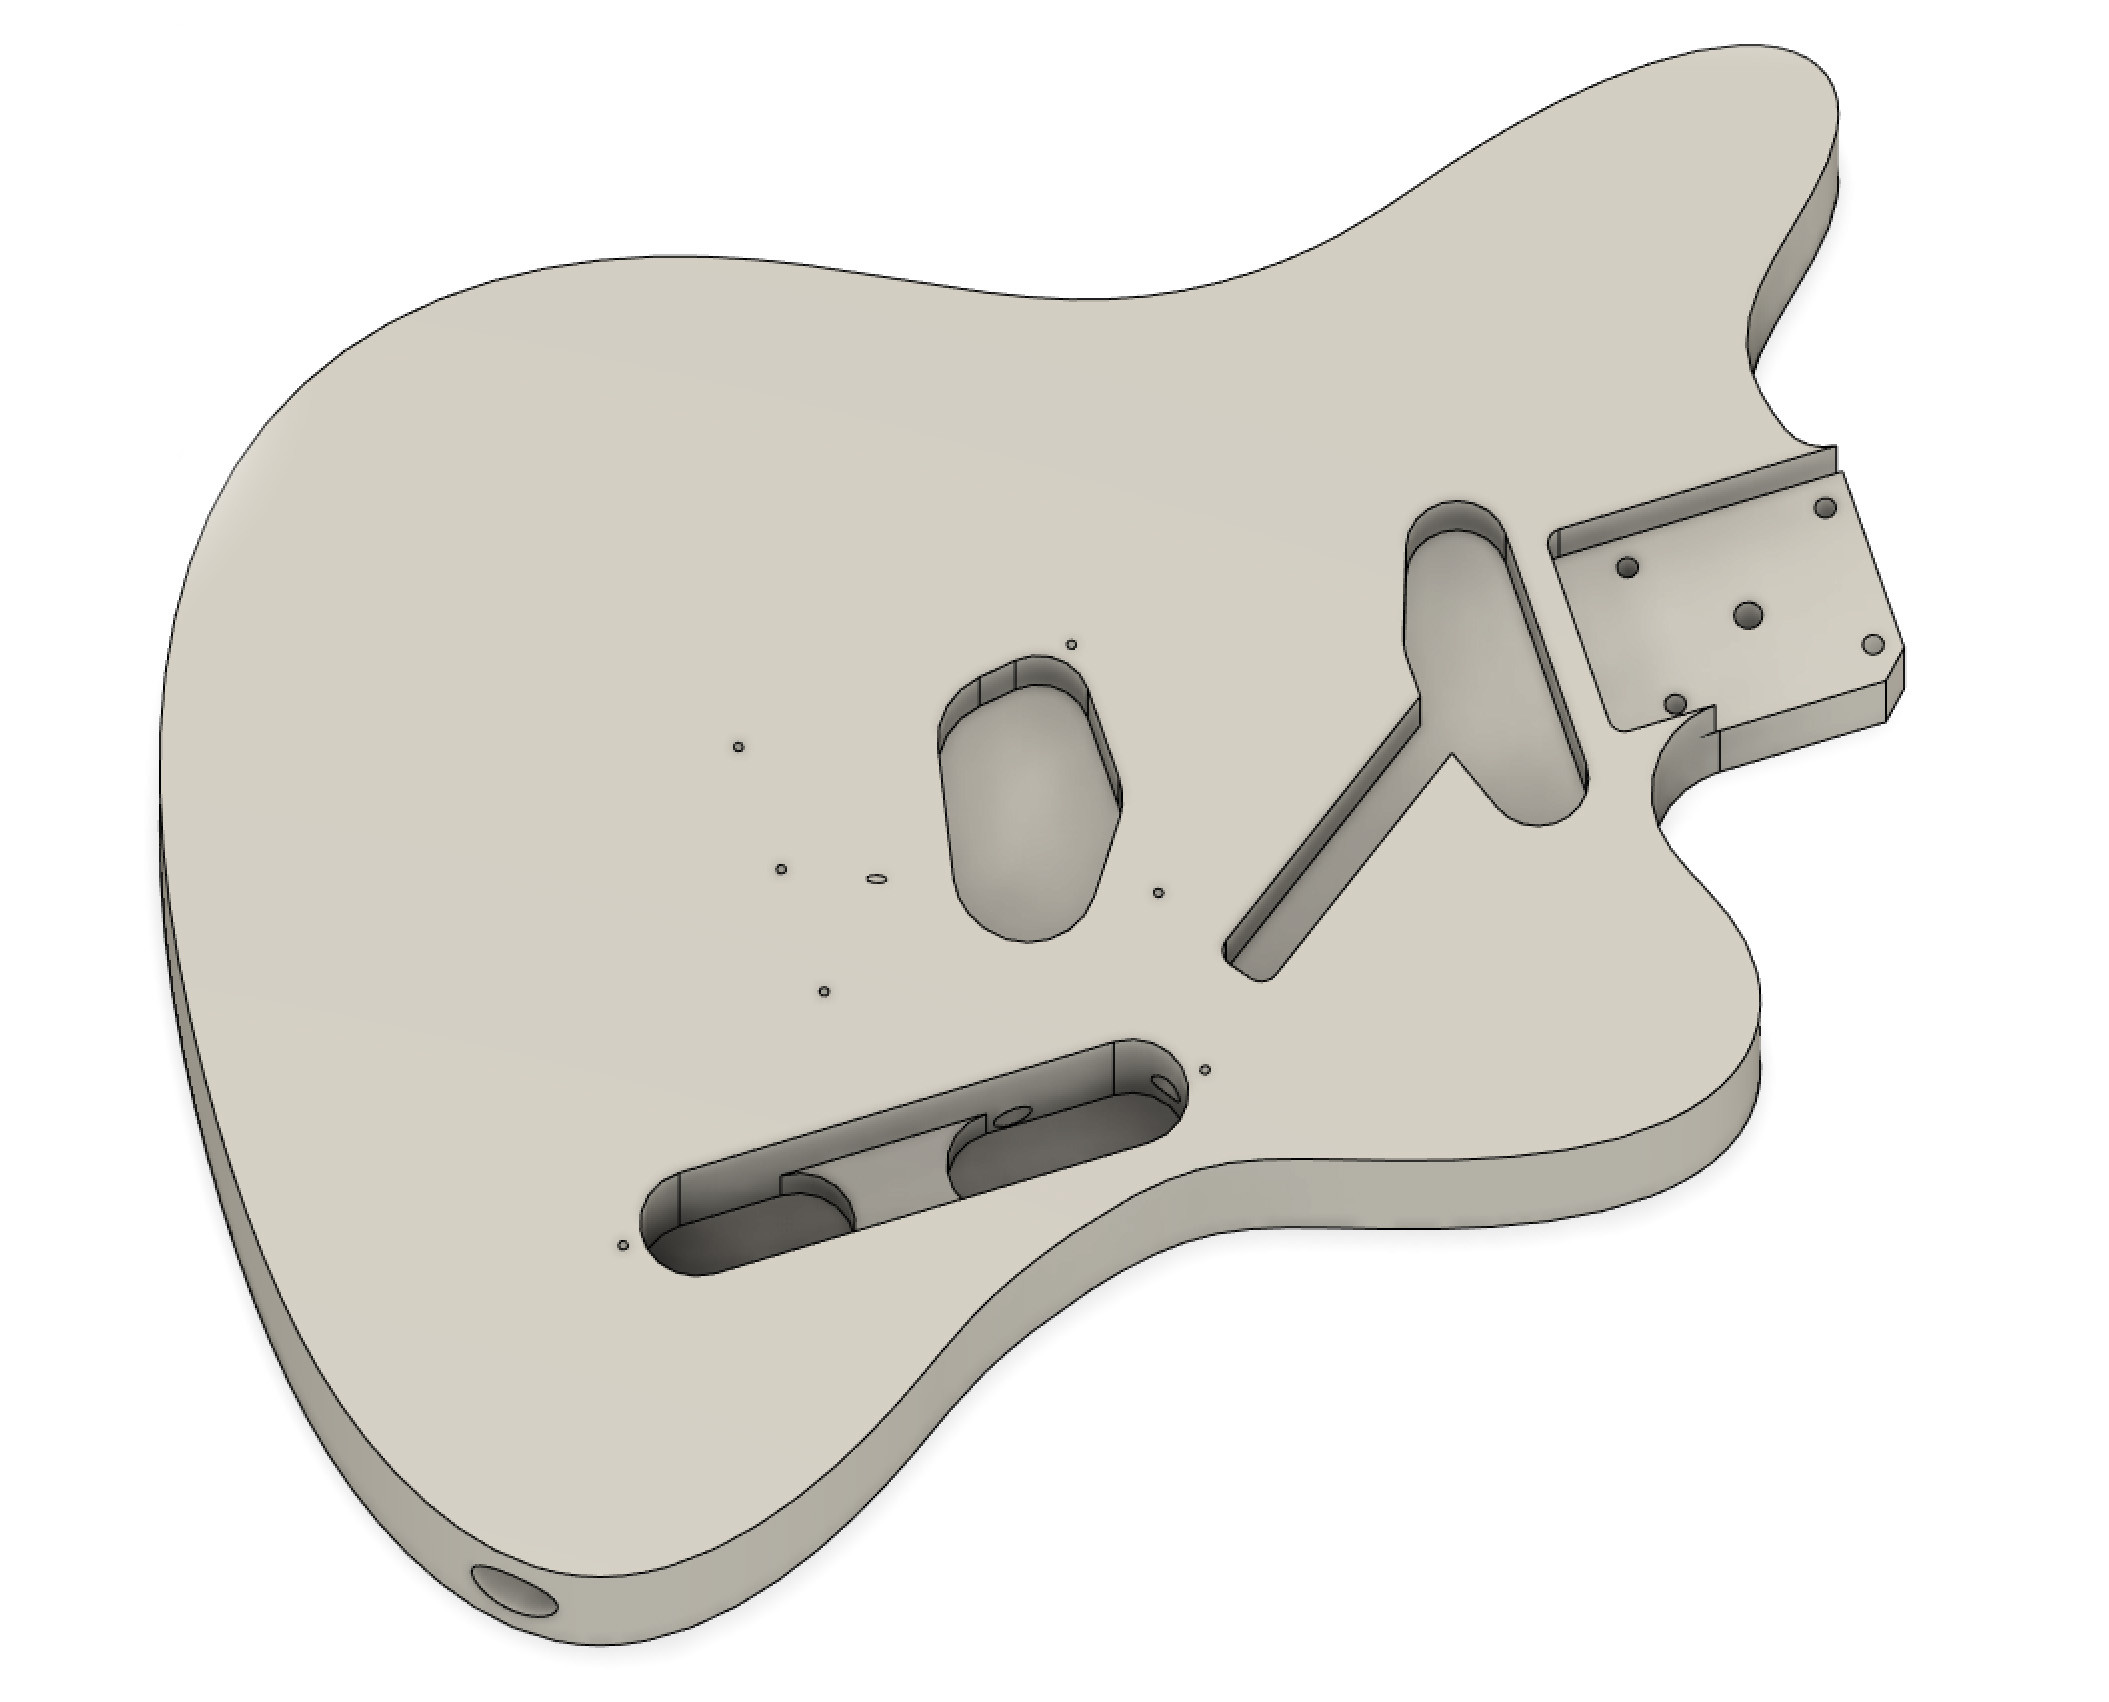
Image alt: Extruded 3D Guitar Body Design Ready for Splitting into Printable Parts
However, the model was too large for most desktop 3D printers, even exceeding the Original Prusa XL’s build volume. Sectioning the model into smaller, printable parts was necessary.
Beyond size, the design lacked visual flair. Leveraging 3D printing’s design freedom, various cutouts were explored, ultimately settling on hexagons. This choice offered functional benefits: hexagon edges facilitated model splitting into multiple parts, with seams appearing as intentional design elements. A prominent chamfer along the top edge enhanced playing comfort.
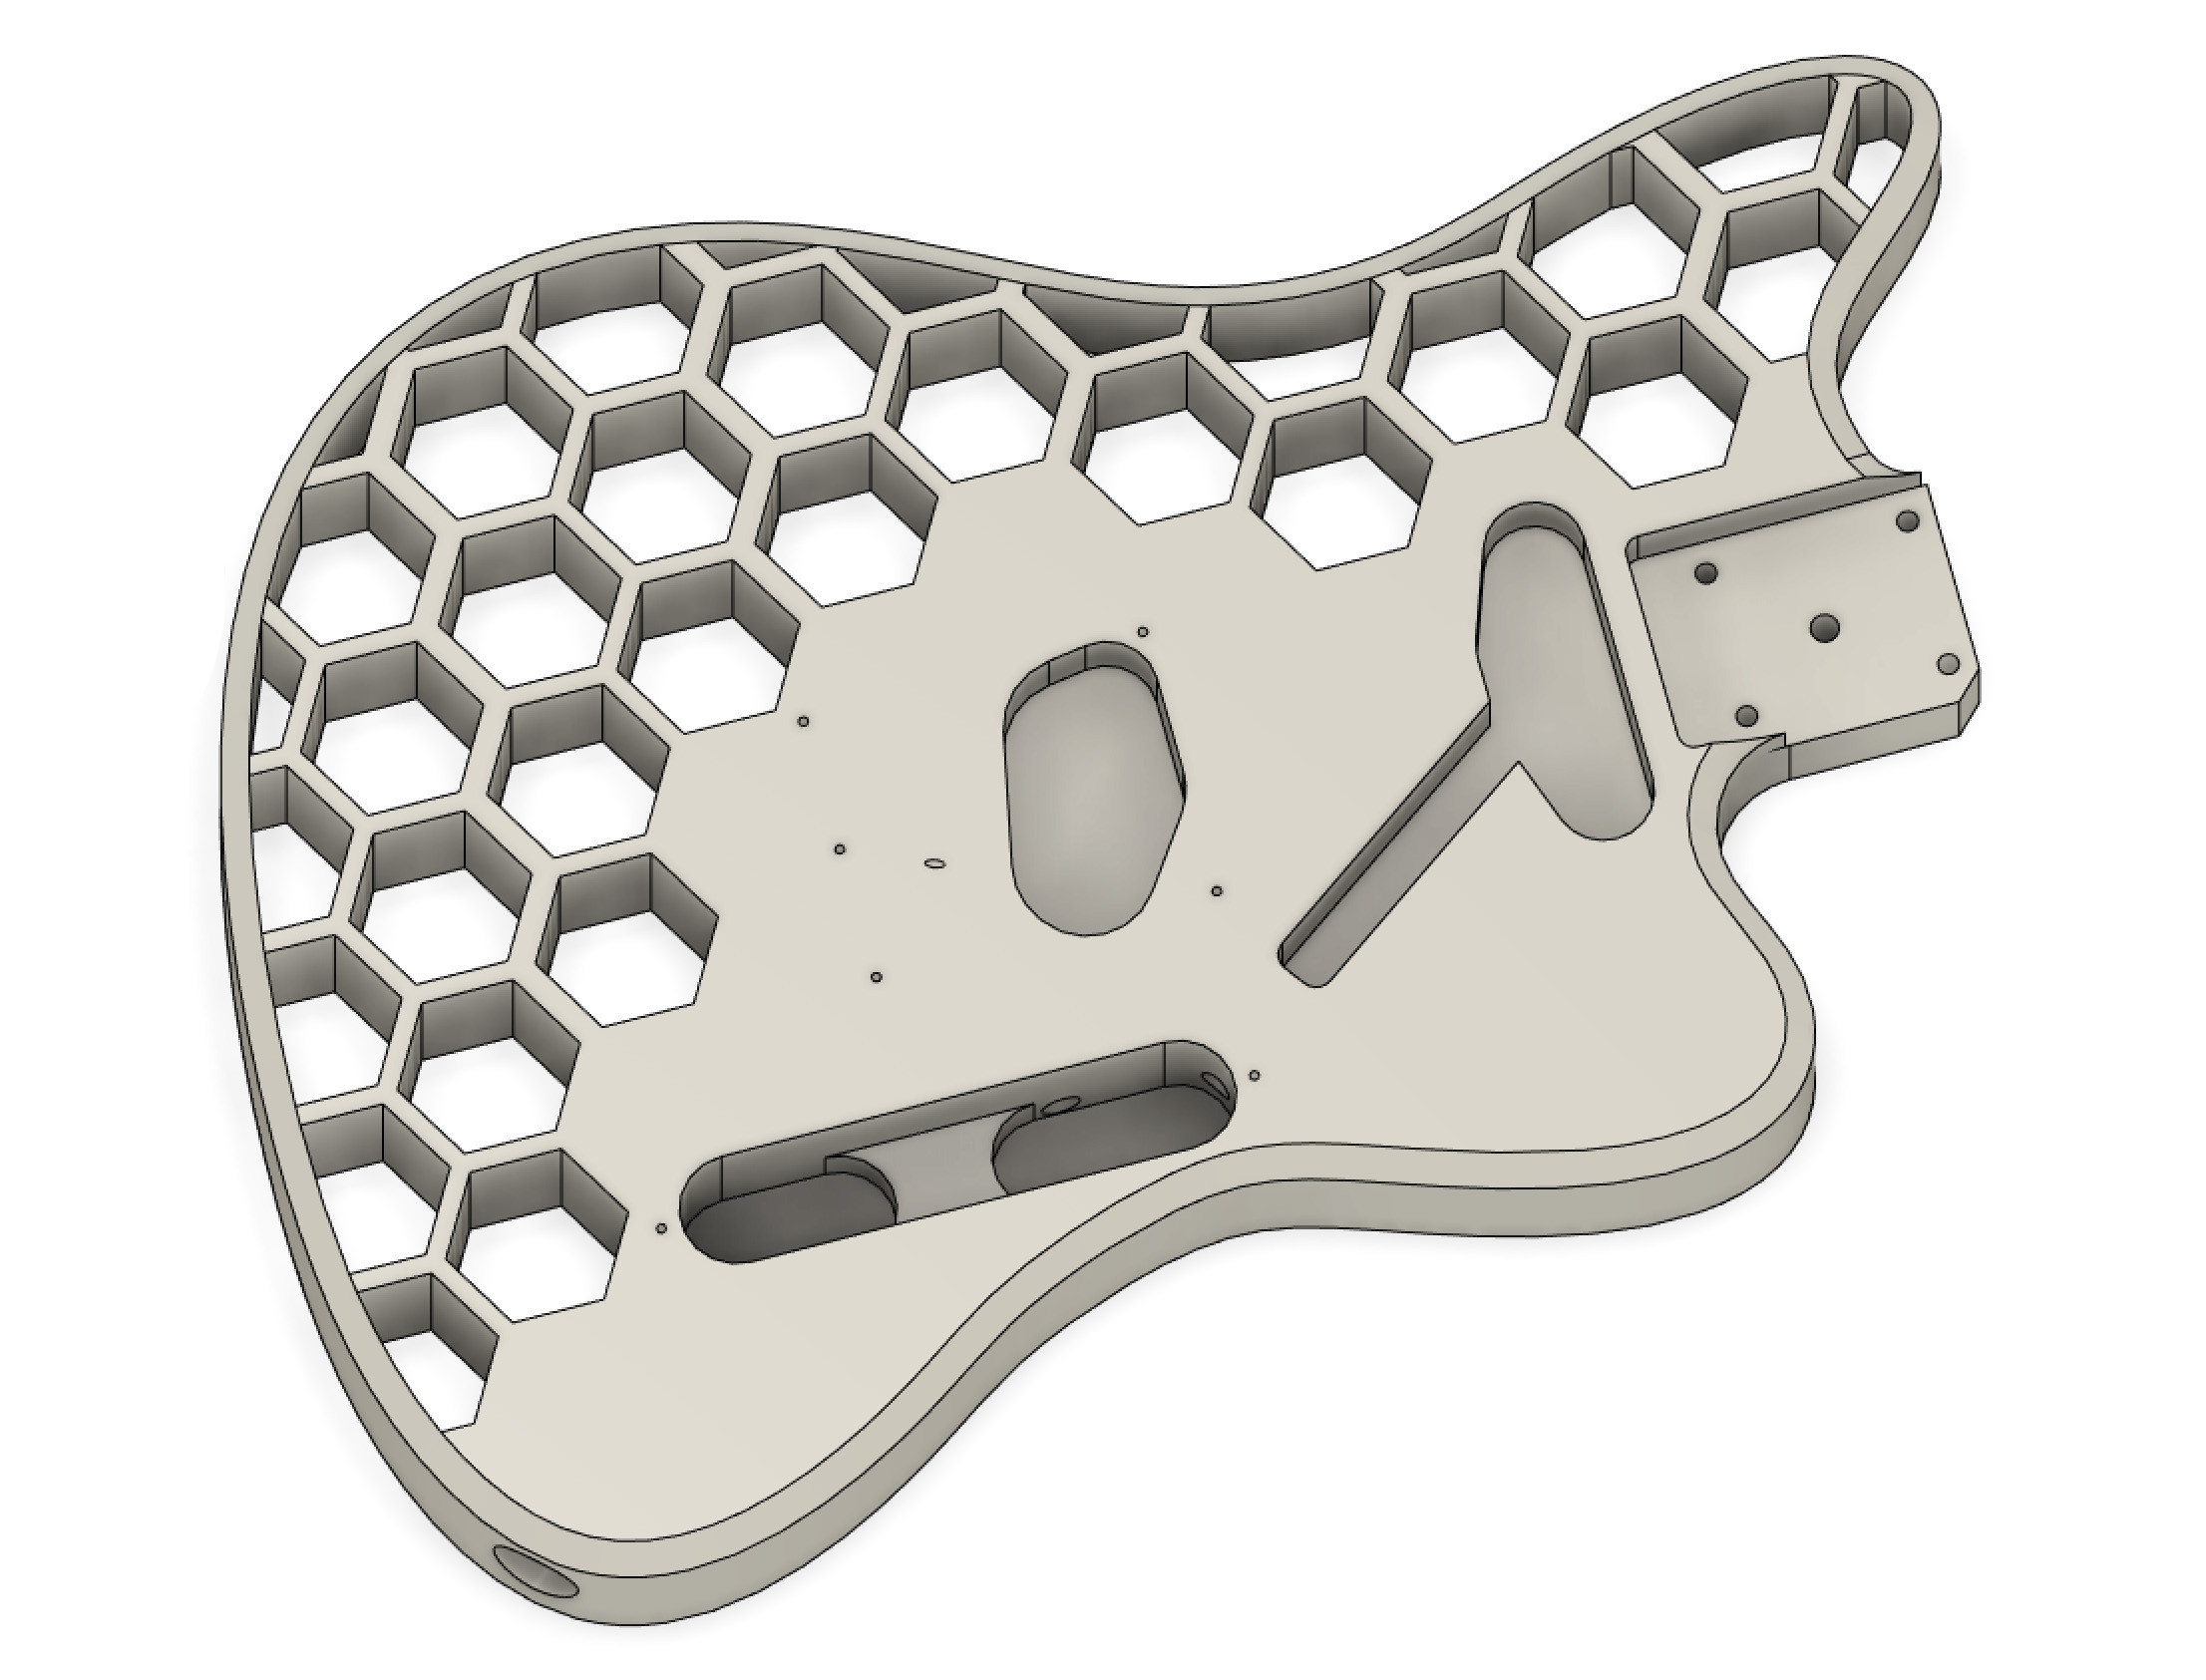
Image alt: Hexagon Design Element for 3D Printed Guitar Body for Easy Assembly
Splitting the 3D Guitar Body into Printable Parts
Recalling the 50 kg string tension, a critical splitting constraint emerged: the section between the neck and bridge should ideally be a single piece. Joining two parts in this high-stress area would introduce unnecessary complexity in achieving sufficient strength.
Fortunately, this was achievable. The hexagon pattern defined the top edge, and a cut below the bridge mounting holes minimized part length. A strategic cut on the bottom left enabled diagonal print orientation, fitting the longest dimension within the print volume and allowing support-free printing, although Organic supports in PrusaSlicer were used for improved overhang finish.
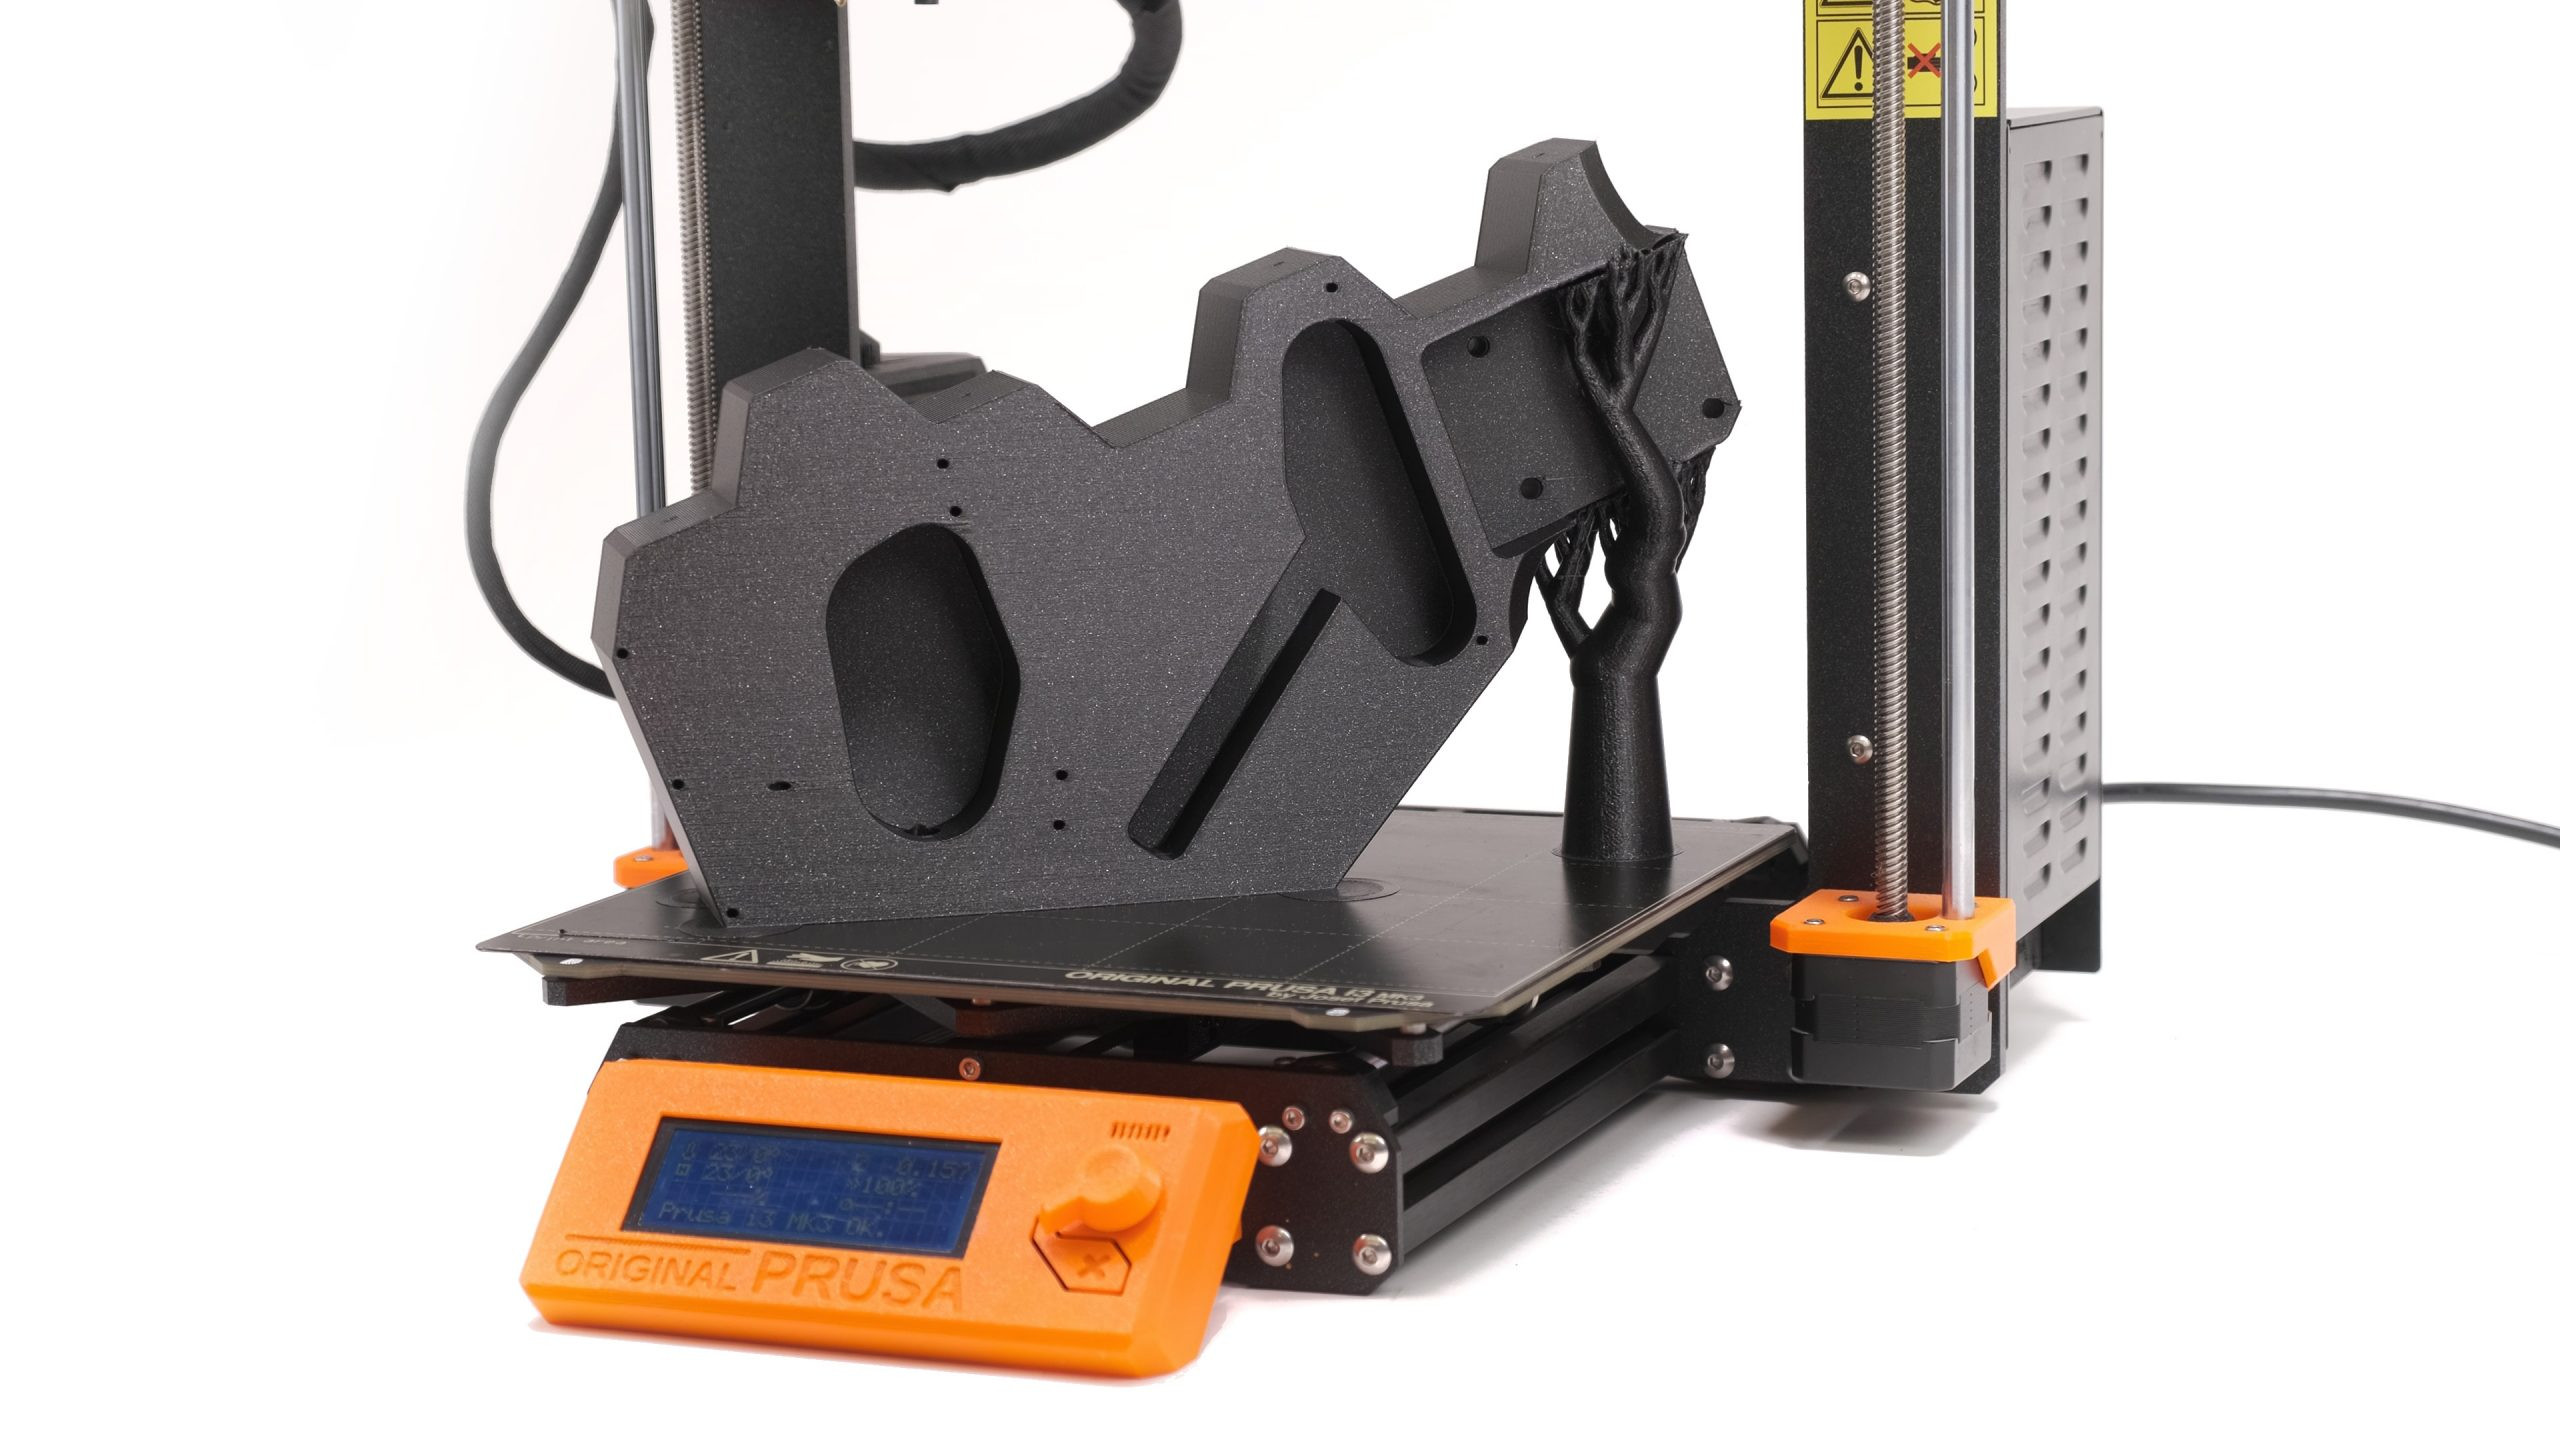
Image alt: 3D Printed Guitar Center Piece Designed to Fit Prusa MK3 Build Plate
Remaining cuts were straightforward. The bottom section without hexagons was split in two, and the top part into three, ensuring each piece fit within the 25×21 cm build plate.
The final major component, the pickguard, also serving as the top pickup mount, was shaped by offsetting surrounding edges by 3mm.
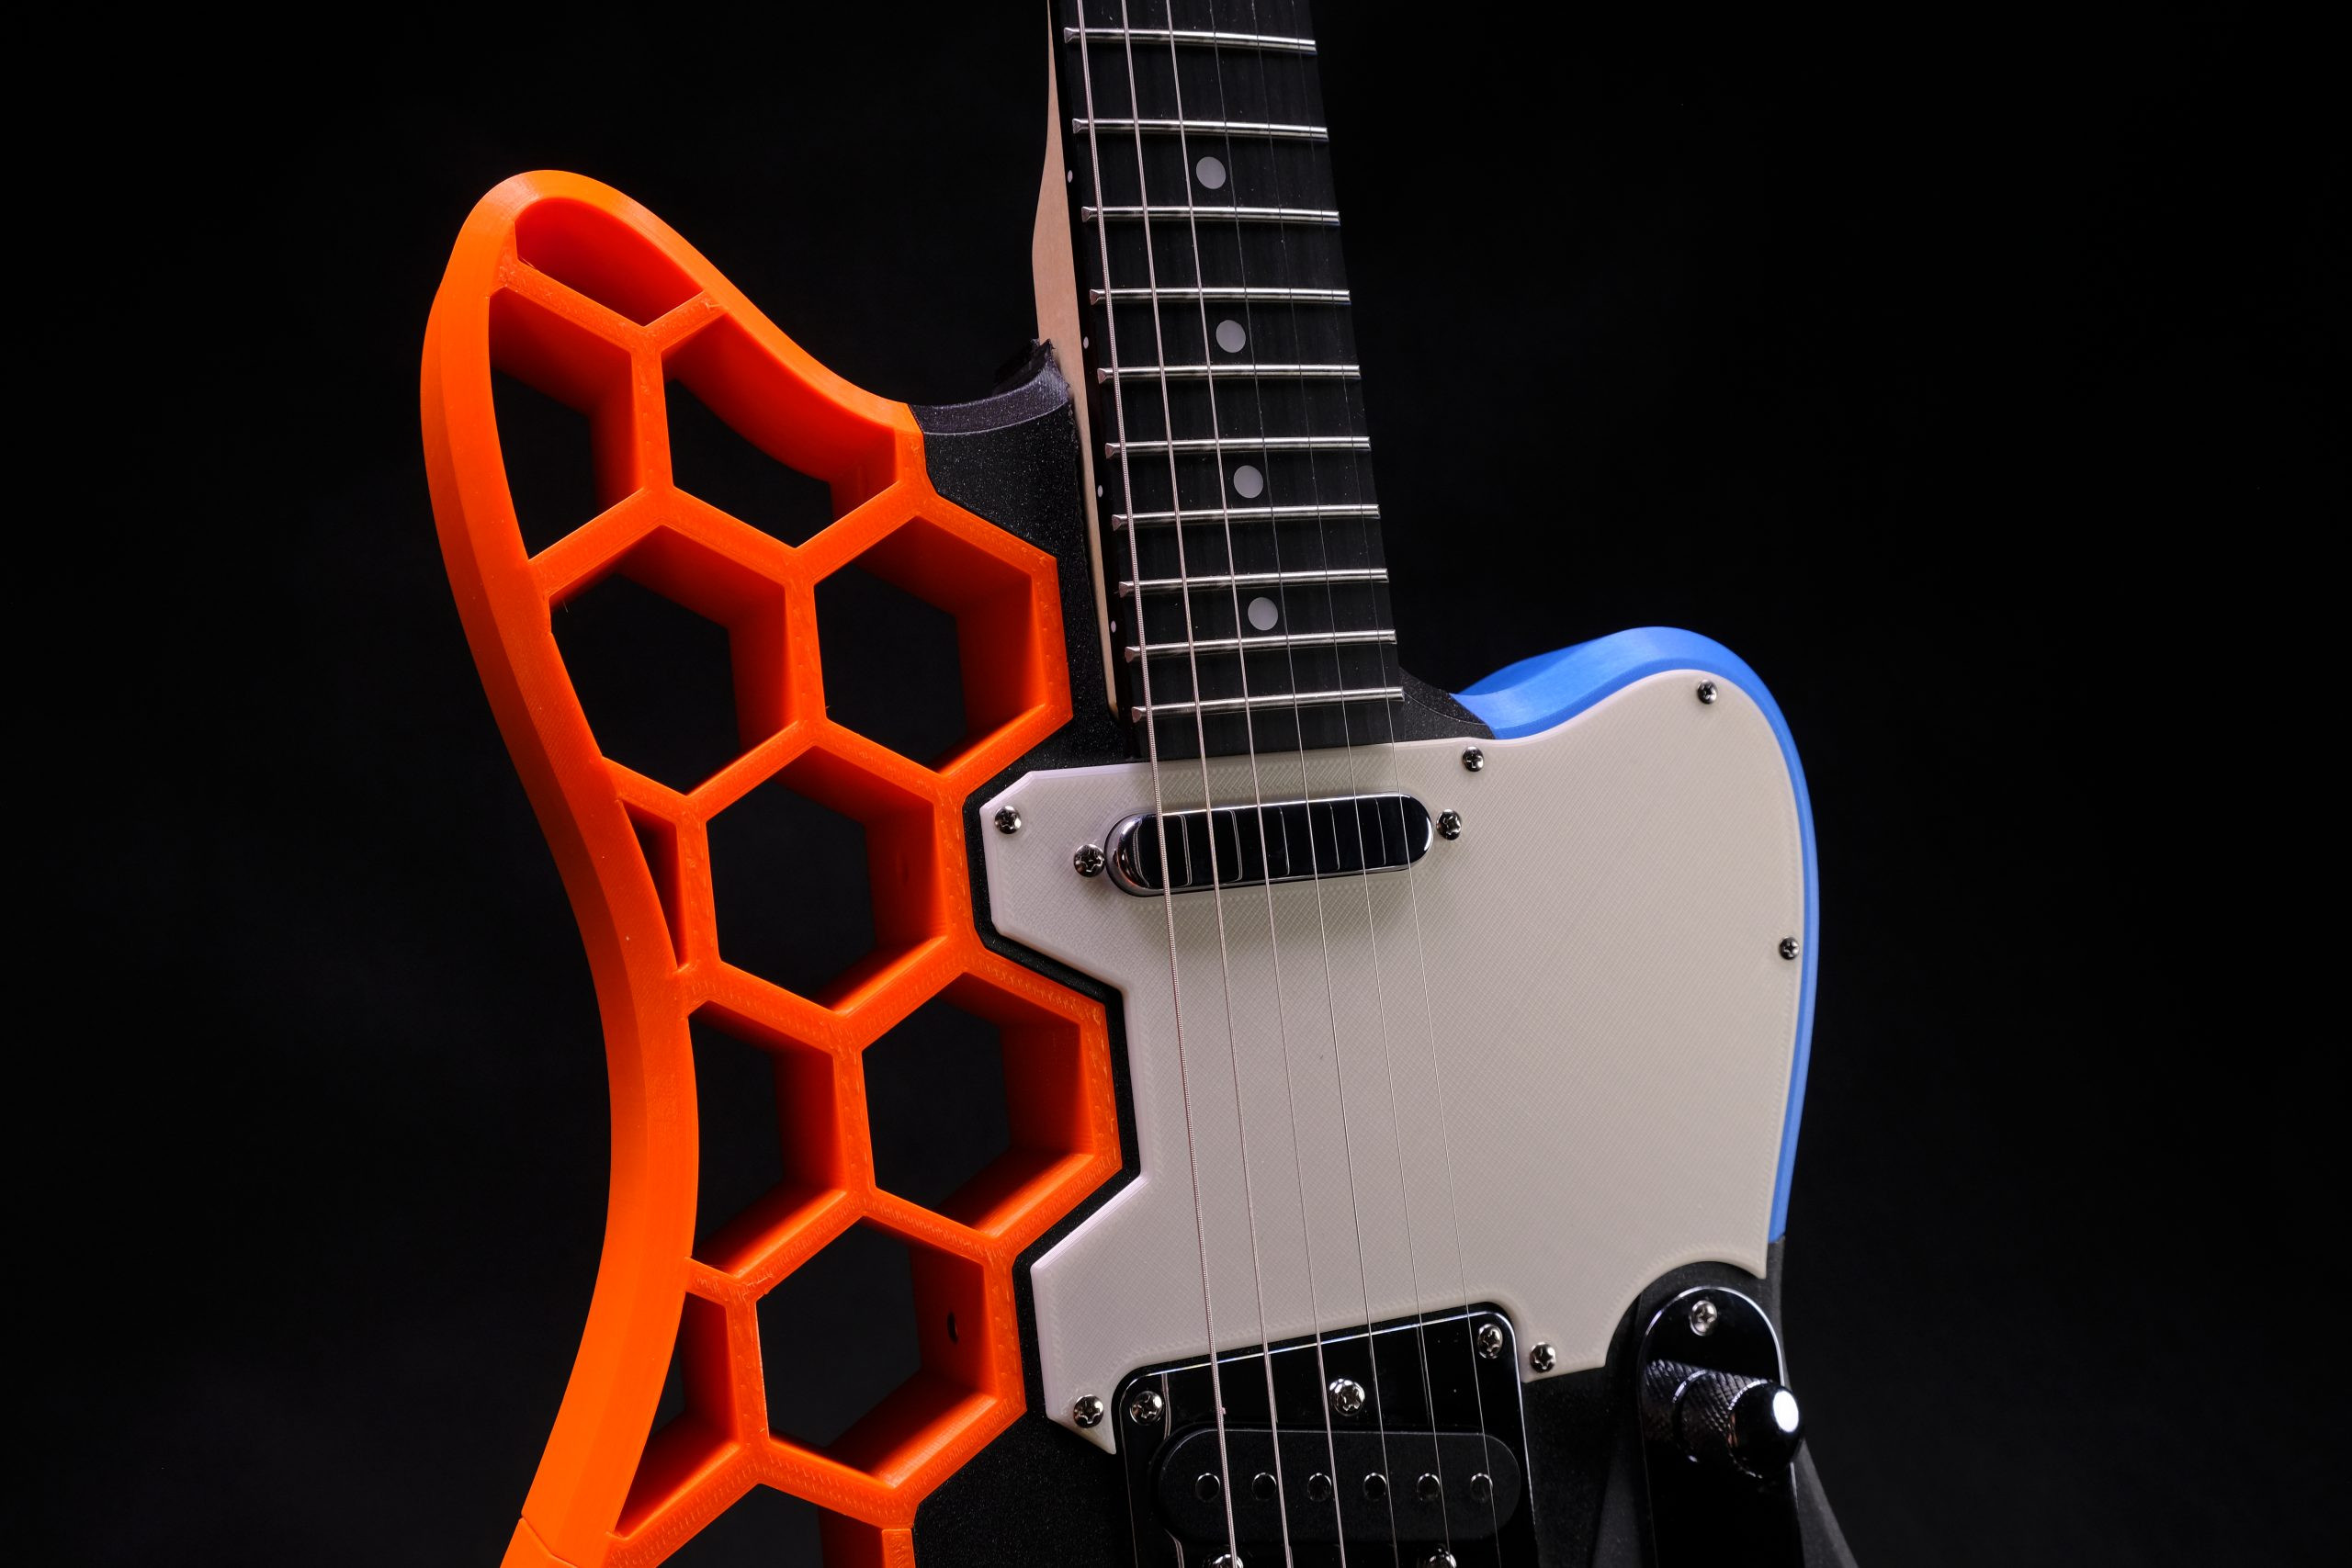
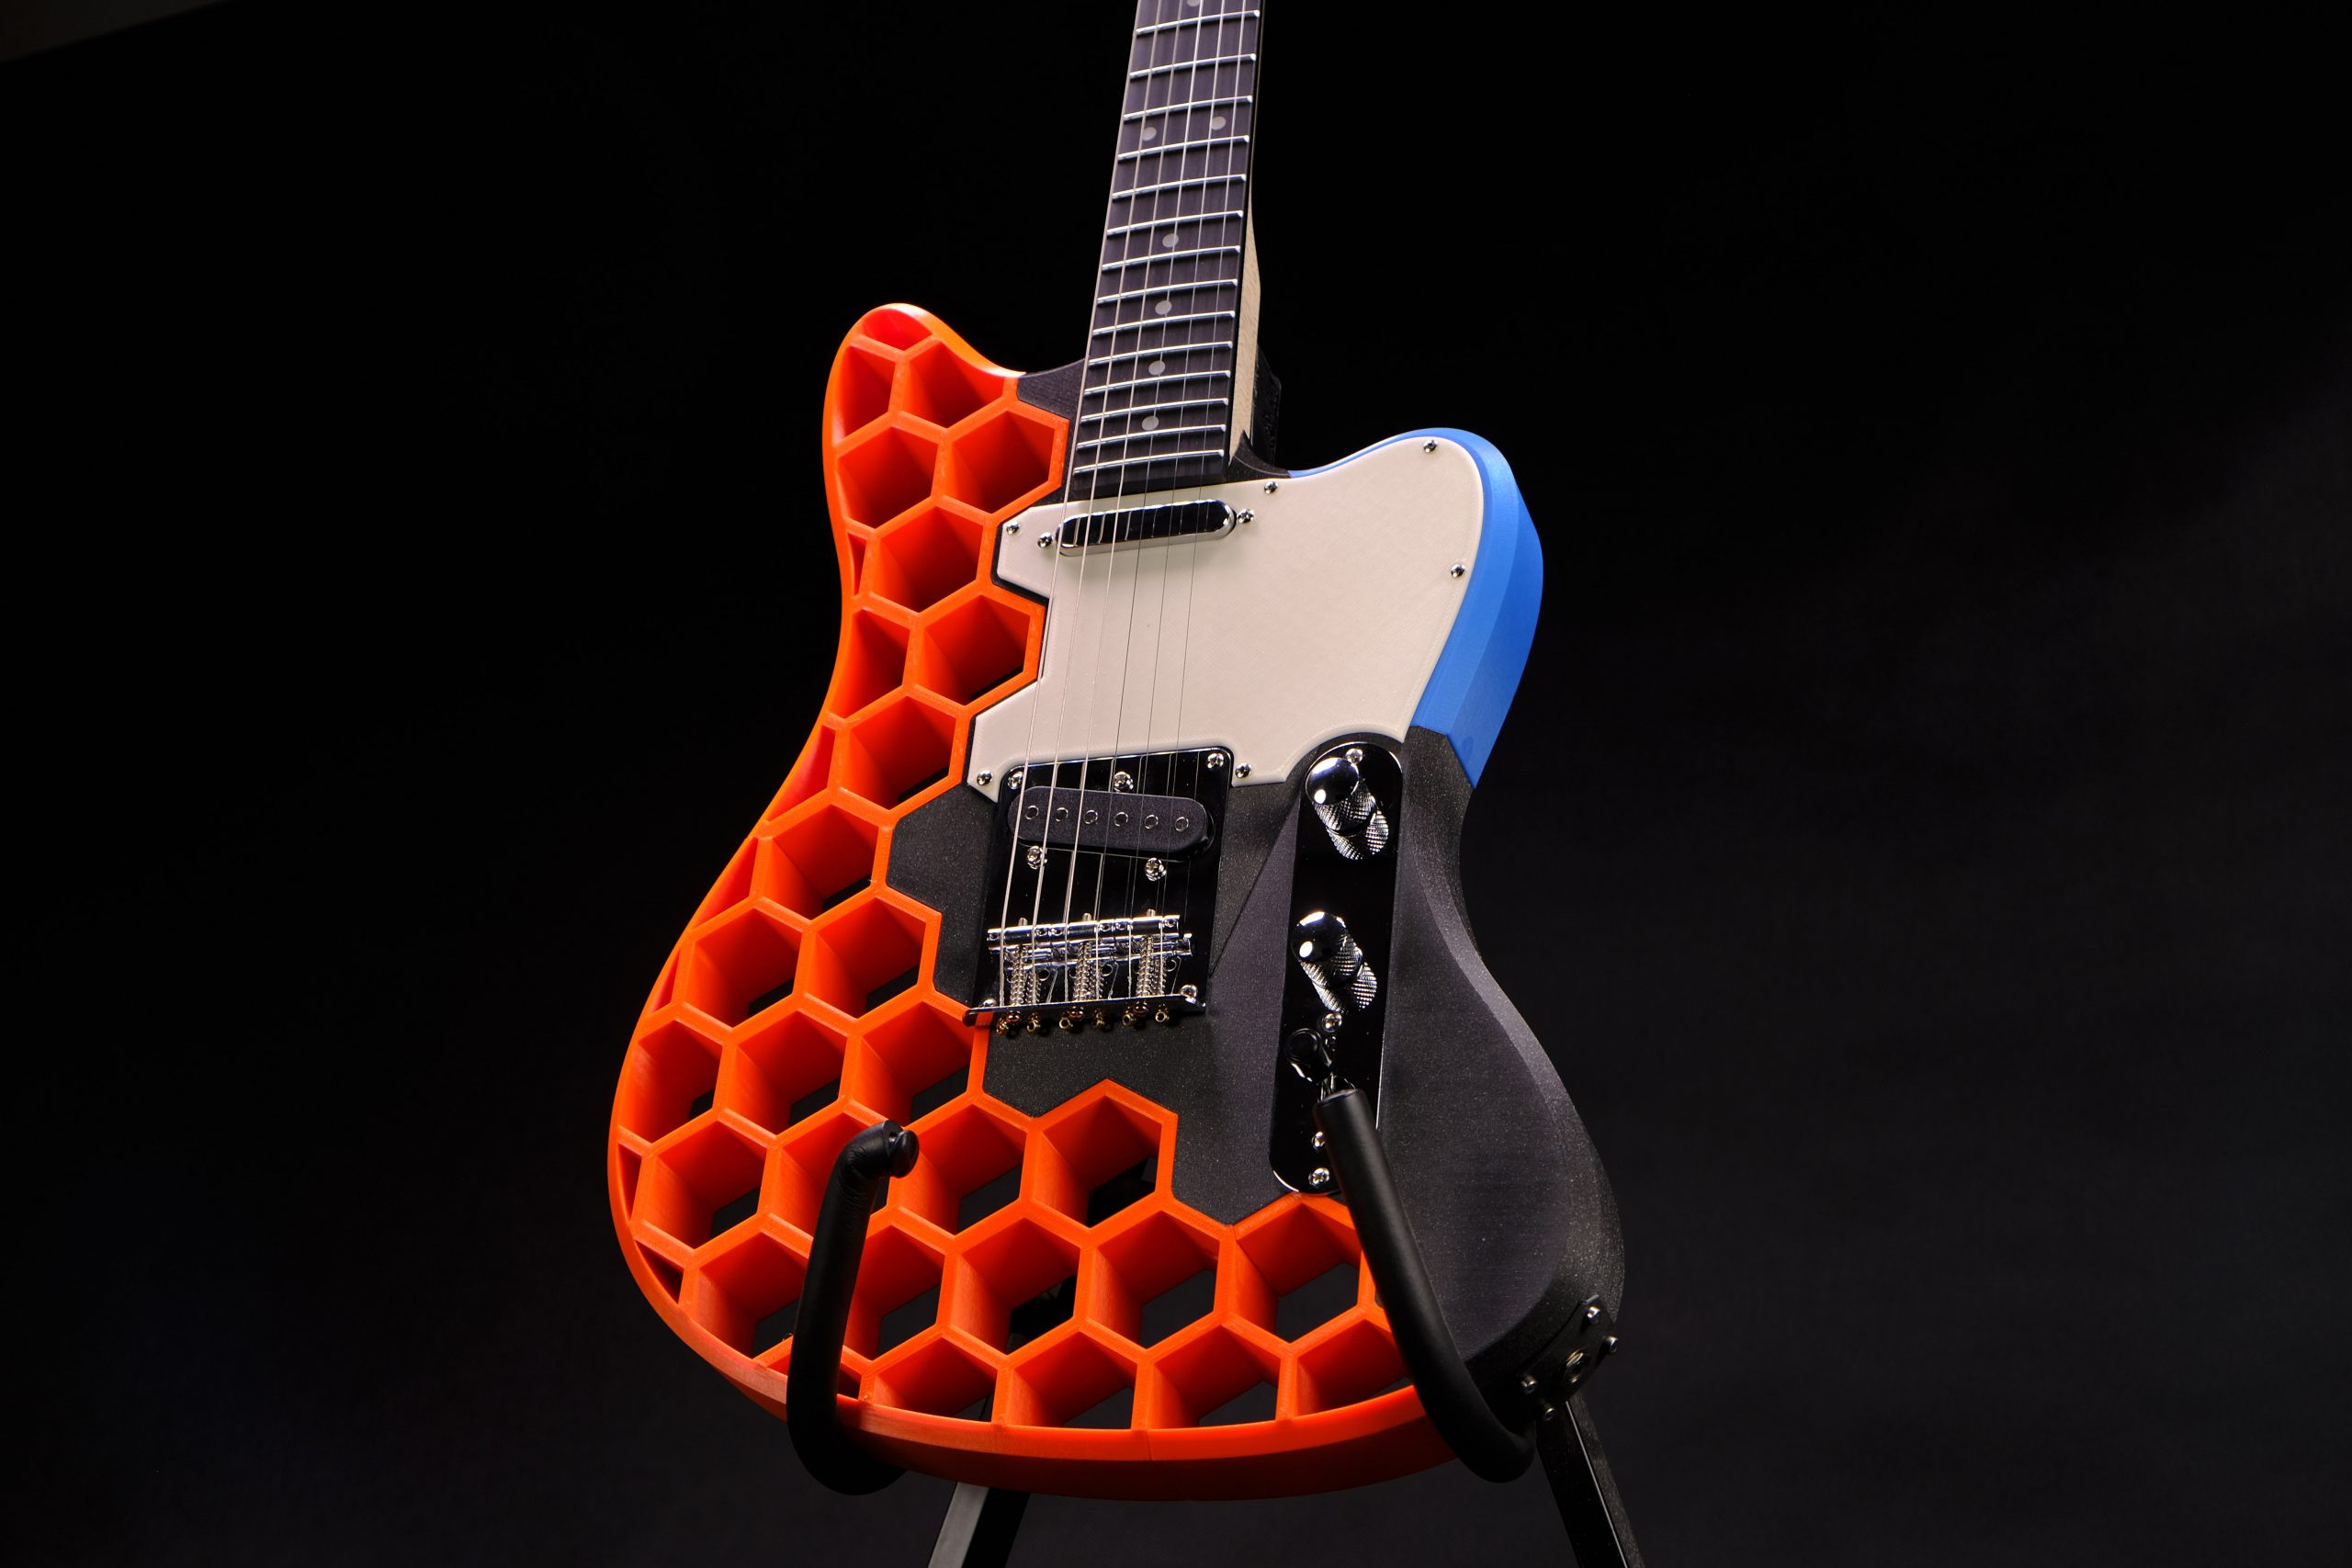
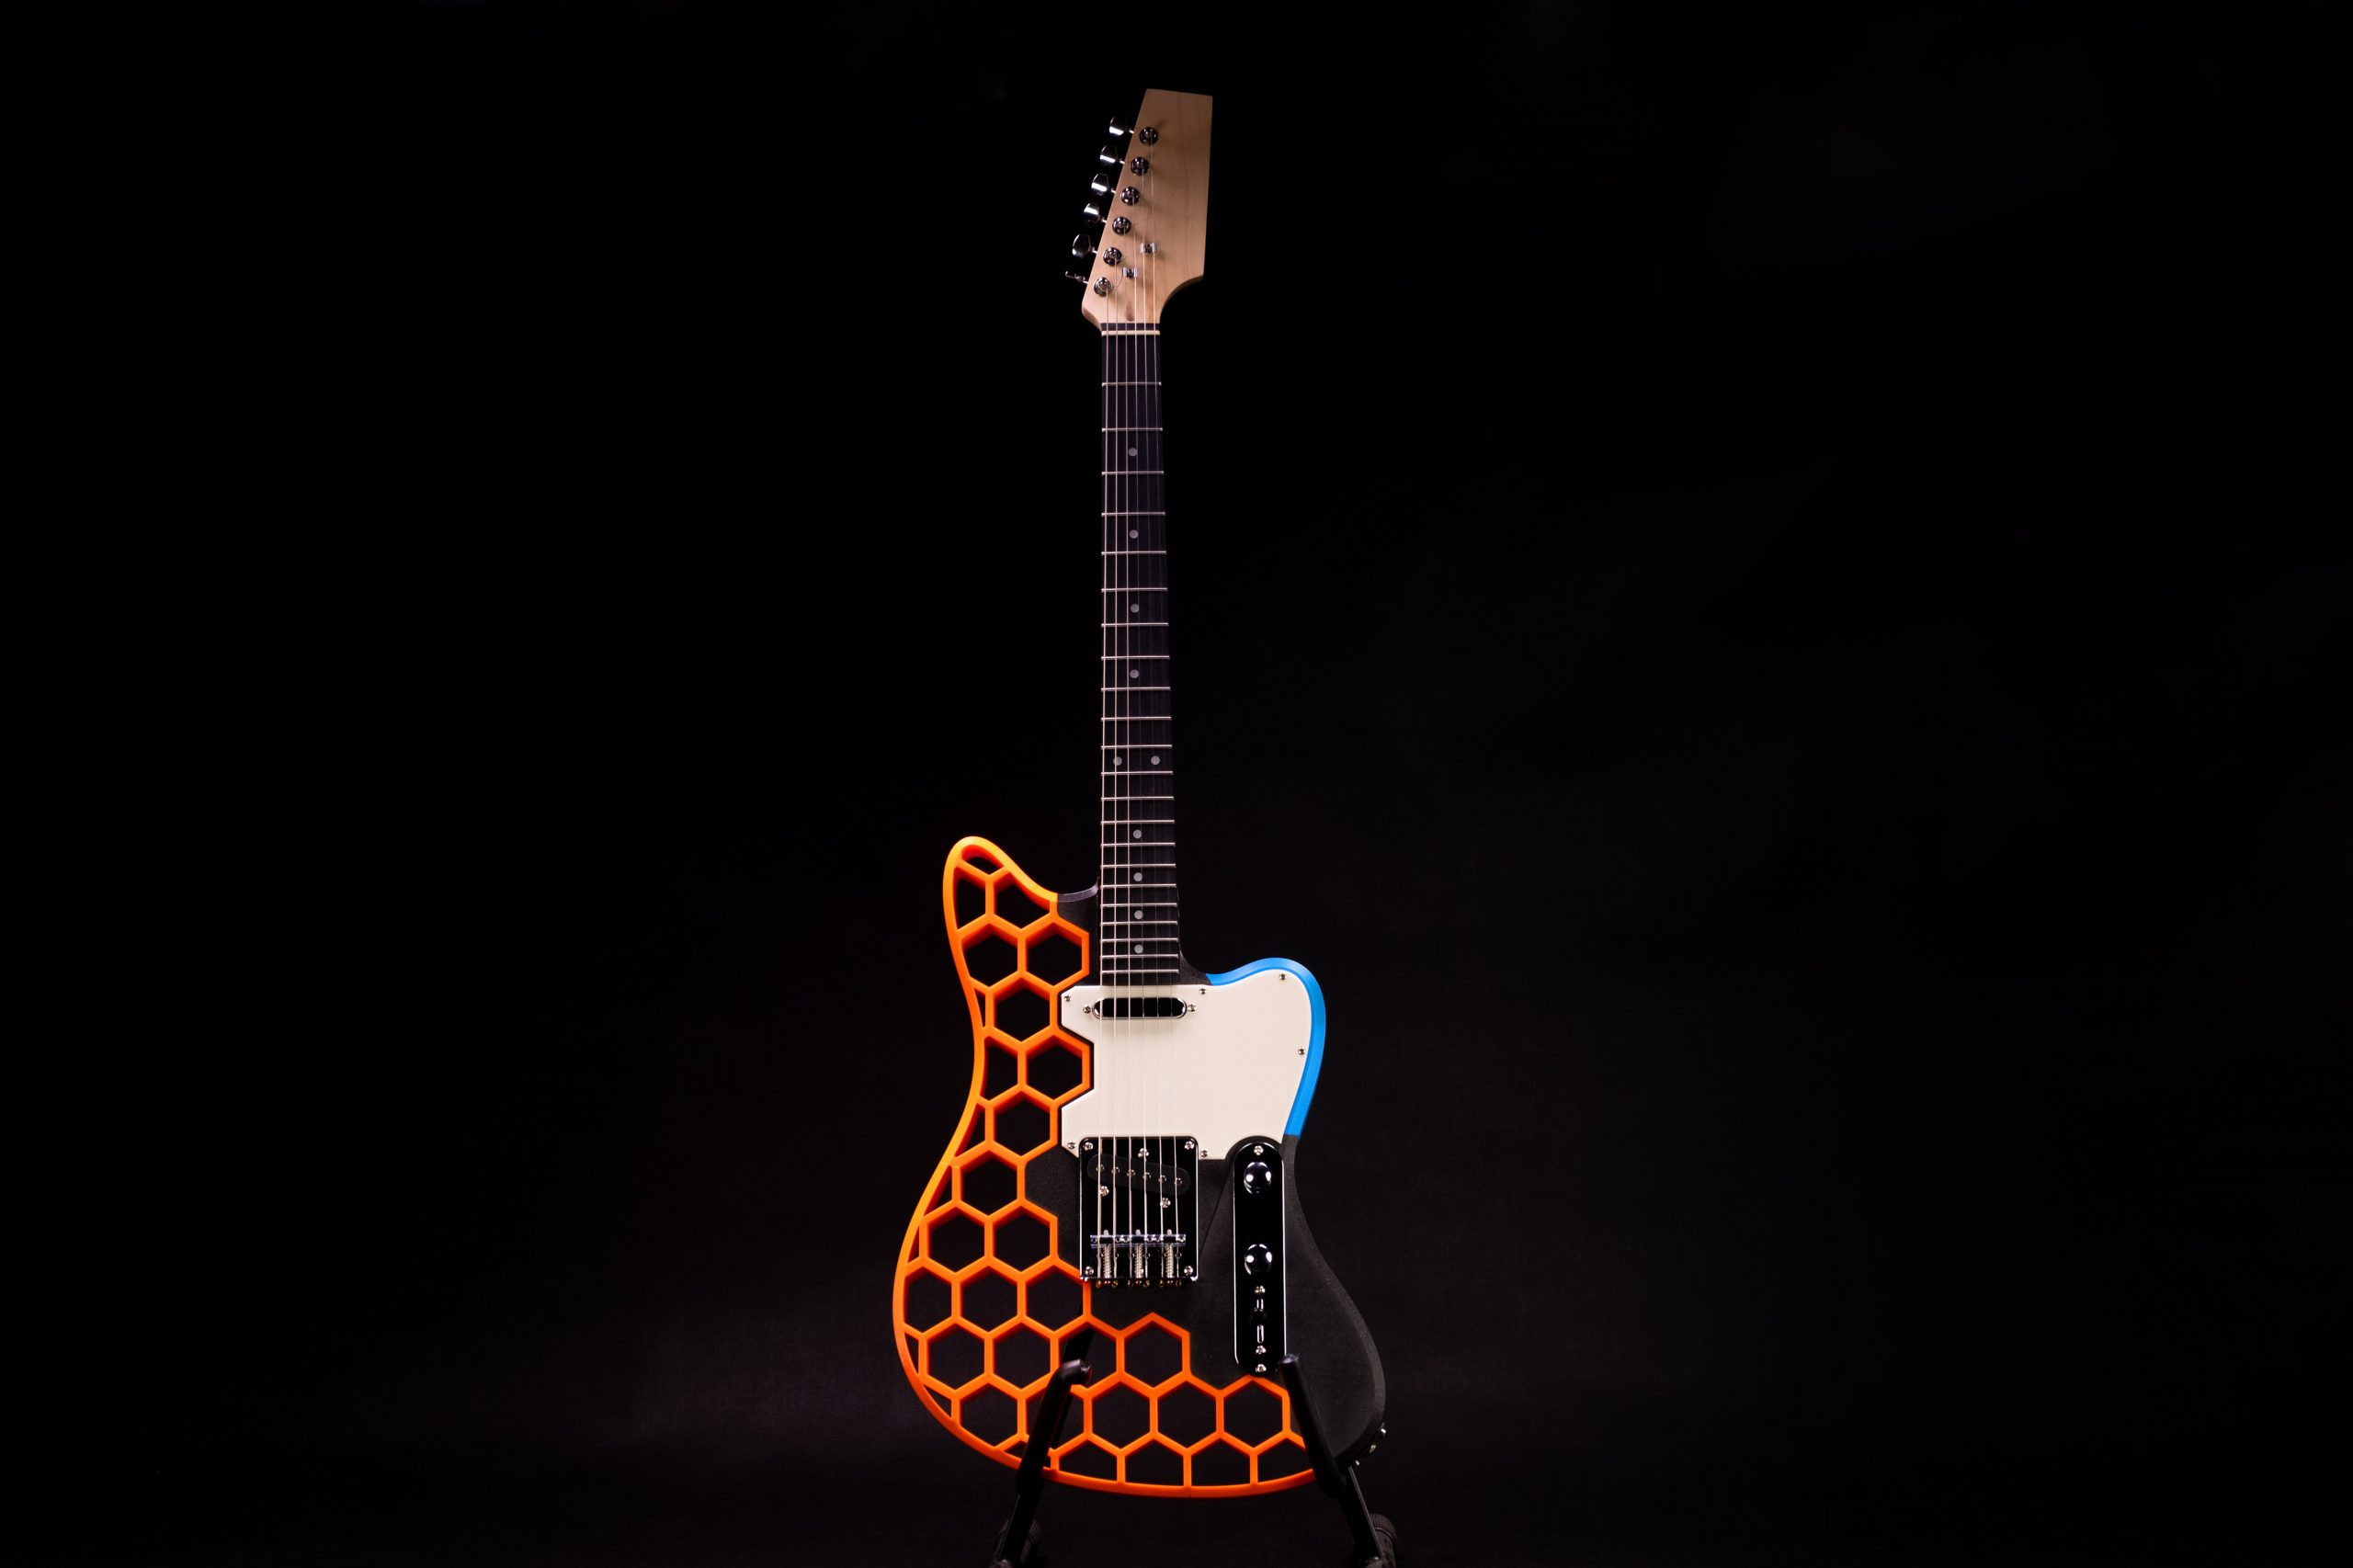
Sectioning the body offered an additional aesthetic advantage: multi-color printing. The Prusa Research color scheme of black and orange was a natural choice, complemented by a teal/blue accent for the bottom-right piece, enhancing visual appeal.
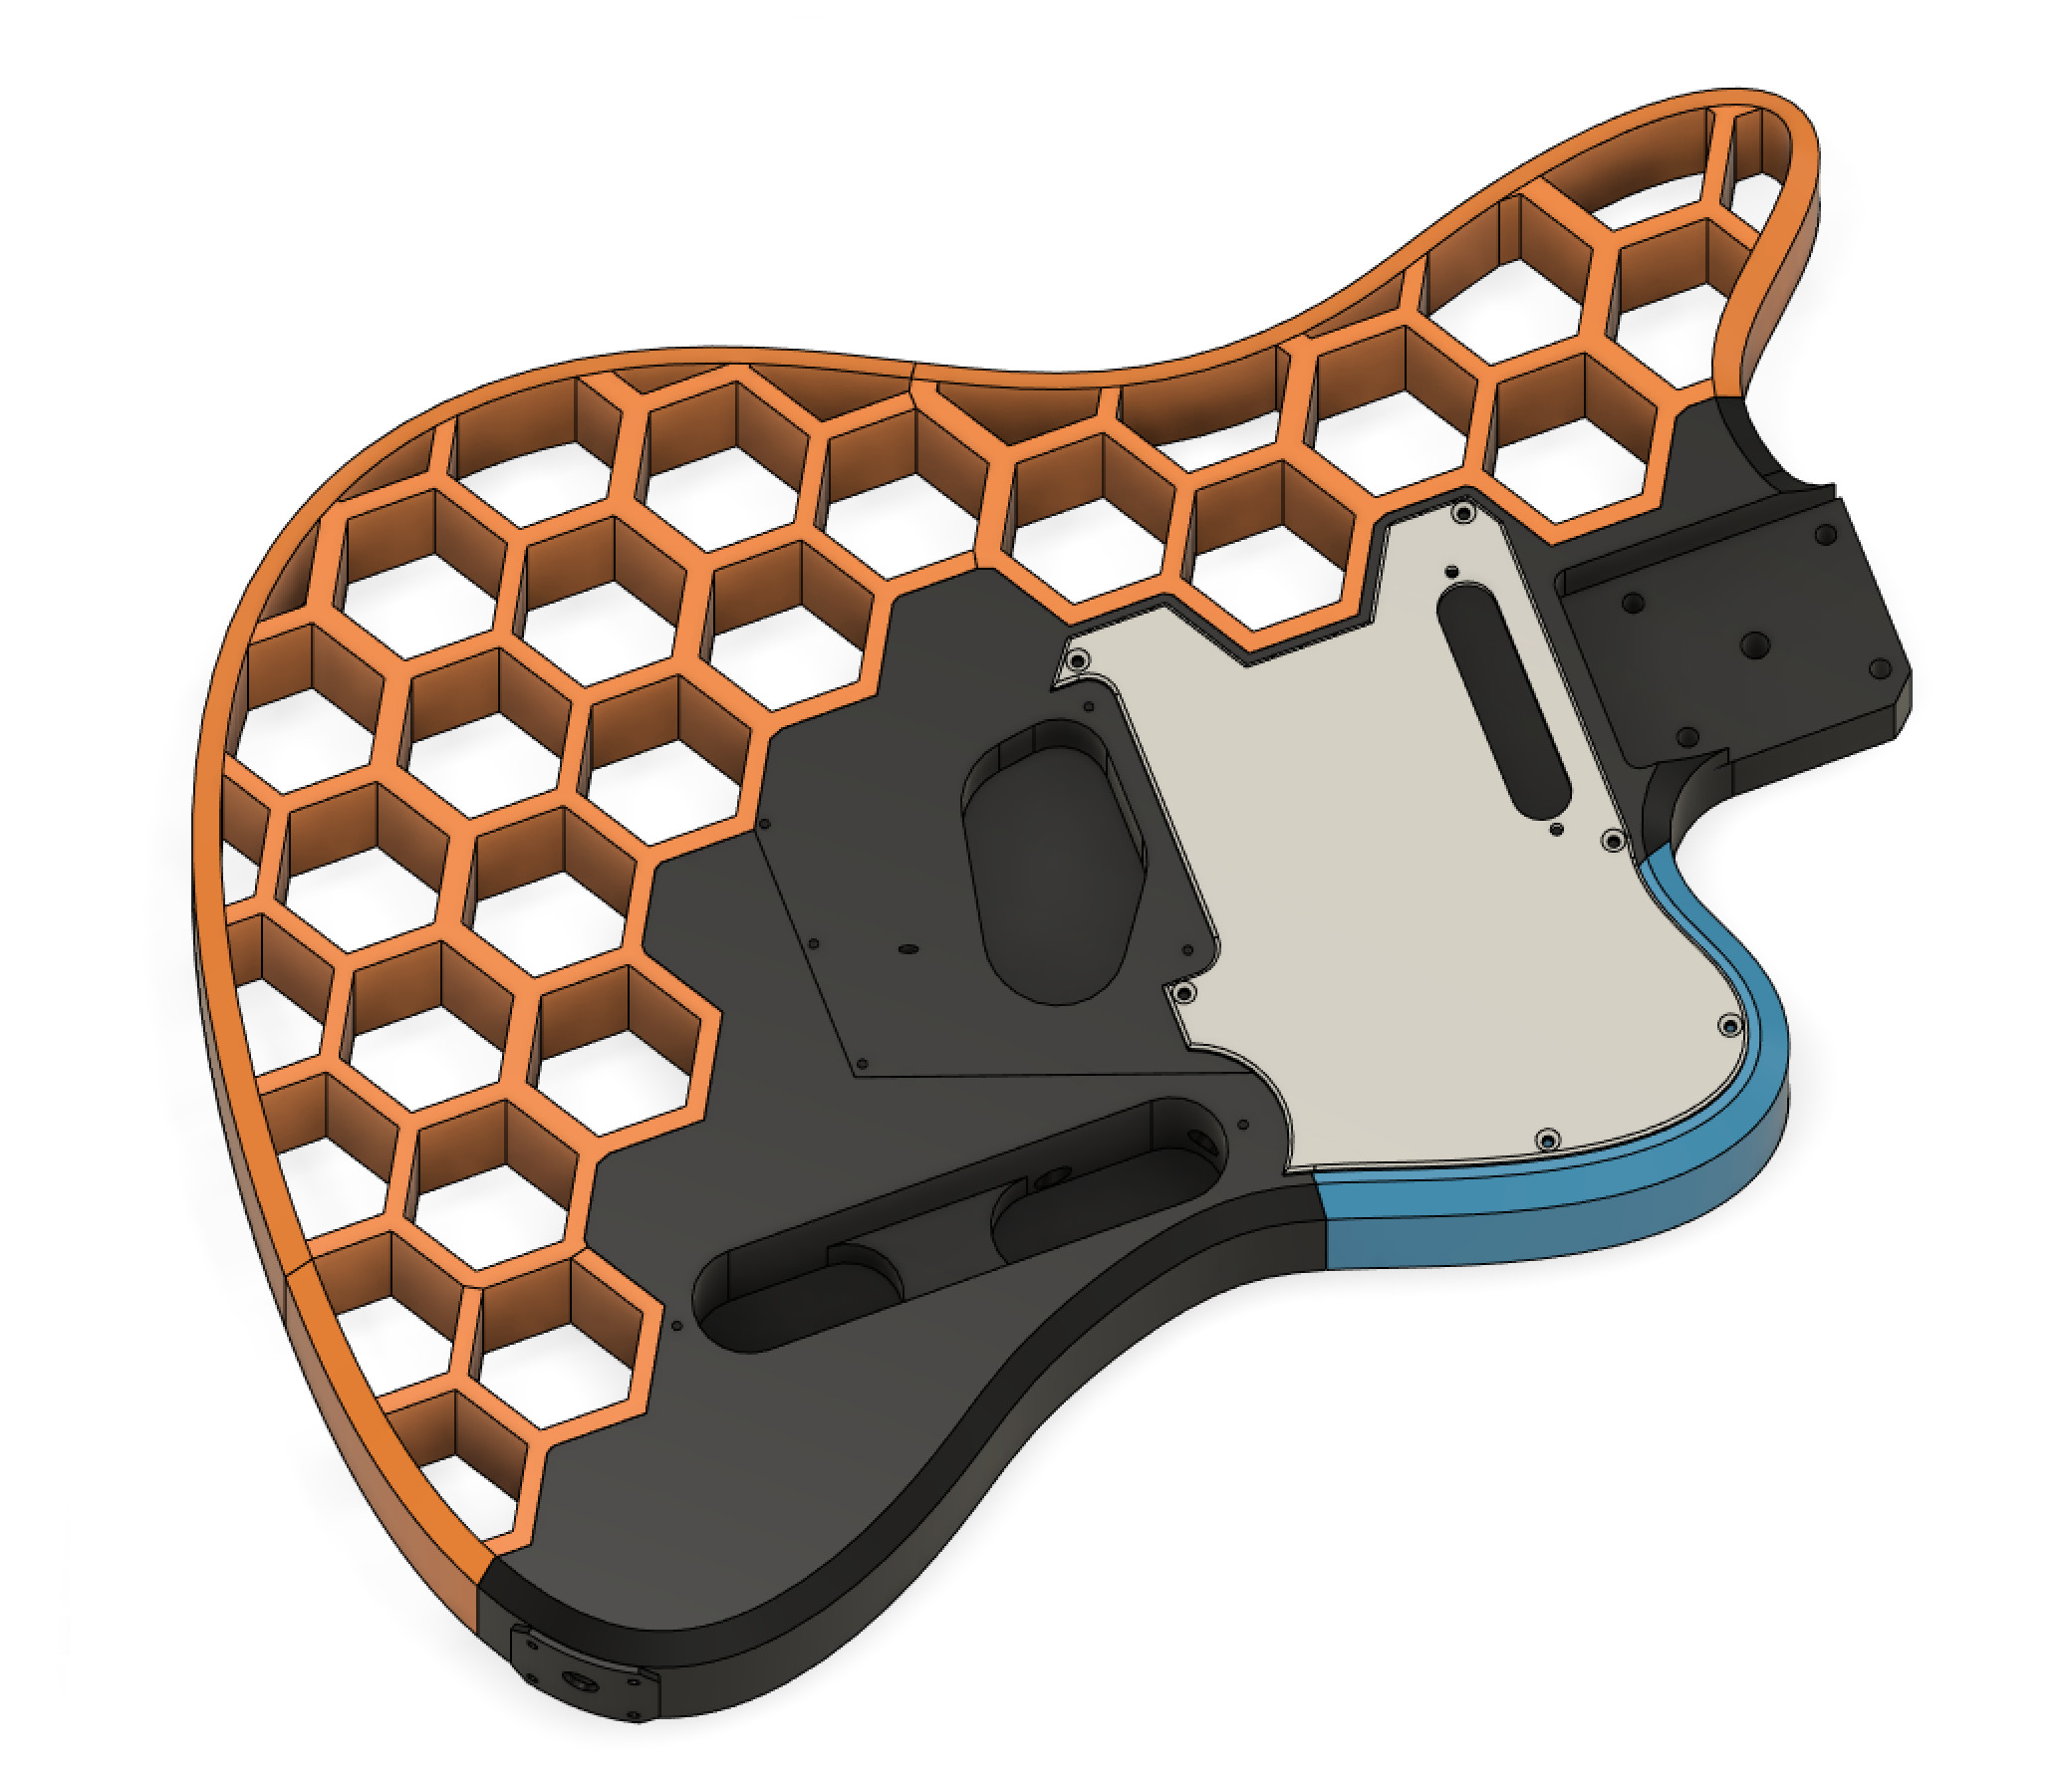
Image alt: Final Design of 3D Printed Prusacaster Guitar Body with Hexagon Pattern
This completed the “Prusacaster” model design.
3D Printing and Assembling Your Guitar
Material Selection for the Center Piece
The central piece, bearing significant mechanical load, might tempt users to use “stronger” materials like PETG. However, stiffness (high bending modulus) is paramount, and standard PLA excels in this regard, aligning with the project’s simplicity and affordability ethos.
PLA’s temperature sensitivity is a drawback. While the substantial center piece can withstand direct sunlight for reasonable durations, leaving the guitar in a hot case on a summer day could pose issues. For higher temperature resistance, consider stiffer materials like Prusament PC Blend Carbon Fiber, Prusament PA11 Carbon Fiber, or similar, noting their increased printing difficulty and cost. Given Prague’s moderate climate, PLA was chosen for the prototype, proving durable for over a year.
Initial testing involved printing the center piece with default PrusaSlicer settings. Fitment confirmed, the neck and bridge were attached, strings added, and remarkably, a functional, albeit minimalist, guitar emerged.
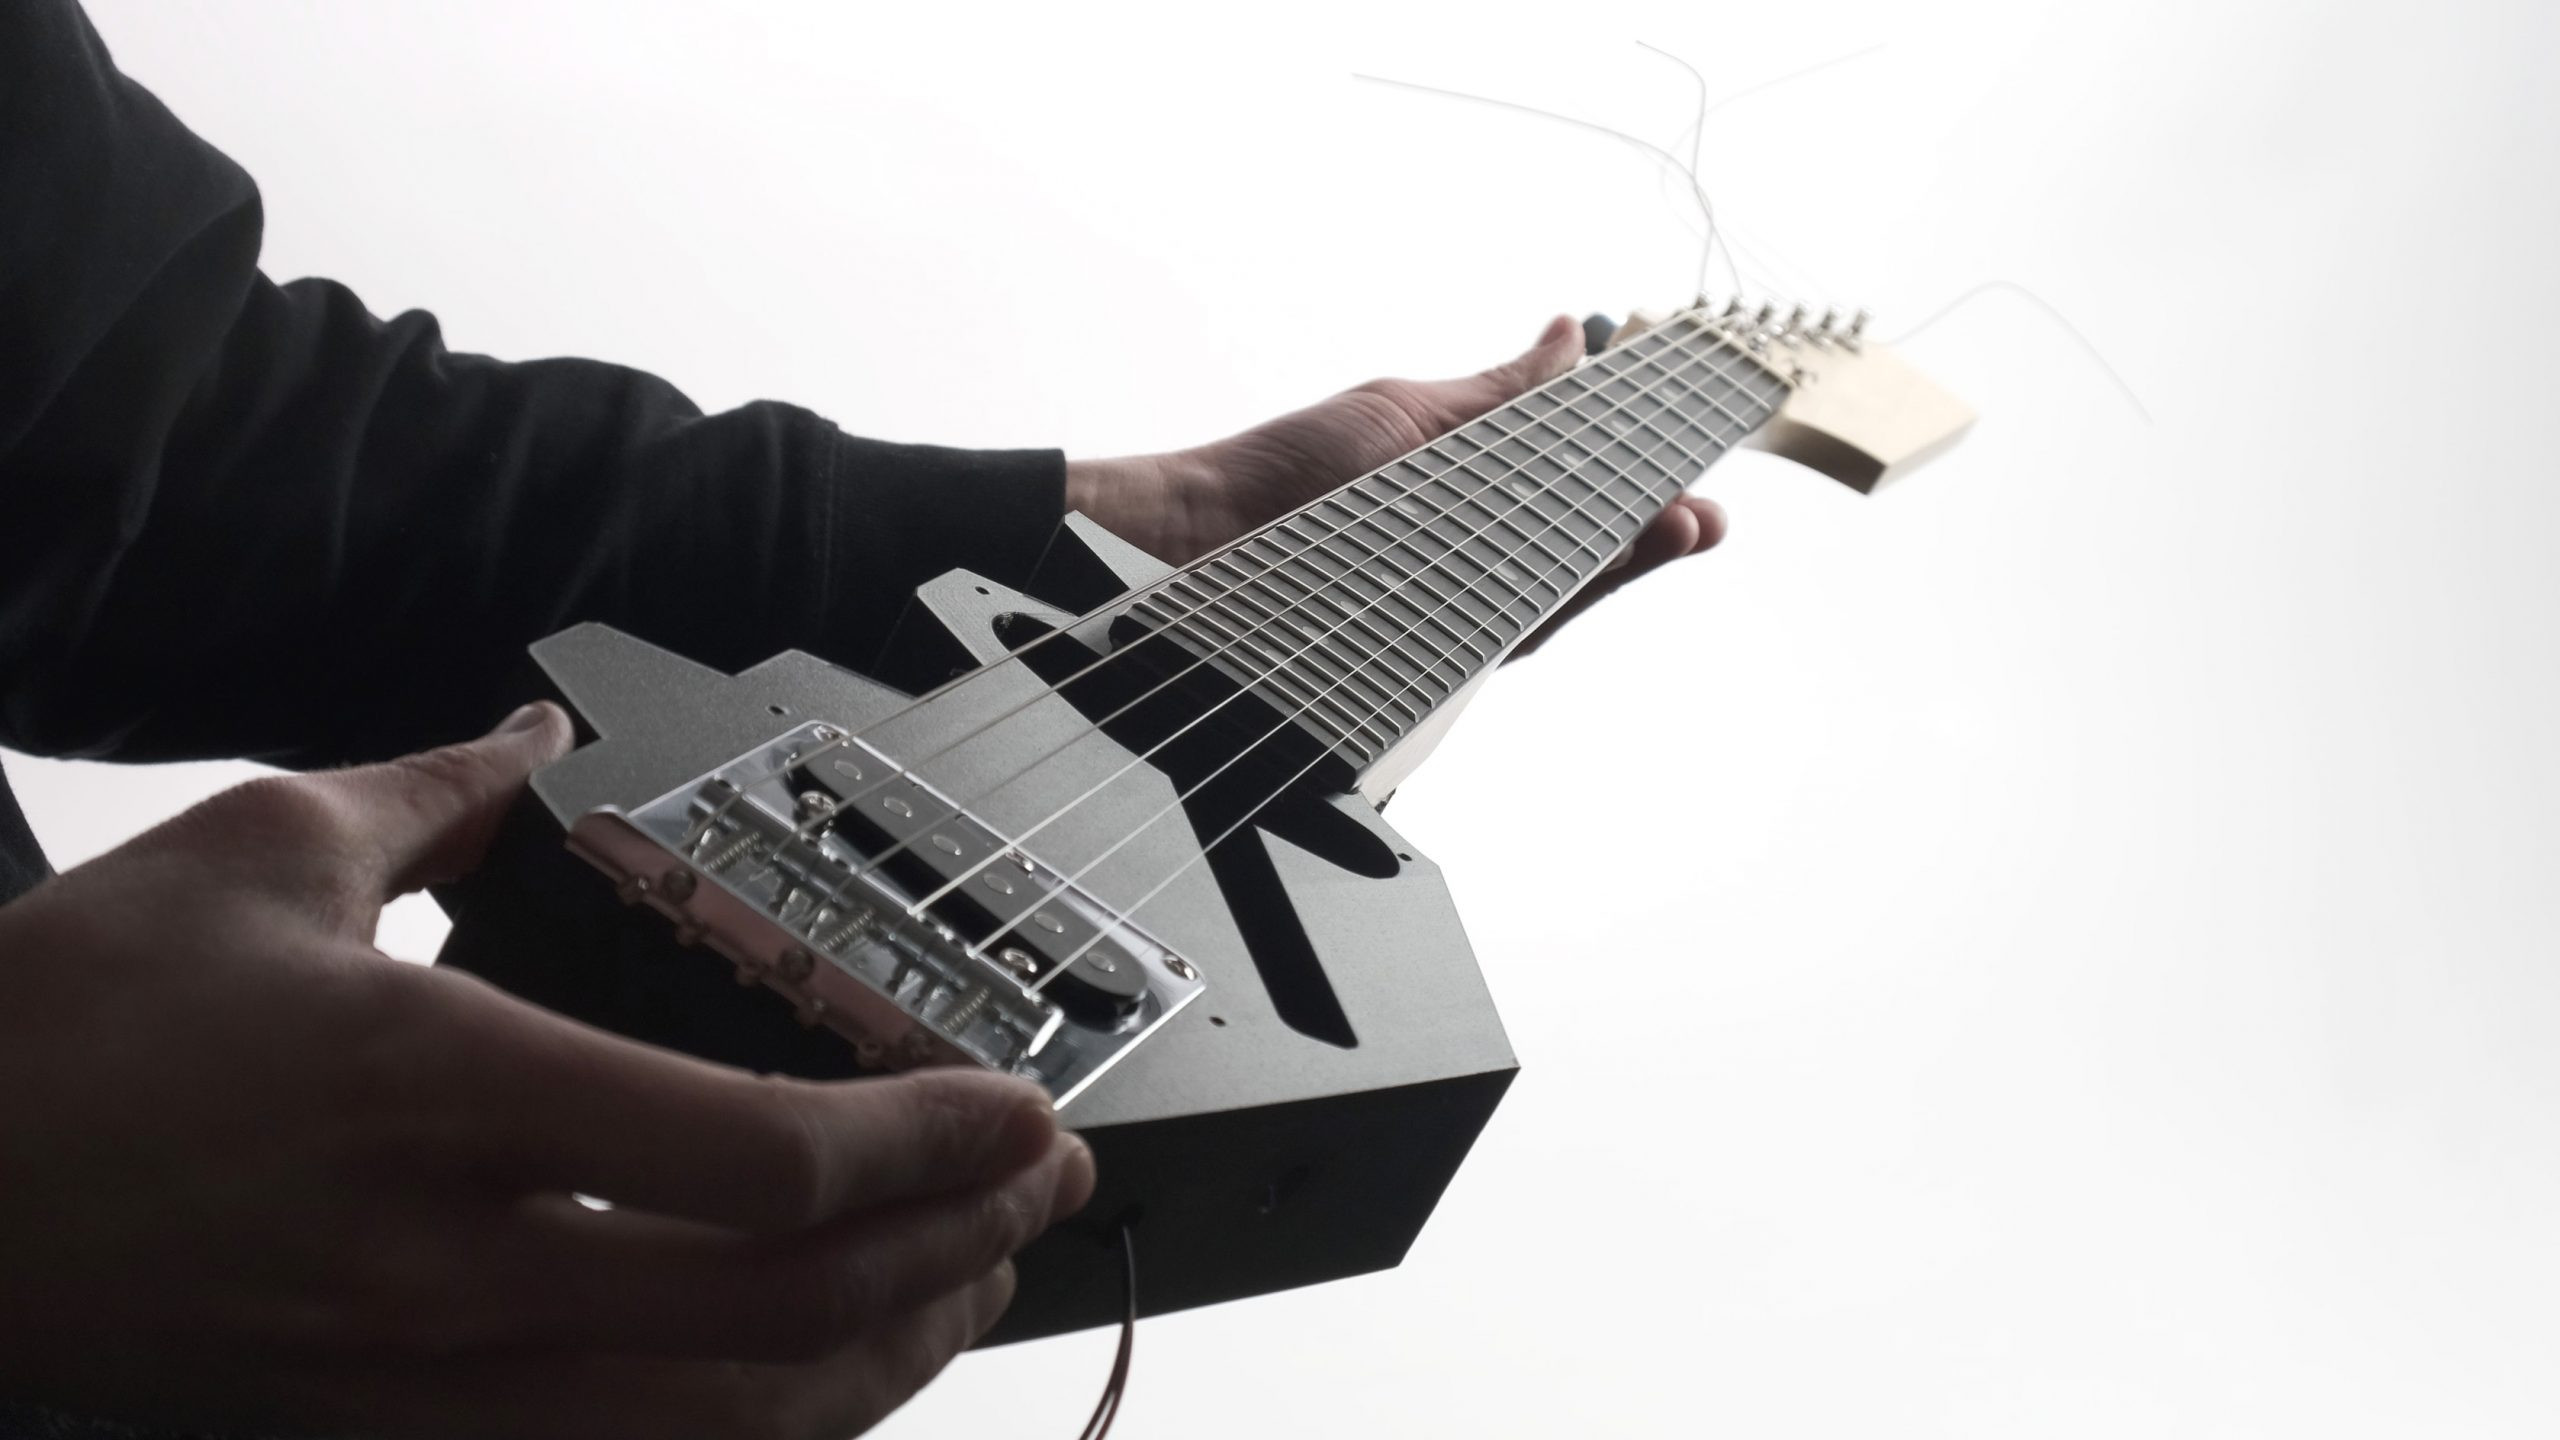
Image alt: Minimalist 3D Printed Guitar Center Piece Assembled with Neck and Bridge
Addressing Material Creep in 3D Printed Parts
Material creep, the slow deformation under sustained stress, became a concern. After a month under string tension, mild bending occurred in the initial print. This was anticipated, as the default PrusaSlicer profile’s 2 perimeters were insufficient for such load. Reprinting the center piece with 7 perimeters and 25% cubic infill completely resolved the creep issue.
String Gauge Selection for 3D Printed Guitars
Guitar strings vary in gauge (thickness). Lighter gauges are easier to play and bend but break more easily and produce less volume. Heavier strings offer increased volume and sustain but require more finger pressure and, crucially, exert greater tension on the neck. Using lighter gauge strings, such as 9 gauge, reduces stress on the 3D printed center piece.
Printing the Remaining Guitar Parts
The remaining parts experience minimal stress, primarily supporting the guitar’s weight on a strap or cable strain. Material choice is less critical. The top three hexagon parts were printed in Prusament PETG Prusa Orange, the bottom switch-holding piece in Prusament PLA Galaxy Black, and the small bottom piece in Prusament PLA Azure Blue, all using default profiles.
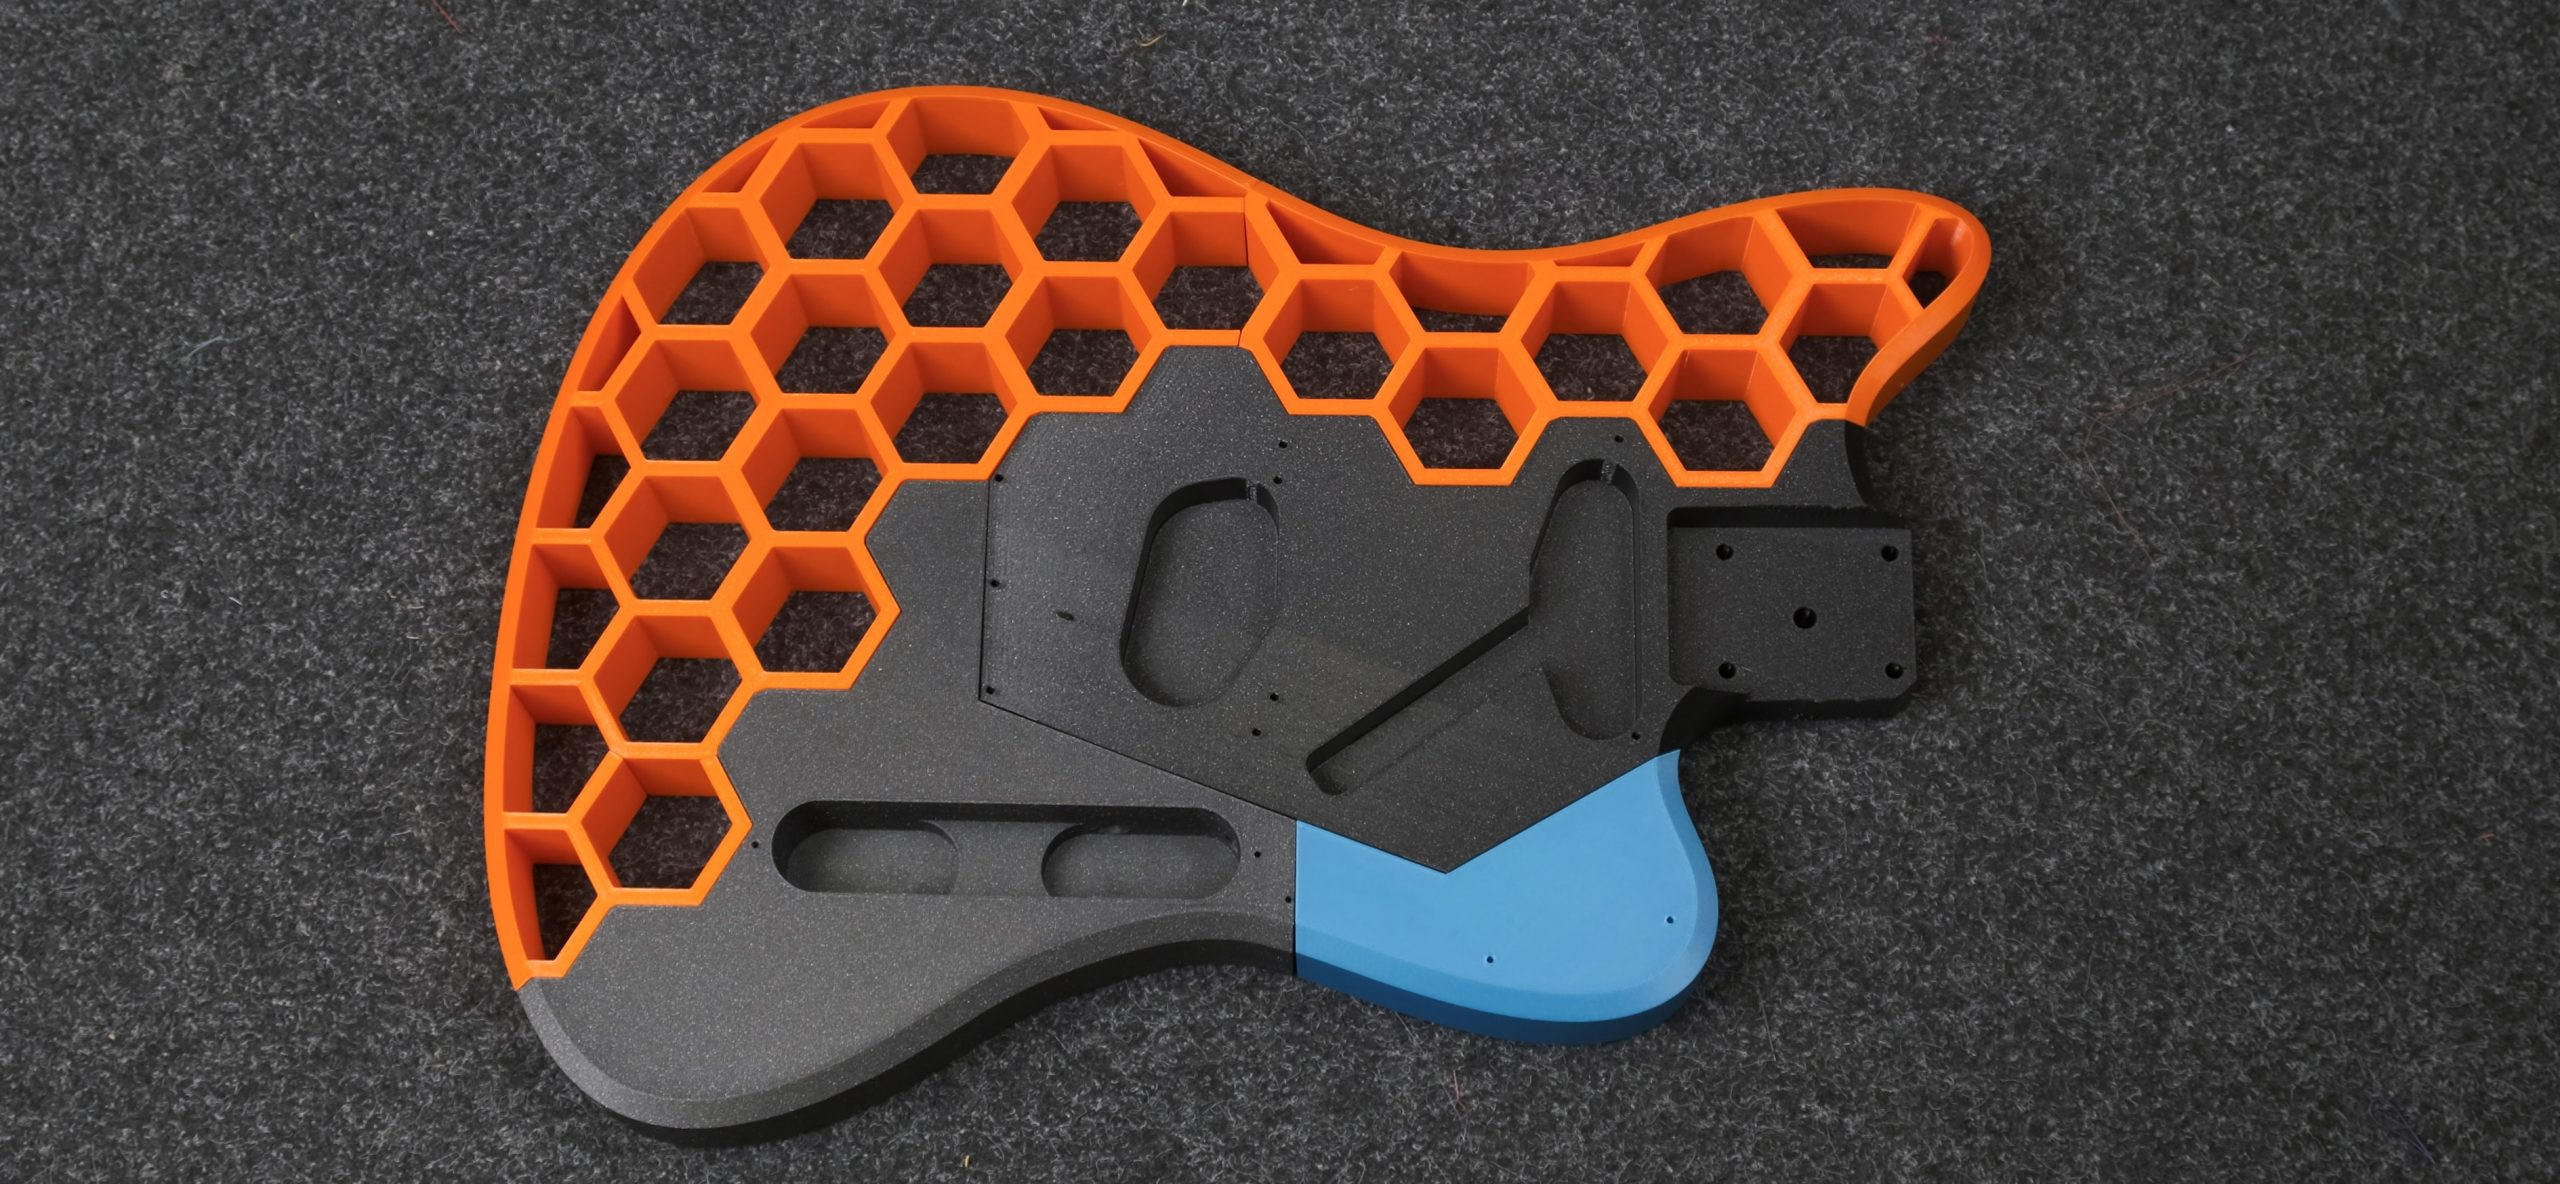
Image alt: 3D Printed Parts for Prusacaster Electric Guitar in Various Colors
Assembling the 3D Printed Guitar Body
All parts feature large contact areas with the center piece. Generous application of superglue ensures robust bonding. M3 screw holes in hexagon pieces offer optional reinforcement, particularly where strap buttons attach, though accessibility can be challenging, making screws optional.
Wiring the 3D Printed Electric Guitar
The Harley Benton T-style kit’s pre-wired cables with JST connectors simplify electronics assembly. Ensure correct connection of top pickup cables to the selector switch to avoid reversed switch operation.
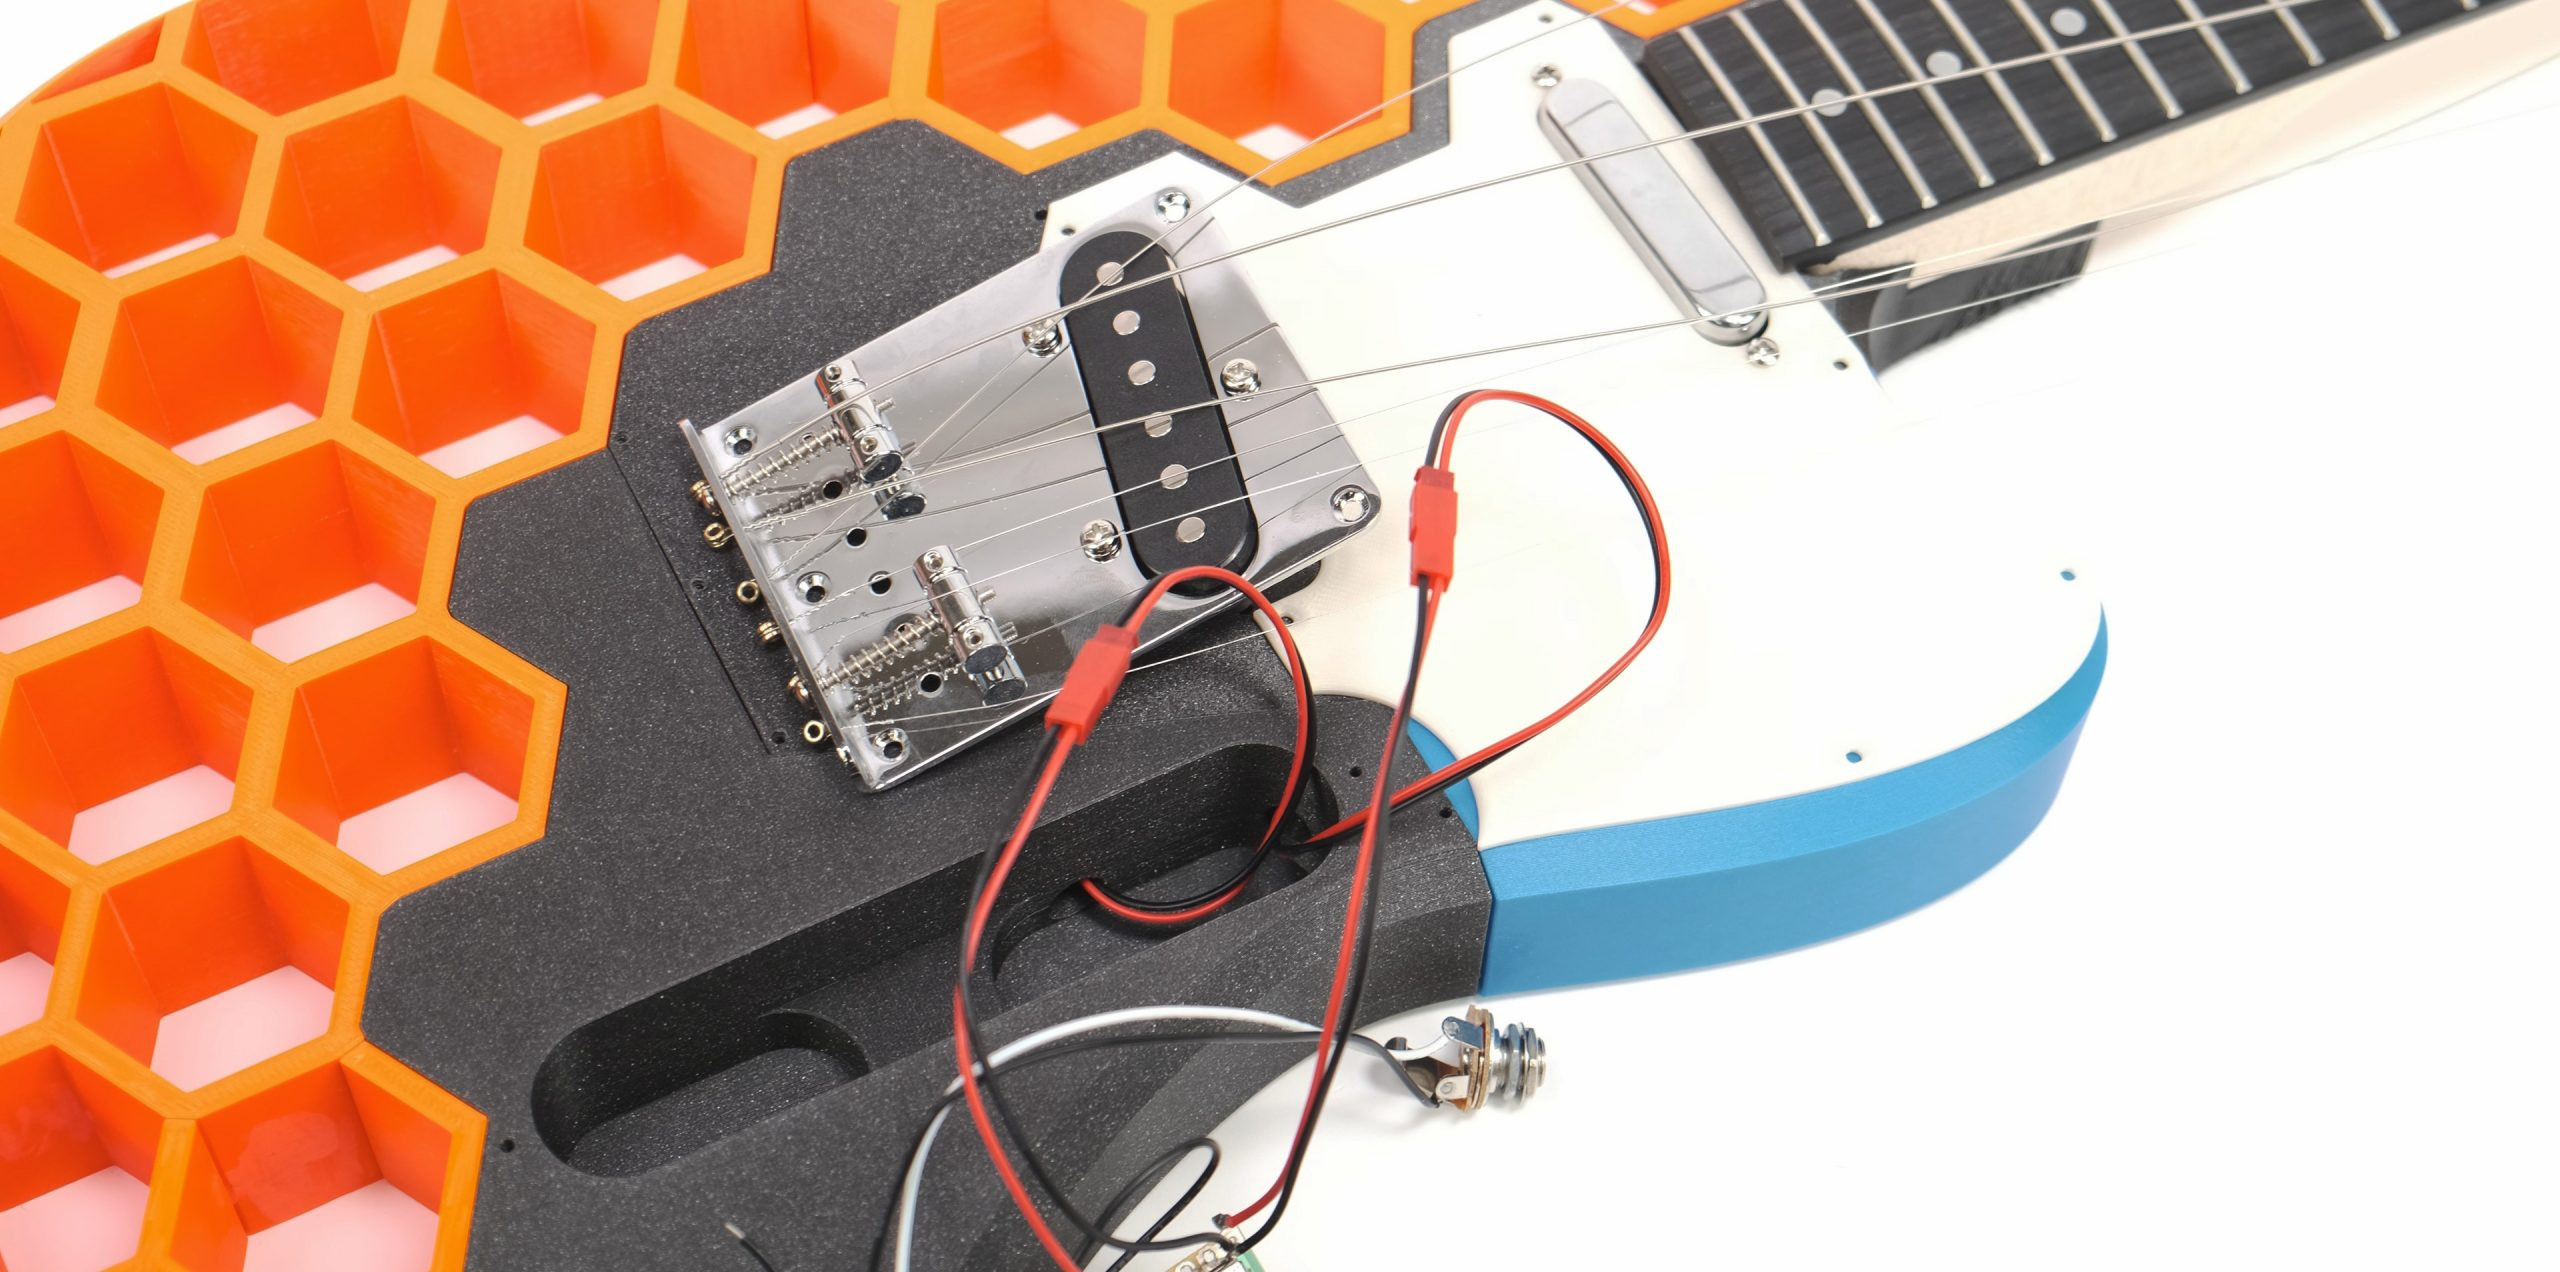
Image alt: Pre-Wired Cables with JST Connectors in Harley Benton Guitar Kit for Easy 3D Printed Guitar Assembly
A seemingly unconnected black wire in the kit serves to ground the strings, mitigating hum. A channel in the center print accommodates this wire, routed under the bridge. Stripping insulation, loosening the bridge, threading the wire, and retightening the bridge effectively grounds the strings, reducing unwanted noise.
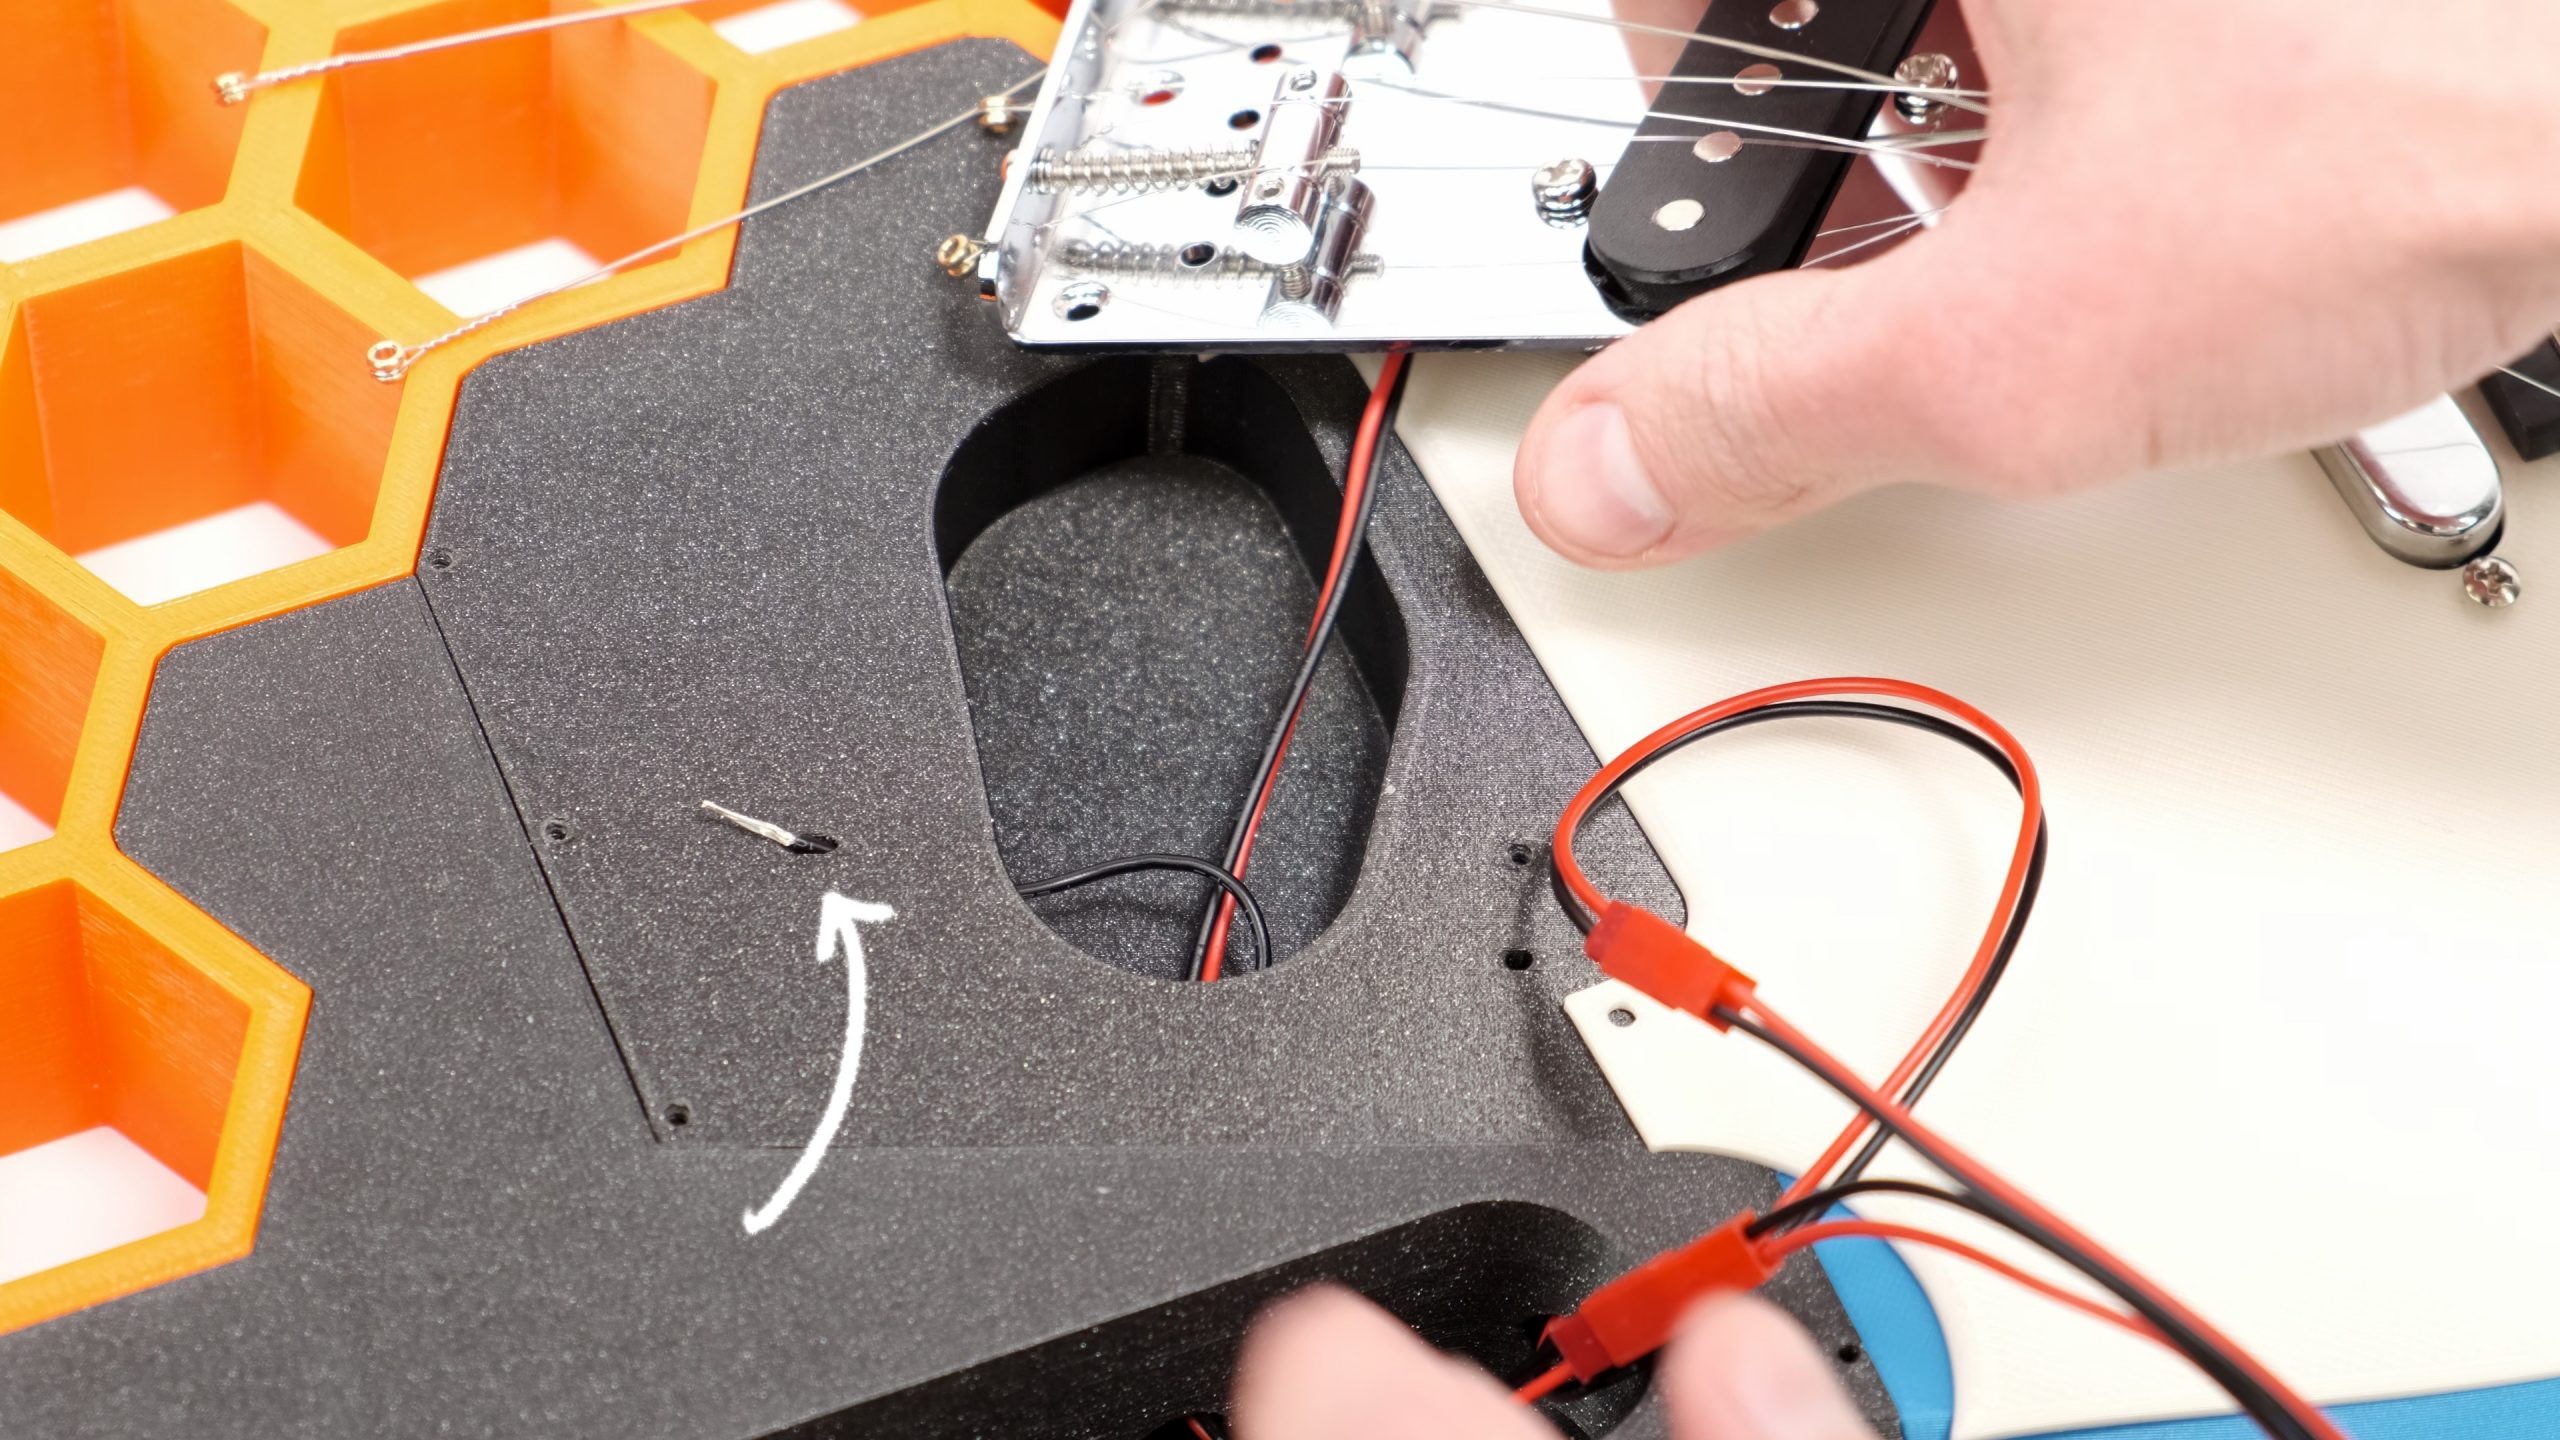
Image alt: Grounding Cable Installation on 3D Printed Guitar to Reduce Buzzing
Final Intonation Adjustment on Your 3D Printed Guitar
After full assembly and stringing, tune the guitar and adjust intonation for accurate tuning across the fretboard. Compare the open string note to the 12th fret note. If the 12th fret note is significantly out of tune, intonation adjustment is needed. Telecaster bridges simplify this process. Adjust saddle position (string contact point) by turning the saddle screw. A flat fretted note (lower pitch) requires moving the saddle towards the neck; a sharp note (higher pitch) necessitates moving it towards the bridge (after slightly loosening the string). Telecaster saddles are shared by two strings, requiring a balance for both.
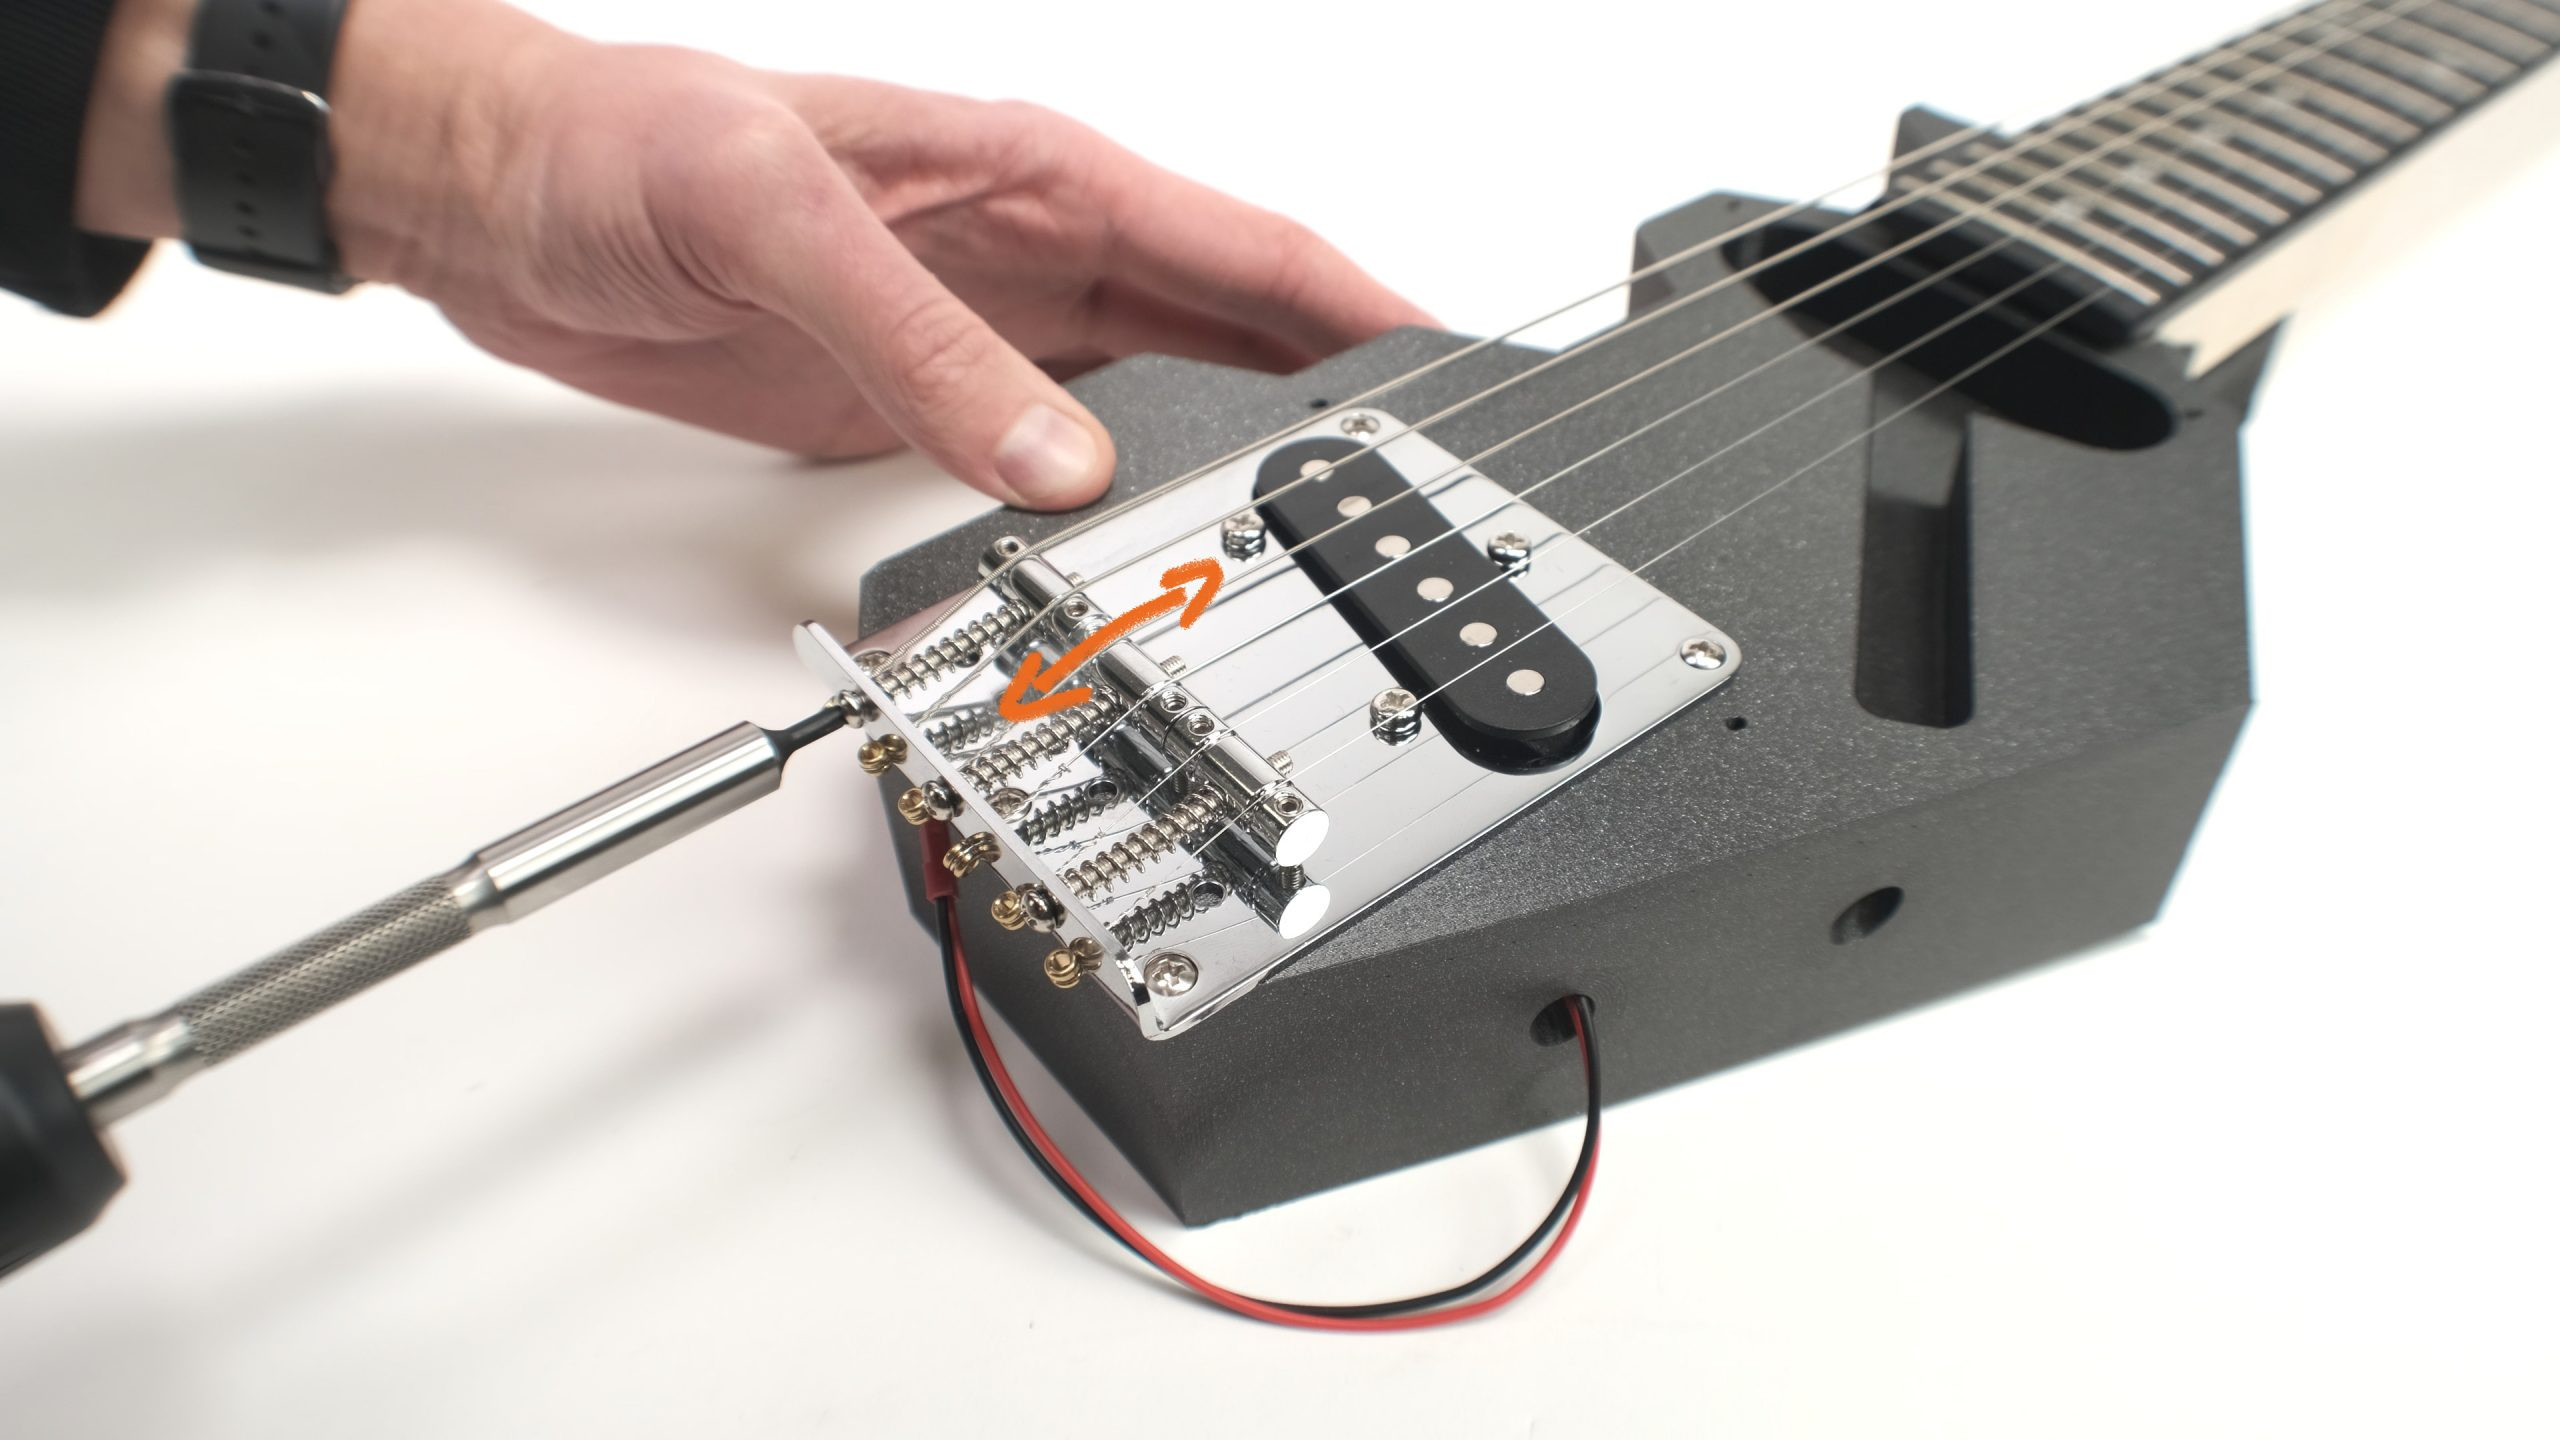
Image alt: Guitar Intonation Adjustment on Telecaster Bridge of 3D Printed Guitar
The Completed 3D Printed Prusacaster Guitar
Playability of the 3D Printed Guitar
The Prusacaster’s playability is surprisingly impressive. Blindfolded, distinguishing it from a conventionally manufactured guitar might be challenging. Tuning stability and intonation are excellent. While not expected to rival high-end Telecasters due to budget components, its performance is remarkable for its cost.
Build Your Own 3D Printed Guitar: Download the Design
Overall, the Prusacaster project is a resounding success. To create your own 3D printed guitar, download the 3D model from Printables.com. STEP files and a DXF drawing of hole positions are also included.
Download the model from Printables.com
The design is available for free download. Enjoy building your own Prusacaster!