The truss rod, while a simple component within a guitar, holds immense importance for its playability and longevity. For anyone venturing into the world of guitar playing, grasping the function, mechanics, and adjustment of the truss rod is invaluable. Whether you own an acoustic or electric guitar, this knowledge empowers you to optimize your instrument’s feel and sound.
What is a Guitar Truss Rod?
At its core, a truss rod is a slender metal rod embedded within the guitar’s neck. It spans the neck’s length, from the nut (near the headstock) to the heel (where the neck joins the body). Positioned just beneath the fretboard, the truss rod is typically accessible through a small opening behind the nut on most guitars. This access point is often concealed by a small cover made of wood or plastic, secured with screws. However, some guitars, particularly older nylon-string models and specific designs like the Big Baby, feature truss rod access through the soundhole, a design still employed by certain acoustic guitar manufacturers today.
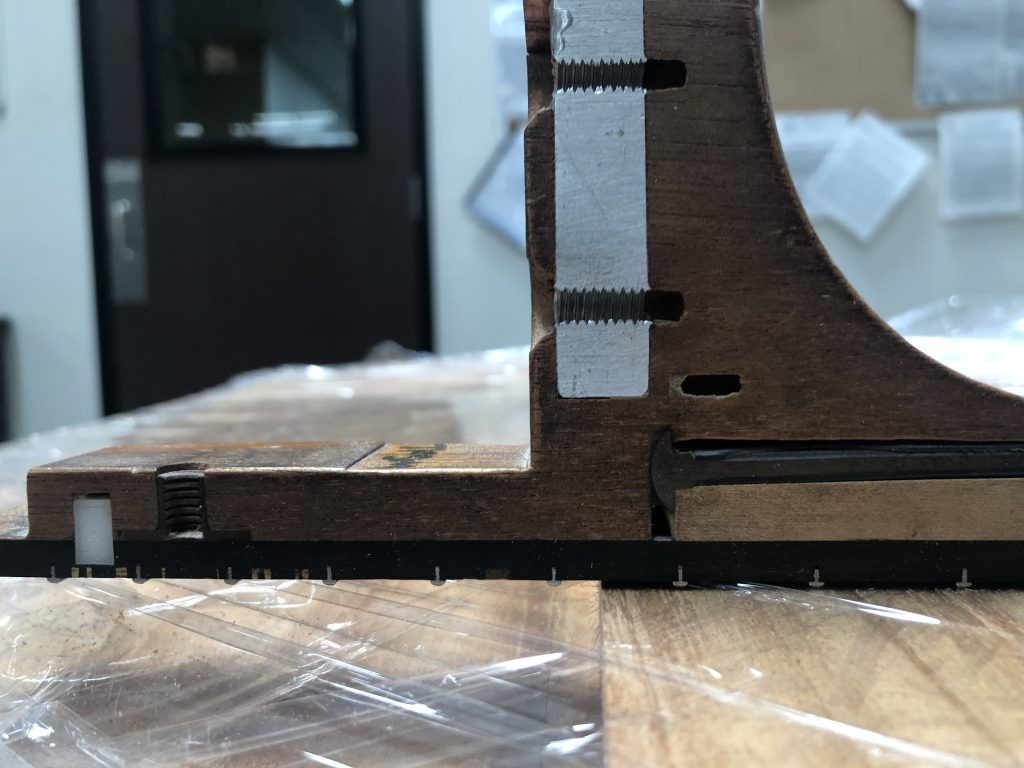
To visualize the truss rod’s placement, consider these cross-sectional views of a Taylor guitar neck, revealing the truss rod within:
Figure 1: Truss Rod Location at the Guitar Headstock
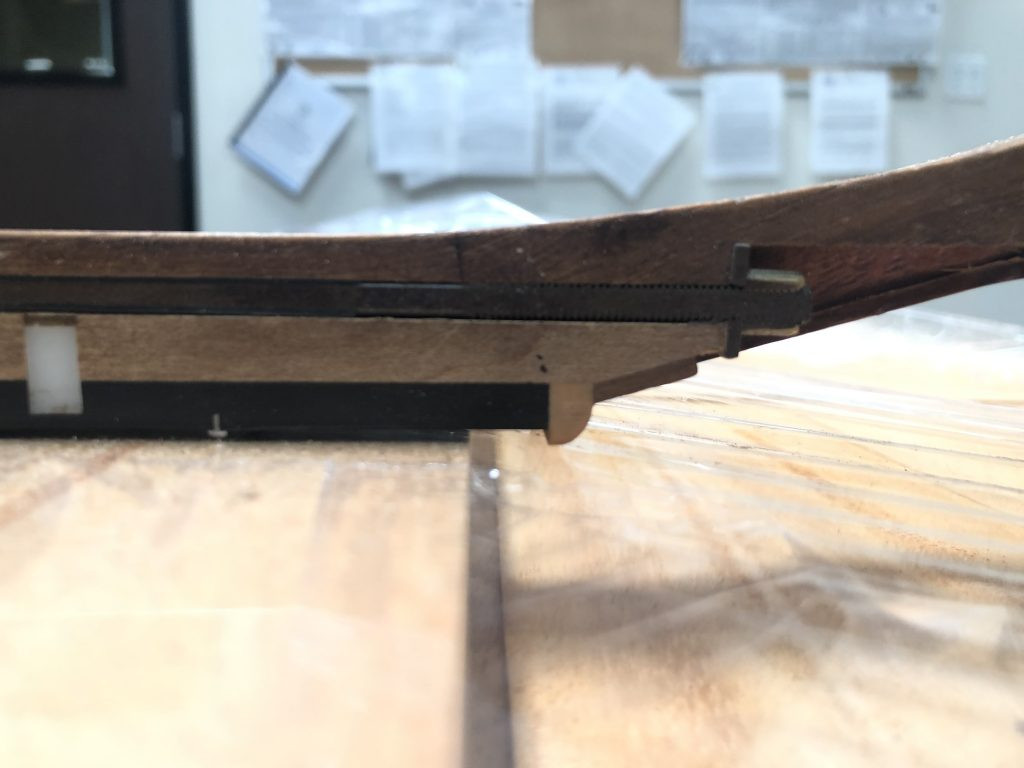
Figure 2: Truss Rod Position at the Guitar Heel
The Crucial Role of the Truss Rod: Managing Neck Relief
The primary function of the guitar truss rod, in both electric and acoustic steel-string guitars, is to counteract the immense tension exerted by the strings. Steel guitar strings, even light gauge sets, can apply significant force – up to 180 pounds for acoustic guitars – pulling upwards on the neck and bridge. The truss rod acts as a vital counterbalance, stabilizing the neck and preventing it from bending under this pressure. Without a properly functioning truss rod, the string tension would warp the guitar neck over time, rendering the instrument unplayable.
Beyond structural integrity, the truss rod plays a crucial role in adjusting neck relief. Neck relief refers to the slight concave bow in the guitar neck, which is essential for comfortable playing. The amount of relief is a matter of personal preference, influenced by playing style and technique. There isn’t a universal “correct” setting; rather, it’s about tailoring the relief to suit individual player needs. Adjusting the truss rod allows guitarists to fine-tune this relief.
It’s important to dispel a common misconception: the truss rod is not primarily for setting the guitar’s action. Action, defined as the height of the strings above the fretboard, is a key factor in playability. While adjusting the truss rod can be a step in action adjustment, it’s not a direct action-setting tool. Achieving optimal action often involves adjustments to the neck angle and the bridge saddle. Over-reliance on the truss rod to correct action issues, such as attempting to compensate for a low neck angle with excessively high string action, can lead to problems like fret buzz.
How to Adjust Your Guitar’s Truss Rod for Optimal Playability
For minor adjustments to neck relief, tweaking the truss rod at home is generally safe and straightforward. Glen Wolff, Customer Service Manager at Taylor Guitars, offers reassurance:
“There are a lot of myths and scary stories about adjusting the truss rod. People are told, “Don’t touch it, you could snap it,” or “Just adjust the saddle, it’s safer than messing with the truss rod.” Some of this comes from stories of older guitars that someone may have had issues with. But here’s what you really need to know. Modern guitars have working, stable truss rods. The truss rod is in the neck so that the neck can be adjusted. It’s meant to be used to add or reduce the relief in the neck, to compensate for the string tension pulling on it. There’s no risk in making a truss rod adjustment to your Taylor. Follow our instructions and watch the video demo on our website and you’ll be better off for knowing how to do it.”
The process is quite simple. Begin by sighting down the guitar neck from the headstock, observing the straightness of the neck. Look for any bowing in the middle section. If the neck bows downwards, away from the strings (excessive relief), you’ll want to tighten the truss rod by turning it clockwise, typically a quarter or half turn at a time. Conversely, if the neck bows upwards, towards the strings (insufficient relief or back bow), loosen the truss rod by turning it counter-clockwise. Remember the simple rule: “righty-tighty, lefty-loosey.”
Make small, incremental adjustments and re-assess the neck relief after each adjustment. If adjusting the truss rod doesn’t resolve your guitar’s playability issues, or if you are uncomfortable performing the adjustment yourself, it’s advisable to consult an experienced guitar technician or luthier. If you own a Taylor guitar, contacting their customer service can connect you with authorized service centers for expert assistance.