
Hey everyone, Darrin from GuitarControl.com here, back with another lesson for you. Today, we’re diving into one of the most recognizable guitar riffs ever written: the intro solo from “Wish You Were Here” by Pink Floyd. Even if you’re not a die-hard Pink Floyd fan, there’s no denying the beauty and emotion in this melody. It’s also surprisingly approachable for intermediate players.
To help you learn this classic riff note-for-note, we’ve got free guitar tabs linked in the description. So grab your guitar, download the tabs, and let’s get started on learning this iconic intro solo tonight!
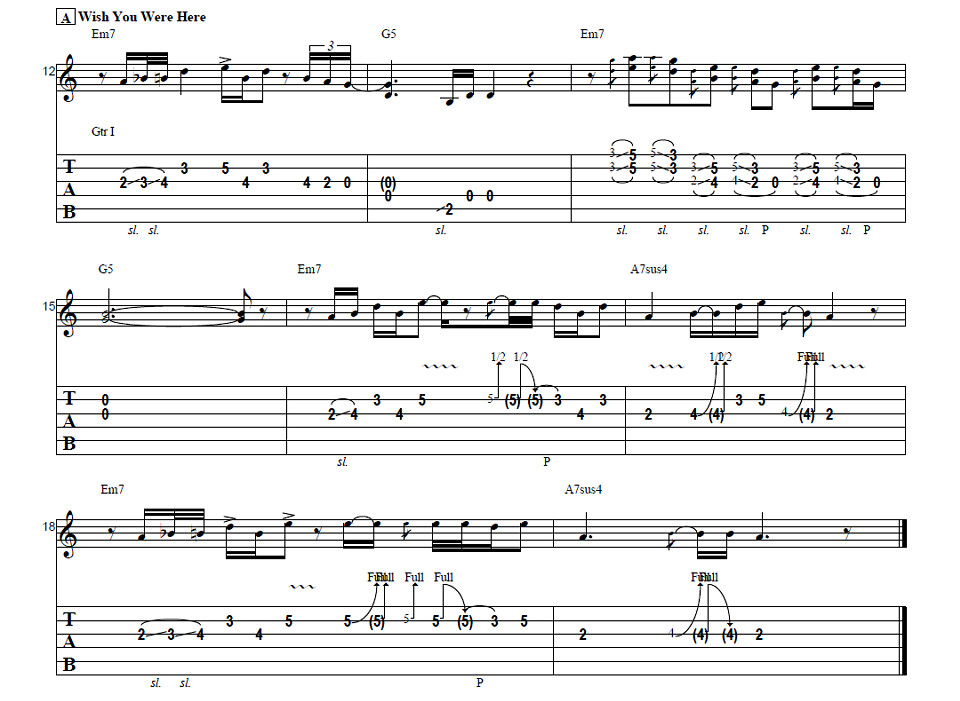
Breaking Down the Wish You Were Here Intro Solo
Let’s get right into it. We’ll start at the second fret of the G string. You’re going to pick that note and then slide up to the fourth fret. The key here is to make the slide slightly staggered, so you can distinctly hear the transition across the third fret. I like to use my middle finger for this initial slide because it sets me up perfectly for the next note, which is on the third fret of the B string. This way, my index finger is already in position.
So, it’s pick and slide… Timing-wise, it’s a bit tricky to count precisely. Think of it as resting on the downbeat of one, and then the slide starts on the “and” of one. The first part is a 16th note, followed by 32nd notes. Instead of overthinking the count, try to feel the rhythm. After the slide, we move to the third fret of the B string. This note is a quarter note, landing on the downbeat of two.
Next, we’re going to the fifth fret of the B string. Keep your first finger anchored on the third fret of the B string as a reference point. Then, use your second finger to fret the fourth fret of the G string, and then return to the third fret of the B string. Keeping that first finger planted is crucial for smooth transitions here.
Following that last note, there’s a very brief pause, a small rest. These little rests are sprinkled throughout the solo, giving you just enough time to reposition your hand for the next phrase.
 wish you were here intro solo
Now, shift your hand down slightly. Your first finger should now be on the second fret of the G string, and your third finger on the fourth fret. We’re going to pick the fourth fret of the G string, followed by the open high E string, and then the open D string. Immediately after, execute a slide from nowhere into the second fret of the A string, and finish with two more open D strings. That completes the first two measures of the solo.
Moving onto the third measure, this section tends to be the trickiest part for many students. It involves a series of quick double stops. The easiest way to approach this, in my experience, is to use your third finger to barre across the third fret of both the B and high E strings. Pick these double stops and slide up to the fifth fret. Think of it as a slide initiating from “nowhere,” even though you’re starting from the third fret. So, it’s a slide from the third to the fifth fret, and then immediately come back down to the first fret and repeat the same sliding motion up to the third fret. That’s the first part of this measure.
Next, we’ll do a similar double stop pattern, but now on the G and B strings, and staggered by a half step. I find using my second and third fingers works best here. Place your second finger on the third fret of the G string and your third finger on the fourth fret of the B string. We’ll perform the same slide, moving up a half step, so you’ll end up on the fourth fret of the G string and the fifth fret of the B string. You could use your first and second fingers, but I find using the second and third allows for a more natural hand position, especially since your middle finger is typically longer than your ring finger. So, slide from the 3rd and 4th frets to the 4th and 5th frets, and then descend to the second fret of the G string and the third fret of the B string. Follow this with an open G string. Repeat the double stop on the G and B strings (second and third frets), then another open G string, and finally, an open B string. This sequence encompasses the fourth measure. Allow that final B string to ring out for the entire measure. That concludes the first half of the entire intro riff.
Starting on the fifth measure, it’s somewhat similar to the beginning again. We’re going back to the second fret of the G string, again using my middle finger, and sliding up to the fourth fret, followed by the third fret of the B string. Then, back to the fourth fret of the G string and up to the fifth fret of the B string. This is why using the middle finger for that initial slide is so efficient.
When you reach the fifth fret on the B string, let it ring with a bit of vibrato. Then, we’re going to bend that note and perform a pull-off back to the third fret. So, it’s a bend, release, pull-off, and then back to the fourth fret of the G string, and finally, the third fret of the B string.
Moving into the next measure, we start on the second fret of the G string. Now, we’re going to the fourth fret of the G string. If you keep your first finger on the second fret, place your second finger on the third fret and your third finger on the fourth fret. This finger positioning is because we’re going to perform a bend, and having those extra fingers behind helps with leverage and stability. Then, shift up to the fifth fret on the B string, return to the same second through fourth fret configuration on the G string, and bend, ending on the second fret.
Alright, and for the next measure, it’s reminiscent of the very beginning once more. We’re doing that slide from the second through the third and fourth frets on the G string, to the third fret of the B string, back to the fourth fret of the G string, and then to the fifth fret of the B string. Now, bend that fifth fret on the B string and release it, pulling off back to the fifth fret, then to the second fret of the G string, and finally, the fourth fret of the G string. Bend and release that fourth fret, and conclude on the second fret of the G string.
To really nail the timing and feel of this solo and make it sync with the rhythm part, a great practice technique is to play along with the original track. The song’s chord progression plays through twice before the lead guitar comes in on the second pass. You can practice playing in unison with the lead guitar to internalize the timing. Then, try playing it from the very beginning of the song, during the initial rhythm-only section. Listen for those… those are like your pickup notes signaling the start of the lead… and then you’ll hear it again… and it transitions right into the G chord and the verse of the song.
Final Thoughts
And there you have it – the intro solo to “Wish You Were Here” by Pink Floyd. As I mentioned, it’s not overly complicated, but it incorporates several techniques that are great practice. While it’s easier to play on an electric guitar, the original was indeed played on acoustic, which is how I demonstrated it here. If you don’t have an acoustic, or if you’re newer to guitar, or have an acoustic that’s tough to play, don’t hesitate to learn this on your electric guitar – it sounds fantastic either way.
If you found this lesson helpful, give us a thumbs up and leave a comment below with any questions or other guitar topics you’d like us to cover. If you’re not already subscribed, please subscribe to our channel and hit the notification bell so you don’t miss any of the new content we upload throughout the week. That’s all for today. Thanks for watching, and have a great day!

