When you’re starting your guitar journey, familiarizing yourself with the different parts of the instrument is crucial. Like learning the alphabet before writing, understanding guitar terminology will significantly enhance your learning experience. Whether you’re taking lessons, exploring online resources, or even thinking about buying a new guitar, knowing the names and functions of each component, as illustrated in a comprehensive Guitar Parts Diagram, is invaluable.
Let’s break down the anatomy of both acoustic and electric guitars, starting with the main sections and then diving into the individual parts.
Main Sections of the Guitar: Head, Neck, and Body
Just like the human body, a guitar can be broadly divided into three main sections: the headstock, the neck, and the body. A guitar parts diagram clearly illustrates these fundamental areas.
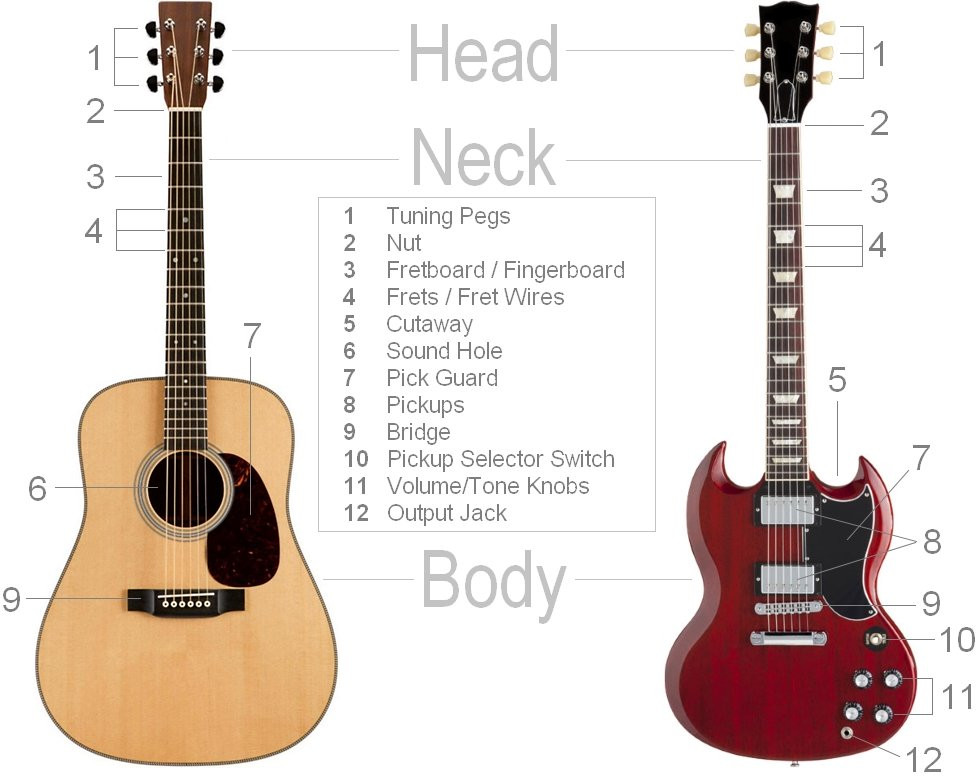 guitar parts diagram showing both acoustic and electric guitar
- Headstock: Located at the top of the guitar, the headstock is where the tuning magic happens. This is where you’ll find the tuning machines responsible for adjusting the pitch of your strings.
- Neck: Extending from the headstock, the neck is the long wooden part where your fretting hand (typically the left hand for right-handed players) comes into play. The neck features the fretboard, the surface where you press down the strings to create different notes and chords.
- Body: The largest part of the guitar, the body resonates and amplifies the sound of the strings. It’s where you strum or pick the strings with your picking hand (typically the right hand for right-handed players).
Notice in the guitar parts diagram that the electric guitar on the right showcases cutaways. These are curved indentations in the body where it meets the neck. Cutaways are designed to provide easier access to the higher frets, particularly useful for lead guitar playing. While more common on electric guitars, acoustic guitars, especially electro-acoustic models, can also feature cutaways.
Detailed Guitar Anatomy: From Headstock to Tail
Now, let’s delve into the individual components of a guitar, examining both acoustic and electric variations, moving from the headstock down to the body’s end. Understanding each part’s role, as depicted in a detailed guitar parts diagram, will give you a deeper appreciation for your instrument.
Headstock: The Tuning Center
The headstock is the command center for tuning your guitar. It houses the tuning machines, which are essential for adjusting string tension and achieving the correct pitches.
On a standard six-string guitar, you’ll find six tuning machines. Each machine has a tuning peg that you turn to tighten or loosen a specific string, raising or lowering its pitch respectively.
There are three primary headstock configurations, as you might see in various guitar parts diagrams:
3 Tuners Per Side: A balanced design with three tuning machines on each side of the headstock, common on many guitars.
In-line Tuners: All six tuners are arranged in a line, typically on one side of the headstock. This configuration is frequently seen on Fender-style guitars.
Classical Tuners: A distinct design found on classical guitars, often featuring ornate plates connecting the tuning pegs.
The tuning machine itself is the mechanism connected to the tuning peg. It turns the tuning post, around which the string is wound. Each tuning post has a hole for threading the string.
The headstock may also provide access to the truss rod. This adjustable rod runs through the neck and controls the neck’s curvature (or “bow”). Truss rod adjustments are typically only needed for advanced setup or when guitars are exposed to significant temperature or humidity changes. Adjusting the truss rod can help minimize fret buzz by correcting neck bowing.
For more in-depth information on guitar setup, resources like this WikiHow guide can be helpful. However, as a beginner, focusing on learning the parts of the guitar from a guitar parts diagram is the first essential step.
Nut: String Spacing and Height
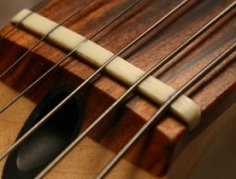 guitar nut
The nut is a small but crucial part located at the end of the fretboard, just before the headstock. Its primary function is to guide the strings from the headstock to the fretboard, ensuring proper string spacing and height.
Nuts are made from various materials, including bone, plastic, graphite, Corian, and brass, each offering slightly different tonal characteristics and durability.
The nut has precisely cut grooves or slots for each string to sit in. It defines one end of the string’s vibrating length (the other being the bridge) when a string is plucked.
Neck: The Foundation of the Fretboard
The neck is the wooden backbone of the guitar, typically crafted from mahogany or maple. It’s important to distinguish between the neck and the fretboard; the fretboard is actually glued onto the neck. When you hold the guitar, your thumb rests on the back of the neck, providing support for your fretting hand.
Fretboard / Fingerboard: Where Notes Come to Life
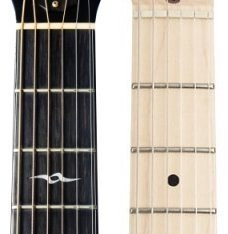 rosewood and maple guitar fretboard
The fretboard, also known as the fingerboard, is the playing surface of the neck. It’s where you press down the strings to produce different notes and chords. Running along the fretboard are raised metal strips called frets or fret wires. To play a specific note, you press the string just behind a fret wire.
Rosewood and maple are the most common fretboard materials. Rosewood is darker and generally contributes to a warmer tone, while maple is lighter and tends to produce a brighter, snappier sound.
Often, you’ll find inlay markers along the fretboard. These are dots or decorative shapes inlaid into the fretboard at specific fret positions, typically at frets 3, 5, 7, 9, 12, 15, 17, 19, 21, and 24 (on guitars with 24 frets). These markers help you visually navigate the fretboard.
Neck Joint: Connecting Neck and Body
The neck joint is where the neck attaches to the guitar body. The neck can be joined to the body using one of three primary methods:
- Bolt-on: The neck is screwed to the body, typically with 3 or 4 bolts. This is a common and versatile method.
- Set-in: The neck is glued into a pocket in the body. This construction is often associated with increased sustain.
- Neck-through: The neck wood extends through the entire length of the body, with the body “wings” glued to the sides. This is the most complex construction and is also known for enhanced sustain.
While set-in and neck-through constructions are often believed to improve sustain, bolt-on necks are also used on many high-quality guitars and offer their own tonal characteristics.
Pick Guard: Protecting the Finish
The pickguard, also called a scratchplate, is a piece of plastic or other material mounted on the body, especially on acoustic and electric guitars. Its main purpose is to protect the guitar’s finish from scratches caused by the pick or fingernails during strumming and picking. Pickguards can also be decorative, adding a visual element with different colors or patterns.
Pickups (Electric Guitars): Capturing String Vibrations
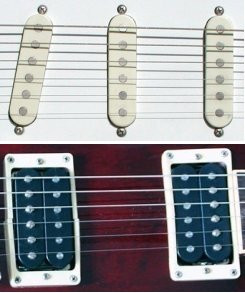 electric guitar single coil and humbucker pickups
Pickups are electromagnetic transducers located on the body, near the end of the fretboard on electric guitars. They are the components that “pick up” the vibrations of the strings and convert them into an electrical signal that is then sent to your amplifier to produce sound.
The pickup closer to the bridge is called the bridge pickup (or lead pickup), while the one closer to the neck is the neck pickup (also known as rhythm or jazz pickup).
The two main types of pickups are:
- Single-coil: (pictured right, top) Known for their bright, clear, and sometimes thinner tone. They are traditionally used on guitars like Stratocasters.
- Humbucker (or double-coil): (pictured left, bottom) Produce a thicker, warmer, and more powerful sound compared to single-coils. They are commonly found on guitars like Les Pauls. Humbuckers often have metal covers.
The term “humbucker” comes from their design, which “bucks the hum” – they are designed to reduce unwanted noise and hum compared to single-coil pickups.
Tone & Volume Controls (Electric Guitars): Shaping Your Sound
These knobs and switches on electric guitars give you control over the volume and tone of the signal coming from the pickups. Common configurations include a master volume knob and one tone knob per pickup. Some guitars may have individual volume knobs for each pickup as well.
Electric guitars also feature a pickup selector switch, allowing you to choose which pickup(s) are active.
Guitars with three pickups, like Stratocasters, typically use a 5-way pickup selector switch. The switch positions usually correspond to: 1) Bridge pickup only, 2) Bridge and middle pickups, 3) Middle pickup only, 4) Middle and neck pickups, 5) Neck pickup only.
Sound Hole (Acoustic Guitars): Natural Amplification
Acoustic guitars utilize a sound hole in the body to project and amplify the sound of the vibrating strings naturally. The sound hole allows the sound waves resonating within the guitar’s body to escape and be heard.
Electro-acoustic guitars combine a sound hole with pickups and an onboard preamp. This gives you the option to play acoustically or plug into an amplifier for amplified sound, similar to an electric guitar.
Electric Guitar Bridge: Anchoring and Adjusting Strings
The bridge on an electric guitar serves as the anchor point for the strings on the body. Remember, the nut is one end of the string’s vibrating length; the bridge is the other. Electric guitar bridges often feature individual saddles for each string. These saddles support the strings and are adjustable for string height (action) and intonation (tuning accuracy across the fretboard). Strings are typically threaded through the body or a tailpiece before passing over the bridge saddles.
Some electric guitar bridges are designed to accommodate a tremolo arm (also known as a whammy bar). The tremolo arm allows you to manipulate the bridge, changing the string tension and pitch to create vibrato effects or dramatic “dive bombs.”
A tune-o-matic bridge is an example of a fixed bridge, meaning it doesn’t have a tremolo system.
Acoustic Guitar Bridge: Simplicity and Vibration Transfer
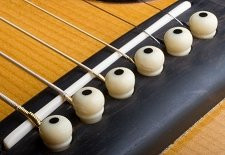 acoustic guitar bridge
The bridge on acoustic guitars shares the same fundamental purpose as electric guitar bridges: to transfer string vibrations to the guitar body. However, acoustic bridges are typically simpler in design. They usually consist of a single piece of wood (often rosewood) with a raised saddle (similar to the nut) over which the strings pass. Strings are secured either by bridge pins that plug into holes in the bridge or are tied directly to the bridge itself.
Strap Buttons: Attaching Your Strap
Strap buttons are simple but essential hardware. They are knobs or pegs located at different points on the guitar body where you attach the ends of your guitar strap. Typically, one strap button is at the base of the body, and the other is near the neck joint or even on the neck heel.
Strings: The Source of Sound
Strings are the vibrating elements that produce sound on a guitar. They come in various gauges (thicknesses) and materials. Electric guitars use steel strings, while acoustic guitars can use steel, brass, or bronze strings. Classical acoustic guitars use nylon strings.
String gauge is measured in inches. For example, a “.010” gauge high E string is 0.010 inches thick. Guitarists often refer to string sets by the gauge of the thinnest string; for instance, “10s” refers to a set where the high E string is .010 inches.
Common string gauges range from .009 (extra light) to .013 (medium) for the thinnest string. Heavier gauge strings require more finger strength to fret but often produce a fuller, “meatier” tone.
For reliable and quality strings, D’Addario strings are highly recommended. Their EXL series for electric guitars and Phosphor Bronze for acoustic guitars are well-regarded for their tone, durability, and corrosion-resistant packaging.
By understanding the function of each part described above and visualized in a guitar parts diagram, you’ll be well-equipped to learn, maintain, and communicate effectively about your guitar. This knowledge is the first step towards a deeper connection with your instrument and a more rewarding musical journey.

