Navigating the world of guitar effects pedals can be exciting, but also overwhelming, especially when it comes to arranging them in your signal chain. With a vast array of pedals available, from vintage classics to modern innovations, understanding the optimal order for your effects is crucial to achieving your desired sound. While there’s no single “right” way to set up your pedalboard, and experimentation is key, there are established guidelines that can serve as a fantastic starting point. This guide will walk you through common practices and explore different approaches to Guitar Effects Order to help you craft the perfect tone.
Understanding the Basics of Guitar Effects Order
The order in which your guitar effects are connected, known as the signal chain, fundamentally shapes your sound. Think of it as a sonic journey where your guitar’s signal travels through each pedal, being modified at every stage. Changing the order can drastically alter how each effect interacts with one another and with your amplifier. A pedal placed earlier in the chain will affect the signal differently than the same pedal placed later.
General Guidelines for Pedal Placement
While experimentation is encouraged, there are some generally accepted placements for different categories of effects pedals. These guidelines are based on how these effects typically interact with each other and aim to provide a balanced and controllable sound.
-
Dynamics and Filter Effects First: Effects that control the dynamics of your signal or filter frequencies are usually placed at the beginning of the chain. This category includes:
- Compressors: These even out your guitar’s dynamics, reducing the difference between loud and soft notes. Placing them early ensures a consistent signal for subsequent effects.
- Wah Pedals: These expressive filters are best placed early to manipulate the raw guitar signal before distortion or modulation.
- Pitch Shifters: If you use pitch-shifting effects, placing them early allows them to track the cleanest possible guitar signal.
- Volume Pedals (for Swells/Clean Volume Control): When used to create volume swells or control your clean guitar volume, a volume pedal is best placed at the very beginning of the chain.
-
Gain-Based Effects Next: Overdrive, distortion, and fuzz pedals, which add gain and harmonic complexity, typically follow dynamics and filters:
- Overdrive and Distortion: These pedals shape the core drive and distortion of your tone. Placing them after dynamics ensures a consistent level hitting the gain stage.
- Fuzz: Fuzz pedals, known for their thick and often unruly distortion, also benefit from being placed early in the gain section.
-
Modulation Effects Come After Gain: Modulation effects, which add movement and texture to your sound, are generally placed after gain-based effects:
- Chorus, Flanger, Phaser, Tremolo, Rotary: These effects create swirling, shimmering, or pulsating sounds. Placing them after distortion allows them to modulate the already processed signal, creating richer textures.
-
Time-Based Effects at the End: Time-based effects, which create echoes and ambience, are usually positioned towards the end of the signal chain:
- Delay and Reverb: These effects simulate echoes and room acoustics, adding depth and space to your sound. Placing them last ensures that all other effects are enveloped in the delay and reverb, creating a cohesive final sound.
-
Volume Pedal (for Overall Level Control): If you want to use a volume pedal to control the overall output level of your entire pedalboard, place it at the very end of the chain, just before your amplifier.
Example Pedalboard Setups
Let’s look at some practical examples of pedalboard setups, building upon the general guidelines discussed.
Setup 1: Standard Pedalboard Configuration
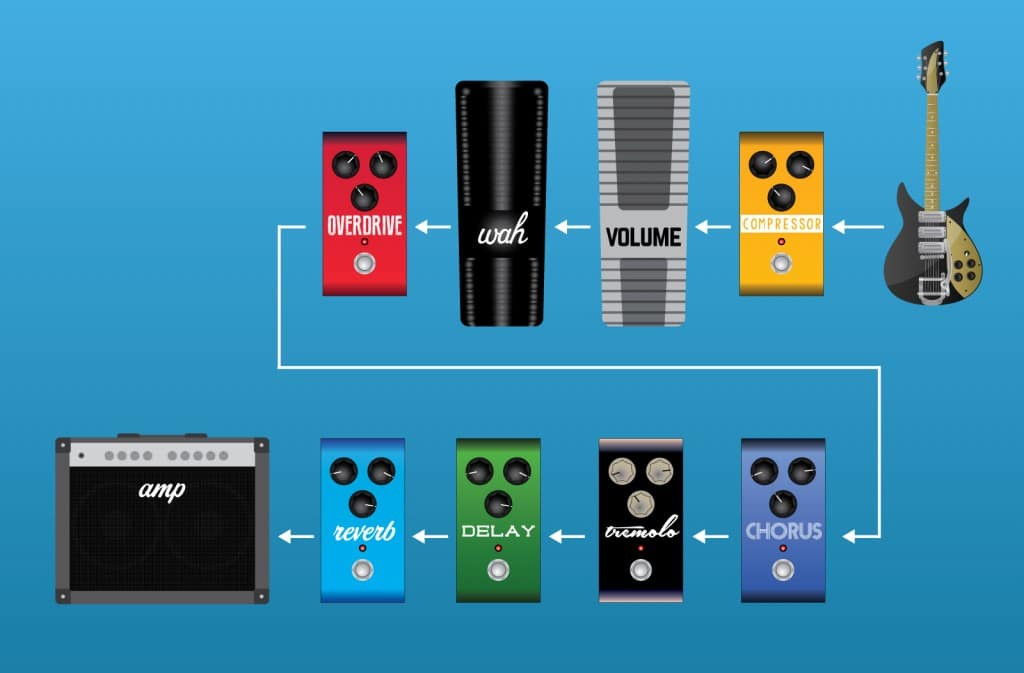 Effects Pedal signal chain
Guitar → Compressor → Volume Pedal (Swells) → Wah Pedal → Overdrive → Chorus → Tremolo → Delay → Reverb → Amplifier
In this setup, the volume pedal is positioned early for creating volume swells and controlling the input level to subsequent effects. This is a versatile configuration suitable for a wide range of musical styles, offering a balanced and well-defined sound. Placing the compressor first ensures a consistent signal level feeding into the wah and gain pedals, while modulation and time-based effects add texture and space at the end.
Setup 2: Volume Pedal for Master Volume Control
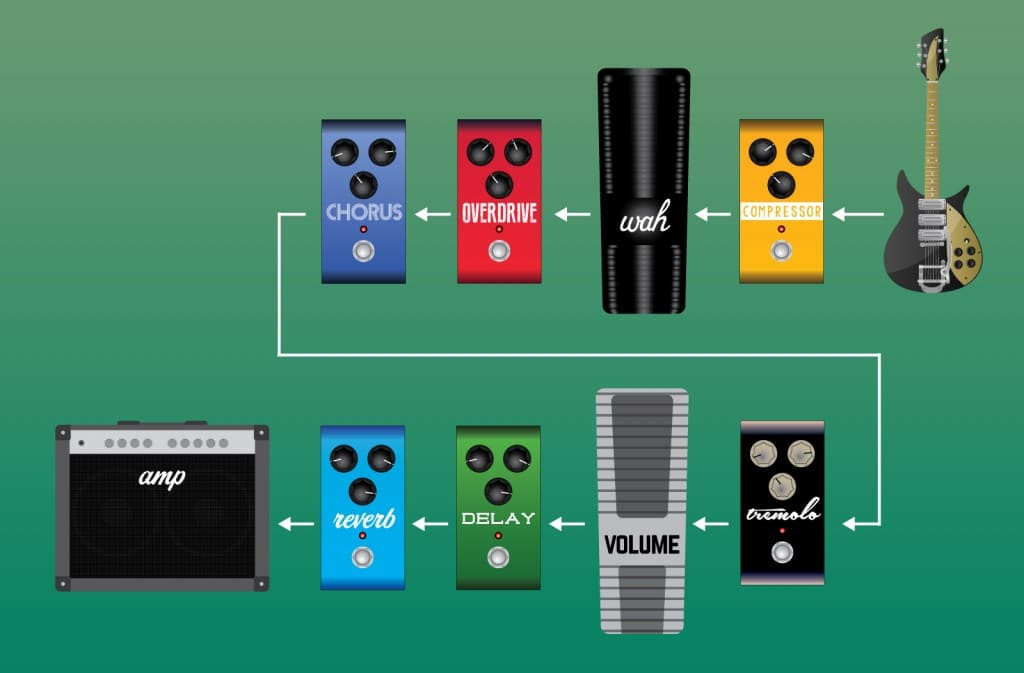 Effects Pedal signal chain
Guitar → Compressor → Wah Pedal → Overdrive → Chorus → Tremolo → Volume Pedal (Master Volume) → Delay → Reverb → Amplifier
Here, the volume pedal is moved towards the end, acting as a master volume control for your entire pedalboard. This is useful for adjusting the overall loudness without affecting the gain staging of your overdrive or distortion pedals. This setup allows you to maintain your desired drive level while controlling the final output volume, perfect for dynamic stage performances or recording situations.
Utilizing the Amplifier’s Effects Loop
Many guitar amplifiers feature an effects loop, which is a send and return jack that inserts effects pedals between the preamp and power amp sections of the amplifier. This placement can be particularly beneficial for certain types of effects, especially when you derive your core distortion from the amplifier itself.
-
Why Use an Effects Loop? The preamp section of your amplifier is responsible for the initial tone shaping and gain, while the power amp section amplifies the signal to speaker level. Placing effects in the effects loop means they are processed after the preamp distortion but before the power amp.
-
Ideal Effects for the Effects Loop: Time-based and modulation effects often sound best in the effects loop, especially when using amplifier distortion. Placing delay and reverb before a distorted amplifier preamp can result in a muddy and indistinct sound, as the repeats and reverb tails are further distorted by the preamp.
-
Types of Effects Loops:
- Series Effects Loop: In a series loop, the entire signal from the preamp is routed through the effects loop. This is the most common type.
- Parallel Effects Loop: In a parallel loop, only a portion of the preamp signal is sent through the effects loop, while the rest remains unaffected. Parallel loops often have a mix control to blend the wet (effected) and dry (unaffected) signals. When using pedals in a parallel loop, set the pedal’s mix control to 100% wet to avoid phasing issues. Some pedals, like Strymon’s TimeLine and BigSky, have a “Kill Dry” feature for optimal use in parallel loops.
Effects Loop Setups
Let’s explore setups that incorporate the amplifier’s effects loop.
Effects Loop Setup 1: Time-Based Effects in the Loop
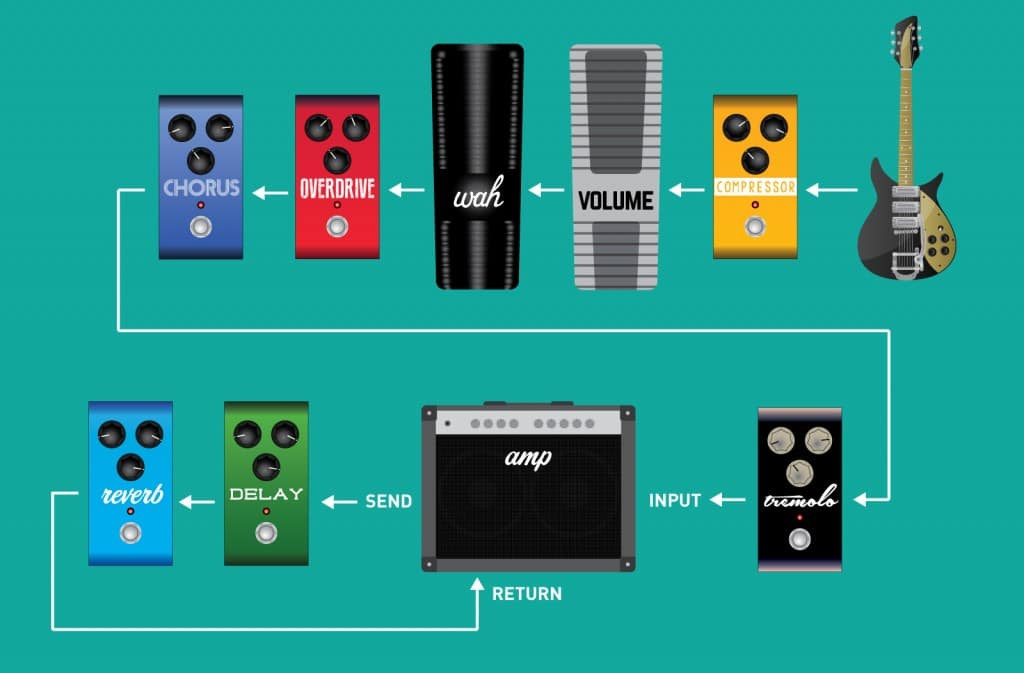 Setting up your Effects Signal Chain – Amplifier Effects Loops
Guitar → Compressor → Volume Pedal → Wah Pedal → Overdrive → Chorus → Tremolo → Amplifier INPUT; Amplifier Effects Send → Delay → Reverb → Amplifier Effects Return
This is a classic approach, placing only delay and reverb in the effects loop. This configuration is ideal when you use your amplifier’s overdrive or distortion. The preamp’s distorted signal is then fed into the delay and reverb in the loop, resulting in clean and distinct repeats and ambience that are not muddied by further preamp distortion.
Effects Loop Setup 2: Modulation and Time-Based Effects in the Loop
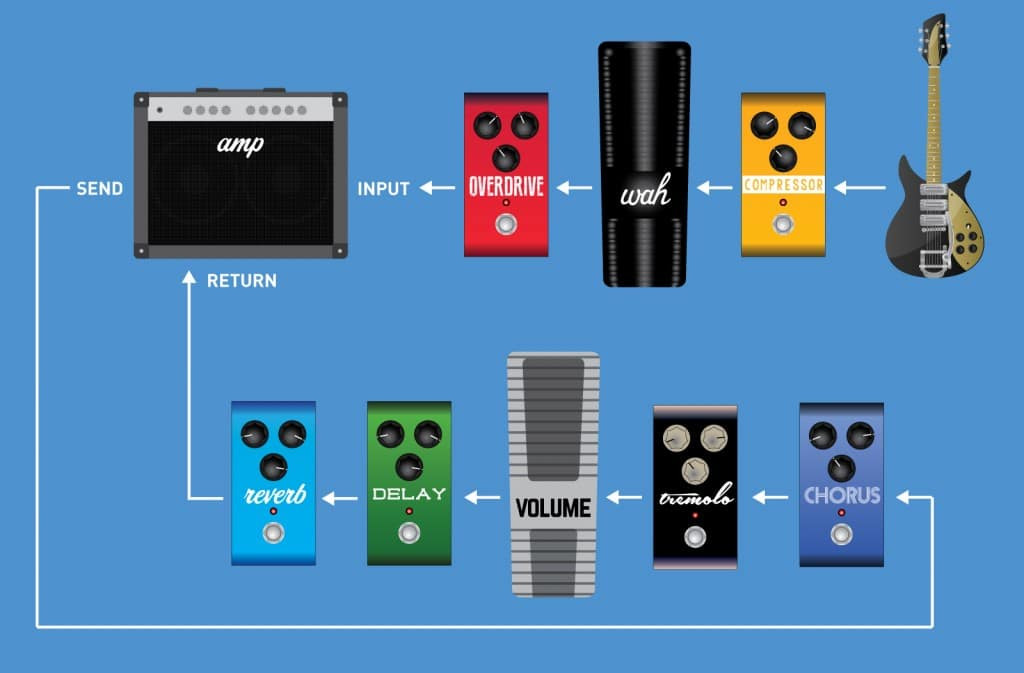 Setting up your Effects Signal Chain – Amplifier Effects Loops
Guitar → Compressor → Wah Pedal → Overdrive → Amplifier Input; Amplifier Effects Send → Chorus → Tremolo → Volume Pedal → Delay → Reverb → Amplifier Effects Return
In this setup, modulation effects and the volume pedal are also moved into the effects loop, along with delay and reverb. This can create a different character for your modulation effects, placing them after the preamp stage. Experimenting with modulation before and after the preamp can yield interesting sonic results.
Special Cases and Pedal-Specific Considerations
Some pedals are designed with unique features or tonal characteristics that make them suitable for placement in multiple positions, or even specific positions, in the signal chain.
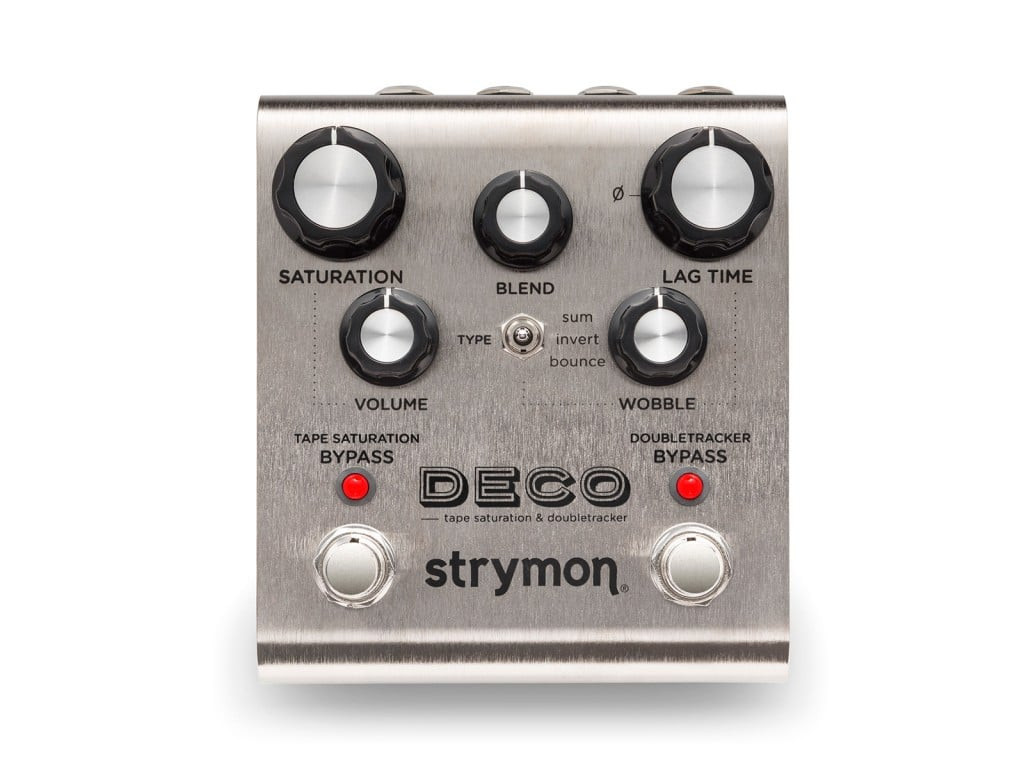 Deco Tape Saturation & Doubletracker
The Strymon Deco is a prime example of a versatile pedal. Its Tape Saturation can function as a subtle overdrive when placed early in the chain, or it can add tape-like warmth and harmonic enhancement when placed at the end, coloring your entire signal.
The Strymon Mobius modulation pedal offers a Pre/Post routing feature, allowing you to select within each preset whether the effect is placed “Pre” (before other effects in the Mobius chain) or “Post” (after). This internal routing flexibility provides immense control over modulation placement.
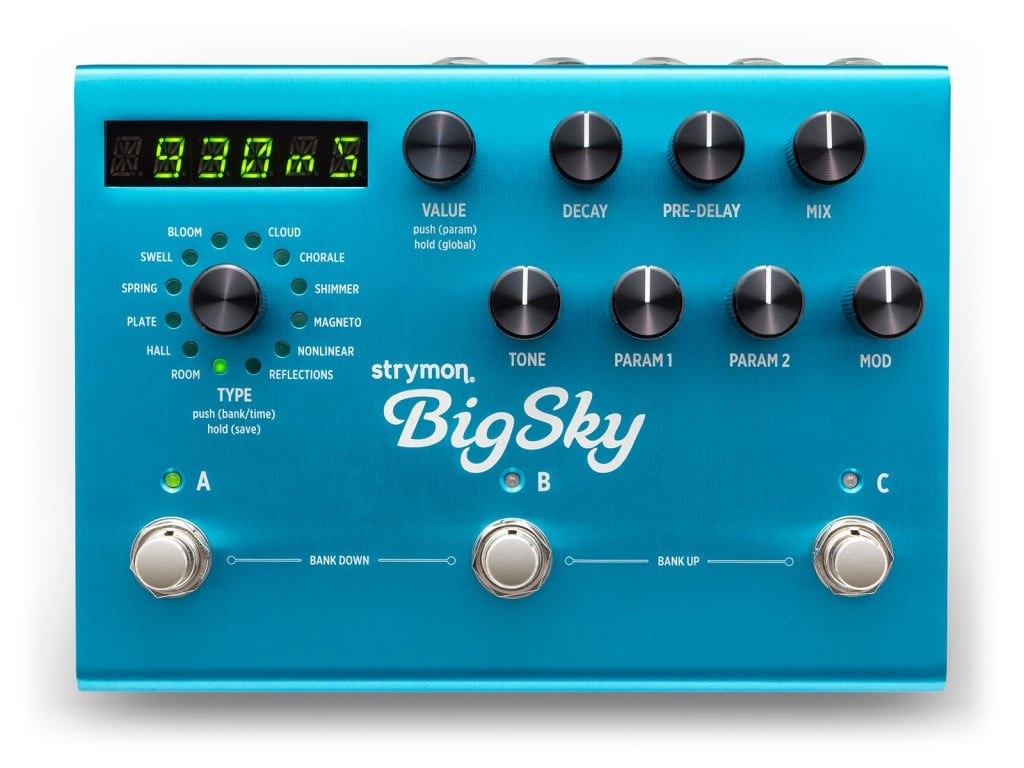 BigSky Reverberator – Reverb Pedal
Pedals like the Strymon Lex rotary speaker emulator can be placed after gain for typical modulation sounds or at the very end of the chain to create the effect of your entire signal passing through a rotary speaker cabinet. The Strymon BigSky reverb features a cabinet filter, making it suitable for direct recording or PA use, simulating the sound of a miked speaker cabinet.
The Most Important Rule: Experiment!
Ultimately, the “best” guitar effects order is subjective and depends on your personal taste and desired sound. The guidelines and examples presented here are starting points, not rigid rules. The most exciting sonic discoveries often come from experimentation and breaking conventional wisdom. Don’t be afraid to try unorthodox placements and listen carefully to how each change affects your tone. Happy accidents and unique sounds are waiting to be found! Use these suggestions as a foundation to build your own pedalboard and discover your individual sonic signature.

