Guitar chord notation can seem confusing at first, especially when you encounter different formats. For guitarists, especially beginners, understanding Guitar Chord Tabs is crucial. This guide will clarify the different ways guitar chords are notated, focusing on chord tabs and how they relate to other common methods like chord diagrams.
There are primarily three methods for writing guitar chords:
- Standard Staff Notation: Similar to notation used for most musical instruments, this uses a five-line staff.
- Chord Tabs (Tablature): Specifically designed for guitar, chord tabs are excellent for fingerpicking and more complex accompaniments, including bass lines. This is what we’re focusing on as guitar chord tabs.
- Chord Diagrams: Often used with lyrics, these diagrams visually represent chords and are sometimes simply referred to as “words” indicating the chord name.
Why do guitar tabs include chord names like C, Am, Fmaj7?
As you learn about guitar chord tabs, you’ll notice letters and symbols like C, Am, and Fmaj7. These are the names of the chords being played. The guitar chord tab itself visually represents the six strings of your guitar, and the numbers on the tab indicate which fret to press down on with your fretting hand.
The chord names (like C, Am, Fmaj7) and chord diagrams are different ways to show you how to form these chords on the guitar. Think of chord diagrams as another visual representation of the same chords you see named in guitar chord tabs.
Chord Diagrams Explained:
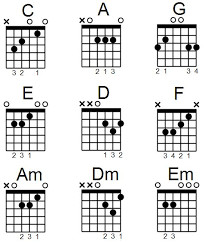
Chord diagrams display the guitar strings vertically. The chord name (like “Am”) is usually written above the diagram. Dots on the diagram show where you need to place your fingers on the fretboard, and numbers below sometimes indicate which fingers to use.
 Example of Chord Diagrams
Imagine rotating a chord diagram 90 degrees to the left. You’ll start to see how it relates to a guitar chord tab. The diagram shows you where to put your fingers (fret and string), and in a guitar chord tab, these positions are translated into numbers on lines representing the strings. Sometimes, finger numbers are also included on the side of rotated diagrams to further guide your finger placement.
 Rotated Chord Diagram Example
Let’s take the example of an Am (A minor) chord. The Am chord diagram tells us to play the notes A, C, and E. Looking at the guitar chord tab example for Am, we can see how this translates to the guitar:
- E string (6th string, thickest): Open (0 in tab, meaning play open string)
- A string (5th string): Open (0 in tab)
- D string (4th string): 2nd fret (2 in tab, finger 2)
- G string (3rd string): 2nd fret (2 in tab, finger 3)
- B string (2nd string): 1st fret (1 in tab, finger 1)
- E string (1st string, thinnest): Open (0 in tab)
You’ll notice in this guitar chord tab example that the bass notes might not always be explicitly played, depending on the musical context.
By understanding this connection, you can start to decipher any chord diagram and translate it into a guitar chord tab, and vice versa. Practice with different chords, and you’ll become more comfortable with both guitar chord tabs and chord diagrams.
It’s worth noting that there can be slight variations in chord diagrams, especially regarding suggested fingerings. For example, the fingering for A major shown as “213” is less common. A more typical and often easier fingering is “123”. Exploring different resources for chord diagrams is helpful. You can find many lists of guitar chords online by searching for “Guitar chords images.”
 Example of Guitar Chord Diagrams List
Exploring these resources will help you compare different chord diagrams, understand various fingerings, and further solidify your understanding of guitar chord tabs and chord notation in general.