
Learning guitar chords is an exciting first step for any aspiring guitarist, and the C major chord is one of the most essential to master. At guitarplayers.net, we’re dedicated to making your guitar journey enjoyable and successful right from the start. This guide will walk you through not just one, but two effective ways to play the C chord, ensuring you get playing quickly and confidently.
Understanding the Standard C Major Chord
The most common C major chord is a foundational chord in countless songs. While it might seem a little challenging at first, breaking it down step-by-step makes it completely achievable. This version uses three fingers and delivers a rich, full sound.
One key aspect of this chord is finger placement. You’ll need to develop a slight stretch for your third finger to reach the third fret. Consistent practice will build this finger flexibility. Also, focus on arching your fingers so that you’re pressing down with the very tips. This prevents muting adjacent strings and ensures a clear, buzz-free sound.
Step-by-Step Guide to Playing the Standard C Chord
Let’s learn the C chord one finger at a time:
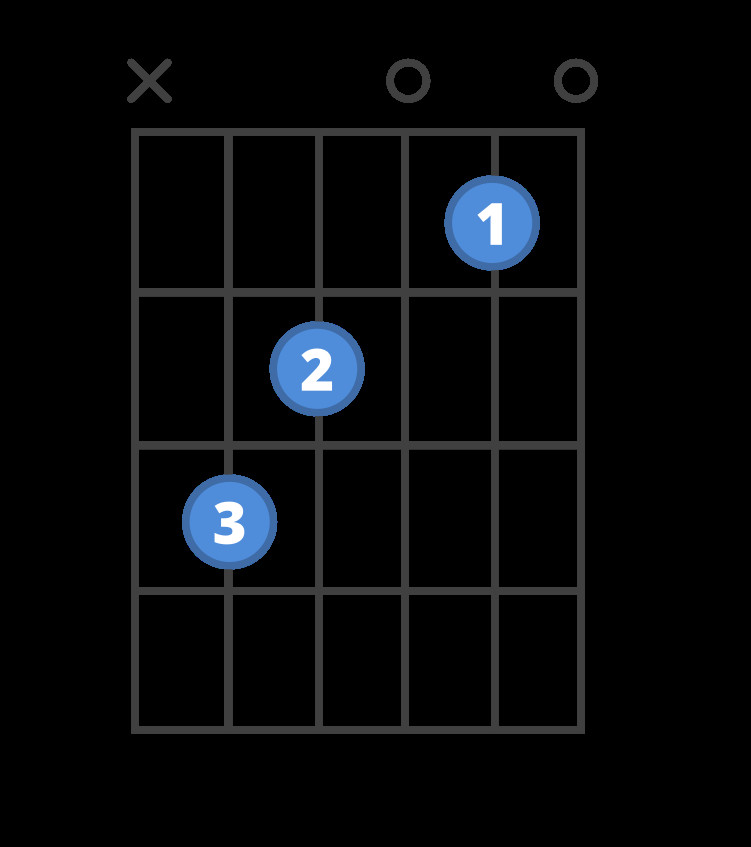 Chord diagram for the C guitar chord.
Need help reading chord diagrams? Check out our comprehensive guide on how to read guitar chord diagrams here.
Step One: Finger 1 Placement
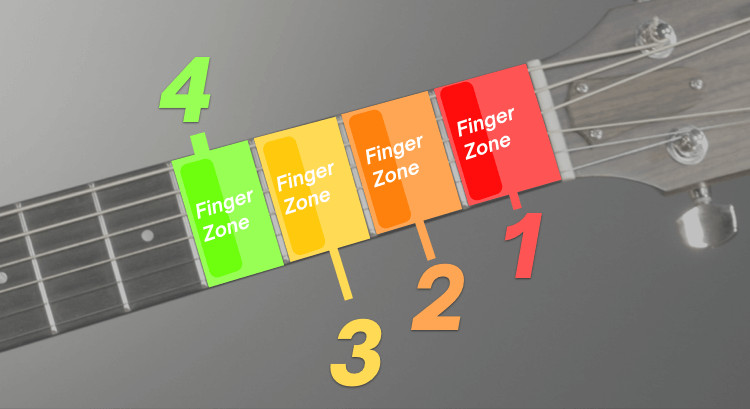
Place your first finger on the 1st fret of the 2nd string (B string). Remember, guitar strings are numbered from thinnest (1st) to thickest (6th). When we refer to a fret, we mean the space just behind the metal fret, closer to the guitar’s headstock.
 Guitar finger zones diagram.
In the diagram above, you’ll be placing your first finger on the string in the orange color within the orange finger zone.
Step Two: Finger 2 Placement
Next, place your second finger on the 2nd fret of the 4th string (D string). Take a moment to observe your second finger. Notice how it should be nicely curved, arching over the first three strings. This curvature is crucial because it ensures you’re only pressing down on the D string with the tip of your finger, allowing the other strings to ring clearly. This finger arch is key to getting a clean sounding C chord.
Step Three: Finger 3 Placement
Now, place your third finger on the 3rd fret of the 5th string (A string). This might require a bit of a stretch initially, but with practice, it will become easier.
 Close-up of finger 3 placement for C chord.
Observe how the finger in the image is positioned as far into the finger zone as possible. Positioning your finger closer to the fret reduces the amount of pressure needed to prevent string buzzing and achieve a clear tone.
Step Four: Strumming the C Chord
For the C chord, you won’t strum all six strings. You will only strum the thinnest five strings. Position your pick or thumb above the 5th string (A string) and strum downwards, ensuring you play the A string, D string, G string, B string, and high E string, while avoiding the thickest 6th string (low E string). By strumming only these five strings, you will play the complete C major chord.
The Simplified One-Finger C Chord for Beginners
If you’re brand new to guitar, forming chords can feel a bit like a finger puzzle. We believe it’s essential to start playing music from day one. That’s why we’re introducing a simplified, one-finger version of the C chord to get you started right away.
This version contains the same notes as the standard C chord but produces a sound that is less full. It’s a fantastic stepping stone to the full version.
To play this easy C chord, simply place your first finger on the 1st fret of the 2nd string (B string), and strum only the thinnest three strings – the high E, B, and G strings. That’s all there is to it!
 Easy one-finger C chord diagram.
Need help reading chord diagrams? Our guide on reading chord diagrams can help.
Once you feel comfortable with this simplified C chord, we encourage you to progress to the fuller sounding, standard version to expand your musical possibilities.
Tips for Mastering the C Chord
- Start Slow: Don’t rush. Focus on placing each finger correctly and getting a clean sound from each string before strumming.
- Finger Pressure: Apply just enough pressure to get a clear sound without buzzing. Pressing too hard can cause tension and fatigue.
- Finger Arch: Maintain an arch in your fingers, especially your second finger, to avoid muting adjacent strings.
- Practice Transitions: Once you can play the C chord cleanly, practice switching to and from other easy chords like G, D, or Am. This builds chord changing speed and fluidity.
- Use a Tuner: Ensure your guitar is properly tuned. An out-of-tune guitar will make even correctly played chords sound wrong.
- Short, Regular Practice: Even 15-20 minutes of focused practice each day is more effective than longer, infrequent sessions.
Enhance Your Practice with GuitarPlayers.net Resources
To further support your learning, GuitarPlayers.net provides several interactive tools:
- Chord Coach: Use our interactive Chord Coach tool (similar to the ChordBank App mentioned in the original article, but specific to guitarplayers.net if available or remove app mention and keep concept general) which listens to you play and provides real-time feedback, guiding you string by string.
- Beginner Lessons: Explore our comprehensive series of beginner guitar lessons designed to make learning chords, tuning, and rhythm easy and enjoyable.
- Games: Make practice fun with chord-based games that help you memorize chord shapes and transitions without even realizing you’re drilling.
- Smart Flashcards: Utilize flashcard exercises to improve your chord changes, specifically practicing transitions between C and other common chords like Am, G, and D.
By combining this guide with consistent practice and the resources available at guitarplayers.net, you’ll be playing the C chord confidently and smoothly in no time. The C chord is a gateway to countless songs, so dedicate yourself to mastering it, and enjoy the rewarding journey of learning guitar!