For bass players of all levels, knowing your way around the fretboard is crucial. Many bassists, even those with years of experience, sometimes find themselves unsure about the precise location of every note on their bass guitar neck. This lack of fretboard knowledge can hinder your playing, improvisation, and overall musical understanding.
But fear not! Learning the notes on your bass guitar neck doesn’t have to be a daunting and lengthy process. The fretboard is structured logically, and once you grasp this underlying logic, navigating it becomes intuitive.
In this guide, you will learn: A detailed, step-by-step method to quickly and effectively learn all the notes on your bass guitar fretboard.
Let’s dive in and unlock the secrets of your bass guitar neck.
Your Step-by-Step System to Master Bass Guitar Neck Notes
This comprehensive approach to learning the notes on your bass fretboard can be broken down into these four key steps:
Let’s explore each step in detail, providing diagrams and clear explanations to guide you through the process. Whether you’re a beginner just starting your bass journey or an experienced player seeking to solidify your fretboard knowledge, this guide is designed to help you. Keep this page bookmarked for easy access as you progress in learning the notes on your bass.
Step 1: Understanding the Interval Logic of Musical Notes
In Western music, we primarily use just 12 distinct notes. The most efficient way to learn these notes is by understanding the logical system behind their arrangement, focusing on one note at a time.
Key Concept: Musical notes follow an alphabetical sequence. If you are familiar with the alphabet, particularly the letters A through G, you already have a significant head start!
The seven natural notes are: A, B, C, D, E, F, and G. These are often referred to as natural notes and correspond to the white keys on a piano.
This alphabetical sequence repeats continuously: A, B, C, D, E, F, G, A, B, C, D, E, F, G, and so on.
The remaining five notes are the sharps and flats, positioned between these natural notes: A♯/B♭, C♯/D♭, D♯/E♭, F♯/G♭, and G♯/A♭. These are equivalent to the black keys on a piano, situated between most of the white keys.
Notice that sharps and flats have dual names, like A♯/B♭. This is known as enharmonic spelling. While they represent the same pitch, their names can vary depending on the musical context. For now, concentrate on memorizing the notes themselves; understanding enharmonic spelling will become more natural as your fretboard knowledge expands.
Whole Steps and Half Steps Explained
If you look at a piano keyboard, you’ll observe black keys between most white keys, but there are two exceptions.
Important Tip: There is no black key between E and F, and no black key between B and C. This crucial relationship holds true on the bass fretboard as well!
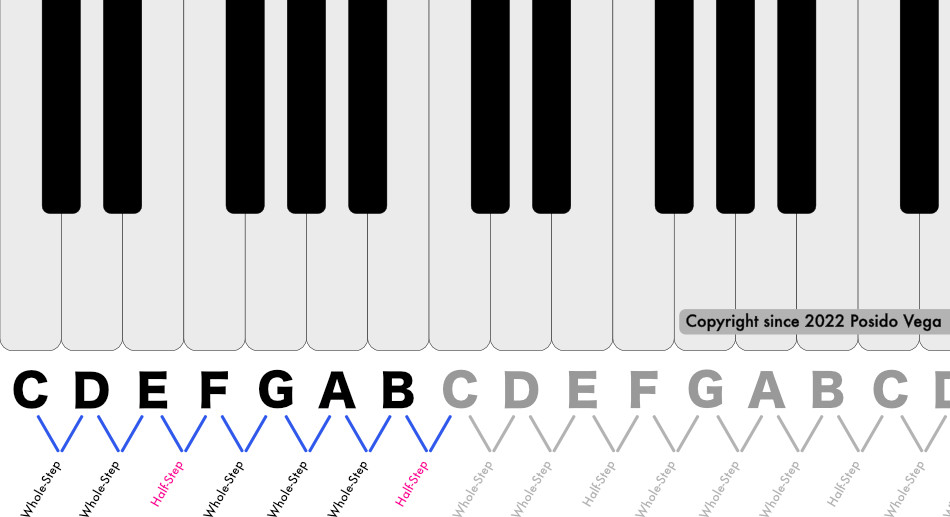 Piano keys – Whole-Step and Half-Step Diagram
Piano keys – Whole-Step and Half-Step Diagram
The distance between E and F is a half-step (one fret on the bass). Similarly, the distance between B and C is also a half-step (one fret).
All other natural notes are separated by a whole step (two frets).
Now, let’s apply this knowledge directly to your bass guitar fretboard. This approach will be far less tedious than attempting to memorize notes chromatically, step by step.
Step 2: Decoding the Logic of the Bass Guitar Fretboard
Let’s recap the key principles we’ve learned:
- Musical notes are arranged in alphabetical order.
- E-F and B-C are always a half-step apart.
- All other natural notes are a whole step (two frets) apart.
Here’s the most fundamental fretboard principle you must understand:
- Each fret on the bass guitar fretboard represents a half-step.
- Consequently, two frets equal a whole step.
On a standard four-string bass guitar, the open string notes.) are, from thickest to thinnest, E, A, D, and G.
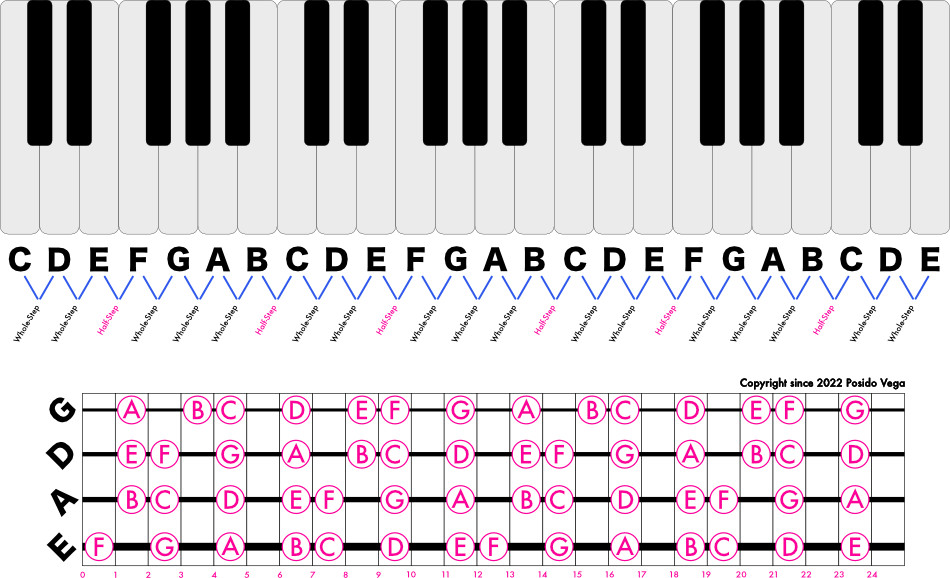 Bass Guitar Fretboard Notes and Piano Notes Diagram
Bass Guitar Fretboard Notes and Piano Notes Diagram
Let’s start with the thickest string, the E string. The easiest way to learn your bass guitar notes is to focus on one string at a time initially.
Remember, E-F and B-C are the only natural note pairs with no notes in between them (half-step apart).
Finding the Notes on Your E-String (The Simple Method)
Starting on your open E-string, the first fret is F. This is because E and F are a half-step apart.
Using the logic of musical notes and whole/half steps, we can map out all the natural notes on the E string:
- From F, move up two frets (whole step) to G.
- From G, move up two frets (whole step) to A.
- From A, move up two frets (whole step) to B.
- From B, move up one fret (half step) to C.
- From C, move up two frets (whole step) to D.
- From D, move up two frets (whole step) to E.
- The pattern then repeats.
Now, let’s apply this same logic to the next string, the A-string.
Finding the Notes on Your A-String (The Simple Method)
The note locations on the A-string are as follows:
- From open A, move up two frets (whole step) to B.
- From B, move up one fret (half step) to C.
- From C, move up two frets (whole step) to D.
- From D, move up two frets (whole step) to E.
- From E, move up one fret (half step) to F.
- From F, move up two frets (whole step) to G.
- From G, move up two frets (whole step) to A.
- Again, this pattern repeats up the neck.
Let’s continue this process and map out the natural notes on the D-string.
Finding the Notes on Your D-String (The Simple Method)
The note locations on the D-string are:
- From open D, move up two frets (whole step) to E.
- From E, move up one fret (half step) to F.
- From F, move up two frets (whole step) to G.
- From G, move up two frets (whole step) to A.
- From A, move up two frets (whole step) to B.
- From B, move up one fret (half step) to C.
- From C, move up two frets (whole step) to D.
- And this pattern continues to repeat.
Just one more string to go! Let’s learn the natural notes on the G-string.
Finding the Notes on Your G-String (The Simple Method)
The note locations on the G-string are:
- From open G, move up two frets (whole step) to A.
- From A, move up two frets (whole step) to B.
- From B, move up one fret (half step) to C.
- From C, move up two frets (whole step) to D.
- From D, move up two frets (whole step) to E.
- From E, move up one fret (half step) to F.
- From F, move up two frets (whole step) to G.
- This pattern also repeats as you move up the fretboard.
Now that you have a good grasp of natural notes, let’s accelerate your fretboard knowledge by exploring octaves.
Step 3: Utilizing Octaves as Fretboard Landmarks
This step is crucial for quickly expanding your fretboard awareness. Octaves serve as excellent “signposts” across the neck. While other intervals can also be used, octaves are particularly helpful for beginners because they represent the same note at a different pitch, making them easy to recognize and remember.
A perfect octave is a note with the same pitch name but double (or half) the frequency.
There are multiple octaves present on your bass guitar fretboard, and learning their locations is highly beneficial. Find and memorize these octave shapes along the neck.
Bass Guitar Fretboard Octaves Diagram
Here are some easy-to-remember octave shapes on the bass:
- Shape 1: Starting on any fret, move two frets higher and up two strings to find an octave higher.
- Shape 2: Starting on any fret, move two frets lower and down two strings to find an octave lower.
- Shape 3: Starting on any fret, move three frets lower and up three strings to find an octave higher.
- Shape 4: Starting on any fret, move three frets higher and down three strings to find an octave lower.
- Shape 5: Starting on any fret, move five frets lower and up one string to find an octave higher.
- Shape 6: Starting on any fret, move five frets higher and down one string to find an octave lower.
- Shape 7: Starting on any fret, move seven frets higher and up one string to find an octave higher.
- Shape 8: Starting on any fret, move seven frets lower and down one string to find an octave lower.
Practice these shapes in different positions on the neck to internalize the octave patterns.
Step 4: Practical Application in Musical Contexts
While understanding the logic and octave shapes is essential, Step 4 is where you truly solidify your fretboard knowledge and learn your notes quickly: applying what you’ve learned in actual playing situations.
Key Tip: There’s no substitute for hands-on practice. You need to play your bass and actively apply your knowledge.
The more you practice applying these principles, the more the notes will become ingrained in your muscle memory, and fretboard mastery will come sooner than you expect.
Try this exercise: Use a simple bassline and a metronome to keep time. As you play the root note of the bassline, consciously think about the octave of that note, and then play the same bassline an octave higher.
You’ll be surprised at how quickly this exercise helps you locate notes across the fretboard.
https://www.youtube.com/watch?v=Oz7Uyv3eyZU[/embed]
Learn Your Fretboard Bass Guitar Notes Fast! (4 Easy Steps)
(Bonus) Step 5: Reinforce Learning by Verbalizing Note Names
To further accelerate your learning, dedicate a few minutes during each practice session to consciously saying the name of each note aloud as you play it.
Practice slowly and deliberately, prioritizing accuracy over speed.
This technique is remarkably effective for learning bass notes quickly. A method I personally used was to say the note name, then locate the fret, and finally play the note. When learning to read standard music notation, verbalizing note names aloud helped reinforce their positions on the fretboard.
I even practiced this during band rehearsals, jam sessions, and live performances. This way, I was actively learning while playing in a musical context.
This approach forced me to think on my feet and boosted my confidence, especially when I was a beginner bassist.
Your Turn to Explore
The knowledge of fretboard logic and octaves is valuable, but its true power is unlocked when you put it into practice.
Learning your bass guitar notes is fundamental for improvisation, reading music, and playing along to chord charts while maintaining solid timing.
Start applying these techniques, and you’ll see significant progress in your fretboard knowledge within weeks.
For more resources and lessons to enhance your bass playing, explore what’s inside My Sandbox.
Frequently Asked Questions
What are the Notes on a Bass Guitar in Standard Tuning?
The open string notes on a standard 4-string bass guitar are E, A, D, and G.
For a 5-string bass, the open string notes are B, E, A, D, and G.
For a 6-string bass, the open string notes are B, E, A, D, G, and C.
Standard bass tuning is in fourths, meaning the interval between each consecutive string is a perfect fourth. Understanding fourth intervals, like octaves, can be another helpful pattern for learning notes across strings.
What’s the Most Effective Way to Memorize Bass Guitar Notes?
A common question is, “How do I memorize all the notes on the bass?”
My answer is always, “Don’t focus on memorization as the primary goal.”
It’s far more effective to understand the underlying logic of note spellings and the fretboard’s layout. Once you grasp this logic, the note locations on the neck will naturally become intuitive and make sense.
Develop good practice habits, such as paying attention to patterns, recognizing shapes, and verbally naming notes as you play them. Trust the learning process.
Memorization will occur organically as you find relationships and meaning in the information you’re learning. Recognizing patterns and shapes is a powerful way to establish these mental connections.
How Can I Quickly Find Any Note on the Bass Guitar?
To quickly locate any note on your bass guitar, you must understand the instrument’s fretboard structure. A standard 4-string bass is tuned to E, A, D, and G. The fretboard layout mirrors the logical arrangement of a piano keyboard. All natural notes are a whole step apart, with the exception of E and F (half-step) and B and C (half-step). All other natural note pairs are separated by a whole step. By understanding these intervals and patterns, you can navigate the fretboard efficiently and find any note you need.