
Looking for a unique and handmade gift for a baby or toddler? Why not crochet a soft and cuddly Baby Guitar? This adorable toy is perfect for little music lovers and makes a wonderful keepsake. This guide provides a free crochet pattern to create your very own baby guitar, complete with step-by-step instructions and helpful tips to ensure your project is a success. Whether you’re an experienced crocheter or just starting out, this pattern is designed to be easy to follow and enjoyable to make.
Supplies You’ll Need
Before you begin crocheting your baby guitar, gather these supplies:
- Yarn: Red Heart Super Saver (or similar worsted weight yarn) in three colors:
- Color A: Pale Orchid (or a similar light color for the guitar body)
- Color B: Black (for the neck and detailing)
- Color C: Charcoal (for the tuners and bridge)
- A note on black yarn: If you are new to crochet, consider using a dark gray or navy instead of black, as it can be challenging to see your stitches in very dark yarn, especially in low lighting.
- Foam Padding: 1/2 yard of 1″ thick NuFoam Pad (or similar foam for stuffing and structure)
- Crochet Hook: 4 mm crochet hook (size G/6)
- Scissors
- Yarn Needle (for weaving in ends and sewing pieces together)
 Crocheted guitar body pieces and yarn
Crochet Baby Guitar Pattern
This pattern uses standard crochet abbreviations. Here are some common ones you’ll encounter:
- CH: Chain
- SC: Single Crochet
- SC2TOG: Single Crochet Two Together (decrease)
- SL ST: Slip Stitch
- puff stitch: (Yarn over, insert hook into stitch, yarn over, pull up a loop) repeat 4 times, yarn over and pull through all 10 loops on hook.
Let’s start with the different parts of the baby guitar:
 Crocheted guitar body pattern in progress
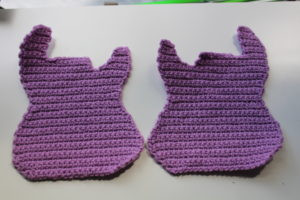
Guitar Body (Make 2)
Using Color A (Pale Orchid), chain 20.
Row 1: SC in 2nd CH from hook, SC across, CH 1, turn [19 stitches]
Row 2: 2 SC in 1st stitch, SC 17, 2 SC in last stitch, CH 1, turn [21 stitches]
Row 3: 2 SC in 1st stitch, SC 19, 2 SC in last stitch, CH 1, turn [23 stitches]
Row 4: 2 SC in 1st stitch, SC 21, 2 SC in last stitch, CH 1, turn [25 stitches]
Row 5: 2 SC in 1st stitch, SC 23, 2 SC in last stitch, CH 1, turn [27 stitches]
Row 6: SC in each stitch, CH 1, turn [27 stitches]
Row 7-8: Repeat row #6
Row 9: SC across 25, SC2TOG, CH 1, turn [26 stitches]
Row 10: SC across 26, CH 1, turn [26 stitches]
Row 11: SC across 24, SC2TOG, CH 1, turn [25 stitches]
Row 12: SC across 22, SC2TOG, CH 1, turn [23 stitches]
Row 13: SC across 23, CH 1, turn [23 stitches]
Row 14: Skip 1st stitch, SC across 22, CH 1, turn [22 stitches]
Row 15: SC2TOG, SC 19, SC2TOG, CH 1, turn [21 stitches]
Row 16: SC across 21, CH 1, turn [21 stitches]
Row 17: SC2TOG, SC 19, CH 1, turn [20 stitches]
Row 18: SC2TOG, SC 18, CH 1, turn [19 stitches]
Row 19: SC across 19, CH 1, turn [19 stitches]
Row 20: 2 SC in 1st stitch, SC 17, 2 SC in last stitch, CH 1, turn [21 stitches]
Row 21: SC across 21, CH 1, turn [21 stitches]
Row 22: Repeat row #21
Row 23: 2 SC in 1st stitch, SC 19, 2 SC in last stitch, CH 1, turn [23 stitches]
Row 24: SC across 23, CH 1, turn [23 stitches]
Row 25: 2 SC in 1st stitch, SC 21, 2 SC in last stitch, CH 1, turn [25 stitches]
Row 26: SC across 25, CH 1, turn [25 stitches]
Row 27: SC 17, CH 1, turn
Row 28: SC in 2nd stitch, SC across 15, CH 1, turn [16 stitches]
Row 29: SC across 16, CH 1, turn [16 stitches]
Row 30: SC 8, SL ST in next 3 stitches, SC 5, CH 1, turn [16 stitches]
Row 31: SC 4, SL ST, CH 1, turn [5 stitches]
Row 32: SC 5, CH 1, turn [5 stitches]
Row 33: SC 5, CH 1, turn [5 stitches]
Row 34: 2 SC in 1st stitch, SC 2, SC2TOG, CH 1, turn [5 stitches]
Row 35: SC 5, CH 1, turn [5 stitches]
Row 36: Repeat row #34
Row 37: Skip 1st stitch, 4 SC, CH 1, turn [4 stitches]
Row 38: SC 3, SL ST, CH 1, fasten off.
After finishing the first and largest “fin” of the guitar body, start with the fin you just made on your right side.
Row 1: Slip knot, then SL ST in 7th stitch from the left, SC across 6, CH 1, turn [6 stitches]
Row 2: SC 4, SL ST in next stitch, CH 1, turn [5 stitches]
Row 3: SC in 2nd stitch, SC 3, CH 1, turn [4 stitches]
Row 4: SC 3, SL ST, CH 1, turn [4 stitches]
Row 5: SC in 2nd stitch, SC 2, CH 1, turn [3 stitches]
Row 6: SC 2, SL ST, CH 1, fasten off
Row 7: At this point you can weave in all ends for both body pieces.
 Two crocheted guitar body pieces side by side
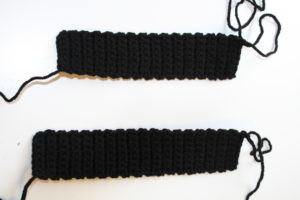
Guitar Neck – Part 1
Using Color B (Black), chain 8.
Row 1: SC in 2nd chain from hook, SC across, CH 1, turn [7 stitches]
Row 2: SC 7, CH 1, turn [7 stitches]
Row 3-36: Repeat row #2 until you have a total of 36 rows. Loosely fasten off and leave a long tail for sewing.
Guitar Neck – Part 2
Using Color B (Black), chain 8.
Row 1: SC in 2nd chain from hook, SC across, CH 1, turn [7 stitches]
Row 2: SC 7, CH 1, turn [7 stitches]
Row 3-32: Repeat row #2 until you have a total of 32 rows. Loosely fasten off and leave a long tail for sewing.
 Two crocheted guitar neck pieces in black yarn
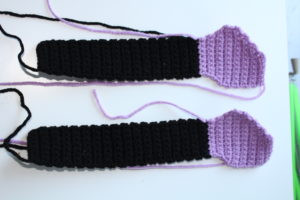
Guitar Head
Pull out the last stitch on NECK 2 and change color to Color A (Pale Orchid), CH 1, turn.
Row 1: SC 7, CH 1, turn [7 stitches]
Row 2: SC 7, CH 1, turn [7 stitches]
Row 3: 2 SC in 1st stitch, SC 5, 2 SC in last stitch, CH 1, turn [9 stitches]
Row 4: SC 9, CH 1, turn [9 stitches]
Row 5: 2 SC in 1st stitch, SC 7, 2 SC in last stitch, CH 1, turn [11 stitches]
Row 6: 2 SC in 1st stitch, SC 9, 2 SC in last stitch, CH 1, turn [13 stitches]
Row 7: SC 13, CH 1, turn [13 stitches]
Row 8: SC2TOG, SC 11, CH 1, turn [12 stitches]
Row 9: SC 10, SC2TOG, CH 1, turn [11 stitches]
Row 10: SC2TOG, SC 9, CH 1, turn [10 stitches]
Row 11: SC 8, SC2TOG, CH 1, turn [9 stitches]
Row 12: SC2TOG, SC 7, CH 1, turn [8 stitches]
Row 13: SC 6, SC2TOG, CH 1, turn [7 stitches]
Row 14: SC2TOG, SC 5, fasten off, leave a long tail for sewing.
 Crocheted guitar head piece in pale orchid and black yarn
Guitar Tuners (Make 4)
Using Color C (Charcoal), CH 11.
Row 1: SC in 2nd chain from hook, SC 9, CH 1, turn [10 stitches]
Row 2: SL ST, puff stitch, SL ST, puff stitch, SL ST x 2, puff stitch, SL ST, puff stitch, SL ST, fasten off, leave a tail for sewing.
Guitar Bridge
Using Color C (Charcoal), chain 9.
Row 1: SC in 2nd chain from hook, SC 7, CH 1, turn [8 stitches]
Row 2: SC 8, CH 1, turn [8 stitches]
Row 3: SC 8, fasten off, leave a tail for sewing.
Assembling Your Baby Guitar
Now for the fun part – putting all the crocheted pieces together to create your baby guitar! It’s recommended to add the details before stuffing for easier handling.
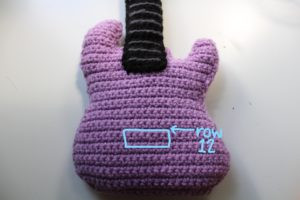 Diagram showing bridge placement on the guitar body
- Attach the Bridge: Decide if you are making a right-handed or left-handed baby guitar. For a right-handed guitar, the taller “fin” of the body should be on the left. Sew the bridge to the body using the charcoal yarn tail. The top of the bridge should align with approximately row #12 of the body piece. Set the body pieces aside.
 Close-up of tuner attachment on the guitar head
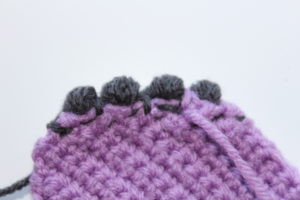
- Attach the Tuners and Create Frets: On the longer head/neck piece (Neck 1 with Head attached), weave the tail from the right side to the diagonal edge. Sew the tuners along the diagonal edge of the guitar head. Sew over the slip stitches between the puff stitches to make only the puff stitches visible, creating the tuner knobs. After attaching tuners, backstitch the frets using black yarn on the same head/neck piece. The first fret line is where the black neck meets the pale orchid head. Add 4 more fret lines, skipping 4 rows each time. Then add 9 more fret lines, skipping 2 rows each time.
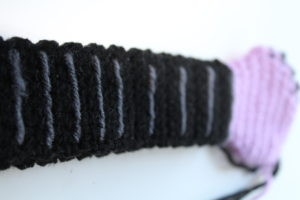 Close-up of back-stitched frets on the guitar neck
- Stuff and Assemble the Body and Neck:
- Cut foam pieces by tracing the body and head/neck pieces, making them slightly smaller (about 1/4″ smaller around the edges) for easier insertion.
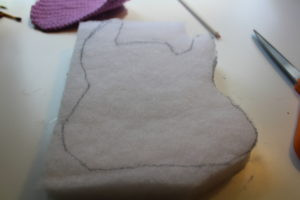 Foam pieces traced and cut for guitar stuffing
* Begin sewing the two body pieces together, starting around row #22. This allows you to sew the fins together before stuffing, which can be trickier once stuffed.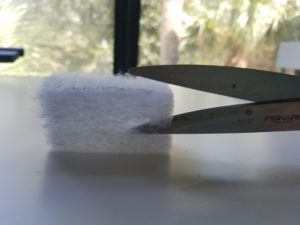 Foam pieces trimmed for easier insertion
* Insert foam into the fins as you sew them closed, using the back of your crochet hook to help push the foam into corners. Continue sewing around the body, stuffing firmly as you go. Securely tie off and weave in the ends.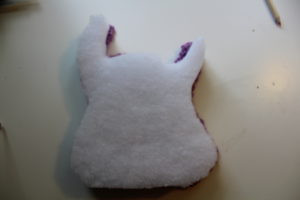 Guitar body partially sewn together with foam stuffing visible
* Sew the head pieces together, ensuring only the tuners are visible. Switch to Color B (Black) and sew one side of Neck 1 to Neck 2, stopping before the last row of the shorter Neck 2. Insert foam into the neck, using the crochet hook to help distribute it evenly. Sew the other side of the neck closed, again stopping before the last row of Neck 2.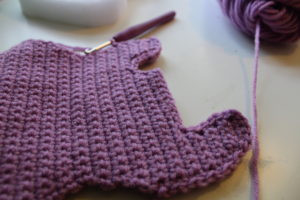 Guitar body mostly sewn with a small opening remaining
* Finally, attach the neck to the body. You may need to add a bit more stuffing at the joint for a smooth transition. Ensure the neck extends slightly down the front of the body and a little onto the back. Sew securely to join the neck and body.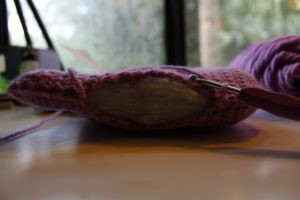 Guitar body almost fully assembled
 Completed crocheted baby guitar
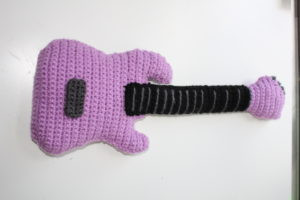 Final view of the completed baby guitar
Your adorable crocheted baby guitar is now complete! This soft and safe toy is perfect for little ones to play with and enjoy. It’s a thoughtful and unique handmade gift that any parent and baby will appreciate. Enjoy creating this musical treasure!