
The Gibson Gold Top Guitar finish is more than just a color; it’s a symbol of vintage elegance and rock ‘n’ roll history. Since its introduction in the early 1950s on iconic models like the Gibson Les Paul and ES-295, the Gold Top has captivated guitarists and collectors alike. This lustrous, metallic sheen isn’t just visually stunning; it’s a testament to Gibson’s pioneering spirit and dedication to crafting instruments with both exceptional sound and striking aesthetics.
This article delves into the fascinating world of the Gibson Gold Top finish. We’ll explore its origins, the unique materials that create its distinctive look, and the process of faithfully recreating this classic finish. Using a real-world example of refinishing a vintage 1969 Les Paul Deluxe Standard, we’ll illuminate the techniques and challenges involved in achieving a perfect Gold Top. Whether you’re a seasoned luthier or simply a guitar enthusiast, understanding the nuances of the Gibson Gold Top guitar finish will deepen your appreciation for these legendary instruments.
The History and Makeup of the Gold Top Finish
The original Gibson Gold Top guitar finish was born from a desire to give the Les Paul model a touch of class and distinction. In the early days of electric guitars, finishes were often simple and utilitarian. Gibson sought to elevate the Les Paul, and the Gold Top was a key element in this strategy.
The secret to the Gold Top’s mesmerizing shimmer lies in its composition. It’s created by suspending finely ground bronze powder within a clear lacquer. This isn’t just any gold paint; the bronze particles catch and reflect light in a way that creates a deep, metallic gold that seems to shift and change with viewing angle.
However, this beauty comes with a challenge. Applying a Gold Top finish evenly is notoriously difficult. The bronze particles can be temperamental, prone to clumping and settling unevenly. Achieving consistent color and a flawless, smooth surface requires skill, patience, and a touch of artistry.
Over the years, Gibson has tweaked the formula for their Gold Top finishes. Notably, in more recent times, they transitioned from using bronze powder to mica chips coated with a gold-colored pigment. This change was primarily motivated by addressing the “greening” phenomenon that can occur with original bronze powder finishes. This greening is a result of the copper in the bronze oxidizing over time, especially in areas where the clear top coat has worn away, often from contact with the player’s arm and sweat.
Despite this shift in pigment, the classic Gibson Gold Top guitar finish, with its subtle depth and vintage charm, remains highly sought after. For many purists, the slight greening that can occur over decades is part of the finish’s character and appeal, telling a story of years of playing and musical history.

Close up shot of a vintage Gibson Les Paul guitar body showcasing the iconic Gold Top finish, highlighting its metallic sheen and depth.
Refinishing a Vintage Les Paul Gold Top: A Detailed Guide
Our project focuses on bringing a 1969 Les Paul Deluxe Standard back to its former glory with a fresh Gold Top finish. This particular guitar, an early example of Gibson’s re-issues of the 1950s Les Pauls, originally sported P-90 pickups and a Gold Top, complemented by a stained mahogany back and neck, and elegant white binding.
However, time and modifications had taken their toll. The guitar arrived stripped of its original finish, routed for humbucker pickups, and with a repaired side ding. While the back and neck had already received grain filler and some tinted finish coats, the pickup cavities needed attention to accommodate humbucker mounting rings.

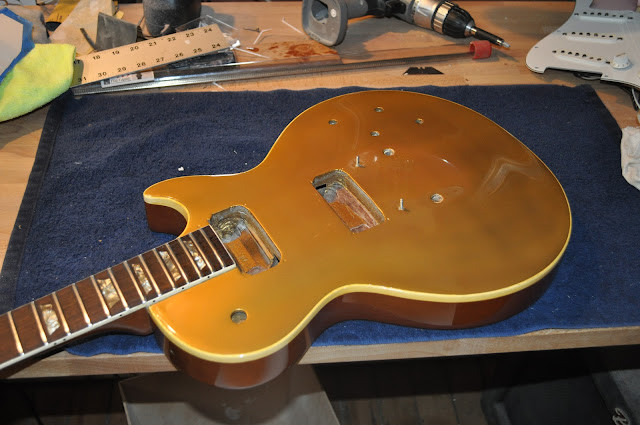
Image showing the stripped 1969 Les Paul Deluxe body with humbucker routes and a three-piece maple top, ready for refinishing in Gold Top.
Interestingly, this Les Paul features a three-piece maple top. The earliest 1968 re-issue Gold Tops actually featured two-piece tops with a center seam, making this three-piece top detail indicative of its production era.
While considering returning the guitar to its original P-90 configuration was discussed, the owner ultimately preferred the richer tones of humbuckers. The widened pickup cavities, a result of a previous modification, are clearly visible.

Close-up photo of the humbucker-routed pickup cavities on the Les Paul body, illustrating the modification from the original P-90 configuration.
Helpfully, remnants of the original Gold Top finish were still present within the pickup cavities. These vestiges of the original color would prove invaluable in accurately tinting the new finish to match the guitar’s vintage character.

Image showing the pickup cavity edges with tape, revealing traces of the original Gold Top finish which will be used for color matching the new finish.
Sourcing Authentic Bronze Powder
A crucial step in achieving an authentic Gibson Gold Top guitar finish is using the correct bronze powder. In a fortunate turn, the guitar’s owner managed to track down the original supplier used by Gibson in the 1950s: Crescent Bronze Co. of Oshkosh, WI. They ordered a 2 lb can of Cres-Lite “Extra Brilliant Gold #256” bronze powder. Crescent Bronze offers a wide array of metallic pigments, and their website is a treasure trove for anyone interested in metallic finishes.

Photo showcasing the can of Cres-Lite “Extra Brilliant Gold #256” bronze powder, the original pigment source for the Gibson Gold Top finish.

Image demonstrating the “greening” effect on a worn vintage Gold Top finish, caused by oxidation of the bronze powder over time.
Preparation and Application Process
Before applying the Gold Top color, meticulous preparation is essential. The first step involved filling minor dings on the maple top, primarily from the pickguard bracket. Then, the entire top was sealed with nitrocellulose sanding sealer. Maple, being a close-grained wood, doesn’t require grain filler. Crucially, Gibson’s lacquer finishes, including Gold Tops, traditionally don’t use a primer coat.
Smoothness is paramount for any metallic finish, as imperfections are amplified under the reflective surface. Therefore, sanding the sealer coat to a perfectly even surface was a critical step.
Next, the sides of the body binding were masked off, but the top edge was left exposed. Gibson’s method involves spraying the color coat directly over the binding and then scraping it clean with a razor blade once the finish is partially cured. This technique is more efficient and cleaner than attempting to mask the complex curves of the binding along the top edge. Masking the straight sides is straightforward, however.
With masking complete, the Gold Top color was mixed. Approximately two teaspoons of bronze powder were carefully stirred into about 6 ounces of clear gloss lacquer. This mixture was then thinned by about 50% for spraying, and frequent stirring during spraying is crucial to keep the bronze powder evenly dispersed.

Image showing the Les Paul body freshly sprayed with the Gold Top finish, still wet and reflective, before binding scraping.
Learning from Setbacks: Achieving a Flawless Gold Top
A vital lesson learned during this process: dedicate a spray gun specifically for metallic finishes. Bronze powder is notorious for clinging to spray guns and can contaminate subsequent clear coats, leading to unwanted metallic flecks in later projects. Cleaning the spray gun immediately after spraying the Gold Top is also essential to prevent clogs and sputtering in future applications.
In fact, the Gold Top application required two attempts in this project. An initial clear coat application was marred by a piece of bronze pigment ejecting from the spray gun and embedding itself in the finish. Attempting to sand it out proved problematic, damaging the tinted clear coat beneath and making seamless touch-up impossible.
Undeterred, the process was restarted. The Gold Top was sprayed again, this time using a smaller automotive detail spray gun instead of an HVLP gun. The detail gun seemed to produce a smoother, more even Gold Top finish. However, this came with increased overspray, necessitating thorough cleanup afterward.
For the final color coat, the lacquer was thinned slightly more with acetone, and the air pressure was reduced for a lighter, more controlled application. Once satisfied with the evenness of the gold, a light clear gloss coat was immediately applied to seal the bronze powder in place.

Image showcasing the binding scraping process, using a jig and razor blade to carefully remove the Gold Top finish from the white binding.
Scraping the Binding and Applying the Tinted Clear Coat
After allowing the color coat to set for a day, the binding scraping commenced. A custom jig, fashioned from a dowel and a razor blade, was used for controlled scraping, supplemented by some freehand work. The goal is to remove the gold lacquer from the binding without digging into the plastic itself. Ideally, a sealer coat acts as a buffer between the binding and the Gold Top, preventing the gold finish from embedding too deeply into the binding. It’s crucial not to mask the binding during the sealer coats to achieve this buffer layer.

Close-up image of the binding after scraping, showing the clean white binding edge contrasting with the Gold Top finish.

Photo highlighting the cleanly scraped binding edge, revealing the crisp line between the Gold Top and the binding.
With the binding scraped clean, the next stage was applying a tinted clear coat. This served two purposes: to match the color of the original finish remnants in the pickup cavities and to impart a vintage amber tint to the binding. The aged look of vintage Gibson binding is primarily due to the lacquer overspray yellowing over time, rather than the plastic itself changing color.
Stew-Mac’s vintage amber tint, mixed into a clear gloss base, was used to achieve this aged effect. The tint was built up gradually over several thin coats, constantly checking against the original finish in the pickup cavities and monitoring the binding’s color.

Image showing the guitar body after the tinted clear coat application, with the Gold Top and binding now exhibiting a subtle vintage amber hue.
Finally, the entire instrument, including the previously unfinished back and neck, received multiple clear coats. After allowing ample curing time (several weeks), the finish was wet-sanded and buffed to a high gloss. The Les Paul’s carved top and non-removable bridge posts necessitated hand wet-sanding the entire top, a factor to consider when estimating the labor involved in such a refinishing project.
The Glorious Rebirth of a Gold Top
The result of this meticulous process is a stunningly refinished Gibson Gold Top guitar, ready to sing once more. The original headstock logo and finish, showing its age and history, were carefully preserved, creating a beautiful contrast with the fresh, vibrant Gold Top.

Full shot of the refinished Gibson Les Paul body, showcasing the completed Gold Top finish before hardware installation, highlighting the vibrant gold and glossy clear coat.

Angled view of the refinished Gold Top, demonstrating the metallic depth and reflectivity of the finish under lighting.

Detailed shot of the completed Gold Top finish, highlighting the smooth, even application and the rich gold color.

Final close-up image of the pickup cavity showing the newly applied Gold Top finish perfectly matching the original finish remnants, demonstrating accurate color matching.
This project underscores the dedication and skill required to faithfully recreate a Gibson Gold Top guitar finish. It’s a finish that demands precision, patience, and a deep understanding of the materials involved. But the result – a guitar reborn in a timeless and iconic color – is undoubtedly worth the effort. For any guitarist, the allure of a Gibson Gold Top guitar is undeniable, representing a golden era of music history and enduring craftsmanship.