Navigating the world of guitar effects pedals can be exciting, but also a bit daunting, especially when you’re faced with a collection of stompboxes and wonder how to connect them all. There’s a common question every guitarist asks at some point: “What’s the right order for my guitar pedals?”. While the beauty of effects pedals is that experimentation is key and there’s truly no single “wrong” way, understanding some fundamental principles of signal chain order can dramatically improve your tone and help you achieve the sounds you’re aiming for.
This guide will walk you through the most common and effective ways to order your guitar effects pedals, whether you’re just starting out or looking to refine your existing pedalboard setup. We’ll cover standard placements, explore the use of amplifier effects loops, and touch upon some special cases to consider.
Understanding Common Pedal Order Placements
For many guitarists, especially when starting out, a generally accepted order for effects pedals provides a solid foundation. This “common placement” is based on how different types of effects interact with your guitar signal and each other. Think of your guitar signal flowing through your pedals in a chain, and the order determines how each effect shapes the sound before it reaches the next.
Here’s a breakdown of typical pedal categories and their suggested positions in the signal chain:
-
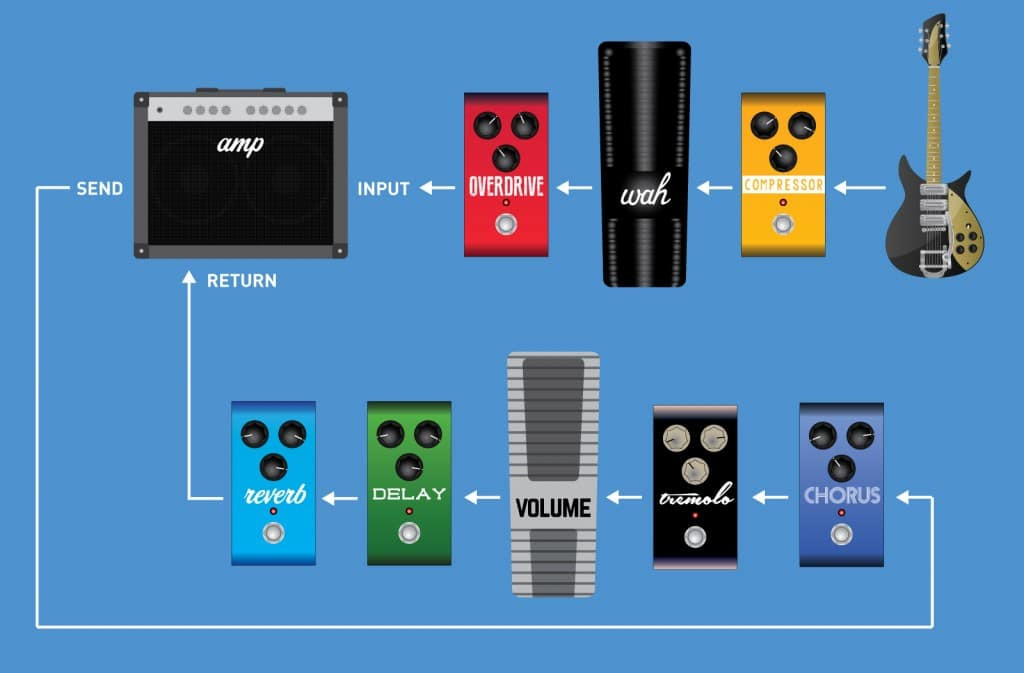
Dynamics Control & Filters (First in Line): Effects like compressors, wah pedals, pitch shifters, and volume pedals are usually placed at the very beginning of your chain, closest to your guitar.
- Compressors even out your guitar’s dynamics, providing a consistent signal level for subsequent effects. Placing them early ensures a clean and controlled input.
- Wah pedals are filters that you manipulate with your foot. Positioning them early allows them to shape the raw guitar signal before it’s processed by other effects like overdrive or distortion.
- Pitch shifters, like harmonizers or octave pedals, also benefit from a clean, unprocessed guitar signal to track accurately.
- Volume pedals at the beginning act as a master volume for your entire pedalboard, controlling the overall input level into your effects.
-
Gain-Based Effects (The Drive Section): Next in line are your overdrive, distortion, and fuzz pedals. These effects add saturation and harmonic complexity to your tone. Placing them after dynamics and filters means they’ll work with a shaped and potentially compressed signal from the earlier pedals.
-
Modulation Effects (Adding Depth and Texture): Chorus, flanger, phaser, and tremolo pedals typically come after your gain effects. These modulation effects add movement, swirl, and texture to your core tone, and are often enhanced when placed after overdrive or distortion.
-
Time-Based Effects (Space and Ambiance): Delay and reverb pedals are generally positioned towards the end of your pedal chain. These effects create echoes and simulate acoustic spaces, adding depth and ambiance to your overall sound. Placing them last ensures that all your other effects are fed into the delay and reverb, creating a cohesive and polished final output.
-
Volume Pedals (Versatile Placement): As mentioned earlier, volume pedals can be placed at the beginning for overall level control. However, placing a volume pedal towards the end of your chain, after gain and modulation but before delay and reverb, offers different functionality. In this position, it allows you to control the volume of your processed signal without cutting off delay or reverb trails, useful for creating swells and fades.
To illustrate these common placements, let’s look at a couple of example pedalboard setups:
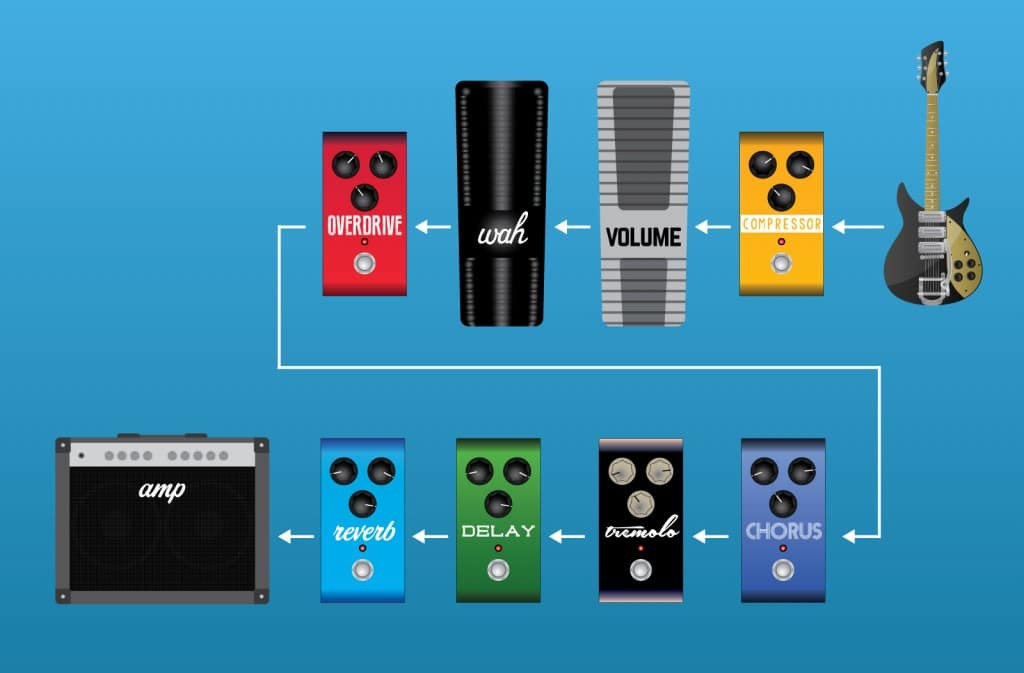
Setup 1: Volume Control at the Input
 Effects Pedal signal chain
Guitar → Compressor → Volume Pedal (Input Control) → Wah Pedal → Overdrive → Chorus → Tremolo → Delay → Reverb → Amplifier
In this setup, the volume pedal is positioned early in the chain. This placement is ideal for controlling the signal level going into your overdrive and other effects. If you use your overdrive pedal to get your core distorted tone, rolling back the volume pedal here can clean up your signal, giving you dynamic control over the amount of drive.
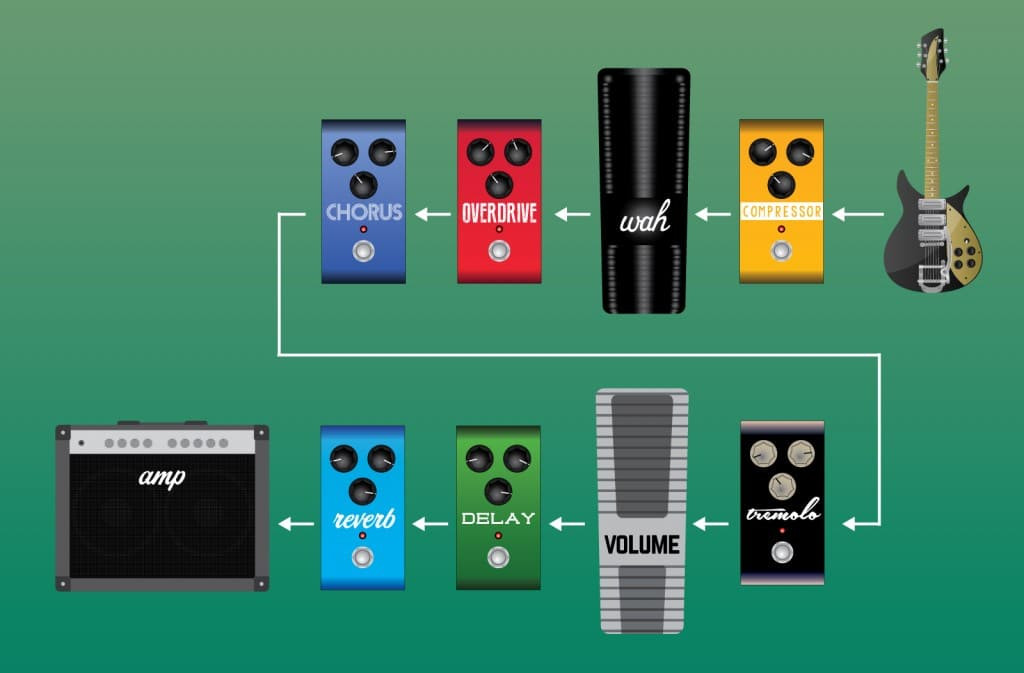
Setup 2: Volume Control Before Time-Based Effects
 Effects Pedal signal chain
Guitar → Compressor → Wah Pedal → Overdrive → Chorus → Tremolo → Volume Pedal (Output Level) → Delay → Reverb → Amplifier
Here, the volume pedal is moved towards the end, just before the delay and reverb. This configuration allows you to adjust the overall volume of your effected signal, including overdrive and modulation, but crucially, it allows delay and reverb trails to ring out naturally when you reduce the volume. This is perfect for volume swells and creating ambient textures without abruptly cutting off your echoes and reverb.
Utilizing Your Amplifier’s Effects Loop
Many guitar amplifiers feature an effects loop, which is a send and return jack (sometimes labeled “Preamp Out” and “Power Amp In”). This loop is inserted in the signal path after the preamp section of your amplifier (which is responsible for much of your amp’s tone and gain) and before the power amp section (which amplifies the signal to drive your speakers).
Why is this significant for pedal order? Placing certain effects in the effects loop can drastically improve your tone, especially if you get your core distortion from your amplifier itself rather than from pedals.
Typically, time-based effects like delay and reverb are prime candidates for the effects loop. If you run these effects before your amp’s preamp distortion, the delay repeats and reverb ambiance will be distorted by the preamp, often resulting in a muddy, indistinct sound. By placing them in the effects loop, after the preamp distortion, the delay and reverb are applied to your already distorted tone, keeping them clean, clear, and adding spaciousness without unwanted muddiness.
Modulation effects can also sound interesting in the effects loop, offering a different character compared to placing them before the amp’s preamp. Experimenting with chorus, flanger, or phaser in the loop can yield unique textures.
There are two main types of effects loops: series and parallel.
-
Series Effects Loop: In a series loop, the entire signal from your amp’s preamp is routed through the effects loop. The signal goes out of the “Effects Send,” through your pedals in the loop, and then returns to the “Effects Return” jack, before proceeding to the power amp. Essentially, the entire signal is processed by the pedals in the loop.
-
Parallel Effects Loop: A parallel loop splits the signal from your preamp. A portion of the signal is sent through the effects loop, while the other portion bypasses the loop and goes directly to the power amp. The signals are then mixed back together. Parallel loops often have a level control to adjust the blend of the effected and uneffected (dry) signal. When using pedals in a parallel loop, it’s generally recommended to set the “mix” control on your pedals to 100% wet (effect only), as the dry signal is already being blended in by the amp’s loop. Some pedals, like Strymon’s TimeLine and BigSky, have a “Kill Dry” feature specifically for parallel loops, which mutes the dry signal from the pedal itself.
Here are examples of pedal setups incorporating the amplifier effects loop:
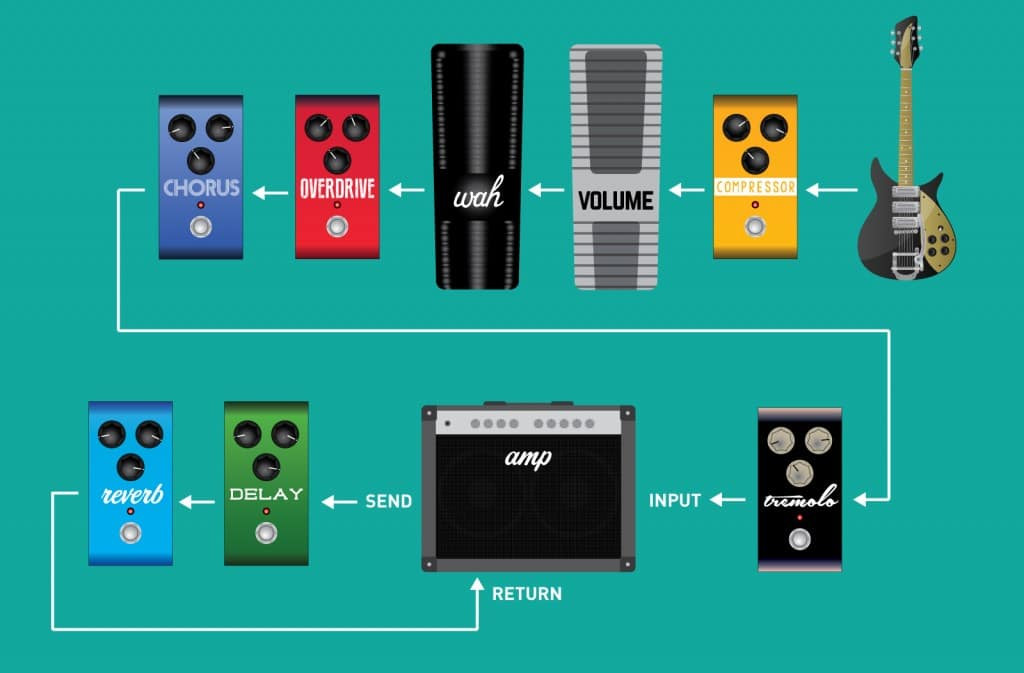
Effect Loop Setup 1: Delay and Reverb in the Loop
 Setting up your Effects Signal Chain – Amplifier Effects Loops
Guitar → Compressor → Volume Pedal → Wah Pedal → Overdrive → Chorus → Tremolo → Amplifier INPUT
Amplifier Effects Send → Delay → Reverb → Amplifier Effects Return
In this common configuration, only delay and reverb are placed in the effects loop. This setup is especially effective when you derive your overdrive or distortion from your amplifier’s preamp. The preamp’s distorted signal is fed into the delay and reverb in the loop, resulting in clear, spacious, and articulate echoes and reverb tails that sit beautifully with your overdriven tone.
Effect Loop Setup 2: Modulation, Delay and Reverb in the Loop
 Setting up your Effects Signal Chain – Amplifier Effects Loops
Guitar → Compressor → Wah Pedal → Overdrive → Amplifier Input
Amplifier Effects Send → Chorus → Tremolo → Volume Pedal (Loop Level) → Delay → Reverb → Amplifier Effects Return
This setup expands on the previous one by including modulation effects and a volume pedal within the effects loop, alongside delay and reverb. Placing modulation in the loop, after the preamp, creates a different sonic texture compared to running modulation before the preamp gain. The volume pedal in the loop can act as a level control specifically for the effects in the loop, allowing you to balance their volume against your core amp tone.
Special Pedal Considerations and Flexible Placements
While the guidelines above provide a strong starting point, some pedals have unique characteristics or features that might warrant deviating from the standard order.
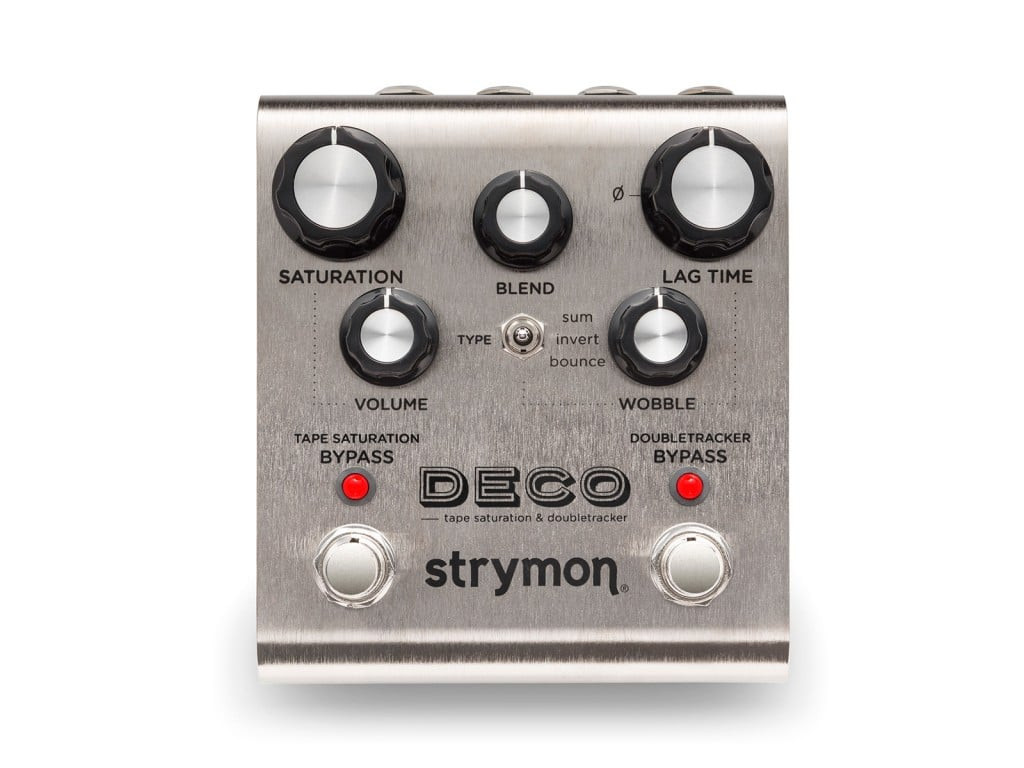 Deco Tape Saturation & Doubletracker
The Strymon Deco, for example, with its Tape Saturation & Doubletracker capabilities, is versatile in its placement. You can position it early in your chain to use its tape saturation as a subtle, warm overdrive. Alternatively, placing it at the end of your chain, with lower saturation settings, can impart a tape-like warmth, gentle compression, and added low-end harmonics to your entire processed signal.
The Strymon Mobius modulation pedal offers a “Pre/Post” feature, giving you internal flexibility in signal chain placement. Within each preset, you can choose whether the effect is placed in a “Pre” position (earlier in your chain, typically before gain) or a “Post” position (later in your chain, often after gain). This internal routing option within the Mobius allows for a wide range of tonal exploration within a single pedal. (Refer to the Mobius manual pages 22-23 for detailed information on this feature.)
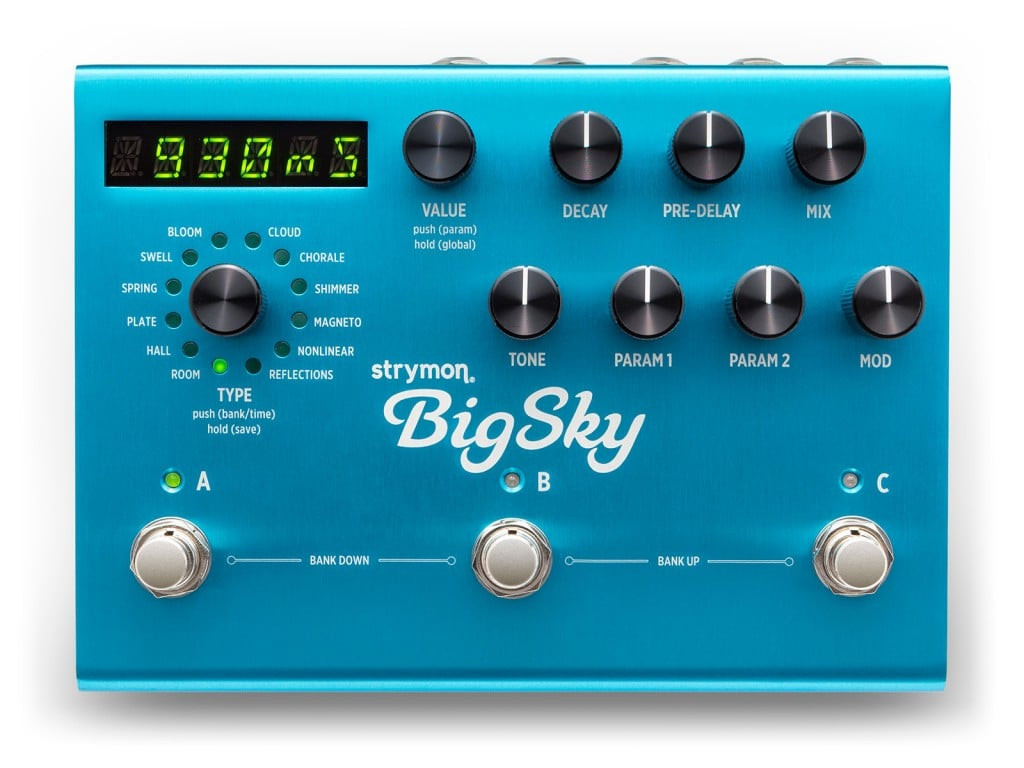 BigSky Reverberator – Reverb Pedal
The Strymon Lex rotary speaker emulator can work effectively either after gain-based effects, alongside other modulation pedals, or at the very end of your signal chain. Placing it last can create the sensation that your entire signal is being processed through a rotating speaker cabinet, adding a unique swirling final layer to your sound. The Strymon BigSky reverb pedal includes a built-in cabinet filter, switchable on the back panel. This feature simulates the sound of playing through a 1×12 speaker cabinet with the reverb engaged or bypassed, making it particularly useful for direct recording or connecting directly to a PA system.
The Golden Rule: Experiment and Trust Your Ears!
Ultimately, the most crucial rule when it comes to Guitar Pedal Chain Order is that there are no hard and fast rules. The suggestions and common placements discussed are excellent starting points and will yield predictable and often desirable results. However, the most exciting and unique sounds often arise from experimentation and happy accidents.
Don’t be afraid to break the mold! Try placing a reverb pedal before distortion, or a phaser after delay. You might discover a sound you love that defies conventional wisdom. The beauty of guitar effects is in the sonic exploration they offer. Use these guidelines as a foundation, but always trust your ears and let your creativity guide you in the quest for your perfect tone. Build your pedalboard to reflect your individual taste and sonic vision.