
Learning guitar chords can feel daunting at first, but mastering the C chord is a fundamental step for any aspiring guitar player. This guide will walk you through two effective ways to play the C chord, starting with the most common version and then introducing an even simpler alternative perfect for absolute beginners. Get ready to start your guitar journey with this essential chord!
The Standard C Major Chord: A Must-Know for Guitarists
The most widely used version of the C Major chord involves using three fingers and strumming five strings. While it might require a bit of finger stretching initially, this version offers a rich and full sound and is crucial for expanding your guitar vocabulary.
A key technique for playing this chord cleanly is to arch your fingers. By using the very tips of your fingers, you’ll avoid accidentally muting adjacent strings and achieve a clear, resonant sound. Let’s break down the steps to form this essential chord.
Step-by-Step Guide
Let’s learn the standard C chord finger by finger:
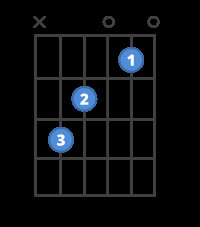
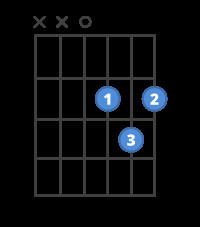
 Chord diagram for the C guitar chord.
Understanding Chord Diagrams: If you’re new to chord diagrams, they are visual representations of the guitar fretboard. The horizontal lines represent the frets, and the vertical lines represent the strings. The dots indicate where you should place your fingers.
Step One: Index Finger Placement
Begin by placing your index finger on the first fret of the second string (B string). Remember that guitar strings are numbered from thinnest (1st string) to thickest (6th string). Frets are numbered starting from the headstock. Position your finger just behind the first fret, closer to the guitar’s headstock, in the designated finger zone for optimal sound.
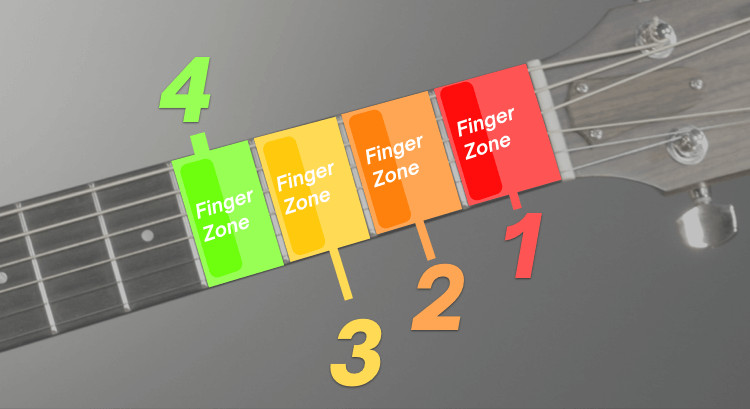 Finger placement zones on a guitar neck diagram, illustrating the ideal area behind the fret for pressing down strings.
Think of placing your finger on the orange string in the orange finger zone as shown in the diagram. This precise placement is crucial for a clear sound.
Step Two: Middle Finger Placement
Next, place your middle finger on the second fret of the fourth string (D string). Take a moment to observe your finger’s position. Notice how it should be nicely curved, arching over the first three strings. This curvature ensures that you are pressing down only on the fourth string with the tip of your finger, preventing any unwanted muting of other strings. This technique is vital for achieving a clean and crisp C major chord.
Step Three: Ring Finger Placement
Now, place your ring finger on the third fret of the fifth string (A string). This step might require a slight stretch, but with practice, it will become more comfortable.
 Close-up photo showing the correct placement of the ring finger on the 3rd fret of the A string for the C major chord.
Observe how the finger is positioned as close to the fret as reachable within the finger zone. Positioning your finger closer to the fret reduces the pressure needed to produce a clear sound and minimize string buzz.
Step Four: Strumming the Chord
For the C major chord, you will strum only the thinnest five strings. Avoid strumming the thickest string (low E string). Position your pick or thumb on the second thickest string (A string) and strum downwards, ensuring you hit only the desired five strings. By excluding the low E string, you will effectively play a complete and well-balanced C major chord.
The One-Finger C Chord: An Easier Start for Beginners
When you’re just starting out, forming chords can feel awkward. The good news is, you can begin playing guitar from day one with a simplified, one-finger version of the C chord.
This version contains all the same notes as the standard C chord, but the sound is less full. It’s an excellent starting point to get your fingers acquainted with chord shapes and begin making music quickly.
To play the one-finger C chord, simply place your index finger on the first fret of the second string and strum only the thinnest three strings. That’s all there is to it!
 Chord diagram for the one-finger C guitar chord.
Chord diagram for the simplified one-finger C chord, ideal for beginners.
Once you feel at ease with this version, challenge yourself to learn the fuller sounding, standard C chord.
Practice Tools to Master the C Chord
To help you solidify your C chord and transition smoothly to playing songs, utilize these practice tools:
Chord Coach App
Enhance your learning with the ChordBank App’s Chord Coach feature.
![]() Screenshot of the ChordBank app interface on a smartphone, showcasing the Chord Coach feature.
Screenshot of the ChordBank app interface on a smartphone, showcasing the Chord Coach feature.
ChordBank uses your phone’s microphone to listen as you play, providing real-time feedback and guiding you string by string. This interactive tool is fantastic for ensuring accuracy and building muscle memory.
[
Start playing C »
Chord Coach: Step by Step](/o/chordtraining/?k=Z16xfny>x=xdxicBWmxx)
Beginner Lessons
If you’re finding it challenging to get started with guitar chords, the “Chords For Beginners” lesson series is designed to make learning easy and enjoyable.
These lessons cover essential skills like tuning your guitar, mastering fundamental chords, and playing in rhythm, all within a few days. It’s a structured approach to set you on the path to becoming a confident guitar player.
[
Chords for Beginners »
Lesson](/o/open-lesson/?k=ZEaGSC&unit=beginner)
Games for Engaging Practice
Make practice fun with interactive games that help reinforce your C chord playing.
![]()
![]()
Games like EmojiHunt and ChordPOP! within the ChordBank app turn chord practice into an engaging activity. As you play the C chord (and other chords), the app listens and reacts, making learning feel less like practice and more like play.
[
EmojiHunt: C »
Play chords to fill in the blanks!](/o/game/?k=1iOCC0>x=xdxicBWmxx)
[
ChordPOP!: C »
Play chords to fire darts and pop balloons!](/o/game/?k=U9hYR>x=xdxicBWmxx)
Smart Flashcards for Chord Transitions
Smoothly transitioning between chords is a crucial skill that separates a beginner who owns a guitar from someone who truly plays it. Flashcards are an excellent way to practice these transitions.
Practicing C to Am Chord Changes
The transition from C to Am (A minor) is an ideal starting point for practicing chord changes.
C
 Chord diagram for the C guitar chord.
Am
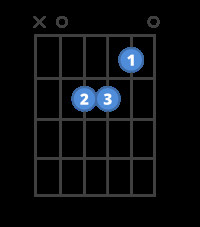 Chord diagram for the Am guitar chord.
These two chords share finger positions and strings, allowing you to keep your index finger anchored while moving your middle and ring fingers. This similarity makes the C to Am transition relatively easy to learn and a great exercise for developing chord changing skills.
[
Practice C and Am »
Smart Flashcards](/o/flash/?k=Z2gNqop>x=xdxicBWmxx,x921cYdcxY)
Practicing C, G, and D Chords Together
Another beneficial practice is to work on transitioning between C, G, and D major chords. These chords are commonly used together in countless songs, making this a highly practical exercise.
C
Chord diagram for the C guitar chord.
G
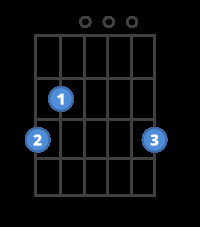 Chord diagram for the G guitar chord.
D
 Chord diagram for the D guitar chord.
Practicing these transitions will significantly improve your ability to play songs and enhance your chord vocabulary.
[
Practice C, D, and G »
Smart Flashcards](/o/flash/?k=Z15rRcc>x=xdxicBWmxx,xY26cxNnxx,z7xVc~rqxx)
About the Author:
Anna Freitas is a guitarist and vocalist with a B.A. from Berklee College of Music. She performs across New England and teaches guitar both in person and online. Her expertise and experience make these lessons reliable and effective for beginner guitarists.