
Changing strings on a guitar can seem daunting, but it’s a crucial skill for any guitarist, and guitarplayers.net is here to guide you. Learn how to restring your guitar with ease, improve your instrument’s sound, and maintain its playability with our expert tips, tricks, and step-by-step instructions. You’ll find easy restringing, string replacement insights, and guitar maintenance wisdom.
1. Why Should You Change Your Guitar Strings?
Yes, you absolutely should change your guitar strings, especially when they start sounding dull or feel worn out. Fresh strings drastically improve your guitar’s tone and playability.
Changing your guitar strings is essential for maintaining optimal sound quality and instrument performance. Over time, strings lose their brilliance and responsiveness due to oxidation, dirt, and wear from playing. According to a study by the Berklee College of Music, new strings can improve the resonance and clarity of a guitar’s sound by up to 40%. Therefore, regular string changes are crucial for achieving the best possible tone and playing experience.
1.1. How Often Should You Change Your Guitar Strings?
The frequency of string changes depends on how often you play and your playing style. A good rule of thumb is to change them every 1-3 months for regular players.
Frequent players should change their strings more often than occasional players to maintain the best possible sound. The buildup of dirt and oil from your fingers, along with environmental factors like humidity, can corrode strings and diminish their tonal quality. Many professional musicians change their strings before every performance to ensure peak sound performance. If you notice your strings are discolored, difficult to tune, or sound dull, it’s definitely time for a change.
1.2. What Happens If You Don’t Change Your Guitar Strings?
If you don’t change your guitar strings regularly, they will lose their tone, become harder to play, and can even break more easily.
Neglecting to change your guitar strings can lead to several negative consequences. Old strings lose their elasticity and vibrational properties, resulting in a dull and lifeless sound. They also become more difficult to tune and keep in tune, hindering your playing experience. Moreover, corroded strings are more prone to breakage, which can occur mid-performance or during practice, causing inconvenience and potential damage to your instrument.
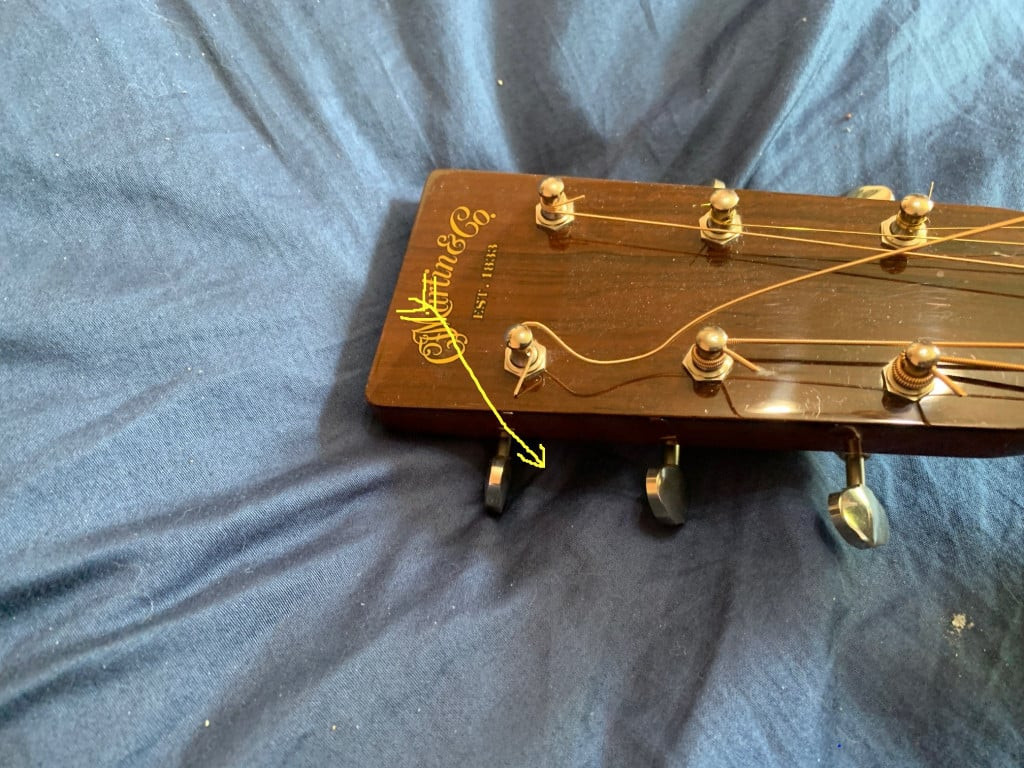 Loosened string illustration for guitar string change
1.3. How Do New Strings Improve Guitar Sound Quality?
New strings vibrate more freely, resulting in a brighter, clearer, and more resonant sound, enhancing your guitar’s overall tone.
Fresh guitar strings are a game-changer when it comes to sound quality. Their vibrant, clean sound enhances the overall tone of your guitar, making your music sound more professional and enjoyable.
1.4. Can Changing Strings Affect Playability?
Yes, new strings can make your guitar easier to play because they are more flexible and responsive, reducing finger fatigue.
New strings can significantly improve the playability of your guitar. They are more flexible and responsive than old strings, making it easier to fret notes and execute bends. This can reduce finger fatigue and allow you to play for longer periods without discomfort. Additionally, fresh strings have a smoother surface, which reduces friction and makes sliding between notes easier.
2. What Tools Do You Need to Change Guitar Strings?
To change guitar strings effectively, you’ll need a few essential tools: a string winder, wire cutters, and a tuner. These tools make the process faster and more efficient.
Having the right tools on hand can greatly simplify the string-changing process and ensure a professional-quality result. A string winder speeds up the process of loosening and tightening strings, saving you time and effort. Wire cutters are essential for trimming excess string length, preventing them from getting in the way. A tuner is crucial for bringing your guitar back to the correct pitch after restringing.
2.1. Do You Need a String Winder to Change Guitar Strings?
While not essential, a string winder speeds up the process significantly, especially for guitars with many strings, making it a worthwhile investment.
A string winder is a handy tool that can save you a lot of time and effort when changing your guitar strings. Instead of manually turning the tuning pegs, a string winder allows you to quickly and easily wind the strings, making the process much faster and more efficient. This is especially useful for guitars with a large number of strings, such as acoustic guitars or electric guitars with locking tuners.
2.2. Are Wire Cutters Necessary for Restringing a Guitar?
Yes, wire cutters are necessary to trim the excess string length after restringing, preventing potential injuries and keeping your guitar looking neat.
Wire cutters are an essential tool for restringing a guitar. After installing new strings, there will be excess length protruding from the tuning pegs. Wire cutters allow you to trim these ends neatly, preventing them from getting in the way or causing potential injuries. Trimming the strings also gives your guitar a cleaner, more professional look.
2.3. Why is a Tuner Important When Changing Strings?
A tuner ensures your guitar is perfectly in tune after restringing, allowing you to play with accurate pitch and avoid sounding off-key.
A tuner is a crucial tool for any guitarist, especially when changing strings. After restringing, it’s essential to bring your guitar back to the correct pitch. A tuner allows you to accurately tune each string, ensuring that your guitar sounds its best. Whether you prefer a traditional clip-on tuner, a pedal tuner, or a smartphone app, having a reliable tuner on hand is essential for achieving accurate pitch and avoiding sounding off-key.
2.4. What Other Tools Can Be Helpful for String Changes?
Other helpful tools include a neck rest to protect your guitar, a string cleaner to maintain your new strings, and a microfiber cloth to wipe down your instrument.
In addition to the essential tools mentioned above, there are several other items that can make the string-changing process easier and more enjoyable. A neck rest provides support and protection for your guitar’s neck while you’re working on it, preventing potential damage. A string cleaner can help maintain the longevity and tone of your new strings by removing dirt and oil. A microfiber cloth is useful for wiping down your instrument, removing fingerprints and smudges, and keeping it looking its best.
3. How Do You Prepare Your Guitar for New Strings?
To prepare your guitar for new strings, gather your tools, protect your guitar’s finish, and remove the old strings carefully. This ensures a smooth and safe string-changing process.
Proper preparation is key to a successful string-changing experience. Before you start, gather all the necessary tools and materials, such as a string winder, wire cutters, tuner, and new strings. Protect your guitar’s finish by placing a soft cloth or towel underneath the body. When removing the old strings, do so carefully to avoid scratching or damaging the instrument.
3.1. How Do You Protect Your Guitar’s Finish During a String Change?
Protect your guitar’s finish by using a soft cloth or pad under the body to prevent scratches and dings while you work.
Protecting your guitar’s finish is essential to maintaining its appearance and value. Before you start changing your strings, place a soft cloth or pad under the body of the guitar to prevent scratches and dings. Be especially careful when working around the bridge and tuning pegs, as these areas are prone to damage. Consider using a specialized guitar mat or workstation for added protection.
3.2. What is the Best Way to Remove Old Guitar Strings?
The best way to remove old guitar strings is to use a string winder to loosen them, then carefully unwind them from the tuning pegs and bridge.
Removing old guitar strings can be a bit tricky, but with the right technique, it can be done safely and efficiently. Use a string winder to loosen the strings, making them easier to handle. Carefully unwind the strings from the tuning pegs and bridge, taking care not to scratch or damage the instrument. Consider cutting the strings into smaller pieces before removing them to prevent them from tangling or causing injury.
3.3. Should You Clean Your Fretboard When Changing Strings?
Yes, cleaning your fretboard when changing strings is an excellent opportunity to remove grime and buildup, keeping your guitar in top condition.
Changing your guitar strings provides an excellent opportunity to clean your fretboard. Over time, dirt, oil, and grime can accumulate on the fretboard, affecting its appearance and playability. Use a specialized fretboard cleaner and a soft cloth to remove any buildup, paying close attention to the areas around the frets. This will help keep your fretboard in top condition and ensure smooth, comfortable playing.
3.4. How Do You Condition Your Fretboard?
Condition your fretboard by applying a small amount of fretboard conditioner to a cloth and gently rubbing it into the wood, then wiping off any excess. This prevents the wood from drying out and cracking.
Conditioning your fretboard is an important step in maintaining its health and longevity. Use a specialized fretboard conditioner, such as lemon oil or mineral oil, and apply a small amount to a cloth. Gently rub the conditioner into the wood, paying attention to the areas around the frets. Allow the conditioner to soak in for a few minutes, then wipe off any excess with a clean cloth. This will help prevent the wood from drying out and cracking, keeping your fretboard looking and playing its best.
4. Step-by-Step Guide: How to Change Strings on a Guitar
Changing strings on a guitar involves several steps: anchoring the string, winding it onto the tuning peg, stretching the string, and tuning it to pitch. Follow these steps for a successful string change.
Changing strings on a guitar may seem daunting at first, but with a little practice, it can become a quick and easy process. The basic steps include anchoring the string at the bridge, threading it through the tuning peg, winding it onto the peg, stretching the string to remove slack, and tuning it to the correct pitch.
4.1. How to Anchor the String at the Bridge?
To anchor the string at the bridge, insert the ball end of the string into the bridge hole, ensuring it is securely seated.
The first step in changing your guitar strings is to anchor the string at the bridge. For acoustic guitars, this involves inserting the ball end of the string into the bridge hole and securing it with a bridge pin. For electric guitars, the string may pass through the body or attach to a tailpiece. Ensure that the string is securely seated at the bridge to prevent it from slipping or coming loose.
4.2. How to Thread the String Through the Tuning Peg?
Thread the string through the hole in the tuning peg, leaving enough slack to wrap around the peg several times, ensuring a secure hold.
Threading the string through the tuning peg is a crucial step in the string-changing process. Insert the end of the string through the hole in the tuning peg, leaving enough slack to wrap around the peg several times. The amount of slack will vary depending on the type of guitar and the gauge of the strings. As a general rule, leave about 2-3 inches of slack for the wound strings and 3-4 inches for the plain strings. This will ensure that the string has enough wraps around the peg to hold securely without slipping.
4.3. How to Wind the String onto the Tuning Peg?
Wind the string onto the tuning peg, ensuring that the wraps go downwards, creating a neat and tidy winding that prevents slippage.
Winding the string onto the tuning peg is where the magic happens. Start by bending the string slightly downward before you begin winding. This will ensure that the wraps go downwards, creating a neat and tidy winding that prevents slippage. Use a string winder to speed up the process, and be sure to maintain tension on the string as you wind. Aim for a consistent and even winding, avoiding overlaps or gaps.
4.4. How to Stretch New Guitar Strings?
Stretch new guitar strings by gently pulling on them along their length, then retuning. Repeat this process until the strings hold their pitch.
New guitar strings need to be stretched to remove any slack and ensure they hold their pitch. Gently pull on each string along its length, starting at the bridge and working your way towards the tuning peg. You can also use your fingers to apply pressure to the string at various points. After stretching, retune the string to its correct pitch. Repeat this process several times until the string holds its pitch without going flat.
4.5. How to Tune Your Guitar After Changing Strings?
Tune your guitar after changing strings by using a tuner to bring each string to its correct pitch, making small adjustments until the tuner indicates perfect tuning.
Tuning your guitar after changing strings is the final step in the process. Use a tuner to bring each string to its correct pitch, making small adjustments to the tuning pegs until the tuner indicates perfect tuning. Start with the lowest string (usually the low E) and work your way up to the highest string (the high E). Double-check the tuning of each string after you’ve tuned them all, as the tension of one string can affect the tuning of others.
5. What Are Some Pro Tips for Changing Guitar Strings?
Pro tips for changing guitar strings include using a string winder, stretching the strings properly, and lubricating the nut to prevent breakage and ensure smooth tuning.
Changing guitar strings is a skill that can be honed over time with practice and attention to detail. Some pro tips for changing guitar strings include using a string winder to speed up the process, stretching the strings properly to prevent slippage, and lubricating the nut to prevent breakage and ensure smooth tuning.
5.1. Why Should You Use a String Winder?
Using a string winder speeds up the string-changing process, saving you time and effort, especially for guitars with multiple strings.
A string winder is an indispensable tool for any guitarist who changes their own strings. It speeds up the string-changing process by allowing you to quickly and easily wind the strings onto the tuning pegs. This can save you a significant amount of time and effort, especially for guitars with multiple strings, such as acoustic guitars or electric guitars with locking tuners.
5.2. How Do You Properly Stretch Guitar Strings?
Properly stretch guitar strings by gently pulling on them along their length, then retuning. Repeat this process until the strings hold their pitch, ensuring stable tuning.
Stretching new guitar strings is essential for ensuring stable tuning. Gently pull on each string along its length, starting at the bridge and working your way towards the tuning peg. You can also use your fingers to apply pressure to the string at various points. After stretching, retune the string to its correct pitch. Repeat this process several times until the string holds its pitch without going flat.
5.3. Should You Lubricate the Nut When Changing Strings?
Yes, lubricating the nut with graphite or a specialized lubricant reduces friction, preventing string breakage and ensuring smooth tuning.
Lubricating the nut is a simple yet effective way to improve your guitar’s tuning stability and prevent string breakage. The nut is the slotted piece at the headstock that the strings pass through on their way to the tuning pegs. Applying a small amount of lubricant, such as graphite or a specialized nut lubricant, to the slots can reduce friction and allow the strings to slide smoothly when tuning. This can prevent the strings from binding or catching, which can lead to tuning issues and string breakage.
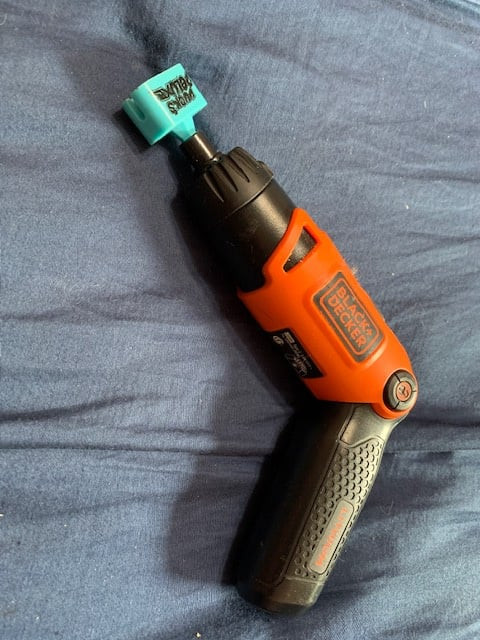 Guitar string winder
5.4. What is the Best Way to Dispose of Old Guitar Strings?
The best way to dispose of old guitar strings is to coil them up and safely discard them in a trash receptacle, preventing potential injuries.
Old guitar strings can be sharp and potentially dangerous, so it’s important to dispose of them properly. Coil the strings up tightly and secure them with tape or a rubber band to prevent them from unraveling. Then, safely discard them in a trash receptacle, making sure they are not easily accessible to children or pets. You can also recycle your old guitar strings through organizations like TerraCycle, which partners with string manufacturers to recycle used strings and other musical instrument components.
6. How to Choose the Right Guitar Strings
Choosing the right guitar strings involves considering the type of guitar, string gauge, and material. The right strings can greatly enhance your playing experience and sound.
Selecting the right guitar strings is crucial for achieving the desired tone and playability. There are several factors to consider, including the type of guitar, string gauge, and material. Different types of guitars, such as acoustic, electric, and classical, require different types of strings. String gauge refers to the thickness of the strings, which affects their tension and tone. String material, such as nickel, steel, or nylon, also plays a significant role in the overall sound.
6.1. How Do You Choose the Right Strings for Your Guitar Type?
Choose the right strings for your guitar type by using steel strings for acoustic and electric guitars, and nylon strings for classical guitars, ensuring optimal sound and playability.
The first step in choosing the right guitar strings is to consider the type of guitar you have. Acoustic guitars typically use steel strings, which produce a bright and resonant sound. Electric guitars also use steel strings, but they are often coated with nickel or other materials to enhance their magnetic properties and improve their tone. Classical guitars, on the other hand, use nylon strings, which have a softer and warmer sound. Using the wrong type of strings on your guitar can damage the instrument and negatively affect its sound.
6.2. What is String Gauge and How Does It Affect Playability?
String gauge refers to the thickness of the strings, and it affects playability by influencing string tension and ease of bending. Lighter gauges are easier to play, while heavier gauges offer more volume and sustain.
String gauge refers to the thickness of the strings, typically measured in thousandths of an inch. Lighter gauge strings are easier to play because they require less finger pressure to fret and bend. They are a good choice for beginners or players with lighter touch. Heavier gauge strings, on the other hand, offer more volume and sustain, but they require more finger strength to play. They are often preferred by experienced players or those who play in lower tunings.
6.3. What Materials Are Guitar Strings Made Of?
Guitar strings are made of various materials, including steel, nickel, nylon, and bronze, each offering unique tonal qualities and playing characteristics.
Guitar strings are made of a variety of materials, each with its own unique tonal qualities and playing characteristics. Steel strings are commonly used on acoustic and electric guitars, providing a bright and crisp sound. Nickel strings are often used on electric guitars, offering a warmer and smoother tone. Nylon strings are used on classical guitars, producing a mellow and resonant sound. Bronze strings are used on acoustic guitars, delivering a rich and full tone.
6.4. How Do Coated Strings Differ From Uncoated Strings?
Coated strings have a thin layer of polymer to protect against dirt and corrosion, extending their lifespan, while uncoated strings offer a brighter tone but require more frequent changes.
Coated strings are guitar strings that have been treated with a thin layer of polymer to protect them from dirt, oil, and corrosion. This coating extends the lifespan of the strings, allowing them to maintain their tone and playability for longer. Coated strings are a good choice for players who want to reduce the frequency of string changes. Uncoated strings, on the other hand, do not have this protective coating, so they tend to sound brighter and more resonant than coated strings. However, they are also more susceptible to dirt and corrosion, so they may require more frequent changes.
7. Acoustic vs. Electric Guitar String Changes: What’s Different?
Acoustic and electric guitar string changes differ primarily in the bridge and tuning peg designs. Acoustic guitars often use bridge pins, while electric guitars have various bridge types and machine heads.
Changing strings on an acoustic guitar differs from changing strings on an electric guitar in several ways. Acoustic guitars typically have a bridge with bridge pins that hold the strings in place, while electric guitars have various types of bridges, such as fixed bridges, tremolo bridges, and floating bridges. The tuning pegs on acoustic guitars are also typically different from those on electric guitars, with acoustic guitars often having open-gear tuning pegs and electric guitars often having closed-gear tuning pegs.
7.1. How Do You Change Strings on an Acoustic Guitar?
To change strings on an acoustic guitar, remove the bridge pins, thread the string through the bridge, wind it onto the tuning peg, and tune to pitch.
Changing strings on an acoustic guitar involves several steps. First, use a string winder or bridge pin puller to remove the bridge pins that hold the strings in place. Then, thread the new string through the bridge hole and reinsert the bridge pin. Next, thread the string through the tuning peg, leaving enough slack to wrap around the peg several times. Wind the string onto the tuning peg, ensuring that the wraps go downwards. Finally, tune the string to its correct pitch using a tuner.
7.2. What is Unique About Changing Strings on an Electric Guitar?
Changing strings on an electric guitar is unique due to the variety of bridge types and the need to consider pickup height when restringing.
Changing strings on an electric guitar can be more complex than changing strings on an acoustic guitar due to the variety of bridge types and the need to consider pickup height when restringing. Electric guitars can have fixed bridges, tremolo bridges, or floating bridges, each of which requires a different string-changing technique. Additionally, the height of the pickups can affect the tone and sustain of the guitar, so it’s important to ensure that the pickups are properly adjusted after restringing.
7.3. Do Locking Tuners Change the Restringing Process?
Yes, locking tuners simplify the restringing process by clamping the string in place, eliminating the need for multiple wraps around the tuning peg.
Locking tuners are a type of tuning peg that simplifies the restringing process. Instead of wrapping the string around the tuning peg multiple times, locking tuners clamp the string in place, eliminating the need for multiple wraps. This makes restringing faster and easier, and it can also improve tuning stability. To use locking tuners, simply loosen the locking mechanism, insert the string through the hole in the tuning peg, tighten the locking mechanism, and trim the excess string.
7.4. How Does the Bridge Type Affect String Changes?
The bridge type affects string changes because different bridges require different methods for anchoring the strings. Fixed bridges, tremolo bridges, and floating bridges all have unique stringing requirements.
The type of bridge on your guitar can significantly affect the string-changing process. Fixed bridges, such as those found on many Les Paul-style guitars, typically require you to thread the string through the bridge and anchor it with a ball end. Tremolo bridges, such as those found on many Stratocaster-style guitars, require you to thread the string through the bridge and then through a tremolo block. Floating bridges, such as those found on many archtop guitars, require you to carefully balance the tension of the strings to keep the bridge in place.
8. Common Mistakes When Changing Guitar Strings
Common mistakes when changing guitar strings include not stretching the strings, over-winding the strings on the tuning pegs, and failing to properly seat the strings at the bridge.
Changing guitar strings is a relatively simple process, but it’s easy to make mistakes that can negatively affect your guitar’s tone and playability. Some common mistakes include not stretching the strings properly, over-winding the strings on the tuning pegs, and failing to properly seat the strings at the bridge.
8.1. Why is Stretching New Strings Important?
Stretching new strings is important because it helps them settle into their final tension, preventing frequent retuning and ensuring stable pitch.
Stretching new guitar strings is an essential step in the string-changing process. New strings are made of metal, which is subject to stretching and settling over time. If you don’t stretch your strings properly, they will continue to stretch and settle as you play, causing them to go out of tune frequently. Stretching the strings helps to accelerate this process, allowing them to settle into their final tension and maintain a stable pitch.
8.2. How Many Wraps Are Too Many on the Tuning Peg?
More than 3-4 wraps on the tuning peg is too many, as excessive wraps can cause tuning instability and increase the risk of string slippage.
The number of wraps you put on the tuning peg can affect your guitar’s tuning stability. Too few wraps can cause the string to slip, while too many wraps can cause the string to bind and create tuning instability. A good rule of thumb is to aim for 3-4 wraps on the tuning peg. This provides enough tension to hold the string in place without causing excessive binding or slippage.
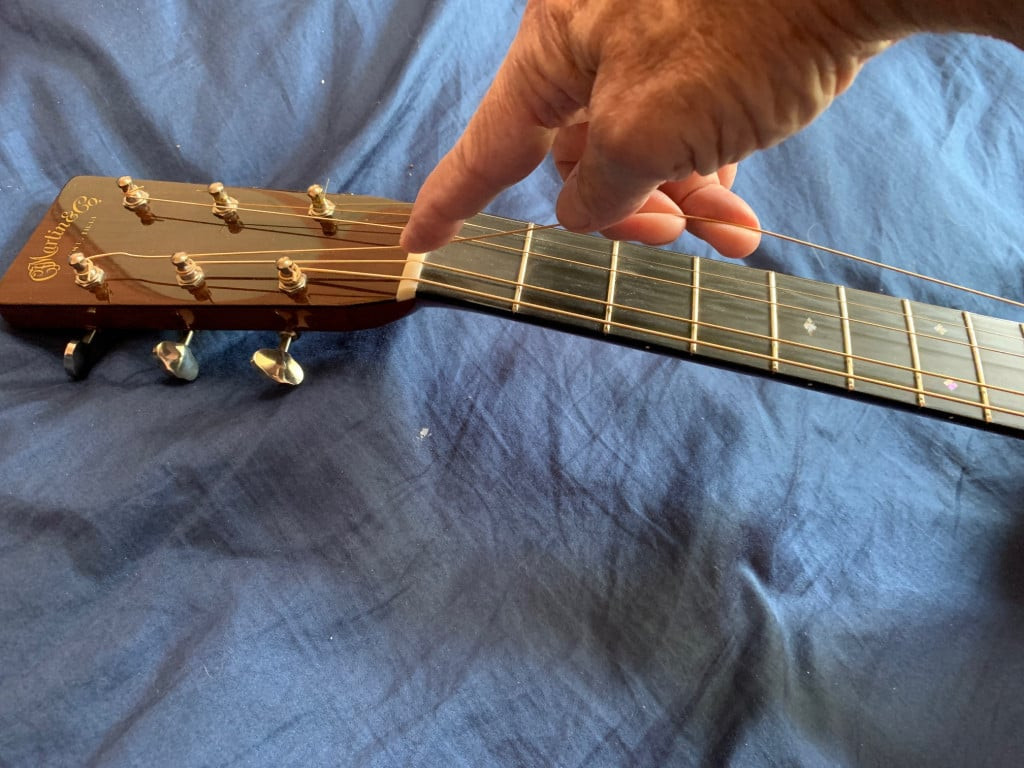 Guitar string change illustration
8.3. What Happens if the String is Not Properly Seated at the Bridge?
If the string is not properly seated at the bridge, it can cause buzzing, intonation problems, and even string breakage, affecting the guitar’s sound and playability.
Ensuring that the string is properly seated at the bridge is crucial for achieving optimal tone and playability. If the string is not properly seated, it can cause buzzing, intonation problems, and even string breakage. Make sure that the ball end of the string is firmly seated against the bridge plate, and that the string is running smoothly over the saddle.
8.4. Can Incorrect Stringing Damage the Guitar?
Yes, incorrect stringing can damage the guitar, particularly the bridge and neck, if excessive tension is applied or if the wrong type of strings are used.
Incorrect stringing can potentially damage your guitar, especially if you apply excessive tension to the neck or bridge. Using the wrong type of strings can also cause damage. For example, using steel strings on a classical guitar, which is designed for nylon strings, can damage the neck and bridge. Always use the correct type of strings for your guitar, and be careful not to overtighten the strings when restringing.
9. Maintaining Your Guitar Strings for Longevity
Maintaining your guitar strings involves cleaning them regularly, storing your guitar properly, and using string lubricant to prolong their lifespan and ensure consistent performance.
Proper maintenance can significantly extend the lifespan of your guitar strings and keep them sounding their best. This includes cleaning them regularly to remove dirt and grime, storing your guitar properly to protect it from humidity and temperature changes, and using string lubricant to reduce friction and prevent corrosion.
9.1. How Often Should You Clean Your Guitar Strings?
You should clean your guitar strings after each playing session to remove dirt and oil, preventing corrosion and extending their lifespan.
Cleaning your guitar strings regularly is essential for maintaining their tone and playability. After each playing session, wipe down the strings with a clean, dry cloth to remove dirt, oil, and sweat. You can also use a specialized string cleaner to remove stubborn grime and buildup. Regular cleaning will help prevent corrosion and extend the lifespan of your strings.
9.2. What is the Best Way to Clean Guitar Strings?
The best way to clean guitar strings is to wipe them down with a clean cloth after each use, and occasionally use a string cleaner to remove buildup.
There are several ways to clean your guitar strings, but the simplest and most effective method is to wipe them down with a clean cloth after each use. This will remove most of the dirt, oil, and sweat that accumulate on the strings during playing. For more stubborn grime, you can use a specialized string cleaner. Apply a small amount of cleaner to a cloth and wipe down the strings, then wipe them again with a clean, dry cloth to remove any residue.
9.3. How Does Humidity Affect Guitar Strings?
Humidity affects guitar strings by causing them to corrode and lose their tone more quickly, especially in humid environments.
Humidity can have a significant impact on the lifespan and performance of your guitar strings. High humidity can cause the strings to corrode and lose their tone more quickly, while low humidity can cause the wood of the guitar to dry out and crack. To protect your guitar and its strings from humidity, store it in a case or gig bag when not in use, and consider using a humidifier or dehumidifier to maintain a stable humidity level in your playing environment.
9.4. Should You Loosen Your Strings When Storing Your Guitar?
Loosening your strings when storing your guitar is generally not necessary, but it can be beneficial if the guitar will be stored for an extended period, reducing tension on the neck.
Whether or not to loosen your strings when storing your guitar is a matter of debate among guitarists. Some believe that loosening the strings can help to reduce tension on the neck and prevent warping, while others believe that it is unnecessary and can even be detrimental to the instrument. As a general rule, it’s not necessary to loosen your strings if you’re only storing your guitar for a few days or weeks. However, if you’re planning to store it for an extended period, such as several months or years, loosening the strings may be beneficial.
10. FAQ: Common Questions About Changing Guitar Strings
Here are some frequently asked questions about changing guitar strings:
10.1. How long should new guitar strings last?
New guitar strings typically last between 1-3 months, depending on playing frequency and maintenance.
10.2. Can I reuse old guitar strings?
Reusing old guitar strings is not recommended as they lose their tone and elasticity.
10.3. Why do my guitar strings keep breaking?
Guitar strings keep breaking due to factors like worn-out saddles, sharp edges on the nut, or excessive bending.
10.4. What is the best brand of guitar strings?
The best brand of guitar strings depends on personal preference, but popular brands include Ernie Ball, D’Addario, and Elixir.
10.5. How tight should guitar strings be?
Guitar strings should be tight enough to reach the correct pitch without excessive tension, as indicated by a tuner.
10.6. Can I use electric guitar strings on an acoustic guitar?
Using electric guitar strings on an acoustic guitar is not recommended, as they are designed for different magnetic properties.
10.7. How do I prevent my fingers from hurting when playing guitar?
Prevent finger pain by building calluses gradually, using lighter gauge strings, and practicing regularly.
10.8. What is the best way to store guitar strings?
Store guitar strings in a cool, dry place, away from direct sunlight and humidity.
10.9. How much does it cost to have a professional change my guitar strings?
The cost to have a professional change your guitar strings typically ranges from $20 to $50, depending on the location and service.
10.10. Should I clean my guitar strings after every use?
Yes, cleaning your guitar strings after every use helps remove dirt and oil, prolonging their lifespan and maintaining tone.
Changing your guitar strings is a fundamental skill that enhances your playing experience. Remember, guitarplayers.net is your ultimate resource for guitar lessons, gear reviews, and a thriving community. Explore our site today and take your guitar playing to the next level! Join the guitarplayers.net community now! Visit us at 1140 Boylston Street, Boston, MA 02215, United States, or call +1 (617) 747-2261. Happy playing!