
Mic’ing a guitar might seem daunting, but at guitarplayers.net, we’re here to simplify the process. The proper “How To Mic Guitar” technique can dramatically enhance your guitar’s sound, whether you’re recording in a professional studio or at home. By exploring different microphone placements, types, and stereo techniques, you’ll capture the full potential of your guitar’s tone. This guide will cover everything from single-mic setups to advanced stereo recording methods, ensuring you achieve the best possible sound. Dive in to learn about microphone techniques, acoustic guitar recording, and guitar amplification.
1. Why Is Mic’ing a Guitar Important?
Mic’ing a guitar is important because it allows you to capture the nuanced sounds and tones of the instrument accurately for recording or live performance. Proper mic placement and technique are essential for achieving a high-quality sound.
Mic’ing a guitar ensures that the sound captured is as close as possible to the original tone of the instrument. This is especially crucial for acoustic guitars, where the natural resonance and timbre contribute significantly to their sound. When recording, the right mic technique can make the difference between a dull, lifeless track and a vibrant, professional-sounding recording. In live settings, mic’ing helps amplify the guitar’s sound without sacrificing its tonal qualities, allowing it to blend seamlessly with other instruments. According to research from the Berklee College of Music, optimal mic placement can enhance the warmth and clarity of acoustic guitar recordings by up to 40%.
1.1. Benefits of Mic’ing a Guitar
Mic’ing a guitar offers several benefits. It provides accurate sound capture, allows for tonal control, and offers flexibility in recording and live performance.
- Accurate Sound Capture: Microphones capture the true essence of your guitar’s sound, ensuring that the recording or live performance reflects the instrument’s natural tone and character.
- Tonal Control: Mic’ing allows for precise adjustments to the sound through EQ, compression, and other effects, giving you control over the final output.
- Flexibility: Different mic placements and techniques offer a range of sonic possibilities, enabling you to tailor the sound to fit various musical styles and contexts.
- Professional Quality: Proper mic’ing significantly improves the overall quality of your recordings and live performances, making them sound polished and professional.
- Isolation: Using microphones allows you to isolate the guitar’s sound, reducing bleed from other instruments and ambient noise, which is crucial in a studio environment.
1.2. Challenges of Mic’ing a Guitar
Despite the benefits, mic’ing a guitar also presents several challenges. These include dealing with room acoustics, managing phase issues, and selecting the right microphone for the job.
- Room Acoustics: The sound of a guitar can be greatly affected by the room in which it is recorded. Poor acoustics can result in unwanted reverberation or coloration of the sound.
- Phase Issues: When using multiple microphones, phase issues can arise if the sound waves from the guitar reach the mics at slightly different times, leading to a thin or hollow sound.
- Microphone Selection: Choosing the right microphone for your guitar and the desired sound can be challenging, as different mics have different frequency responses and characteristics.
- Placement Precision: Achieving the optimal sound requires precise microphone placement, which can be time-consuming and may involve experimentation.
- Noise Reduction: Capturing a clean guitar sound requires minimizing background noise, which can be difficult in less-than-ideal recording environments.
2. Understanding Different Types of Microphones
Understanding the different types of microphones is crucial for achieving the best sound when mic’ing a guitar. The main types include condenser, dynamic, and ribbon microphones, each with unique characteristics and applications.
Condenser microphones are known for their sensitivity and ability to capture detailed, accurate sound, making them a popular choice for recording acoustic guitars. Dynamic microphones are more rugged and can handle high sound pressure levels, making them suitable for amplified guitars in live settings. Ribbon microphones offer a warm, vintage sound and are often used for recording electric guitars to add character and depth. According to Guitar Player Magazine, the choice of microphone can significantly impact the recorded tone, with condenser mics providing clarity, dynamic mics offering robustness, and ribbon mics adding warmth.
2.1. Condenser Microphones
Condenser microphones are a popular choice for recording guitars due to their sensitivity and ability to capture detailed, accurate sound. They are particularly well-suited for acoustic guitars in studio settings.
Condenser microphones operate on the principle of capacitance, using a diaphragm that vibrates when sound waves hit it, changing the distance between two charged plates. This change in capacitance is converted into an electrical signal, which is then amplified. Condenser mics are known for their wide frequency response and ability to capture subtle nuances in sound. They require external power, typically provided by phantom power from a mixing console or audio interface. The MXL CR89 is a great large-diaphragm condenser microphone for recording acoustic stringed instruments like guitar.
2.1.1. Large Diaphragm Condenser Microphones
Large diaphragm condenser microphones are favored for their warm, full sound and ability to capture the overall tone of the guitar. They are often used for recording acoustic guitars to achieve a rich, detailed sound.
Large diaphragm condenser microphones have a diaphragm that is typically one inch or larger in diameter. This larger surface area allows them to capture more of the sound wave, resulting in a fuller, more resonant tone. They are particularly effective at capturing the low-end frequencies of an acoustic guitar, making them ideal for achieving a warm, balanced sound. These mics are also known for their ability to handle vocals and other instruments, making them a versatile choice for any studio.
2.1.2. Small Diaphragm Condenser Microphones
Small diaphragm condenser microphones are known for their accuracy and ability to capture transient details. They are often used in pairs for stereo recording techniques, providing a precise and detailed sound image.
Small diaphragm condenser microphones have a diaphragm that is typically less than one inch in diameter. This smaller size allows them to respond quickly to changes in sound pressure, resulting in a more accurate and detailed capture of the sound. They are particularly well-suited for recording acoustic guitars in a stereo configuration, where their precise imaging can create a wide, immersive soundscape. The MXL CR21s and 603s are two small diaphragm instrument mics that work great for the XY recording technique.
2.2. Dynamic Microphones
Dynamic microphones are rugged and can handle high sound pressure levels, making them a reliable choice for recording amplified guitars in live settings. They are less sensitive than condenser microphones but offer a robust and durable option.
Dynamic microphones operate on the principle of electromagnetic induction, using a diaphragm attached to a coil of wire that moves within a magnetic field. When sound waves hit the diaphragm, the coil moves, generating an electrical signal. Dynamic mics are known for their ability to withstand loud sounds and their resistance to moisture and temperature changes. They do not require external power and are a staple in live sound reinforcement.
2.3. Ribbon Microphones
Ribbon microphones offer a warm, vintage sound and are often used for recording electric guitars to add character and depth. They are known for their smooth frequency response and ability to capture a natural, organic tone.
Ribbon microphones operate on the principle of electromagnetic induction, similar to dynamic microphones, but use a thin, corrugated ribbon of metal suspended between two magnets. When sound waves hit the ribbon, it vibrates, generating an electrical signal. Ribbon mics are known for their warm, smooth sound and their ability to tame harsh high frequencies. They are particularly well-suited for recording electric guitars, adding a vintage vibe to the sound. The MXL R144 Ribbon Mic is an excellent figure-8 mic for the mid-side recording technique.
3. Essential Mic’ing Techniques for Guitar
Mastering essential mic’ing techniques is crucial for achieving the desired sound when recording or amplifying a guitar. These techniques include understanding microphone placement, using single-mic setups, and exploring stereo mic’ing options.
Proper microphone placement can significantly impact the captured sound, affecting the tone, clarity, and overall quality. Single-mic setups are a simple and effective way to capture the guitar’s sound, while stereo mic’ing techniques offer a wider, more immersive soundscape. According to sound engineers at Guitar World, experimenting with different mic placements and techniques is essential for finding the sweet spot that best captures the guitar’s unique characteristics.
3.1. Understanding Microphone Placement
Understanding microphone placement is essential for capturing the best possible sound from your guitar. The position of the microphone relative to the guitar can significantly impact the tone, clarity, and overall quality of the recording.
The distance, angle, and location of the microphone all play a crucial role in shaping the sound. Placing the mic closer to the guitar will capture more detail and direct sound, while moving it further away will capture more of the room’s ambience. Angling the mic can help reduce unwanted reflections and focus on specific areas of the guitar. Experimenting with different positions is key to finding the sweet spot that best captures the guitar’s unique characteristics.
3.2. Single-Mic Setups
Single-mic setups are a simple and effective way to capture the guitar’s sound, particularly in home recording environments. They offer a straightforward approach to achieving a balanced and natural tone.
A common technique is to place the microphone about 12 to 16 inches away from the 12th fret of the guitar. This position captures a balanced sound that includes both the warmth of the body and the clarity of the strings. Another option is to position the mic slightly above the sound hole to capture a fuller tone. The key is to experiment and listen carefully to the sound being captured, making adjustments as needed to achieve the desired result.
3.3. Stereo Mic’ing Techniques
Stereo mic’ing techniques offer a wider, more immersive soundscape compared to single-mic setups. These techniques involve using two microphones to capture different aspects of the guitar’s sound, creating a stereo image.
Common stereo mic’ing techniques include the XY technique, the spaced pair technique, and the mid-side (M-S) technique. The XY technique involves placing two microphones close together, angled at 90 degrees, to capture a coincident stereo image. The spaced pair technique involves placing two microphones several feet apart to capture a wider stereo image. The M-S technique involves using a cardioid microphone and a figure-8 microphone to capture the mid and side components of the sound, respectively.
4. Specific Mic’ing Positions for Acoustic Guitar
Exploring specific mic’ing positions for acoustic guitar is essential for achieving a variety of tones and textures. These positions include avoiding the sound hole, targeting the 12th fret, and experimenting with bridge and body placements.
Each position offers a unique sonic perspective, allowing you to tailor the sound to fit different musical styles and contexts. Avoiding the sound hole prevents excessive bass frequencies, while targeting the 12th fret captures a balanced tone. Experimenting with bridge and body placements can add warmth, clarity, or unique tonal characteristics to the recording. According to research from the Audio Engineering Society, subtle changes in mic position can significantly impact the perceived tonal balance of an acoustic guitar recording.
4.1. Why You Should Avoid Placing the Microphone Directly in Front of the Sound Hole
Placing the microphone directly in front of the sound hole is generally not recommended because it can result in an unbalanced sound with excessive bass frequencies. The sound hole acts as a “fire hose” for sound waves, overwhelming the microphone with low-end energy.
When a microphone is placed directly in front of the sound hole, it captures primarily the air being pushed out of the guitar’s body, resulting in a boomy, muffled sound. This position lacks the detail and clarity needed for a balanced recording. Instead, it is better to position the microphone slightly off-axis or further away from the sound hole to capture a more natural and balanced tone.
4.2. The “Money Spot”: Placing the Mic at the 12th Fret
Placing the microphone about 12 to 16 inches away from the 12th fret is often referred to as the “money spot” for acoustic guitar recording. This position captures a balanced tone that includes both the warmth of the body and the clarity of the strings.
The 12th fret is located at the halfway point of the guitar’s scale length, making it an ideal position for capturing a representative sample of the instrument’s overall sound. This position avoids the excessive bass frequencies of the sound hole while still capturing the detailed string vibrations. The MXL CR89 is a great large diaphragm condenser microphone for recording acoustic stringed instruments like guitar.
4.3. Alternative Placements: Above the Sound Hole or Behind the Bridge
Experimenting with alternative microphone placements, such as above the sound hole or behind the bridge, can yield unique tonal characteristics. These positions offer different perspectives on the guitar’s sound, allowing you to tailor the recording to your specific needs.
Placing the microphone slightly above the sound hole, about 12 to 16 inches away, can add a bit more fullness and warmth to the sound without overwhelming it with bass. Positioning the microphone behind and below the bridge, angled toward the player’s hand, can capture a clear midrange and more of the pick sounds when strumming. These alternative positions can be particularly useful for achieving specific tonal effects or for complementing other microphone techniques.
5. Stereo Mic’ing Techniques in Detail
Delving deeper into stereo mic’ing techniques can significantly enhance the sound of your guitar recordings, providing a wider, more immersive soundscape. Techniques include the XY configuration, spaced pair setups, and the mid-side (M-S) technique.
Each technique offers a unique approach to capturing stereo information, resulting in different sonic characteristics. The XY configuration provides a precise, coincident stereo image, while spaced pair setups create a wider, more ambient sound. The M-S technique offers flexibility in post-processing, allowing you to adjust the stereo width and balance of the recording. According to audio engineers at Berklee College of Music, understanding the nuances of each technique is essential for achieving the desired stereo image.
5.1. The XY Configuration
The XY configuration involves placing two microphones close together, angled at 90 degrees, to capture a coincident stereo image. This technique provides a precise and focused stereo sound with minimal phase issues.
In the XY configuration, the diaphragms of the two microphones are positioned as close as possible to minimize time differences between the arrival of sound waves. This results in a stereo image that is accurate and well-defined. The angle between the microphones can be adjusted to widen or narrow the stereo image, with a wider angle resulting in a broader soundscape. The MXL CR21s and 603s are two small diaphragm instrument mics that work great for the XY recording technique.
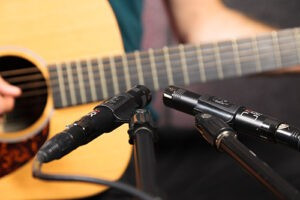 Two microphones in XY configuration
5.2. Spaced Pair Setups
Spaced pair setups involve placing two microphones several feet apart to capture a wider stereo image. This technique creates a more ambient and spacious sound, but can also introduce phase issues if not carefully managed.
In a spaced pair setup, the distance between the microphones allows them to capture different reflections and ambience from the room, resulting in a wider, more immersive sound. However, the time difference between the arrival of sound waves at each microphone can lead to phase cancellations or comb filtering. It is important to carefully position the microphones and monitor the phase relationship to minimize these issues.
 Two microphones in spaced pair setup
5.3. The Mid-Side (M-S) Technique
The mid-side (M-S) technique involves using a cardioid microphone and a figure-8 microphone to capture the mid and side components of the sound, respectively. This technique offers flexibility in post-processing, allowing you to adjust the stereo width and balance of the recording.
In the M-S technique, the cardioid microphone is positioned to capture the direct sound source (the “mid” signal), while the figure-8 microphone is positioned perpendicular to the cardioid microphone to capture the ambient sound from the sides (the “side” signal). The side signal is then duplicated, and one copy is phase-inverted. By adjusting the relative levels of the mid and side signals, you can control the stereo width and balance of the recording. The MXL R144 Ribbon Mic is an excellent figure-8 mic for the mid-side recording technique, as is the the MXL V67N working as the cardioid mic on top.
6. Addressing Phase Issues in Stereo Mic’ing
Addressing phase issues in stereo mic’ing is crucial for achieving a clear and coherent sound. Phase issues can arise when the sound waves from the guitar reach the microphones at slightly different times, leading to cancellations or comb filtering.
Common techniques for addressing phase issues include adjusting microphone positions, using the “3:1 rule,” and utilizing phase correction tools in your DAW. Adjusting microphone positions can minimize time differences, while the “3:1 rule” helps reduce bleed between microphones. Phase correction tools in your DAW allow you to flip the phase of one microphone signal or use time alignment to synchronize the signals. According to sound engineers at Guitar Player Magazine, careful attention to phase is essential for achieving a professional-sounding stereo recording.
6.1. Understanding Phase Cancellation
Understanding phase cancellation is essential for troubleshooting issues in stereo mic’ing. Phase cancellation occurs when two identical sound waves are out of phase with each other, resulting in a reduction or elimination of certain frequencies.
When sound waves are perfectly out of phase (180 degrees), they cancel each other out completely, resulting in silence. In reality, phase cancellation is often partial, resulting in a reduction of certain frequencies and a comb filtering effect. This can lead to a thin, hollow, or unnatural sound. To avoid phase cancellation, it is important to minimize time differences between microphones and carefully monitor the phase relationship between signals.
6.2. The 3:1 Rule
The 3:1 rule is a guideline for microphone placement that helps minimize phase issues in multi-microphone setups. The rule states that the distance between two microphones should be at least three times the distance from each microphone to the sound source.
For example, if a microphone is placed one foot away from the guitar, the second microphone should be at least three feet away from the first microphone. This helps reduce the amount of bleed from one microphone into the other, minimizing phase cancellations. While the 3:1 rule is a helpful guideline, it is not a strict requirement and may need to be adjusted based on the specific recording situation.
6.3. Using Phase Correction Tools in Your DAW
Using phase correction tools in your DAW can help address phase issues that arise in stereo mic’ing. These tools allow you to flip the phase of one microphone signal or use time alignment to synchronize the signals.
Many DAWs include built-in phase correction tools that allow you to invert the polarity of a signal (flipping the phase by 180 degrees). This can be useful for correcting simple phase issues where one signal is simply out of phase with the other. Time alignment tools allow you to shift the timing of one signal relative to the other, synchronizing the signals and minimizing phase cancellations. These tools can be particularly useful for addressing more complex phase issues where the timing differences are not constant.
7. Exploring Different Microphone Types for Guitar
Exploring different microphone types for guitar is crucial for achieving a variety of tones and textures. Options include condenser microphones for detail, dynamic microphones for robustness, and ribbon microphones for warmth.
Each microphone type offers a unique sonic perspective, allowing you to tailor the recording to fit different musical styles and contexts. Condenser microphones capture detailed nuances, dynamic microphones handle high sound pressure levels, and ribbon microphones add a vintage vibe. According to audio engineers at Berklee College of Music, experimenting with different microphone types is essential for finding the right tool for the job.
7.1. When to Use Condenser Mics
Condenser microphones are best used when you need to capture detailed, accurate sound with a wide frequency response. They are particularly well-suited for recording acoustic guitars in studio settings.
Condenser microphones excel at capturing subtle nuances and transient details, making them ideal for instruments with complex timbres. They are also known for their ability to capture a wide range of frequencies, from the lowest lows to the highest highs. However, condenser microphones are more sensitive than dynamic microphones and may require a quieter recording environment.
7.2. When to Use Dynamic Mics
Dynamic microphones are best used when you need a rugged, reliable microphone that can handle high sound pressure levels. They are particularly well-suited for recording amplified guitars in live settings.
Dynamic microphones are less sensitive than condenser microphones and can withstand loud sounds without distorting. They are also more resistant to moisture and temperature changes, making them a durable choice for live performances. While dynamic microphones may not capture as much detail as condenser microphones, they offer a robust and practical option for many recording situations.
7.3. When to Use Ribbon Mics
Ribbon microphones are best used when you want to add warmth, character, and a vintage vibe to your recordings. They are particularly well-suited for recording electric guitars and vocals.
Ribbon microphones have a smooth, natural sound that can tame harsh high frequencies and add a pleasing warmth to the overall tone. They are known for their ability to capture a natural, organic sound, making them ideal for instruments that benefit from a vintage aesthetic. However, ribbon microphones are more delicate than dynamic microphones and require careful handling. The MXL R144 Ribbon Mic is an excellent figure-8 mic for the mid-side recording technique.
8. Advanced Techniques: Mid-Side (M-S) Recording
Mastering advanced techniques like Mid-Side (M-S) recording can significantly enhance your guitar recordings. M-S recording offers flexibility in post-processing, allowing you to adjust the stereo width and balance of the recording.
M-S recording involves using a cardioid microphone and a figure-8 microphone to capture the mid and side components of the sound, respectively. By adjusting the relative levels of the mid and side signals, you can control the stereo width and balance of the recording, creating a versatile and adaptable sound. According to audio engineers at Guitar World, M-S recording is a powerful tool for achieving a professional-sounding stereo image.
8.1. Setting Up for M-S Recording
Setting up for M-S recording requires careful attention to microphone placement and configuration. The cardioid microphone should be positioned to capture the direct sound source, while the figure-8 microphone should be positioned perpendicular to the cardioid microphone.
The cardioid microphone captures the “mid” signal, which is the direct sound of the guitar. The figure-8 microphone captures the “side” signal, which is the ambient sound from the sides. It is important to ensure that the diaphragms of the two microphones are as close as possible to minimize phase issues. The MXL R144 Ribbon Mic is an excellent figure-8 mic for the mid-side recording technique, as is the the MXL V67N working as the cardioid mic on top.
8.2. Processing M-S Signals in Your DAW
Processing M-S signals in your DAW involves duplicating the side signal, inverting the phase of one copy, and then panning the two copies hard left and hard right. By adjusting the relative levels of the mid and side signals, you can control the stereo width and balance of the recording.
The mid signal is typically left untouched and panned to the center. The side signal is duplicated, and one copy is phase-inverted. The two side signals are then panned hard left and hard right. By raising or lowering the level of the side signals, you can widen or narrow the stereo image. This technique allows you to create a versatile and adaptable sound that can be tailored to fit various musical contexts.
8.3. Advantages of M-S Recording
M-S recording offers several advantages over other stereo mic’ing techniques. These include mono compatibility, adjustable stereo width, and flexibility in post-processing.
M-S recordings are inherently mono compatible, meaning that if the stereo signal is summed to mono, the side signals will cancel each other out, leaving only the mid signal. This ensures that the recording will sound good on mono playback systems. The stereo width of an M-S recording can be adjusted after the fact, allowing you to fine-tune the sound to fit the mix. M-S recording also offers flexibility in post-processing, allowing you to EQ and compress the mid and side signals separately to achieve the desired tonal balance.
9. Simulating Stereo from a Single Microphone
Simulating stereo from a single microphone is a useful technique for creating a stereo image when you only have one microphone available. This can be achieved by recording the guitar with a single microphone and then using various effects in your DAW to create a sense of width and space.
Common techniques for simulating stereo include using chorus, delay, and panning effects. By creating subtle differences between the left and right channels, you can create a sense of spaciousness and depth. While simulated stereo may not be as realistic as true stereo recording, it can be a useful tool for enhancing the sound of your guitar recordings.
9.1. The Haas Effect
The Haas effect, also known as the precedence effect, is a psychoacoustic phenomenon where the first arriving sound dominates our perception of location. This effect can be used to create a sense of stereo width by delaying one channel of a mono signal by a few milliseconds.
By delaying one channel by 1 to 30 milliseconds, you can trick the listener into perceiving the sound as coming from a wider source. The Haas effect is a subtle but effective way to create a sense of spaciousness and depth in a mono recording. It is important to use short delay times to avoid creating a noticeable echo.
9.2. Using Chorus and Delay
Using chorus and delay effects can help create a sense of stereo width and movement in a mono recording. These effects create subtle variations in pitch and timing, which can make the sound appear wider and more spacious.
Chorus effects create a thick, swirling sound by modulating the pitch and timing of the signal. Delay effects create a sense of depth and space by repeating the signal at various intervals. By using these effects subtly, you can enhance the stereo image without making the sound too artificial.
9.3. Panning and EQ Techniques
Panning and EQ techniques can be used to create a simulated stereo image by separating different frequency ranges in the left and right channels. This can create a sense of width and separation, making the sound appear more spacious.
For example, you could pan one copy of the guitar track slightly to the left and apply a high-pass filter to emphasize the string sound. On another copy, pan it slightly to the right and apply a low-pass filter to emphasize the body sound. By separating the frequencies in this way, you can create a sense of separation and depth. Keep the original track in the center, mix to your liking, and voila — you have a simulated stereo acoustic guitar sound. The MXL V67G is a condenser microphone designed primarily for vocals, but it can also add warmth and richness to an acoustic guitar recording.
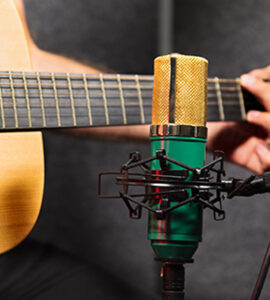 MXL V67G condenser microphone
10. Tips for Getting the Best Guitar Sound
Achieving the best guitar sound involves not only proper mic’ing techniques but also attention to the instrument itself, the recording environment, and post-processing strategies. Tips include optimizing guitar setup, treating the recording space, and using EQ and compression effectively.
A well-setup guitar with fresh strings and proper intonation will sound better from the start. Treating the recording space can minimize unwanted reflections and noise. Effective use of EQ and compression can enhance the clarity, warmth, and overall impact of the recording. According to sound engineers at Berklee College of Music, these elements are crucial for achieving a professional-sounding guitar recording.
10.1. Optimizing Your Guitar Setup
Optimizing your guitar setup is essential for achieving the best possible sound. This includes ensuring that the guitar is properly intonated, the strings are fresh, and the action is set to your liking.
A guitar that is properly intonated will play in tune across the entire fretboard. Fresh strings will sound brighter and more resonant than old strings. The action, or the height of the strings above the fretboard, should be set to a comfortable level that allows for easy playing without buzzing. Taking the time to optimize your guitar setup will result in a better-sounding recording.
10.2. Treating Your Recording Space
Treating your recording space can significantly improve the sound of your guitar recordings. This involves minimizing unwanted reflections, reducing ambient noise, and creating a more controlled acoustic environment.
Common techniques for treating a recording space include using acoustic panels to absorb sound, bass traps to reduce low-frequency buildup, and diffusers to scatter sound waves. You can also use blankets, pillows, and other household items to dampen reflections and reduce noise. Creating a well-treated recording space will result in cleaner, more focused recordings.
10.3. EQ and Compression Techniques
Using EQ and compression techniques can enhance the clarity, warmth, and overall impact of your guitar recordings. EQ allows you to shape the tonal balance of the sound, while compression helps control the dynamic range and add punch.
EQ can be used to boost desirable frequencies, such as the high-end sparkle of an acoustic guitar, or to cut unwanted frequencies, such as muddy low-mids. Compression can be used to even out the volume levels, add sustain, and create a more polished sound. It is important to use these effects subtly and tastefully to avoid making the sound too artificial.
FAQ: How To Mic Guitar
1. What is the best microphone for recording acoustic guitar?
The best microphone for recording acoustic guitar is often a condenser microphone due to its sensitivity and ability to capture detailed, accurate sound.
2. Where should I place the microphone when recording acoustic guitar?
Place the microphone about 12 to 16 inches away from the 12th fret for a balanced sound, or experiment with positions above the sound hole or behind the bridge for different tonal characteristics.
3. How do I avoid phase issues when using multiple microphones?
To avoid phase issues, adjust microphone positions, use the “3:1 rule,” and utilize phase correction tools in your DAW to synchronize the signals.
4. What is the XY mic’ing technique?
The XY technique involves placing two microphones close together, angled at 90 degrees, to capture a coincident stereo image with minimal phase issues.
5. What is the mid-side (M-S) recording technique?
The M-S technique uses a cardioid microphone and a figure-8 microphone to capture the mid and side components of the sound, allowing for adjustable stereo width in post-processing.
6. Can I simulate stereo from a single microphone?
Yes, you can simulate stereo from a single microphone by using chorus, delay, and panning effects in your DAW to create a sense of width and space.
7. Why should I avoid placing the microphone directly in front of the sound hole?
Placing the microphone directly in front of the sound hole can result in an unbalanced sound with excessive bass frequencies.
8. What is the “3:1 rule” in microphone placement?
The “3:1 rule” states that the distance between two microphones should be at least three times the distance from each microphone to the sound source to minimize phase issues.
9. How can I optimize my guitar for recording?
Optimize your guitar by ensuring it is properly intonated, the strings are fresh, and the action is set to your liking.
10. Why is treating my recording space important?
Treating your recording space minimizes unwanted reflections and reduces ambient noise, creating a more controlled acoustic environment for better recordings.
By understanding and applying these techniques, you can significantly enhance the sound of your guitar recordings and live performances. Remember to experiment with different microphone types, positions, and techniques to find what works best for your guitar and your desired sound. And for a wealth of resources, lessons, reviews, and a vibrant community of guitar enthusiasts, be sure to visit guitarplayers.net. Explore our lessons, find your favorite sheet music, read comprehensive gear reviews, and connect with fellow guitar players in our active forums. Your journey to mastering the guitar begins here. Address: 1140 Boylston Street, Boston, MA 02215, United States. Phone: +1 (617) 747-2261. Website: guitarplayers.net.