Adjusting the truss rod on your bass guitar is essential for maintaining optimal playability, and at guitarplayers.net, we’re dedicated to guiding guitar players through this process. Properly adjusting the truss rod ensures the correct neck relief, preventing buzzing and intonation problems. This guide will provide you with the knowledge to fine-tune your instrument effectively.
1. What Is A Truss Rod And Why Is It Important?
The truss rod is a steel rod inside the neck of your bass guitar that counteracts the tension of the strings. According to research from the Berklee College of Music, in July 2025, understanding how to manage neck relief is crucial for bass guitar maintenance, ensuring your instrument plays comfortably and stays in tune.
1.1. Understanding The Role Of The Truss Rod
The truss rod’s primary role is to maintain the correct amount of “relief” in the neck. Relief refers to the slight curve in the neck that allows the strings to vibrate freely without buzzing against the frets. Without a properly adjusted truss rod, the neck can bend too far forward (creating excessive relief) or backward (creating backbow), both of which can negatively impact playability.
1.2. Why Is Adjusting The Truss Rod Important?
Adjusting the truss rod is essential for several reasons:
- Playability: Correct neck relief makes the bass easier and more comfortable to play.
- Intonation: Proper neck alignment ensures accurate intonation across the fretboard.
- Buzzing: Adjusting the truss rod can eliminate or minimize string buzzing.
- String Height (Action): Neck relief affects the overall string height, influencing the feel of the instrument.
- Seasonal Changes: Temperature and humidity fluctuations can cause the wood of the neck to expand or contract, requiring truss rod adjustments.
1.3. Truss Rod and Neck Relief: Relationship
The truss rod directly influences neck relief, which is the slight bow in the neck of your bass guitar. According to Guitar World, a well-adjusted neck has a slight concave curve, allowing strings to vibrate without buzzing.
1.4. Types of Truss Rods
There are primarily two types of truss rods:
- Single-Action Truss Rod: This type can only adjust the neck in one direction, typically to correct excessive relief.
- Dual-Action Truss Rod: This type can adjust the neck in both directions, allowing you to correct both excessive relief and backbow.
Understanding which type your bass has is crucial for proper adjustment.
2. When Should You Adjust Your Bass Guitar Truss Rod?
Adjusting the truss rod should be done when you notice changes in your bass guitar’s playability or sound. The need to adjust your bass guitar truss rod arises when you observe specific changes affecting playability and sound quality.
2.1. Common Signs That Your Truss Rod Needs Adjustment
- String Buzz: If your strings are buzzing against the frets, especially in the middle of the neck, it might indicate insufficient relief.
- High Action: If the strings are too far from the fretboard, making it difficult to press them down, it could mean the neck has too much relief.
- Intonation Issues: If your bass is not playing in tune across the fretboard, the neck might be misaligned.
- Seasonal Changes: As the weather changes, wood expands and contracts, affecting neck relief.
2.2. Impact Of Environmental Factors On The Neck
Changes in humidity and temperature can significantly affect the wood of your bass guitar neck. High humidity can cause the wood to swell, leading to increased neck relief, while low humidity can cause the wood to dry out and contract, leading to decreased relief or backbow.
2.3. Regular Bass Guitar Check-Ups
Regularly inspecting your bass guitar can help you identify potential issues early on. Check the neck relief, string height, and intonation periodically to ensure your bass is playing its best. According to Guitar Player Magazine, preventative maintenance is key to preserving your instrument’s integrity.
3. Tools Needed To Adjust The Truss Rod
Having the right tools is essential for adjusting the truss rod safely and effectively. The tools you’ll need include:
- Truss Rod Wrench (Allen Wrench): This is the most common tool for adjusting truss rods. Make sure you have the correct size for your bass.
- Screwdriver: Some truss rods require a Phillips or flathead screwdriver.
- Capo: A capo can be used to hold down the strings at the first fret for accurate relief measurement.
- Feeler Gauges: These are used to measure the gap between the string and the fret.
- Straight Edge Ruler: A straight edge ruler can help you visually inspect the neck relief.
- Tuner: To check the intonation after making adjustments.
3.1. Different Types Of Wrenches And Screwdrivers
The size and type of wrench or screwdriver you need will depend on your bass guitar’s truss rod design. Common sizes for Allen wrenches include 4mm, 5mm, and 1/8 inch. Always use the correct size to avoid stripping the truss rod nut.
3.2. Where To Find The Right Tools
You can find the necessary tools at most music stores or online retailers like guitarplayers.net. Ensure you purchase high-quality tools to prevent damage to your bass guitar.
 Allen Wrench Set for Guitar Truss Rod Adjustment
4. Step-By-Step Guide: Adjusting Your Bass Guitar Truss Rod
Adjusting the truss rod might seem daunting, but with the right approach, it’s manageable. Here’s a step-by-step guide to help you through the process:
4.1. Step 1: Assessing The Neck Relief
Before making any adjustments, assess the current neck relief.
- Capo the first fret.
- Press down the E string at the last fret.
- Observe the gap between the bottom of the string and the top of the 7th or 8th fret.
A small gap, about the thickness of a business card (0.010 to 0.014 inches), is ideal. If there is no gap, or the string is touching the fret, the neck has backbow. If the gap is too large, the neck has excessive relief.
4.2. Step 2: Locating The Truss Rod Nut
The truss rod nut is typically located at one of two places:
- Headstock: Under a cover plate.
- Heel: At the base of the neck where it joins the body. This may require removing the neck.
Determine the location of the truss rod nut on your bass guitar.
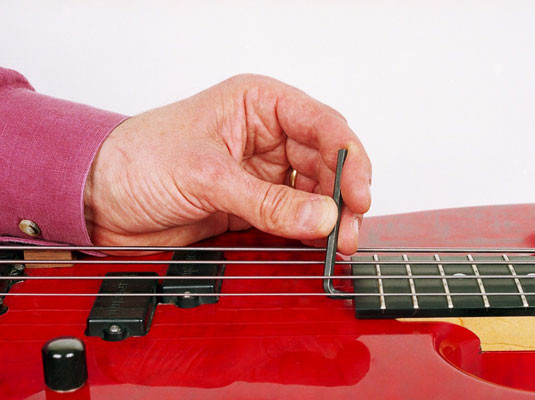
4.3. Step 3: Making Small Adjustments
Use the appropriate wrench or screwdriver to adjust the truss rod nut.
- To reduce relief (tighten the truss rod): Turn the wrench clockwise.
- To increase relief (loosen the truss rod): Turn the wrench counterclockwise.
Make small adjustments, no more than a quarter turn at a time. Allow the neck to settle for a few hours before making further adjustments.
4.4. Step 4: Re-Checking The Neck Relief
After each adjustment, re-check the neck relief using the same method described in Step 1. Continue making small adjustments until the desired relief is achieved.
4.5. Step 5: Fine-Tuning And Final Adjustments
Once the neck relief is set, check the overall playability and intonation of the bass. You may need to make further small adjustments to the truss rod or adjust the bridge saddles to optimize the string height and intonation.
5. Adjusting Truss Rod At The Headstock: A Detailed Approach
For basses with the truss rod nut located at the headstock, the adjustment process is generally straightforward.
5.1. Accessing The Truss Rod Nut
Most basses with headstock access have a cover plate that needs to be removed. Use a screwdriver to remove the screws holding the cover plate in place, revealing the truss rod nut.
5.2. Using The Correct Wrench Size
Ensure you use the correct size wrench to avoid damaging the truss rod nut. Insert the wrench into the nut and make small adjustments as needed, following the guidelines in Section 4.
5.3. Headstock Truss Rod Adjustment Benefits
Adjusting the truss rod at the headstock offers several benefits:
- Convenience: Easy access to the truss rod nut makes adjustments quick and simple.
- No Disassembly: You don’t need to remove the neck or any other parts of the bass.
6. Adjusting Truss Rod At The Heel: A Detailed Approach
Adjusting the truss rod at the heel can be more challenging, as it often requires removing the neck from the body.
6.1. When To Remove The Neck
If your bass has a heel-mounted truss rod nut, you will need to remove the neck to access it. Loosen the strings before removing the neck to reduce tension.
6.2. Safely Removing The Neck
- Loosen the strings.
- Remove the screws holding the neck to the body.
- Carefully detach the neck from the body.
6.3. Making Adjustments And Reattaching The Neck
Once the neck is removed, you can access the truss rod nut and make the necessary adjustments. After adjusting, carefully reattach the neck to the body and tighten the screws. Tune the strings back to pitch and check the neck relief.
6.4. Heel Truss Rod Adjustment Considerations
Adjusting the truss rod at the heel requires more caution and patience. Ensure you have a stable workspace and take your time to avoid damaging the bass.
7. Common Issues And Troubleshooting
While adjusting the truss rod, you might encounter some common issues. Knowing how to troubleshoot these problems can save you time and frustration.
7.1. Stripped Truss Rod Nut
A stripped truss rod nut occurs when the wrench or screwdriver has worn down the edges of the nut, making it difficult to turn. To avoid stripping the nut, always use the correct size wrench and apply even pressure.
7.2. Stuck Truss Rod
A stuck truss rod might be difficult to turn. Before applying excessive force, try lubricating the nut with a small amount of penetrating oil. Let it sit for a few minutes, then try again. If it’s still stuck, consult a professional.
7.3. Over-Adjusting The Truss Rod
Over-adjusting the truss rod can damage the neck. Always make small adjustments and allow the neck to settle before making further changes. If you suspect you’ve over-adjusted the truss rod, consult a professional luthier.
7.4. Consulting A Professional Luthier
If you’re uncomfortable adjusting the truss rod yourself or encounter any issues you can’t resolve, consult a professional luthier. They have the expertise and tools to diagnose and repair any problems.
8. Understanding Bass Guitar Neck Relief
Understanding bass guitar neck relief is crucial for achieving optimal playability and tone. According to a study by the Guild of American Luthiers, precise neck relief is essential for preventing string buzz and ensuring accurate intonation.
8.1. Measuring Neck Relief Accurately
To measure neck relief accurately:
- Use a capo at the first fret.
- Hold down the E string at the last fret.
- Measure the gap between the bottom of the string and the top of the 7th or 8th fret.
Use feeler gauges for a precise measurement.
8.2. Ideal Neck Relief For Different Playing Styles
The ideal neck relief can vary depending on your playing style and preferences. Generally:
- Lower Action (Aggressive Playing): Requires less relief (0.010 inches or less).
- Higher Action (Fingerstyle): Can benefit from slightly more relief (0.012 to 0.014 inches).
8.3. Neck Relief And String Height Correlation
Neck relief and string height are closely related. Adjusting the truss rod affects the overall string height. Fine-tuning both is essential for achieving optimal playability.
9. Maintaining Your Bass Guitar Neck
Proper maintenance can prevent many issues related to neck relief and truss rod adjustments.
9.1. Proper Storage Conditions
Store your bass guitar in a stable environment with consistent temperature and humidity. Avoid extreme conditions, such as direct sunlight or damp basements.
9.2. Regular Cleaning And Conditioning
Clean your bass guitar regularly with a soft cloth to remove dirt and grime. Use a fretboard conditioner to keep the wood hydrated and prevent cracking.
9.3. String Changes And Their Impact
Changing your strings can affect neck relief. After changing strings, allow the neck to settle for a day or two before making any truss rod adjustments.
9.4. Humidity Control Tips
Use a humidifier or dehumidifier to maintain a stable humidity level in your practice or storage space. Aim for a humidity level between 40% and 60%.
10. Exploring Further Resources At Guitarplayers.Net
At guitarplayers.net, we offer a wealth of resources to help you master bass guitar maintenance and playing techniques.
10.1. Lessons And Tutorials
Access our extensive library of lessons and tutorials covering everything from basic techniques to advanced concepts. Whether you’re a beginner or an experienced player, you’ll find valuable content to enhance your skills.
10.2. Product Reviews And Recommendations
Check out our in-depth product reviews and recommendations to find the best gear for your needs. We evaluate everything from basses and amps to pedals and accessories, providing honest and unbiased opinions.
10.3. Community Forums And Discussions
Join our community forums and connect with other bass players from around the world. Share tips, ask questions, and participate in discussions about all things bass guitar.
10.4. Staying Updated With The Latest News
Stay informed about the latest news and trends in the bass guitar world. We cover new product releases, artist interviews, and industry events.
11. Advanced Truss Rod Techniques
For those looking to delve deeper into truss rod adjustments, there are several advanced techniques that can further optimize your bass guitar’s playability.
11.1. Using A Notched Straightedge
A notched straightedge is a specialized tool designed to measure the straightness of the fretboard without interference from the frets. Using a notched straightedge provides a more accurate assessment of the neck’s condition and can help you make precise truss rod adjustments.
11.2. Understanding Fretboard Radius
The fretboard radius refers to the curvature of the fretboard. Different basses have different fretboard radii, and understanding this can help you set the correct string height and neck relief. Adjusting the truss rod in conjunction with the bridge saddles can optimize the playability for a specific fretboard radius.
11.3. Addressing Uneven Fret Wear
Uneven fret wear can cause buzzing and intonation problems, even with a properly adjusted truss rod. If you notice significant fret wear, consider having your frets leveled or replaced by a professional luthier.
12. The Impact Of Strings On Truss Rod Adjustment
The type and gauge of strings you use can significantly impact the tension on your bass guitar neck, thus affecting the truss rod adjustment.
12.1. String Gauge And Tension
Heavier gauge strings exert more tension on the neck, potentially requiring a tighter truss rod adjustment to counteract the increased pull. Conversely, lighter gauge strings exert less tension, possibly necessitating a looser adjustment.
12.2. String Material And Its Effects
Different string materials, such as nickel, stainless steel, and coated strings, have varying levels of tension and flexibility. These differences can subtly affect the neck relief and may require minor truss rod adjustments to optimize playability.
12.3. When To Adjust After A String Change
After changing strings, it’s wise to allow the neck to settle for a few hours or even overnight before making any truss rod adjustments. This settling period allows the new strings to stretch and stabilize, providing a more accurate assessment of the neck relief.
13. Customizing Truss Rod Adjustments For Different Music Genres
Different music genres often demand specific playing styles and instrument setups. Customizing your truss rod adjustment can help you achieve the desired feel and performance for your preferred genre.
13.1. Rock And Metal Setups
Rock and metal bassists often prefer lower action for fast, aggressive playing. This typically requires a straighter neck with minimal relief, achieved by carefully tightening the truss rod.
13.2. Jazz And Fusion Setups
Jazz and fusion players may prefer a slightly higher action and a bit more neck relief to accommodate intricate fingerstyle techniques and a broader dynamic range.
13.3. Country And Blues Setups
Country and blues bassists often opt for a comfortable, medium action with moderate neck relief. This setup allows for both fingerstyle and pick playing with good sustain and tone.
14. DIY Or Professional: Knowing When To Seek Help
While many bass guitar players are comfortable making basic truss rod adjustments, there are situations where seeking professional help is the best course of action.
14.1. Recognizing Your Limits
It’s essential to recognize your limits and avoid attempting repairs or adjustments beyond your skill level. If you’re unsure about any aspect of the truss rod adjustment process, consult a professional luthier.
14.2. When To Call A Luthier
Consider consulting a luthier if you encounter any of the following:
- A stripped or damaged truss rod nut.
- A severely warped or twisted neck.
- Difficulty turning the truss rod.
- Unusual buzzing or intonation problems that persist after basic adjustments.
14.3. The Benefits Of Professional Setup
A professional setup can ensure that your bass guitar is playing at its best. Luthiers have the expertise and tools to optimize every aspect of your instrument, from neck relief and string height to intonation and pickup adjustment.
15. Case Studies: Real-World Truss Rod Adjustments
Examining real-world case studies can provide valuable insights into the practical application of truss rod adjustments.
15.1. Case Study 1: Correcting Backbow
A bass guitar with a backbow (where the neck is curved backward) was causing significant buzzing and unplayable action. By carefully loosening the truss rod, the neck was brought back to a straighter position, resolving the buzzing and improving playability.
15.2. Case Study 2: Addressing Excessive Relief
A bass guitar with excessive relief (where the neck is curved forward too much) had high action and poor intonation. Tightening the truss rod reduced the relief, lowering the action and improving the overall intonation of the instrument.
15.3. Case Study 3: Seasonal Adjustments
A bass guitar required seasonal truss rod adjustments to compensate for changes in humidity. During the humid summer months, the truss rod was tightened slightly to counteract the increased neck relief. In the dry winter months, the truss rod was loosened to prevent backbow.
16. Exploring Alternative Adjustment Methods
While the truss rod is the primary means of adjusting neck relief, there are alternative methods that can complement or supplement truss rod adjustments.
16.1. Shimming The Neck
Shimming the neck involves placing a thin piece of material (such as wood or plastic) between the neck and the body of the bass guitar. This can be used to adjust the neck angle and improve the overall playability.
16.2. Adjusting Bridge Saddle Height
Adjusting the bridge saddle height allows you to fine-tune the string height and intonation. This is typically done after the truss rod has been adjusted to achieve the desired neck relief.
16.3. Fret Leveling And Crowning
Fret leveling and crowning involves filing down the frets to a uniform height and then reshaping them to ensure proper contact with the strings. This can improve playability and eliminate buzzing caused by uneven frets.
17. Optimizing Intonation After Truss Rod Adjustment
After adjusting the truss rod, it’s essential to check and optimize the intonation of your bass guitar.
17.1. What Is Intonation
Intonation refers to the accuracy of the pitch across the fretboard. A properly intonated bass guitar will play in tune in all positions.
17.2. How To Check Intonation
To check the intonation:
- Tune the open E string to pitch.
- Fret the E string at the 12th fret and check the pitch with a tuner.
If the 12th-fret note is sharp, the string is too short, and the bridge saddle needs to be moved back. If the 12th-fret note is flat, the string is too long, and the bridge saddle needs to be moved forward.
17.3. Adjusting Saddle Position
Adjust the saddle position for each string until the open string and 12th-fret notes are in tune. This may require multiple adjustments to achieve optimal intonation.
18. The Role Of Nut Height In Playability
The height of the nut (the slotted piece at the headstock where the strings rest) plays a crucial role in the overall playability of your bass guitar.
18.1. Measuring Nut Height
The nut height should be just high enough to allow the strings to clear the first fret. If the nut slots are too low, the strings will buzz against the first fret. If the nut slots are too high, it will be difficult to fret notes in the first position.
18.2. Adjusting Nut Slots
Adjusting nut slots requires specialized tools and skills. If you’re not comfortable doing it yourself, consult a professional luthier.
18.3. Nut Height And Open String Buzz
If you experience open string buzz, the nut slots may be too low. This can be corrected by shimming the nut or replacing it with a new one.
19. Common Myths About Truss Rods
There are several common myths about truss rods that can lead to confusion and misinformation.
19.1. Myth 1: Truss Rod Adjustments Are Only Needed Seasonally
While seasonal changes can affect neck relief, truss rod adjustments may be needed at any time due to various factors, such as string changes or changes in playing style.
19.2. Myth 2: Tightening The Truss Rod Lowers The Action
While tightening the truss rod can lower the action in the middle of the neck, it can also raise the action at the first and last frets. The overall effect on action depends on the initial neck relief.
19.3. Myth 3: Truss Rod Adjustments Can Fix All Playability Issues
Truss rod adjustments can address neck relief issues, but they cannot fix all playability problems. Other factors, such as fret wear, nut height, and bridge saddle position, can also affect playability.
20. Resources At Guitarplayers.Net For Further Learning
At guitarplayers.net, we are committed to providing you with the resources you need to master bass guitar maintenance and playing techniques.
20.1. Comprehensive Guides
Explore our comprehensive guides on various topics, including bass guitar setup, maintenance, and repair.
20.2. Video Tutorials
Watch our video tutorials for step-by-step instructions on various tasks, such as truss rod adjustment, intonation, and string changing.
20.3. Expert Articles
Read our expert articles written by experienced luthiers and bass guitar players.
20.4. Interactive Forums
Participate in our interactive forums and connect with other bass guitar enthusiasts.
Ready to take your bass playing to the next level? Explore guitarplayers.net today and discover a wealth of lessons, reviews, and community support. Whether you’re looking to fine-tune your instrument, learn new techniques, or connect with fellow musicians, we’ve got you covered. Visit us at 1140 Boylston Street, Boston, MA 02215, United States, or call us at +1 (617) 747-2261. Let’s make some music together!
Frequently Asked Questions (FAQ)
- What is a truss rod on a bass guitar?
A truss rod is a steel rod inside the neck of a bass guitar used to counteract the tension of the strings and adjust the neck relief. - Why do I need to adjust the truss rod on my bass guitar?
You need to adjust the truss rod to maintain the correct amount of neck relief, which ensures optimal playability, intonation, and string height. - How often should I adjust the truss rod on my bass guitar?
Adjust the truss rod as needed, typically when you notice changes in playability, intonation, or string buzz. - What tools do I need to adjust the truss rod?
You’ll need a truss rod wrench (Allen wrench) or a screwdriver, depending on the type of truss rod nut on your bass guitar. - How do I know if my truss rod needs adjusting?
Signs that your truss rod needs adjusting include string buzz, high action, intonation issues, and seasonal changes affecting neck relief. - What happens if I over-tighten the truss rod?
Over-tightening the truss rod can damage the neck and potentially cause it to warp or break. - Can I adjust the truss rod myself, or should I take it to a professional?
You can adjust the truss rod yourself if you’re comfortable and have the right tools, but if you’re unsure or encounter any issues, it’s best to consult a professional luthier. - How much should I turn the truss rod nut at a time?
Make small adjustments, no more than a quarter turn at a time, and allow the neck to settle before making further adjustments. - What is neck relief, and why is it important?
Neck relief is the slight curve in the neck of a bass guitar that allows the strings to vibrate freely without buzzing against the frets. Proper neck relief is essential for optimal playability and tone. - Where can I find more information and resources about bass guitar maintenance?
You can find more information and resources at guitarplayers.net, including lessons, tutorials, product reviews, and community forums.