
Adjusting the guitar neck is essential for maintaining playability, and at guitarplayers.net, we’re dedicated to helping guitarists of all levels master this skill. A well-adjusted neck ensures proper string action, intonation, and overall comfort, allowing you to play your best; learning about neck relief, truss rod adjustments, and neck shims can significantly improve your guitar’s performance and your playing experience.
1. Understanding The Importance of Guitar Neck Adjustment
Why is adjusting your guitar neck crucial? It’s simple: a straight and properly adjusted neck is fundamental to your guitar’s playability, intonation, and overall sound. Neglecting this aspect can lead to buzzing frets, high action, and difficulty playing chords and solos. Understanding the anatomy of the guitar neck, including the truss rod and its function, is the first step to achieving optimal performance.
1.1. What is the Purpose of Adjusting a Guitar Neck?
The primary reason to adjust a guitar neck is to control the amount of “relief,” or the slight bow in the neck. This relief is crucial for allowing the strings to vibrate freely without buzzing against the frets. According to research from the Berklee College of Music, a properly adjusted neck relief ensures optimal playability and intonation across the fretboard.
1.2. Why is Neck Relief Important for Guitar Playability?
Neck relief is vital because it provides the necessary space for the strings to vibrate without hitting the frets. If the neck is too straight or has a back-bow, the strings will likely buzz, especially in the lower frets. Conversely, if the neck has too much relief, the action will be high, making it difficult to fret notes and chords, this is according to Guitar World Magazine.
1.3. How Does Temperature and Humidity Affect Guitar Necks?
Temperature and humidity significantly impact wood instruments like guitars. Wood expands in high humidity, causing the neck to bow forward, and contracts in low humidity, leading to a back-bow. Maintaining a stable environment for your guitar is crucial, as recommended by Taylor Guitars. Ideally, keep your guitar in a room with 45-55% humidity and a temperature between 70-75°F (21-24°C).
2. Identifying Common Guitar Neck Problems
Before diving into adjustments, it’s important to recognize the common symptoms of a misaligned guitar neck. Buzzing frets, high action, and intonation issues are all telltale signs. Regularly inspecting your guitar can help you catch these problems early and prevent further damage.
2.1. What are the Signs of an Improperly Adjusted Guitar Neck?
Common signs of an improperly adjusted guitar neck include:
- Fret Buzz: Strings buzzing against the frets, especially in the lower positions.
- High Action: Strings are too far from the fretboard, making it difficult to press down.
- Intonation Problems: Notes are out of tune as you move up the neck.
- Difficulty Playing: Overall discomfort and strain while playing.
2.2. How to Check Guitar Neck Relief
Checking neck relief is simple. Here’s how:
- Fret the low E string at the first fret.
- Fret the same string at the last fret.
- Observe the gap between the string and the top of the 6th-8th fret.
- The gap should be very small, around the thickness of a business card (0.010 inches).
If the gap is larger or smaller, the truss rod needs adjustment.
2.3. What is Back-Bow and How Does It Affect Playability?
Back-bow occurs when the guitar neck curves backward, meaning it has little to no relief or even a negative relief. This condition causes significant fret buzz, especially on the lower frets, making the guitar nearly unplayable. A back-bow requires loosening the truss rod to allow the neck to return to a neutral or slightly forward position.
3. Essential Tools for Adjusting Your Guitar Neck
Having the right tools is essential for making accurate and safe adjustments to your guitar neck. A truss rod wrench, precision ruler, and feeler gauges are indispensable for any guitarist looking to maintain their instrument.
3.1. What Tools Do I Need to Adjust a Guitar Neck?
The essential tools include:
- Truss Rod Wrench: This is specific to your guitar model (usually an Allen wrench or a socket wrench).
- Feeler Gauges: For measuring the neck relief accurately.
- Precision Ruler: To measure string height (action).
- Screwdriver: For adjusting the bridge and other components.
- Tuner: To check intonation after adjustments.
3.2. How to Choose the Right Truss Rod Wrench
Choosing the correct truss rod wrench is critical to avoid damaging the truss rod nut. Consult your guitar’s manual or the manufacturer’s website for the specific size and type of wrench required. Using the wrong size can strip the nut, leading to costly repairs.
3.3. Where to Buy Quality Guitar Adjustment Tools
You can find high-quality guitar adjustment tools at reputable music stores like Guitar Center or online retailers like Sweetwater. Look for brands known for precision and durability, such as StewMac or MusicNomad.
4. Step-by-Step Guide to Adjusting the Guitar Neck
Ready to get hands-on? This section provides a detailed, step-by-step guide to adjusting your guitar neck, covering everything from truss rod adjustments to setting the proper neck relief.
4.1. How to Locate the Truss Rod Nut
The truss rod nut is typically located either at the headstock or inside the soundhole of the guitar. At the headstock, it’s usually covered by a small plastic plate. Inside the soundhole, you’ll need a long Allen wrench to reach it.
4.2. How to Tighten a Guitar Truss Rod
Tightening the truss rod corrects excessive neck relief (too much bow). Here’s how:
- Insert the correct wrench into the truss rod nut.
- Turn the wrench clockwise in small increments (1/4 turn).
- Re-check the neck relief after each adjustment.
- Continue until the desired relief is achieved.
4.3. How to Loosen a Guitar Truss Rod
Loosening the truss rod corrects a back-bow (not enough relief). Here’s how:
- Insert the correct wrench into the truss rod nut.
- Turn the wrench counter-clockwise in small increments (1/4 turn).
- Re-check the neck relief after each adjustment.
- Continue until the desired relief is achieved.
4.4. What is the Correct Amount of Neck Relief?
The ideal neck relief varies depending on your playing style and preferences, but a good starting point is around 0.010 inches (the thickness of a business card). This measurement is taken between the string and the top of the 6th-8th fret when fretting the first and last frets.
4.5. What Happens if I Overtighten the Truss Rod?
Overtightening the truss rod can cause serious damage to your guitar. It can strip the truss rod nut, warp the neck, or even crack the fretboard. Always make small adjustments and check the relief frequently to avoid overdoing it.
4.6. What Happens if I Under-Tighten the Truss Rod?
Under-tightening the truss rod results in excessive neck relief, leading to high action and difficulty playing. The strings will be too far from the fretboard, making it harder to fret notes and chords comfortably.
5. Adjusting Action and String Height
Once the neck relief is set, adjusting the action (string height) is the next step in optimizing your guitar’s playability. Lower action makes it easier to fret notes, while higher action can prevent buzzing.
5.1. How to Measure Guitar String Height
String height is typically measured at the 12th fret. Use a precision ruler to measure the distance between the bottom of the string and the top of the fret. A common measurement for electric guitars is 2/32″ (1.6mm) on the high E string and 3/32″ (2.4mm) on the low E string.
5.2. How to Lower Guitar String Action
To lower the action, you’ll need to adjust the bridge saddles. Each saddle has screws that raise or lower its height. Use a small Allen wrench or screwdriver to adjust the saddles until the desired string height is achieved. Remember to adjust the intonation after changing the action.
5.3. How to Raise Guitar String Action
Raising the action is the reverse of lowering it. Use the same screws on the bridge saddles to raise the height of the strings. Be careful not to raise the action too high, as this can make the guitar difficult to play.
5.4. Common Problems with String Height and How to Fix Them
A common problem is uneven string height, where some strings are higher or lower than others. This can be corrected by individually adjusting the bridge saddles to ensure each string is at the correct height. Another issue is strings buzzing only on certain frets, which may indicate uneven frets that require leveling.
6. Intonation Adjustments After Neck and Action Adjustments
Intonation is the accuracy of pitch as you move up the fretboard. After adjusting the neck and action, it’s essential to check and adjust the intonation to ensure your guitar plays in tune across the entire neck.
6.1. What is Guitar Intonation and Why is It Important?
Intonation refers to how accurately a guitar plays in tune as you move up the fretboard. Proper intonation ensures that a note played at the 12th fret is exactly one octave higher than the open string. Poor intonation results in notes being sharp or flat, making chords sound dissonant and solos out of tune.
6.2. How to Check Guitar Intonation
To check intonation:
- Tune the open string to the correct pitch.
- Fret the same string at the 12th fret.
- Compare the fretted note to the open string using a tuner.
- If the fretted note is sharp, the string is too short.
- If the fretted note is flat, the string is too long.
6.3. How to Adjust Guitar Intonation
Intonation is adjusted by moving the bridge saddles forward or backward. If the 12th fret note is sharp, move the saddle back (away from the nut). If the 12th fret note is flat, move the saddle forward (towards the nut). Use a screwdriver to adjust the saddle position, and re-check the intonation after each adjustment.
6.4. Common Intonation Problems and Solutions
A common problem is intonation that is consistently sharp or flat across all strings, which may indicate a problem with the nut or bridge placement. Another issue is intonation that is correct on some strings but not others, requiring individual saddle adjustments.
7. Dealing with Guitar Neck Shims
Guitar neck shims are small pieces of material placed in the neck pocket to adjust the neck angle. They can be used to correct issues with action, neck alignment, and bridge height.
7.1. What is a Guitar Neck Shim and When is It Needed?
A guitar neck shim is a thin piece of wood or plastic inserted into the neck pocket to change the angle of the neck in relation to the body. Shims are typically needed when the bridge is either too high or too low, and cannot be adjusted sufficiently to achieve the desired action.
7.2. How to Install a Guitar Neck Shim
To install a shim:
- Remove the guitar neck from the body.
- Place the shim in the neck pocket, either at the headstock end or the bridge end, depending on the desired effect.
- Reattach the neck and check the action and neck relief.
- Adjust as necessary.
7.3. Choosing the Right Size and Material for a Guitar Shim
Shims come in various thicknesses and materials, such as wood, plastic, and metal. The thickness of the shim depends on the amount of angle correction needed. Wood shims, like maple or mahogany, are generally preferred for their tonal qualities and stability.
8. Professional Guitar Setup vs. DIY Adjustments
While many guitar adjustments can be done at home, knowing when to seek professional help is essential. A professional setup can address more complex issues and ensure your guitar is playing at its best.
8.1. What are the Benefits of a Professional Guitar Setup?
A professional guitar setup offers several benefits:
- Expertise: Experienced technicians can diagnose and correct a wide range of issues.
- Precision: Professionals have specialized tools and knowledge to make precise adjustments.
- Comprehensive Service: A setup typically includes neck adjustment, action adjustment, intonation, fret leveling, and more.
- Peace of Mind: Knowing your guitar is in good hands can provide peace of mind.
8.2. When Should I Take My Guitar to a Professional?
You should consider taking your guitar to a professional if:
- You are uncomfortable making adjustments yourself.
- You encounter persistent problems that you can’t resolve.
- Your guitar needs fret work or other complex repairs.
- You want a comprehensive setup to optimize your guitar’s performance.
8.3. How Much Does a Professional Guitar Setup Cost?
The cost of a professional guitar setup varies depending on the technician and the services included. A basic setup typically ranges from $50 to $100, while more comprehensive setups with fret work can cost $150 or more.
9. Maintaining Your Guitar Neck for Longevity
Proper maintenance is key to ensuring your guitar neck remains in good condition for years to come. Regular cleaning, proper storage, and environmental control are all important factors.
9.1. How to Clean a Guitar Neck
To clean a guitar neck, use a soft, lint-free cloth to wipe away dirt and grime. For stubborn buildup, you can use a specialized guitar cleaner or a slightly damp cloth. Avoid using harsh chemicals or abrasive materials that can damage the finish.
9.2. Best Practices for Storing Your Guitar to Protect the Neck
Store your guitar in a case when not in use to protect it from dust, humidity, and temperature changes. Keep it away from direct sunlight, heaters, and air conditioners. Consider using a humidifier in the case to maintain a stable humidity level, especially in dry climates.
9.3. How Often Should I Adjust My Guitar Neck?
The frequency of neck adjustments depends on the climate and how much your guitar is played. Generally, you should check the neck relief every few months and make adjustments as needed. If you notice significant changes in playability or intonation, it’s time for an adjustment.
10. Exploring Guitar Resources at GuitarPlayers.net
At guitarplayers.net, we offer a wealth of resources to help you master guitar maintenance and playing techniques. From detailed lessons and gear reviews to a vibrant community forum, you’ll find everything you need to elevate your guitar journey.
10.1. What Resources Does GuitarPlayers.net Offer for Guitar Maintenance?
GuitarPlayers.net provides:
- Detailed Guides: Step-by-step instructions on various guitar maintenance tasks.
- Video Tutorials: Visual demonstrations of adjustment techniques.
- Product Reviews: Honest assessments of guitar maintenance tools and products.
- Community Forum: A place to ask questions and share tips with other guitarists.
10.2. How to Find Guitar Lessons and Tutorials on GuitarPlayers.net
Navigate to the “Lessons” section of our website to find a wide range of guitar lessons and tutorials. We offer content for all skill levels, from beginner basics to advanced techniques. You can also use the search bar to find specific topics or songs.
10.3. How to Join the GuitarPlayers.net Community Forum
To join our community forum, simply create an account on our website. Once logged in, you can participate in discussions, ask questions, and connect with other guitar enthusiasts. Our forum is a great place to get advice, share your playing experiences, and find inspiration.
Adjusting your guitar neck is a crucial skill for any guitarist, and with the right knowledge and tools, you can keep your instrument playing its best. Remember to take your time, make small adjustments, and seek professional help when needed. Visit guitarplayers.net for more in-depth guides, lessons, and a supportive community to help you on your guitar journey. Start exploring today and unlock the full potential of your instrument!
 Close-up of high E string distance to fretboard edge at the 22nd fret, showing misalignment
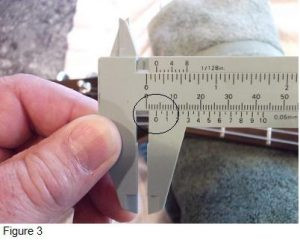 Measurement of the distance between the high E string and the fretboard edge at the nut
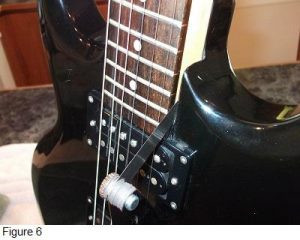 Using a feeler gauge to hold the neck in place during alignment check
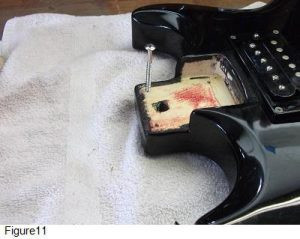 Neck screws threading into the body
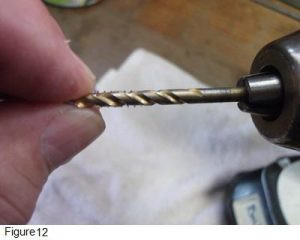 Drilling the body holes to relieve tension
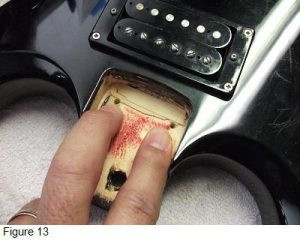 Identifying the holes to be drilled
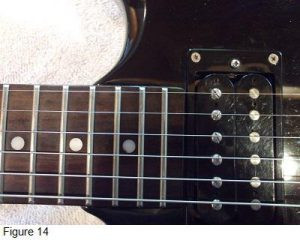 Checking the alignment after drilling
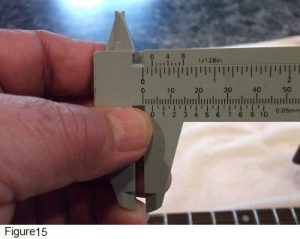 Measuring the distance at the nut after adjustment
 Measuring the distance at the 22nd fret after adjustment
FAQ: How To Adjust The Guitar Neck
1. Why does my guitar neck need adjustment?
Your guitar neck needs adjustment due to changes in temperature and humidity, which can cause the wood to expand or contract. This affects the neck relief and string action, impacting playability and intonation.
2. How often should I adjust my guitar neck?
Ideally, you should check your guitar neck every few months or whenever you notice changes in playability. Seasonal changes often necessitate adjustments.
3. What tools are required for adjusting a guitar neck?
The necessary tools include a truss rod wrench (specific to your guitar model), feeler gauges, a precision ruler, and a screwdriver for adjusting bridge height.
4. How do I know if my guitar neck has too much relief?
If your guitar neck has too much relief, the strings will be too high off the fretboard, making it difficult to press down and play comfortably. You may also notice buzzing on the lower frets.
5. What is a truss rod and how does it work?
A truss rod is a metal rod inside the guitar neck that counteracts the tension of the strings. Adjusting the truss rod controls the amount of bow (relief) in the neck.
6. Can I damage my guitar by adjusting the truss rod myself?
Yes, you can damage your guitar by over-tightening or loosening the truss rod. Always make small adjustments (1/4 turn) and check the neck relief after each adjustment.
7. What is string action and how does it affect playability?
String action is the height of the strings above the fretboard. Lower action makes the guitar easier to play but can cause buzzing, while higher action requires more effort to fret notes.
8. How do I adjust the string action on my guitar?
You can adjust the string action by raising or lowering the bridge saddles. Use a small Allen wrench or screwdriver to adjust the saddle height until the desired action is achieved.
9. What is intonation and why is it important?
Intonation is the accuracy of pitch as you move up the fretboard. Proper intonation ensures that notes played at the 12th fret are in tune with the open strings.
10. When should I seek professional help for guitar adjustments?
You should seek professional help if you are uncomfortable making adjustments yourself, encounter persistent problems, or if your guitar needs fret work or other complex repairs.
Address: 1140 Boylston Street, Boston, MA 02215, United States
Phone: +1 (617) 747-2261
Website: guitarplayers.net