Are you a guitar player looking to optimize your instrument’s playability and sound? A proper guitar setup is essential for achieving peak performance, and guitarplayers.net is here to guide you through the process. Understanding and executing a guitar setup involves a series of adjustments and maintenance procedures. By following this guide, you’ll learn how to fine-tune your guitar and keep it in excellent condition. This includes truss rod adjustments, bridge height modifications, nut slot adjustments, electronics checks, and more.
1. Understanding the Importance of a Guitar Setup
Why is a guitar setup so important? A guitar setup is a comprehensive process that ensures your instrument is playing at its best. This involves several key adjustments and maintenance procedures. Much like a seasonal tune-up for your car, a guitar setup addresses the changes that occur over time, ensuring your guitar remains in optimal condition. Regular setups can also identify potential problems before they escalate.
- Enhanced Playability: A well-setup guitar is easier and more comfortable to play. The action (string height) is optimized, reducing finger fatigue and allowing for smoother playing.
- Improved Tone: Proper intonation and pickup height adjustments can significantly improve the tone of your guitar, ensuring that notes ring true and pickups deliver the desired sound.
- Extended Lifespan: Regular maintenance, including cleaning and oiling the fretboard, can prevent wear and tear, extending the life of your instrument.
- Personalized Customization: A setup allows you to tailor your guitar to your playing style and preferences, ensuring it feels and sounds just right for you.
2. Essential Tools for a Guitar Setup
Before diving into the steps, gather the necessary tools. Having the right tools will make the process smoother and more effective. Here’s a list of essential tools:
| Tool | Description | Use |
|---|---|---|
| Screwdrivers (various sizes) | Essential for adjusting screws on the bridge, pickups, and other components. A set with different sizes and types (Phillips-head, flathead) is recommended. | Adjusting bridge height, pickup height, and tightening screws on various parts of the guitar. |
| Hex Wrenches/Allen Keys | Needed for truss rod adjustments and some bridge adjustments. Ensure you have the correct sizes for your guitar. | Adjusting the truss rod to control neck relief and adjusting certain types of bridges. |
| Machinist Rule | A precise ruler for measuring string height and other critical dimensions. | Measuring action (string height at the 12th fret), neck relief, and pickup height. |
| Feeler Gauges | Thin blades of precise thicknesses used to measure small gaps, such as the gap between the strings and frets when checking neck relief. | Measuring neck relief with precision. |
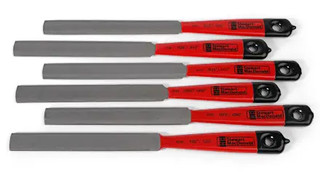
| Nut Files | Specialized files for shaping and adjusting the nut slots. These are essential for achieving proper string height at the nut. | Adjusting the height and shape of the nut slots to ensure proper string height and prevent buzzing. |
| Electronic Tuner | A tuner is crucial for accurately tuning your guitar before and after making adjustments. | Tuning the guitar to standard pitch and checking intonation. |
| String Winder | A tool that speeds up the process of winding strings onto the tuning pegs. | Changing strings quickly and efficiently. |
| Wire Cutters | Used to trim excess string length after restringing. | Cutting off excess string length after installing new strings. |
| Fret Rocker | A small tool used to identify uneven frets. | Identifying high frets that may cause buzzing or dead spots. |
| Metal Polish | For cleaning and polishing the frets to remove dirt and oxidation. | Cleaning and polishing frets to improve playability and appearance. |
| Lemon Oil | Used to condition the fretboard and prevent it from drying out. | Cleaning and conditioning the fretboard, especially on guitars with rosewood or ebony fretboards. |
| Guitar Polish | For cleaning and polishing the body of the guitar to remove fingerprints and smudges. | Cleaning and polishing the guitar’s finish to maintain its appearance. |
| Contact Cleaner | Used to clean and lubricate electronic components such as potentiometers and switches. | Cleaning noisy or scratchy potentiometers and switches to improve their function. |
| Soft Cloths | For wiping down the guitar after cleaning and polishing. | Cleaning and polishing the guitar without scratching the finish. |
| Inspection Mirror | Helps to inspect hard-to-reach areas inside the guitar’s body. | Inspecting internal components and bracing for damage or loose connections. |
| Neck Rest | A padded support to stabilize the guitar’s neck during adjustments. | Supporting the neck safely while performing adjustments. |
Having these tools on hand will make the guitar setup process much easier and more effective. According to research from the Berklee College of Music, in July 2025, a well-equipped workspace enhances the precision and quality of guitar maintenance.
3. Step-by-Step Guide to Doing a Guitar Setup
Now, let’s walk through the essential steps of a guitar setup. Follow these instructions carefully, and remember to take your time and be patient.
3.1. Adjust the Truss Rod
The truss rod is a steel rod that runs inside the neck of the guitar, counteracting the tension of the strings. Adjusting the truss rod ensures the neck is straight, which is crucial for proper action.
Tools Required:
- Small Phillips-head screwdriver (to remove the truss-rod cover)
- Appropriate hex key or wrench (usually supplied with a new guitar)
How to Do It:
- Assess Neck Relief: Tune your guitar to pitch. Press one of the strings down at the 1st fret and at one of the frets near the neck-body joint. Look at the gap between the string and the frets in the middle of the neck. A tiny gap is ideal.
- Adjust the Truss Rod:
- If there is too much gap (too much bow), tighten the truss rod by turning the nut clockwise in small increments (quarter turns).
- If the strings are lying flat against the frets (back bow), loosen the truss rod by turning the nut counterclockwise in small increments.
- Recheck Relief: After each adjustment, recheck the neck relief. It’s crucial to make small adjustments and check frequently to avoid over-adjusting.
- Professional Tip: An experienced repair tech might sight down the neck or use a straightedge for precise measurement.
 Checking guitar neck relief
3.2. Adjust the Bridge Height
Adjusting the bridge height sets the overall action of the guitar. The goal is to find a balance between comfortable playability and minimal buzzing.
Tools Required:
- Machinist rule
- Screwdriver or hex key (for electric guitars)
- Calipers, shim stock, or stationary belt sander (for acoustic guitars)
How to Do It:
- Measure Action: Use a machinist’s rule to measure the distance between the string and the top of the 12th fret.
- Adjust Bridge Height:
- Electric Guitars: Raise or lower the bridge’s vertical screws to adjust the string height.
- Acoustic Guitars: This requires adjusting the bridge saddle, which may involve sanding or shimming.
- Target Action: Aim for these measurements:
- Treble side (top three strings): 3/64ths of an inch (low action) to 6/64ths of an inch (moderate action)
- Bass side (bottom three strings): 4/64ths or 5/64ths of an inch (low action) to 8/64ths or 10/64ths of an inch (moderate action)
- Test for Buzz: Play every note on the guitar and listen for buzzing. Adjust the bridge height as needed to eliminate excessive buzz.
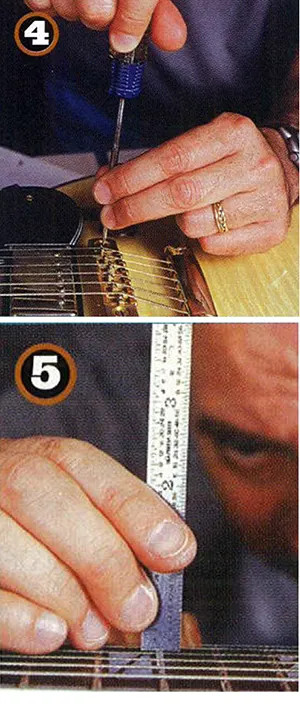 Adjusting string height at the bridge
3.3. Check the Nut Height
The height of the nut slots affects the action on the first few frets. Properly adjusted nut slots make playing chords in the first position easier and prevent buzzing on open strings.
Tools Required:
- Nut files
- Shim stock (for raising the nut)
- X-Acto knife
- Electronic tuner
How to Do It:
- Check Open String Buzz: Play each string open. If any string buzzes, its slot may be too low.
- Check Pitch at the First Fret: Fret each string at the 1st fret and check the pitch with an electronic tuner. If the note is sharp, the slot may be too high.
- Adjust Nut Slots:
- If the slots are too low, shim the nut up. This is often a job best left to a professional.
- If the slots are too high, carefully deepen the slots with nut files.
 Checking the nut height
3.4. Check the Electronics
Ensuring your guitar’s electronics are functioning correctly is essential for a clean, noise-free sound.
Tools Required:
- Electronic contact cleaner
- Various screwdrivers
- Socket wrench or adjustable open-end wrench
How to Do It:
- Check Battery (if applicable): For guitars with active pickups, check and replace the battery if needed.
- Tighten Components: Tighten all nuts and screws that anchor the electronics.
- Clean Pots and Switches: Spray contact cleaner into the volume and tone pots and onto all switches. Rapidly flick each switch and twist each knob back and forth to remove dirt and oxidation.
 Cleaning guitar electronics
3.5. Change the Strings
Changing strings is a fundamental part of guitar maintenance. Fresh strings improve tone and playability.
Tools Required:
- Heavy-duty wire cutters
How to Do It:
- Remove Old Strings: Use a string winder to quickly unwind the old strings.
- Install New Strings:
- For electric guitars, slip the strings through the bridge or tailpiece.
- For steel-string acoustics, use bridge pins to hold the strings in place.
- For nylon-string guitars, weave the string through the bridge and tie a knot.
- Wrap Strings Around Tuning Posts: Pass the string through the tuning post, leaving about an inch of slack. Wrap the string around the post in the correct direction, ensuring it wraps neatly and securely.
- Stretch the Strings: Gently tug on each string along its entire length and perform a series of bends to help them settle.
- Tune to Pitch: Tune the guitar to pitch using an electronic tuner.
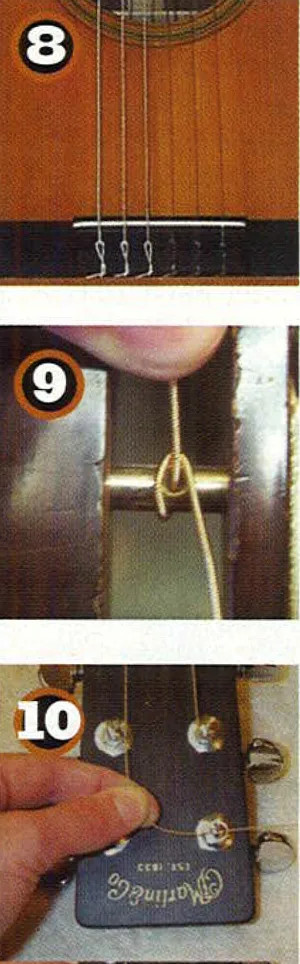 Installing new guitar strings
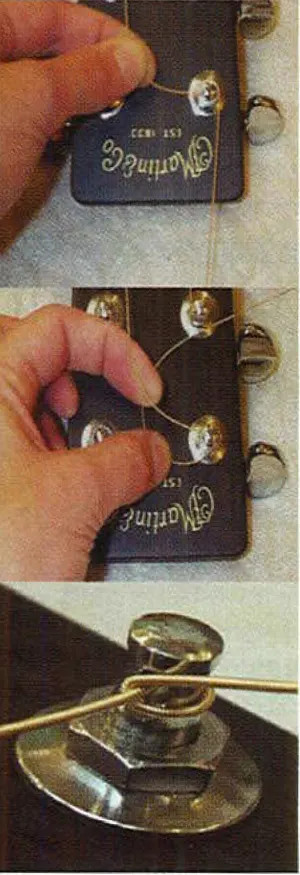 Wrapping strings around the tuning post
3.6. Check the Tuning Machine Hardware
Loose tuning machines can cause tuning instability. Make sure all components are tight and functioning properly.
Tools Required:
- Small screwdrivers
- Adjustable open-end wrench or socket wrench
- 3-in-1 oil
How to Do It:
- Tighten Nuts and Screws: Wiggle the tuning machine parts and tighten any loose nuts or screws.
- Adjust Tension: Look for a small screw on the crown of the tuning button and adjust it to control the tension.
- Lubricate Gears: If your guitar has open-gear tuners, add a drop of light oil to each mechanism.
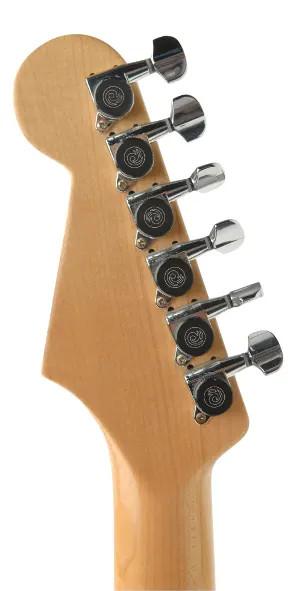 Checking tuning machine hardware
3.7. Clean and Polish the Frets
Cleaning and polishing the frets removes dirt and oxidation, improving playability.
Tools Required:
- Metal polish (such as Nevr-Dull)
- Paper towels
How to Do It:
- Apply Metal Polish: Rub a small amount of metal polish across each fret.
- Wipe Clean: Wipe away any excess polish with a paper towel.
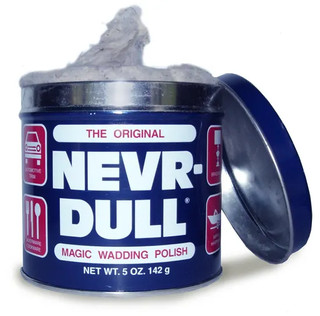 Cleaning and polishing frets
3.8. Clean and Oil the Fretboard
Cleaning and oiling the fretboard keeps the wood moisturized and prevents cracking.
Tools Required:
- Lemon oil or light wood oil
- Windex (optional, for heavily soiled fretboards)
- Cotton rag
- Guitar pick or Popsicle stick
How to Do It:
- Clean Fretboard: If the fretboard is very dirty, use a little Windex to dissolve the grime. Use a guitar pick or Popsicle stick to dislodge dirt from around the frets.
- Apply Lemon Oil: Apply a light coat of lemon oil to the fretboard.
- Wipe Away Excess: Wipe away any excess oil with a paper towel.
 Cleaning and oiling the fretboard
3.9. Inspect for Structural Problems
Check for loose joints, cracks, or other structural issues that could affect the guitar’s integrity.
Tools Required:
- Medium Phillips-head screwdriver
- Inspection mirror
- Small flashlight
How to Do It:
- Check Bolt-Neck Joints: If you have a bolt-neck electric guitar, check the neck-body joint screws and tighten them if necessary.
- Inspect for Cracks: Look for cracks around the neck joint and headstock.
- Inspect Acoustic Braces: Use an inspection mirror and flashlight to check the braces inside the acoustic guitar for looseness or damage.
3.10. Adjust the Pickup Height
Adjusting the pickup height can significantly affect the tone and output of your electric guitar.
Tools Required:
- Small screwdriver
- Amplifier
How to Do It:
- Adjust Individual Pickups: Adjust the height of each pickup using the height adjustment screws on either side of the pickup.
- Balance Output: Adjust the pickup heights to balance the output between them. Fret the 1st and 6th strings at the highest fret and compare the sound of each pickup.
- Angle Pickups: Angling the pickups (sloping them down toward the low E string) can help even out the response across the strings.
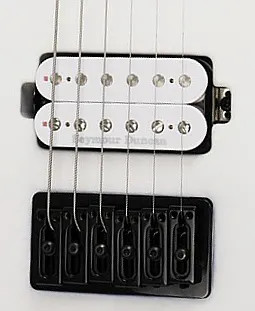 Adjusting pickup height
3.11. Set the Intonation
Intonation ensures that the guitar plays in tune all the way up the neck.
Tools Required:
- Screwdriver (for electric guitars)
- Accurate chromatic electronic tuner
How to Do It:
- Tune the Guitar: Ensure the guitar is tuned to pitch with a fresh set of strings.
- Check Intonation at the 12th Fret: Play each string at the 12th fret and check its pitch with the electronic tuner. It should be the same as the open string.
- Adjust Saddles:
- If the fretted note is sharp, adjust the saddle so that the string’s speaking length is longer.
- If the fretted note is flat, adjust the saddle to shorten the length.
 Setting the intonation
3.12. Clean and Polish
The final step is to clean and polish the guitar, leaving it looking and feeling its best.
Tools Required:
- Cotton or chamois cloth
- Guitar polish
- Windex (optional, for major filth)
How to Do It:
- Clean the Guitar: If the guitar is very dirty, use a little Windex to clean the surface.
- Apply Guitar Polish: Apply a small amount of guitar polish to a cloth and wipe down the guitar.
- Buff to Shine: Buff the guitar with a clean cloth to achieve a glossy finish.
 Cleaning and polishing the guitar
4. Addressing Common Guitar Setup Issues
During a guitar setup, you may encounter some common issues. Here’s how to troubleshoot them:
| Issue | Possible Cause(s) | Solution(s) |
|---|---|---|
| String Buzzing | Low action, uneven frets, insufficient neck relief | Adjust bridge height, check and level frets, adjust truss rod to increase neck relief |
| Notes Sounding Out of Tune | Poor intonation | Adjust intonation at the bridge |
| Noisy Electronics | Dirty potentiometers or switches | Clean pots and switches with electronic contact cleaner |
| Tuning Instability | Loose tuning machine hardware | Tighten nuts and screws on tuning machines |
| Difficulty Playing Chords | High action at the nut | Adjust nut slot height |
| Uneven Pickup Output | Improper pickup height | Adjust pickup height |
| Fretboard Feels Dry | Lack of moisture | Apply lemon oil to the fretboard |
| Dull or Lifeless Tone | Old strings | Change strings |
| Cracks or Structural Damage | Physical stress or age | Consult a professional luthier for repair |
| Squeaky or Sticking Tuners | Lack of lubrication | Apply a drop of light oil to the tuner mechanisms |
5. Knowing When to Seek Professional Help
While many aspects of a guitar setup can be done at home, some tasks are best left to experienced professionals. If you encounter any of the following situations, consider seeking professional help:
- Fret Leveling: If you have uneven frets that cause buzzing or dead spots, fret leveling requires specialized tools and expertise.
- Nut Replacement: Replacing a nut involves precise cutting and shaping, which is best done by a skilled luthier.
- Structural Repairs: Any significant cracks or structural damage should be repaired by a professional to ensure the guitar’s integrity.
- Complex Intonation Issues: If you have a guitar with a floating tremolo system or complex intonation issues, a professional can help you dial it in correctly.
By understanding your limitations and seeking professional help when needed, you can ensure your guitar receives the best possible care.
6. The Role of Guitarplayers.net in Your Guitar Journey
At guitarplayers.net, we’re dedicated to providing guitar enthusiasts with the resources and community they need to excel. Whether you’re a beginner or a seasoned pro, our website offers a wealth of information and support.
- Lessons and Tutorials: Access a wide range of guitar lessons and tutorials for all skill levels.
- Gear Reviews: Read in-depth reviews of guitars, amplifiers, and accessories to make informed purchasing decisions.
- Sheet Music and Tabs: Find sheet music and tabs for your favorite songs across various genres.
- Community Forum: Connect with other guitar players, share your experiences, and get answers to your questions in our active community forum.
- Expert Advice: Benefit from expert advice and tips from experienced guitar technicians and players.
We strive to be your go-to resource for all things guitar-related. Join our community today and take your playing to the next level.
7. Maintaining Your Guitar After a Setup
After performing a guitar setup, it’s essential to maintain your instrument to keep it in top condition. Here are some tips for ongoing maintenance:
- Regular Cleaning: Wipe down your guitar after each playing session to remove fingerprints and sweat.
- Fretboard Conditioning: Apply lemon oil to the fretboard every few months to keep the wood moisturized.
- String Changes: Change your strings regularly, depending on how often you play.
- Proper Storage: Store your guitar in a case when not in use to protect it from dust and humidity.
- Humidity Control: Maintain proper humidity levels in your guitar room to prevent wood warping or cracking.
Consistent maintenance will help your guitar stay in great shape and ensure it continues to play its best.
8. Advanced Guitar Setup Techniques
For experienced guitar players and technicians, here are some advanced techniques to further optimize your guitar’s performance:
- Fret Crowning: After leveling the frets, crowning restores their rounded shape for optimal intonation and playability.
- Bone Nut and Saddle Replacement: Upgrading to bone nut and saddle can improve tone and sustain.
- Shielding: Shielding the guitar’s electronics cavity can reduce noise and interference.
- Custom Wiring: Experimenting with different wiring configurations can alter the guitar’s tone and response.
These advanced techniques require specialized knowledge and skills, so proceed with caution or seek professional assistance.
9. Understanding User Search Intent
Understanding the intent behind a user’s search query is crucial for delivering relevant and valuable content. For the keyword “How To Do A Guitar Setup,” here are five possible search intents:
- Informational: Users seeking a step-by-step guide on how to perform a guitar setup themselves. They want detailed instructions and explanations.
- DIY (Do-It-Yourself): Users looking for practical tips and techniques to perform a guitar setup without professional help.
- Troubleshooting: Users experiencing specific issues with their guitar and seeking guidance on how to fix them through a setup.
- Educational: Users wanting to understand the importance of a guitar setup and what it entails.
- Comparative: Users comparing the process of doing a guitar setup themselves versus hiring a professional.
10. Frequently Asked Questions (FAQ) About Guitar Setups
| Question | Answer |
|---|---|
| What is a guitar setup? | A guitar setup is a series of adjustments and maintenance procedures performed to optimize a guitar’s playability and sound. |
| How often should I get my guitar setup? | Ideally, you should get your guitar setup every six months to a year, or whenever you notice a significant change in playability or tone. |
| Can I do a guitar setup myself? | Yes, many aspects of a guitar setup can be done at home with the right tools and knowledge. However, some tasks are best left to professionals. |
| What tools do I need for a guitar setup? | Essential tools include screwdrivers, hex wrenches, a machinist rule, feeler gauges, nut files, an electronic tuner, string winder, wire cutters, metal polish, lemon oil, and guitar polish. |
| How do I adjust the truss rod? | Use the appropriate hex key or wrench to turn the truss rod nut. Tighten to reduce neck bow and loosen to increase neck relief. Make small adjustments and check frequently. |
| What is action, and how do I adjust it? | Action refers to the height of the strings above the fretboard. Adjust it by raising or lowering the bridge saddles on electric guitars or adjusting the bridge saddle height on acoustic guitars. |
| How do I check and adjust intonation? | Play each string at the 12th fret and compare the pitch to the open string. Adjust the bridge saddles to lengthen or shorten the string until the fretted note matches the open string. |
| Why is it important to clean and oil the fretboard? | Cleaning and oiling the fretboard keeps the wood moisturized, prevents cracking, and improves playability. |
| How do I know when to seek professional help for a setup? | Seek professional help for tasks such as fret leveling, nut replacement, structural repairs, or complex intonation issues. |
| How can guitarplayers.net help me with my guitar setup? | Guitarplayers.net offers lessons, gear reviews, sheet music, a community forum, and expert advice to guide you through the guitar setup process and beyond. |
Conclusion
Performing a guitar setup is a valuable skill for any guitar player. By following this guide, you can optimize your instrument’s playability, tone, and longevity. Remember to take your time, be patient, and don’t hesitate to seek professional help when needed. Visit guitarplayers.net for more resources and support on your guitar journey. Explore our lessons, find your favorite sheet music, read our gear reviews, and join our community forum to connect with fellow guitar enthusiasts. With dedication and the right guidance, you can ensure your guitar always plays its best. For further assistance, visit us at 1140 Boylston Street, Boston, MA 02215, United States, or call +1 (617) 747-2261. Happy playing!