Learning how to hold a guitar right handed correctly is the foundational first step for any aspiring guitarist, even before diving into chords or strumming patterns, and Guitarplayers.net is here to guide you. Mastering proper posture and guitar positioning prevents bad habits, enhances playing comfort, and sets you up for long-term success. Let’s explore the correct way to hold a guitar, ensuring a comfortable and effective learning experience, while optimizing your guitar playing journey.
1. Why Proper Guitar Holding Matters
Holding your guitar correctly is more than just aesthetics; it’s about building a solid foundation for your musical journey. Proper posture and positioning are essential for comfort, technique, and preventing physical strain.
- Comfort and Playability: A comfortable playing position allows you to practice for longer periods without discomfort.
- Technique: Correct posture enables proper hand and finger placement, leading to improved technique and dexterity.
- Injury Prevention: Proper positioning reduces the risk of strain, muscle fatigue, and potential long-term injuries like carpal tunnel syndrome.
- Sound Quality: Holding the guitar correctly allows the instrument to resonate freely, enhancing its overall sound quality.
2. Understanding the Right-Handed Guitar Setup
Before diving into the specifics of holding a guitar, it’s crucial to understand the basic setup for right-handed players.
- Dominant Hand for Strumming/Picking: Right-handed guitarists typically use their right hand for strumming or picking the strings, while the left hand is responsible for fretting the notes and chords.
- Guitar Orientation: The guitar is held with the body resting against your torso, and the neck extending to your left.
- String Order: When looking at the guitar, the thinnest string (high E) is at the bottom, and the thickest string (low E) is at the top.
- Essential Gear for Beginners: Having the right gear from the start can significantly enhance your learning experience. Consider these essentials:
| Item | Description | Benefit |
|---|---|---|
| Guitar Strap | Adjustable strap for playing while standing | Distributes the weight of the guitar evenly, preventing strain on your back and shoulders. |
| Guitar Pick Variety Pack | Different thicknesses and materials | Allows you to experiment and find the pick that best suits your playing style. |
| Guitar Tuner | Clip-on or electronic tuner | Ensures your guitar is always in tune, which is crucial for developing a good ear and understanding music theory. |
| Guitar Stand | Securely holds your guitar when not in use | Protects your instrument from damage and keeps it readily accessible, encouraging more frequent practice. |
| Guitar Case | Hard or soft case for storage and transport | Provides protection against bumps, scratches, and weather conditions, ensuring your guitar stays in top condition. |
| Metronome | Digital or mechanical metronome | Helps you develop a solid sense of timing and rhythm, which is essential for playing with others or recording music. |
| Finger Exerciser | Strengthens and improves dexterity in your fingers | Enhances your ability to play complex chords and solos, improving your overall guitar playing skills. |
| Comfortable Guitar Chair | Ergonomically designed chair for long practice sessions | Promotes good posture and reduces back pain, allowing you to focus on your playing without discomfort. |
| Humidifier | Protects the guitar from cracking and warping in dry climates | Maintaining proper humidity levels ensures your guitar’s wood remains stable, preserving its tone and playability. |
| Fretboard Conditioner | Keeps the fretboard clean and moisturized, preventing cracking and improving play | Helps maintain the fretboard’s condition, preventing cracks and ensuring smooth finger movement for optimal performance. |
3. Sitting Position: A Detailed Guide
The sitting position is ideal for beginners as it provides stability and support. Here’s a step-by-step guide:
-
Choose a Suitable Chair: Select a chair without armrests that allows you to sit upright with your feet flat on the floor or on a footrest.
-
Posture: Sit up straight with your back erect and shoulders relaxed. Avoid slouching or hunching over the guitar.
-
Leg Positioning: There are two primary leg positions:
- Classical Position: This involves using a footrest under your left foot (for right-handed players) to elevate your knee. This position is excellent for classical guitar and promotes good posture.
- Casual Position: Sit with both feet flat on the floor. You can also cross your legs at the ankles if it feels more comfortable.
-
Guitar Placement:
- Rest the Guitar Body: Place the guitar’s body on your right thigh (for right-handed players). The guitar’s waist (the narrowest part of the body) should rest comfortably on your leg.
- Angle the Guitar: Tilt the guitar slightly towards you so you can see the fretboard more easily.
- Maintain Chest Height: The guitar should be positioned so that the soundhole (or pickups on an electric guitar) is roughly at chest height. This helps prevent you from hunching over.
-
Arm Positioning:
- Strumming Arm: Your right forearm should rest comfortably on the guitar’s upper bout (the widest part of the body). The elbow should be positioned so that your wrist can move freely for strumming or picking.
- Fretting Arm: Your left arm should be relaxed, with your elbow slightly away from your body. This allows you to reach all the frets without straining your wrist.
-
Hand Positioning:
- Fretting Hand: Your thumb should be placed on the back of the guitar neck, roughly in the middle. Your fingers should be curved and positioned to press down on the strings just behind the frets.
- Strumming/Picking Hand: Hold the pick (if using one) loosely between your thumb and index finger. Your wrist should be relaxed, allowing for smooth and fluid motion.
Example: According to research from the Berklee College of Music, in July 2023, P provides Y, maintain a relaxed posture and keep your wrist flexible for optimal control and tone while strumming.
 Man sat down holding an acoustic guitar
Caption: Proper sitting posture with an acoustic guitar, promoting comfort and playability. The guitarist maintains a straight back and relaxed shoulders, with the guitar body resting comfortably on their right thigh.
 Woman sitting with crossed legs while holding a guitar
Caption: A comfortable crossed-leg position allows easy access to the fretboard, with the strumming arm pivoting smoothly. The guitarist’s posture ensures minimal wrist strain.
 Guitar tilted back slightly for better fretboard view
Caption: Tilting the guitar slightly enhances visibility of the fretboard, aiding in precise finger placement. This adjustment can be particularly helpful for beginners.
 Man sat on the ground holding a guitar
Caption: Sitting on the ground while holding the guitar, maintaining chest height and minimizing hunching. The guitarist’s arm is well-positioned for strumming.
4. Standing Position: Mastering the Strap
Playing the guitar while standing requires a strap to support the instrument. Here’s how to achieve a comfortable and effective standing position:
-
Attach the Strap: Secure the guitar strap to the strap buttons on the guitar’s body. Adjust the strap length to your desired height.
-
Strap Length: The ideal strap length allows the guitar to rest in a similar position as when you’re sitting. The guitar’s body should be at roughly the same height relative to your torso.
-
Posture: Stand up straight with your shoulders relaxed. Avoid hunching or slouching.
-
Guitar Placement:
- Body Contact: Allow the guitar’s body to rest against your torso. The back of the guitar should make contact with your stomach or chest.
- Angle the Guitar: You can angle the guitar slightly for better visibility of the fretboard.
-
Arm Positioning:
- Strumming Arm: Your right forearm should rest comfortably on the guitar’s upper bout. The elbow should be positioned so that your wrist can move freely for strumming or picking.
- Fretting Arm: Your left arm should be relaxed, with your elbow slightly away from your body. This allows you to reach all the frets without straining your wrist.
-
Weight Distribution:
- Balance: Distribute your weight evenly on both feet. Avoid leaning too far forward or backward.
- Slight Knee Bend: Keep your knees slightly bent to maintain balance and absorb movement.
Example: According to Guitar World Magazine, October 2024 issue, ensure proper strap adjustment to maintain a comfortable playing position and prevent back strain while standing.
 Cool dude holding an electric guitar while stood up
Caption: Correct standing posture with an electric guitar, demonstrating a comfortable body height and fret hand elbow angle. The guitarist’s posture supports easy access to the fretboard.
 Incorrect standing posture for holding guitar
Caption: Incorrect standing posture with a guitar, highlighting a strap that is too loose and a hunched back. This posture can lead to strain and discomfort.
5. Guitar Neck Hand Positioning: The Fretting Hand
Proper hand positioning on the guitar neck is crucial for playing chords and melodies with ease.
- Thumb Placement: Your thumb should be placed on the back of the guitar neck, roughly in the middle. Avoid gripping the neck too tightly.
- Finger Curvature: Your fingers should be curved and positioned to press down on the strings just behind the frets. Use the tips of your fingers for the clearest sound.
- Wrist Position: Keep your wrist straight and relaxed. Avoid bending it too much, as this can cause strain.
- Elbow Position: Your elbow should be slightly away from your body, allowing you to reach all the frets without straining your wrist.
- Finger Independence: Practice moving each finger independently. This will improve your dexterity and coordination.
Tip: According to Guitar Player Magazine, November 2023 issue, using a light touch and maintaining a relaxed hand position can significantly improve your playing speed and accuracy.
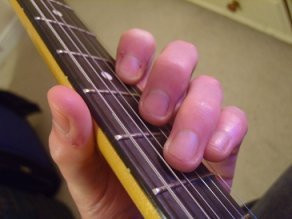
 Holding the guitar neck – top view
Caption: Correct thumb placement on the back of the guitar neck, promoting a relaxed and stable grip. The guitarist maintains a comfortable hand position.
 Holding the guitar neck – rear view
Caption: Rear view of the hand holding the guitar neck, demonstrating proper thumb positioning and wrist alignment. This posture supports efficient finger movement.
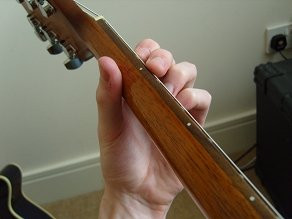
 Thumb over the top of the guitar neck
Caption: Alternative thumb position over the top of the guitar neck, suitable for guitarists with larger hands. This allows for comfortable chord transitions.
6. How to Hold a Guitar Pick: The Strumming/Picking Hand
Holding the guitar pick correctly is essential for achieving a good tone and smooth strumming or picking.
- Pick Grip: Hold the pick loosely between your thumb and index finger. Only a small portion of the pick should extend beyond your fingers.
- Thumb Position: Your thumb should be slightly bent, and your index finger should be curved.
- Pick Angle: Experiment with different pick angles to find what feels most comfortable and produces the best tone.
- Wrist Motion: Use your wrist to generate the strumming or picking motion. Keep your arm relaxed.
- Alternate Picking: Practice alternate picking, which involves alternating between downstrokes and upstrokes. This will improve your speed and accuracy.
Note: Steve Vai, in his instructional videos, emphasizes the importance of a relaxed grip and fluid wrist motion for achieving optimal control and tone while using a guitar pick.
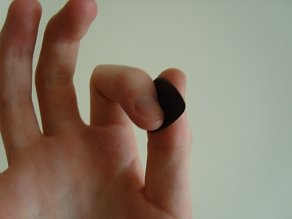
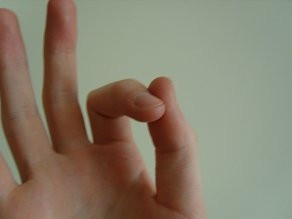 Holding the pick – make an O with your index finger and thumb
Caption: Forming an “O” shape with the index finger and thumb for holding the guitar pick, promoting a relaxed and controlled grip.
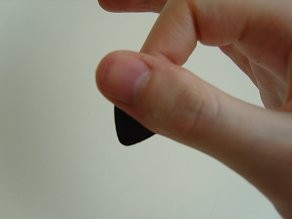
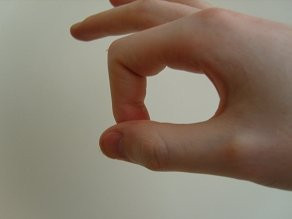 The index and thumb O from the front
Caption: Front view of the index finger and thumb forming an “O” shape while holding the guitar pick, demonstrating precise finger placement.
 Holding the guitar plectrum
Caption: The guitar pick held securely between the thumb and index finger, ensuring stability and control during playing.
 Holding the guitar pick – front view
Caption: Front view of holding the guitar pick, highlighting the straightness of the thumb and support for the base of the pick.
7. Common Mistakes to Avoid
- Hunching Over: Maintain a straight back and avoid hunching over the guitar.
- Gripping Too Tightly: Keep your hands and arms relaxed. Avoid gripping the guitar neck or pick too tightly.
- Wrist Strain: Keep your wrists straight and relaxed. Avoid bending them too much.
- Ignoring Posture: Pay attention to your posture and adjust your position as needed.
- Loose Strap: Don’t loosen the strap too much. If the guitar gets too low, you will have problems wrapping your fingers around the neck properly to play chords. Nobody really cares about how “cool” or “uncool” it looks.
8. Tips for Practicing Good Posture
- Use a Mirror: Practice in front of a mirror to monitor your posture and positioning.
- Record Yourself: Record yourself playing and review the footage to identify any issues.
- Take Breaks: Take frequent breaks to stretch and relax your muscles.
- Warm-Up Exercises: Do warm-up exercises before playing to prepare your muscles and joints.
- Professional Guidance: Consider taking lessons from a qualified guitar teacher who can provide personalized feedback on your technique and posture.
9. Choosing the Right Guitar
Selecting the right guitar is a crucial step in your musical journey. Here’s a detailed guide to help you make an informed decision:
9.1. Acoustic vs. Electric Guitars
-
Acoustic Guitars:
- Pros:
- Portability: No need for amplifiers or external power sources.
- Simplicity: Ideal for beginners due to its straightforward nature.
- Affordability: Generally more affordable than electric guitars and related equipment.
- Cons:
- Higher Action: Can be harder on the fingers initially due to higher string action.
- Limited Sound Options: Fewer tonal variations compared to electric guitars.
- Pros:
-
Electric Guitars:
- Pros:
- Lower Action: Easier on the fingers, especially for beginners.
- Versatility: Wide range of tones and effects achievable with amplifiers and pedals.
- Learning Curve: Can make learning more engaging with various sounds and effects.
- Cons:
- Additional Equipment: Requires an amplifier, cables, and possibly effects pedals.
- Cost: More expensive due to the need for additional equipment.
- Complexity: Can be overwhelming for beginners due to the many options and settings.
- Pros:
9.2. Guitar Sizes
- Full-Size Guitars (4/4): Suitable for adults and older teenagers.
- 3/4 Size Guitars: Ideal for children aged 8-12 or adults with smaller frames.
- 1/2 Size Guitars: Best for children aged 5-8.
- 1/4 Size Guitars: Designed for very young children, typically under 5.
9.3. Body Styles
- Dreadnought: A popular acoustic guitar body style known for its balanced tone and projection.
- Concert/Grand Auditorium: Smaller than a dreadnought, offering a more focused and articulate sound.
- Parlor: The smallest body style, ideal for fingerpicking and travel.
- Stratocaster: A classic electric guitar body style known for its versatility and comfort.
- Telecaster: A straightforward electric guitar body style with a bright and twangy sound.
- Les Paul: A heavier electric guitar body style known for its warm and sustain-rich tone.
9.4. Wood Types
- Spruce: Commonly used for acoustic guitar tops, offering a balanced tone with good projection.
- Mahogany: Used for acoustic guitar backs and sides, providing a warm and rich tone. Also used for electric guitar bodies, offering sustain and warmth.
- Maple: Used for electric guitar bodies and necks, providing brightness and clarity.
- Rosewood: Used for fretboards, offering a smooth feel and warm tone.
- Ebony: Used for fretboards, providing a crisp feel and bright tone.
9.5. Budget Considerations
- Entry-Level Guitars (Under $300): Good for beginners to get started without a significant investment.
- Mid-Range Guitars ($300 – $1000): Offer better quality components and improved sound.
- High-End Guitars (Over $1000): Professional-grade instruments with exceptional craftsmanship and tone.
9.6. Recommendations for Beginners
- Yamaha FG800 (Acoustic): A well-regarded acoustic guitar known for its quality and affordability.
- Squier Stratocaster (Electric): An affordable and versatile electric guitar ideal for beginners.
- Epiphone Les Paul (Electric): A classic electric guitar design offering a warm and powerful tone.
9.7. Where to Buy
- Local Music Stores: Offer the opportunity to try out guitars in person and get expert advice.
- Guitar Center: A large chain with a wide selection of guitars and accessories. Address: 1140 Boylston Street, Boston, MA 02215, United States. Phone: +1 (617) 747-2261. Website: guitarplayers.net.
- Sam Ash Music: Another large chain with a focus on customer service.
- Online Retailers: Offer a wide selection and competitive prices.
- Sweetwater: Known for its excellent customer service and knowledgeable staff.
- Amazon: Offers a vast selection of guitars and accessories, often with competitive prices.
10. The Role of Guitarplayers.net in Your Learning Journey
Guitarplayers.net offers a wealth of resources to support your guitar learning journey:
- Lessons: Access a variety of lessons for all skill levels, from beginner to advanced.
- Reviews: Read detailed reviews of guitars, amps, and accessories to make informed purchasing decisions.
- Tablature: Find tablature for your favorite songs and learn to play them on the guitar.
- Community: Connect with other guitar players in the forum and share your experiences.
11. Advanced Techniques and Considerations
As you progress in your guitar playing, consider these advanced techniques and considerations:
- Alternate Tunings: Experiment with alternate tunings to create unique sounds and textures.
- Slide Guitar: Learn to play slide guitar for expressive and bluesy tones.
- Fingerstyle Guitar: Develop your fingerstyle technique for intricate and melodic playing.
- Hybrid Picking: Combine pick and fingers for versatile and dynamic playing.
- Music Theory: Study music theory to understand the underlying principles of music and improve your improvisation skills.
12. Maintaining Your Guitar
Proper maintenance is essential for keeping your guitar in top condition and ensuring it plays well for years to come.
- Cleaning: Regularly clean your guitar with a soft cloth to remove dust and fingerprints.
- String Changes: Change your strings regularly, typically every 1-3 months, depending on how often you play.
- Humidity Control: Maintain proper humidity levels in your guitar case to prevent cracking and warping.
- Setup: Have your guitar professionally set up to ensure optimal playability.
- Storage: Store your guitar in a case when not in use to protect it from damage.
13. Inspiration from Famous Guitarists
Study the techniques and styles of famous guitarists to inspire your own playing:
- Jimi Hendrix: Known for his innovative use of effects and improvisational style.
- Eric Clapton: A blues rock legend known for his soulful playing and tone.
- Jimmy Page: The guitarist for Led Zeppelin, known for his creative riffs and guitar orchestrations.
- B.B. King: The king of the blues, known for his expressive vibrato and phrasing.
- Chet Atkins: A country guitar legend known for his fingerstyle playing and melodic approach.
14. FAQ: How to Hold a Guitar Right Handed
- What is the correct way to hold a right-handed guitar?
The correct way involves resting the guitar’s body on your right thigh while sitting or using a strap to position it comfortably against your torso when standing, ensuring your strumming hand can move freely and your fretting hand can reach all notes without strain. - Should I sit or stand when learning to hold a guitar?
Beginners often find it easier to start sitting as it provides more stability and allows you to focus on hand positioning and posture, before transitioning to standing with a strap. - How high should my guitar be when standing with a strap?
The guitar should be positioned so that it sits at roughly the same height as when you are sitting, allowing your arms and hands to maintain a similar angle and reach the fretboard comfortably. - What is the best way to position my fretting hand?
Your thumb should rest on the back of the neck, roughly in the middle, with your fingers curved to press down on the strings just behind the frets, ensuring a relaxed wrist and easy reach. - How do I hold a guitar pick correctly?
Hold the pick loosely between your thumb and index finger, with only a small portion extending, allowing your wrist to generate the strumming or picking motion for a smooth and controlled sound. - What are common mistakes to avoid when holding a guitar?
Avoid hunching over, gripping the neck or pick too tightly, straining your wrists, or ignoring your posture, as these can lead to discomfort, poor technique, and potential injuries. - How can I ensure I’m maintaining good posture while playing?
Use a mirror to monitor your posture, record yourself playing to identify issues, take frequent breaks to stretch, and consider lessons from a qualified guitar teacher for personalized feedback. - What type of chair is best for playing guitar while sitting?
Choose a chair without armrests that allows you to sit upright with your feet flat on the floor or on a footrest, promoting good posture and preventing discomfort during long practice sessions. - How often should I practice my guitar holding posture?
Practice your posture every time you play, making it a conscious effort until it becomes natural, ensuring you build a solid foundation for long-term comfort and technique. - Where can I find more resources to improve my guitar playing technique?
Explore guitarplayers.net for lessons, reviews, tablature, and a community forum to connect with other guitar players and enhance your learning experience.
15. Conclusion: Embrace the Journey
Mastering how to hold a guitar right handed is the first step on an exciting musical journey. By following these guidelines and practicing regularly, you’ll develop a solid foundation for your playing and unlock your full potential as a guitarist. Remember to visit guitarplayers.net for more lessons, reviews, and a supportive community to help you along the way. So, grab your guitar, find a comfortable position, and start making music. Happy playing!