Are you looking for a creative way to display your guitars while saving space? This guide, brought to you by guitarplayers.net, shows you How To Make A Guitar Holder, offering both practical solutions and aesthetic enhancements for your musical space. Discover the best methods to build your own guitar mount and keep your instruments safe and accessible! Dive in for expert tips, detailed instructions, and innovative ideas to showcase your guitars in style.
1. What Are The Benefits Of Making Your Own Guitar Holder?
Making your own guitar holder provides a personalized and cost-effective way to display and protect your instruments, offering advantages like customization, space-saving design, and creative expression. This approach allows guitar enthusiasts to tailor the holder to their specific needs and preferences, showcasing their guitars in a unique and stylish manner.
-
Customization: DIY guitar holders can be tailored to fit specific guitar types, sizes, and personal style preferences. This level of customization ensures that the holder perfectly matches the instrument and the decor of the room.
-
Cost-Effectiveness: Building a guitar holder can be more affordable than purchasing a commercial one, especially when using reclaimed or readily available materials. This can save money while still providing a high-quality storage solution.
-
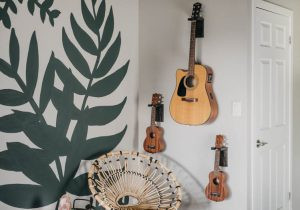
Space-Saving Design: Wall-mounted guitar holders, in particular, are excellent for saving floor space, making them ideal for small apartments, studios, or rooms with limited storage.
-
Creative Expression: DIY projects allow for creative expression and the satisfaction of building something with your own hands. This can be a rewarding experience for guitar enthusiasts who enjoy woodworking or crafting.
-
Material Choice: You have the freedom to select materials that match your aesthetic preferences and the existing decor of your space. Options range from wood and metal to repurposed materials, allowing for a unique and personalized look.
2. What Are The Different Types Of Guitar Holders You Can Make?
There are several types of DIY guitar holders you can create, including wall-mounted hangers, A-frame stands, and custom-built racks, each offering unique benefits and aesthetic appeal. The choice depends on your available space, skill level, and desired visual impact.
- Wall-Mounted Hangers: These are attached to the wall and suspend the guitar by its headstock. They save floor space and can be a stylish way to display instruments.
- A-Frame Stands: These portable stands are easy to build and can be placed on the floor. They are great for quick access and temporary storage during practice or performances.
- Custom-Built Racks: Ideal for multiple guitars, these racks can be designed to fit specific spaces and can incorporate additional storage for accessories like picks, straps, and cables.
- Upcycled Holders: Creative options include repurposing items like wooden pallets, picture frames, or even old furniture to create unique and eco-friendly guitar holders.
- Floating Shelves: These provide a dual-purpose solution, serving as both a display shelf and a guitar holder. They can be customized with padding to protect the guitar’s finish.
3. What Materials And Tools Do I Need To Make A Basic Guitar Holder?
To make a basic guitar holder, you’ll need wood, screws, sandpaper, and basic tools like a saw, drill, and measuring tape. These materials and tools are essential for constructing a sturdy and reliable holder that will safely support your guitar.
- Wood: Choose a sturdy wood like pine, maple, or oak. The thickness should be at least 1 inch to ensure sufficient strength.
- Screws: Use wood screws that are appropriate for the thickness of your wood. Consider using screws with a decorative head for a more polished look.
- Sandpaper: Different grits of sandpaper (coarse, medium, fine) are needed to smooth the wood and prepare it for finishing.
- Saw: A hand saw, jigsaw, or circular saw can be used to cut the wood to the desired dimensions.
- Drill: A power drill is necessary for creating pilot holes for screws and for any decorative elements you might want to add.
- Measuring Tape: Accurate measurements are crucial for ensuring the guitar holder is the correct size and shape.
- Pencil: Use a pencil to mark cutting lines and screw placement.
- Wood Glue: Adding wood glue to the joints will increase the strength and stability of the guitar holder.
- Clamps: Clamps help hold the wood pieces together while the glue dries.
- Finishing Supplies: Stain, paint, varnish, or polyurethane can be used to protect and enhance the appearance of the wood.
- Safety Glasses: Always wear safety glasses to protect your eyes from sawdust and debris.
- Ear Protection: If using power tools, wear ear protection to prevent hearing damage.
 Basic tools and materials for DIY guitar holder
4. How Do I Build A Simple Wall-Mounted Guitar Holder?
Building a simple wall-mounted guitar holder involves cutting wood to size, shaping the neck support, assembling the pieces, and securely mounting it to the wall. This project requires careful measurements and precise cuts to ensure the guitar is safely supported.
- Measure and Cut the Wood:
- Cut a piece of wood (e.g., pine or hardwood) to your desired length. A common size is about 6 inches for the base that mounts to the wall and 4 inches for the arm that will hold the guitar neck.
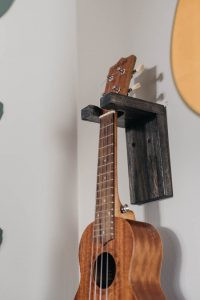
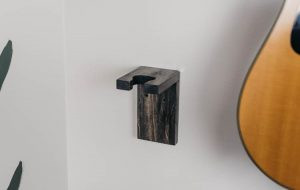
- Shape the Neck Support:
- On the 4-inch piece, mark a U-shaped or curved section that will cradle the guitar neck. Use a jigsaw or coping saw to carefully cut out this shape. Ensure the edges are smooth to prevent damage to the guitar.
- Sand the Pieces:
- Use sandpaper to smooth all edges and surfaces of both wood pieces. This will prevent splinters and create a professional finish.
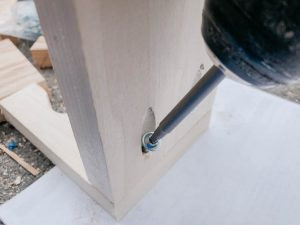
- Assemble the Holder:
- Attach the neck support arm to the base piece using wood glue and screws. Ensure the screws are countersunk to prevent them from scratching the guitar.
- Finish the Wood:
- Apply a finish of your choice, such as stain, paint, or varnish, to protect the wood and enhance its appearance. Let it dry completely.
- Add Padding:
- Apply felt or foam padding to the inside of the neck support to protect the guitar’s finish.
- Mount to the Wall:
- Locate a wall stud using a stud finder. Position the base of the guitar holder against the wall and use long screws to securely attach it to the stud. If you can’t mount to a stud, use drywall anchors that are rated to hold the weight of your guitar.
- Test the Holder:
- Before placing your guitar on the holder, test its stability by applying pressure to ensure it is securely mounted.
5. What Are Some Safety Precautions To Consider When Building A Guitar Holder?
Safety precautions when building a guitar holder include wearing safety glasses and ear protection, using tools properly, and ensuring the holder is securely mounted to the wall. These measures help prevent injuries and ensure the stability of the holder.
- Wear Safety Glasses: Always wear safety glasses to protect your eyes from flying debris when cutting, drilling, or sanding.
- Use Ear Protection: Use earplugs or earmuffs when operating power tools to prevent hearing damage.
- Proper Tool Handling: Use tools according to the manufacturer’s instructions. If you’re not familiar with a tool, take the time to learn how to use it safely.
- Secure Work Area: Ensure your work area is well-lit and free from clutter to prevent accidents.
- Stable Mounting: When mounting the guitar holder to the wall, locate a stud or use appropriate drywall anchors to ensure it can support the weight of the guitar.
- Avoid Over-Tightening: When screwing pieces together, avoid over-tightening, which can strip the screws or split the wood.
- Smooth Edges: Sand all edges and surfaces to prevent splinters and ensure a smooth finish.
- Non-Toxic Finishes: Use non-toxic finishes and allow them to dry completely before placing your guitar on the holder to avoid damaging the instrument.
- Regular Inspection: Periodically inspect the guitar holder for signs of wear or damage, and make any necessary repairs to ensure it remains safe and secure.
- Keep Out of Reach of Children: Ensure the guitar holder is mounted out of reach of small children to prevent them from pulling on the guitar or injuring themselves.
6. How Can I Customize My Guitar Holder To Match My Decor?
Customizing your guitar holder to match your decor involves selecting appropriate wood finishes, adding decorative elements, and choosing a design that complements your room’s aesthetic. This allows you to create a guitar holder that is both functional and visually appealing.
- Wood Finishes:
- Stain: Use wood stain to enhance the natural grain of the wood and match the color of other furniture in the room. Options range from light, natural tones to dark, rich shades.
- Paint: Paint the guitar holder to match the walls or accent colors in your decor. Consider using multiple coats for a smooth, even finish.
- Varnish or Polyurethane: Apply a clear varnish or polyurethane coating to protect the wood and provide a glossy or matte finish.
- Decorative Elements:
- Inlays: Add decorative inlays using materials like metal, mother-of-pearl, or colored resin to create a unique and eye-catching design.
- Carvings: Carve intricate designs into the wood using hand tools or a rotary tool. This can add a personal touch and artistic flair to the guitar holder.
- Metal Accents: Incorporate metal accents such as decorative brackets, hooks, or plates to add a touch of industrial or modern style.
- Design Choices:
- Shape and Style: Choose a shape and style that complements your decor. For example, a sleek, minimalist design might suit a modern room, while a rustic, reclaimed wood holder would fit well in a farmhouse-style space.
- Fabric Padding: Use fabric padding on the neck support to protect the guitar’s finish and add a pop of color or texture.
- Lighting: Install LED strip lights around the guitar holder to highlight the instrument and create a visually stunning display.
- Repurposed Materials:
- Reclaimed Wood: Use reclaimed wood to create a rustic, eco-friendly guitar holder that adds character and charm to your room.
- Vintage Hardware: Incorporate vintage hardware like antique knobs, hooks, or hinges to add a unique and nostalgic touch.
- Personal Touches:
- Engraving: Engrave your name, initials, or a favorite quote onto the guitar holder to personalize it.
- Artwork: Paint or decoupage artwork onto the guitar holder to showcase your artistic talents.
7. What Type Of Wood Is Best For Making A Guitar Holder?
The best types of wood for making a guitar holder include hardwoods like maple, oak, and walnut for their strength and durability, as well as softwoods like pine for their affordability and ease of workability. The choice depends on your budget, desired aesthetic, and skill level.
- Maple:
- Pros: Maple is a strong, durable hardwood with a tight grain pattern. It provides excellent support for guitars and is resistant to wear and tear.
- Cons: Maple can be more expensive than other wood options and may require more effort to work with due to its hardness.
- Oak:
- Pros: Oak is another strong hardwood with a distinctive grain pattern. It is readily available and offers good resistance to dents and scratches.
- Cons: Oak can be prone to splintering if not properly sealed and finished.
- Walnut:
- Pros: Walnut is a beautiful hardwood with a rich, dark color and smooth grain. It is relatively easy to work with and provides a high-end look.
- Cons: Walnut is one of the more expensive wood options and may not be the best choice for budget-conscious projects.
- Pine:
- Pros: Pine is a softwood that is affordable, lightweight, and easy to cut, sand, and finish. It is a good option for beginners and those looking to save money.
- Cons: Pine is less durable than hardwoods and can be prone to dents and scratches. It may also require more coats of finish to achieve a smooth, even surface.
- Cherry:
- Pros: Cherry is a hardwood with a warm, reddish-brown color that deepens with age. It is easy to work with and provides a beautiful, classic look.
- Cons: Cherry can be susceptible to fading if exposed to direct sunlight and may require a protective finish to maintain its color.
- Poplar:
- Pros: Poplar is a softwood that is affordable, lightweight, and easy to paint. It has a smooth, uniform texture and is a good choice for projects where the wood will be painted rather than stained.
- Cons: Poplar is not as strong or durable as hardwoods and may not be the best choice for projects that require high levels of support or resistance to wear and tear.
 Types of wood for guitar holder projects
8. How Do I Ensure My Guitar Holder Is Strong Enough To Support My Instrument?
Ensuring your guitar holder is strong enough involves selecting sturdy materials, using proper construction techniques, and testing the holder’s weight capacity before use. These steps are crucial for preventing accidents and protecting your instrument.
- Material Selection:
- Choose Strong Wood: Use hardwoods like maple, oak, or walnut for their strength and durability. Avoid softwoods like pine for heavy instruments.
- Appropriate Thickness: Ensure the wood is thick enough to support the weight of the guitar. A minimum thickness of 1 inch is generally recommended.
- Construction Techniques:
- Solid Joints: Use wood glue in addition to screws or nails to create strong, stable joints.
- Pocket Holes: Use a Kreg jig to create pocket holes for secure screw placement.
- Reinforcements: Add corner braces or supports to reinforce weak points and increase overall stability.
- Mounting Considerations:
- Wall Studs: Mount the guitar holder to a wall stud whenever possible. Studs provide a solid anchor point that can support significant weight.
- Drywall Anchors: If you can’t mount to a stud, use high-quality drywall anchors that are rated to hold the weight of your guitar.
- Secure Fasteners: Use long screws or bolts to securely attach the guitar holder to the wall.
- Weight Testing:
- Gradual Weight Increase: Before placing your guitar on the holder, gradually increase the weight on the holder to test its capacity. Use sandbags or other heavy objects to simulate the weight of the guitar.
- Observe for Flexing: Watch for any signs of flexing, bending, or instability. If the holder shows any weakness, reinforce it before use.
- Padding and Protection:
- Soft Padding: Use felt or foam padding on the contact points of the guitar holder to protect the instrument’s finish.
- Secure Fit: Ensure the guitar fits snugly in the holder to prevent it from slipping or falling.
- Regular Inspection:
- Check for Wear: Periodically inspect the guitar holder for signs of wear or damage, such as loose screws, cracks in the wood, or worn padding.
- Maintenance: Make any necessary repairs or replacements to ensure the guitar holder remains safe and secure.
9. How High Should I Mount My Guitar Holder On The Wall?
The ideal height for mounting a guitar holder on the wall is typically between 42 and 48 inches from the floor to the bottom of the guitar body, but this can be adjusted based on personal preference and the height of the guitarist. This placement ensures easy access and prevents the guitar from being too high or too low.
- Accessibility:
- Comfortable Reach: Mount the guitar holder at a height that allows you to easily reach and remove the guitar without straining or stretching.
- Playing Position: Consider the height at which you typically play the guitar. Mounting the holder at a similar height can make it easier to transition from playing to storing the instrument.
- Guitar Size:
- Acoustic vs. Electric: Account for the size and shape of your guitar. Acoustic guitars are generally larger than electric guitars and may require a slightly higher mounting position.
- Headstock Clearance: Ensure there is enough clearance between the headstock of the guitar and the ceiling to prevent damage when hanging or removing the instrument.
- Visual Appeal:
- Centered Display: Position the guitar holder so that the guitar is visually centered on the wall. This can create a more aesthetically pleasing display.
- Symmetrical Placement: If you are mounting multiple guitar holders, ensure they are evenly spaced and symmetrically placed on the wall.
- Safety Considerations:
- Out of Reach of Children: Mount the guitar holder out of reach of small children to prevent them from pulling on the guitar or injuring themselves.
- Clearance from Obstacles: Ensure there is enough clearance between the guitar and any furniture or other obstacles in the room to prevent accidental bumps or damage.
- Personal Preference:
- Experiment: Try different mounting heights to find the position that works best for you. Use painter’s tape to temporarily mark the desired height and visualize how the guitar will look on the wall.
- Adjust as Needed: Don’t be afraid to adjust the mounting height if you find that it is not comfortable or practical after using the guitar holder for a while.
 Height of Guitar Holder
10. What Are Some Creative Design Ideas For A DIY Guitar Holder?
Creative design ideas for a DIY guitar holder include repurposing vintage items, incorporating LED lighting, and adding artistic elements like carvings or paint designs. These ideas can transform a simple guitar holder into a unique piece of art.
- Repurposed Vintage Items:
- Old Picture Frames: Use an old picture frame as a decorative backing for the guitar holder. Attach the guitar hanger to the frame and add vintage photos or artwork for a unique touch.
- Vintage Tools: Incorporate vintage tools like old wrenches, hammers, or saws into the design. These can be repurposed as decorative elements or even as functional parts of the guitar holder.
- Wooden Crates: Disassemble a wooden crate and use the wood to build a rustic guitar holder. The crate’s original markings and imperfections will add character to the design.
- LED Lighting:
- Backlit Guitar Holder: Install LED strip lights behind the guitar holder to create a backlit effect. This will highlight the guitar and add a dramatic touch to the display.
- Color-Changing Lights: Use color-changing LED lights to create a dynamic and customizable display. You can change the color of the lights to match your mood or the music you’re playing.
- Spotlights: Install small spotlights above the guitar holder to focus attention on the instrument.
- Artistic Elements:
- Carvings: Carve intricate designs into the wood of the guitar holder. This can add a personal touch and artistic flair to the design.
- Paint Designs: Paint the guitar holder with custom designs, patterns, or artwork. This can be a great way to showcase your artistic talents and match the decor of your room.
- Decoupage: Use decoupage techniques to apply images, patterns, or fabrics to the guitar holder. This can create a unique and textured surface.
- Functional Additions:
- Accessory Storage: Add small shelves or compartments to the guitar holder for storing accessories like picks, straps, and cables.
- Built-In Amplifier: Incorporate a small amplifier into the design of the guitar holder. This can create a convenient and all-in-one setup for practicing and performing.
- Headphone Hook: Add a hook to the guitar holder for storing headphones. This will keep your headphones organized and easily accessible.
- Natural Elements:
- Driftwood: Use driftwood to create a unique and natural-looking guitar holder. The natural shapes and textures of the driftwood will add character to the design.
- Live Edge Wood: Use live edge wood to create a rustic and organic guitar holder. The natural edge of the wood will add a unique and eye-catching element to the design.
11. How Do I Protect My Guitar’s Finish While Using A DIY Holder?
Protecting your guitar’s finish while using a DIY holder involves using soft padding, ensuring a secure fit, and avoiding abrasive materials. These precautions help prevent scratches and damage to your instrument.
- Soft Padding:
- Felt: Apply felt to all contact points between the guitar and the holder. Felt is soft, non-abrasive, and provides excellent protection against scratches.
- Foam: Use foam padding in areas where the guitar needs extra cushioning. High-density foam is durable and provides good shock absorption.
- Microfiber Cloth: Wrap microfiber cloth around the contact points for a soft and lint-free barrier. Microfiber is gentle on the guitar’s finish and helps prevent dust accumulation.
- Secure Fit:
- Snug Fit: Ensure the guitar fits snugly in the holder to prevent it from slipping or rubbing against the sides.
- Adjustable Straps: Add adjustable straps to the guitar holder to secure the instrument in place. This is especially useful for guitars with unusual shapes or sizes.
- Neck Support: Design the guitar holder with a neck support that cradles the neck securely. This will prevent the guitar from swaying or tilting.
- Avoid Abrasive Materials:
- Smooth Surfaces: Sand all surfaces of the guitar holder to create a smooth and even finish. This will prevent splinters or rough edges from scratching the guitar.
- Non-Abrasive Finishes: Use non-abrasive finishes like polyurethane or varnish to protect the wood and provide a smooth surface.
- No Metal Contact: Avoid using metal parts that could come into direct contact with the guitar’s finish. If metal parts are necessary, cover them with padding or rubber.
- Regular Cleaning:
- Dust Removal: Regularly dust the guitar holder to prevent dust and debris from accumulating on the surface.
- Gentle Cleaning: Use a gentle cleaning solution and a soft cloth to clean the guitar holder as needed. Avoid using harsh chemicals or abrasive cleaners.
- Proper Installation:
- Secure Mounting: Ensure the guitar holder is securely mounted to the wall or stand to prevent it from falling or shifting.
- Weight Distribution: Distribute the weight of the guitar evenly on the holder to prevent stress points and potential damage.
- Regular Inspection:
- Check for Wear: Periodically inspect the guitar holder for signs of wear or damage, such as worn padding, loose screws, or cracks in the wood.
- Maintenance: Make any necessary repairs or replacements to ensure the guitar holder remains safe and secure.
12. Can I Make A Guitar Holder For Multiple Guitars?
Yes, you can make a guitar holder for multiple guitars by building a custom rack or stand with individual slots or hangers for each instrument. This is a great way to organize and display your collection while saving space.
- Custom Rack:
- Design: Design a custom rack that fits the dimensions of your guitars and the available space. Consider the number of guitars you want to store and the layout of the room.
- Materials: Use sturdy materials like wood or metal to construct the rack. Ensure the materials are strong enough to support the weight of multiple guitars.
- Construction: Build the rack with individual slots or hangers for each guitar. Use padding or soft materials to protect the guitars from scratches and damage.
- A-Frame Stand:
- Multiple Guitars: Purchase or build an A-frame stand that can accommodate multiple guitars. These stands typically have padded dividers to keep the guitars separated and protected.
- Portability: A-frame stands are portable and easy to move, making them a good option for musicians who need to transport their guitars.
- Wall-Mounted Rack:
- Space-Saving: Build a wall-mounted rack with individual hangers for each guitar. This is a great way to save floor space and create a visually appealing display.
- Secure Mounting: Ensure the rack is securely mounted to the wall using appropriate hardware. Use wall studs or drywall anchors to support the weight of the guitars.
- Combination Rack:
- Hybrid Design: Combine elements of different rack designs to create a hybrid rack that meets your specific needs. For example, you could build a rack with both wall-mounted hangers and floor-standing slots.
- Custom Features: Add custom features to the rack, such as storage compartments for accessories, built-in amplifiers, or LED lighting.
- Considerations:
- Weight Capacity: Ensure the rack is strong enough to support the combined weight of all the guitars.
- Spacing: Provide enough space between the guitars to prevent them from rubbing against each other.
- Protection: Use padding or soft materials to protect the guitars from scratches and damage.
- Accessibility: Design the rack so that each guitar is easily accessible.
- Aesthetics: Choose a design that complements the decor of your room.
 Guitar Rack
13. What Are The Alternatives To DIY Guitar Holders?
Alternatives to DIY guitar holders include commercially available guitar stands and wall mounts, which offer convenience, professional design, and tested reliability. These options can be a good choice for those who prefer not to build their own holders.
- Guitar Stands:
- A-Frame Stands: These stands are portable, easy to set up, and suitable for holding one or more guitars. They are ideal for gigs, rehearsals, and home use.
- Tripod Stands: Tripod stands offer stability and can be adjusted to different heights. They are a good choice for holding guitars on stage or in the studio.
- Multi-Guitar Stands: These stands are designed to hold multiple guitars and are ideal for musicians with large collections.
- Wall Mounts:
- Hanging Mounts: These mounts attach to the wall and suspend the guitar by its headstock. They save floor space and create a visually appealing display.
- Cradle Mounts: Cradle mounts support the guitar body and neck and provide a secure and stable hold.
- Guitar Cases:
- Hard Cases: Hard cases offer the best protection for guitars and are ideal for travel and storage. They are typically made of wood or molded plastic and have a padded interior.
- Soft Cases: Soft cases are lightweight and portable, making them a good choice for carrying guitars to gigs or rehearsals.
- Specialty Racks:
- Rolling Racks: Rolling racks have wheels and can be easily moved around the room. They are ideal for studios, stages, and retail environments.
- Rotating Racks: Rotating racks allow you to easily access guitars from any angle. They are a good choice for displaying guitars in a small space.
- Furniture Integration:
- Guitar Cabinets: Guitar cabinets are designed to store and display guitars in a stylish and organized manner. They often have built-in lighting and storage compartments.
- Custom Furniture: Custom furniture can be designed to incorporate guitar storage into the overall design of the room.
14. How Can I Troubleshoot Common Problems When Building A Guitar Holder?
Troubleshooting common problems when building a guitar holder involves addressing issues like unstable construction, uneven surfaces, and finish imperfections. Identifying and fixing these problems ensures a safe and visually appealing final product.
- Unstable Construction:
- Problem: The guitar holder wobbles or feels unstable.
- Solution:
- Tighten Screws: Ensure all screws are tightened securely.
- Add Reinforcements: Add corner braces or supports to reinforce weak points.
- Check Joints: Verify that all joints are properly glued and aligned.
- Use Sturdier Materials: Consider using thicker or stronger materials for the base and support arms.
- Uneven Surfaces:
- Problem: The guitar holder has uneven surfaces or gaps.
- Solution:
- Sand Surfaces: Sand all surfaces to create a smooth and even finish.
- Use Wood Filler: Fill any gaps or imperfections with wood filler.
- Check Alignment: Ensure all pieces are properly aligned before fastening them together.
- Use Clamps: Use clamps to hold pieces in place while the glue dries.
- Finish Imperfections:
- Problem: The finish is uneven, streaky, or has bubbles.
- Solution:
- Prepare Surface: Properly prepare the surface by sanding and cleaning it before applying the finish.
- Apply Thin Coats: Apply thin, even coats of finish, allowing each coat to dry completely before applying the next.
- Use a Brush or Sprayer: Use a high-quality brush or sprayer to apply the finish.
- Sand Between Coats: Lightly sand between coats to remove any imperfections.
- Mounting Issues:
- Problem: The guitar holder is not securely mounted to the wall.
- Solution:
- Use Wall Studs: Mount the guitar holder to a wall stud whenever possible.
- Use Drywall Anchors: If you can’t mount to a stud, use high-quality drywall anchors that are rated to hold the weight of the guitar.
- Use Long Screws: Use long screws to securely attach the guitar holder to the wall.
- Guitar Fit Issues:
- Problem: The guitar does not fit properly in the holder.
- Solution:
- Adjust Dimensions: Adjust the dimensions of the holder to accommodate the size and shape of the guitar.
- Add Padding: Add padding to the contact points to protect the guitar and provide a snug fit.
- Check Neck Support: Ensure the neck support is properly aligned and provides adequate support.
- Material Selection:
- Problem: The materials are not suitable for the project.
- Solution:
- Use Appropriate Wood: Use hardwoods like maple, oak, or walnut for their strength and durability.
- Check Screw Length: Use screws that are long enough to provide a secure hold but not so long that they poke through the other side.
- Use Quality Glue: Use a high-quality wood glue for strong and durable joints.
15. What Are Some Advanced Techniques For Building Guitar Holders?
Advanced techniques for building guitar holders include incorporating complex joinery, using CNC machining for precision, and integrating electronic components like lighting or sensors. These techniques elevate the craftsmanship and functionality of the guitar holder.
- Complex Joinery:
- Dovetail Joints: Use dovetail joints to create strong and visually appealing connections between the different parts of the guitar holder.
- Mortise and Tenon Joints: Use mortise and tenon joints to create robust and durable connections.
- Finger Joints: Use finger joints to create strong and interlocking connections between the wood pieces.
- CNC Machining:
- Precision Cuts: Use CNC machining to create precise cuts and shapes for the guitar holder. This can be especially useful for creating intricate designs and complex curves.
- Repeatability: CNC machining allows you to easily replicate the design, making it ideal for producing multiple guitar holders.
- Electronic Integration:
- LED Lighting: Integrate LED lighting into the guitar holder to create a visually stunning display. Use color-changing LEDs to customize the lighting effects.
- Proximity Sensors: Incorporate proximity sensors to automatically activate the lighting when a guitar is placed on the holder.
- Humidity Sensors: Add humidity sensors to monitor the humidity levels around the guitar and alert you if they are too high or too low.
- Veneering:
- Decorative Veneers: Apply decorative veneers to the surface of the guitar holder to create a high-end and visually appealing finish.
- Exotic Woods: Use exotic wood veneers to add a touch of luxury and sophistication.
- Resin Casting:
- Resin Inlays: Incorporate resin inlays into the guitar holder to create unique and eye-catching designs.
- Transparent Elements: Use transparent resin to create floating or suspended elements in the guitar holder.
- Vacuum Forming:
- Custom Shapes: Use vacuum forming to create custom shapes and contours for the guitar holder.
- Durable Materials: Use durable materials like ABS plastic for vacuum forming to ensure the guitar holder is strong and long-lasting.
FAQ: How To Make A Guitar Holder
1. How much does it cost to make a guitar holder?
The cost to make a guitar holder typically ranges from $10 to $50, depending on the materials used and the complexity of the design. Using reclaimed wood or simpler designs can significantly reduce costs.
2. Can I use PVC pipes to make a guitar holder?
Yes, PVC pipes can be used to make a guitar holder. They are lightweight, durable, and easy to work with. However, ensure the pipes are properly padded to protect the guitar’s finish.
3. What is the best way to mount a guitar holder to drywall?
The best way to mount a guitar holder to drywall is to use heavy-duty drywall anchors. These anchors provide a secure hold and can support the weight of the guitar. Always follow the manufacturer’s instructions for installation.
4. How do I prevent my guitar from falling off the holder?
To prevent your guitar from falling off the holder, ensure the holder has a snug fit and use soft padding to secure the instrument. Also, regularly inspect the holder for any signs of wear or damage.
5. Is it safe to hang my guitar by the headstock?
Yes, it is generally safe to hang your guitar by the headstock, as guitars are designed to withstand the tension. However, ensure the holder is properly padded and the guitar is not subjected to sudden movements.
6. Can I make a guitar holder without woodworking skills?
Yes, you can make a guitar holder without advanced woodworking skills by using simple designs and readily available materials. Pre-cut wood pieces and basic assembly techniques can make the process easier.
7. How do I choose the right size for my guitar holder?
To choose the right size for your guitar holder, measure the width of your guitar’s neck and the depth of the body. The holder should be slightly larger than these measurements to ensure a comfortable fit.
8. What type of padding should I use for my guitar holder?
The best types of padding for a guitar holder include felt, foam, and microfiber cloth. These materials are soft, non-abrasive, and provide excellent protection for the guitar’s finish.
9. How often should I inspect my guitar holder?
You should inspect your guitar holder regularly, at least once a month, to check for any signs of wear, damage, or instability. Make any necessary repairs or replacements to ensure the holder remains safe and secure.
10. Can I customize my guitar holder with artwork or designs?
Yes, you can customize your guitar holder with artwork or designs by painting, carving, or using decoupage techniques. This is a great way to personalize the holder and match it to your decor.
Ready to take your guitar display to the next level? Visit guitarplayers.net for more innovative ideas, detailed tutorials, and a community of fellow guitar enthusiasts eager to share their experiences. Whether you’re looking for advanced techniques or