Adjusting the truss rod on your acoustic guitar is a crucial skill for any guitar player because it directly affects the instrument’s playability; at guitarplayers.net, we ensure you’re equipped with the knowledge and confidence to perform this task effectively. Whether you’re dealing with high action, fret buzz, or simply want to fine-tune your guitar’s neck, understanding how to adjust the truss rod will allow you to maintain optimal string height and neck relief. Dive into the intricacies of acoustic guitar setup and neck adjustments, and discover how to keep your instrument playing its best.
1. What Is A Truss Rod And Why Is It Important?
A truss rod is a steel or graphite rod embedded inside the neck of an acoustic guitar, running from the headstock to the body joint, and its primary function is to counteract the pull of the strings, preventing the neck from bending or warping under tension. The truss rod keeps the neck straight, allowing for proper action and intonation, which are essential for comfortable playing and accurate pitch.
1.1 What Does The Truss Rod Do For Your Guitar?
The truss rod counteracts string tension, allowing adjustments to neck relief and overall playability. The truss rod is important for:
- Correcting Neck Bow: Over time, the constant pull of the strings can cause the neck to bow forward (upbow) or backward (backbow). The truss rod can be adjusted to counteract these bends, bringing the neck back to a straighter position.
- Adjusting Action: The action is the height of the strings above the frets. Adjusting the truss rod allows you to fine-tune the action, making the guitar easier to play. A slight upbow (relief) is generally desired for optimal playability.
- Preventing Damage: Without a functioning truss rod, the neck could eventually warp or even break due to the continuous string tension. Regular truss rod adjustments can prevent costly repairs and prolong the life of your instrument.
1.2 What Happens If The Truss Rod Is Not Adjusted Properly?
If the truss rod is not adjusted properly, several issues can arise, affecting the guitar’s playability and sound. Some potential problems include:
- High Action: An improperly adjusted truss rod can lead to high action, where the strings are too far from the frets, making the guitar difficult to play, especially when barring chords or playing fast passages.
- Fret Buzz: If the neck is too straight or backbowed, the strings may buzz against the frets, resulting in an unpleasant sound. Fret buzz can occur on specific frets or across the entire fretboard.
- Intonation Problems: An improperly adjusted truss rod can also affect the guitar’s intonation, causing notes to be out of tune as you move up the neck. This can make it challenging to play in tune with other musicians or recorded tracks.
- Neck Damage: In extreme cases, neglecting truss rod adjustments can lead to permanent neck damage, such as warping or cracking. These issues can be expensive to repair and may even render the guitar unplayable.
1.3 How Often Should You Adjust Your Truss Rod?
The frequency of truss rod adjustments depends on several factors, including climate, humidity, string gauge, and playing style, but monitoring your guitar’s neck and playability regularly is key. Here are some guidelines:
- Seasonal Changes: Wood expands and contracts with changes in temperature and humidity. You may need to adjust the truss rod when the seasons change, especially if you live in an area with significant climate variations.
- String Gauge Changes: Switching to a different string gauge can affect the amount of tension on the neck. If you switch from light to heavy strings, you may need to tighten the truss rod, and vice versa.
- Playability Issues: If you notice changes in the action or experience fret buzz, it’s time to check the truss rod. These issues can indicate that the neck has shifted and needs adjustment.
- Regular Check-ups: Even if you don’t notice any immediate problems, it’s a good idea to check the truss rod every few months to ensure the neck is properly aligned.
2. Identifying The Need For A Truss Rod Adjustment
Knowing when your acoustic guitar needs a truss rod adjustment is crucial for maintaining its playability and sound quality; recognizing these signs and symptoms allows you to take timely action and prevent potential damage to your instrument.
2.1 High Action: Strings Too High Above The Frets
High action, where the strings are too far from the frets, is a common sign that your truss rod may need adjustment. If you find it difficult to press down the strings, especially when barring chords or playing higher up the neck, your action may be too high. High action can make the guitar harder to play, cause fatigue in your hands, and affect your overall playing experience. It also makes the guitar’s intonation go sharp.
2.2 Fret Buzz: Strings Buzzing Against The Frets
Fret buzz, where the strings vibrate against the frets when played, can also indicate that the truss rod needs attention. Fret buzz often occurs when the neck is too straight or backbowed, causing the strings to come into contact with the frets. Fret buzz can be annoying and affect the clarity and sustain of your notes.
2.3 Noticeable Change In Neck Relief
Neck relief refers to the amount of bow in the guitar neck, and a slight upbow is generally desired for optimal playability, so checking for an increase or decrease in neck relief will help you determine if you need to adjust the truss rod.
2.4 Difficulty Playing Certain Chords Or Notes
If you’re having difficulty playing certain chords or notes that you used to play easily, it could be a sign that the truss rod needs adjustment. Changes in neck relief can affect the spacing between the strings and frets, making some positions more challenging to play. You may notice that chords sound muddy or that notes are harder to sustain.
2.5 Visible Warping Or Bending Of The Neck
In more severe cases, you may be able to see visible warping or bending of the neck, which is a clear indication that the truss rod needs immediate attention. Look for any unusual curves or twists in the neck, especially along the fretboard, because this could indicate a serious problem that requires professional repair.
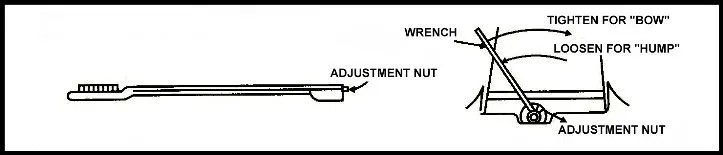 illustration showing where to find the truss rod adjustment nut and to tighten to the right for
Image showing the location of the truss rod adjustment nut and direction to tighten.
3. Tools You’ll Need To Adjust Your Truss Rod
Having the right tools on hand is essential for adjusting your guitar’s truss rod safely and effectively. Using the correct tools will help prevent damage to the truss rod nut or the surrounding areas of the guitar.
3.1 Truss Rod Wrench Or Allen Key
A truss rod wrench, or Allen key, is the primary tool for adjusting the truss rod nut. The size of the wrench varies depending on the guitar manufacturer and model, so using the correct size wrench is crucial to avoid stripping the nut. Most guitars come with a wrench when purchased, but if you don’t have one, you can purchase a set of Allen wrenches at most music stores or online retailers.
3.2 Capo
A capo is a device used to clamp down the strings at a specific fret, effectively shortening the vibrating length of the strings, and it is used to measure neck relief accurately. Place the capo at the first fret to act as a reference point for measuring the amount of bow in the neck.
3.3 Feeler Gauge Or Straight Edge
A feeler gauge or straight edge is used to measure the amount of relief in the neck, with a feeler gauge being a set of thin metal strips of varying thicknesses, and inserting them between the string and the fret. A straight edge is a metal ruler that spans multiple frets.
3.4 Tuning Fork Or Electronic Tuner
A tuning fork or electronic tuner is essential for ensuring that your guitar is properly tuned before and after adjusting the truss rod. Tuning the guitar to the correct pitch ensures accurate measurements of neck relief and action.
3.5 Protective Cloth Or Padding
A protective cloth or padding is used to protect the guitar’s finish from scratches or damage during the adjustment process, so place the cloth under the neck and around the truss rod nut to prevent accidental marks or dings.
4. Step-By-Step Guide To Adjusting A Truss Rod
Adjusting a truss rod may seem daunting, but you can confidently maintain your guitar’s neck health by following these step-by-step instructions.
4.1 Prepare Your Guitar
Before you begin, ensure your guitar is properly tuned, so use a tuning fork or electronic tuner to bring the strings to the correct pitch. Place a protective cloth or padding under the neck to prevent scratches or damage to the finish.
4.2 Locate The Truss Rod Nut
The truss rod nut is usually located at the headstock or inside the soundhole, so check your guitar’s manual if you’re unsure of the exact location. Truss rod nuts at the headstock are typically covered by a plastic plate, which may need to be removed with a screwdriver. Truss rod nuts inside the soundhole are usually accessible without any disassembly.
4.3 Measure The Neck Relief
To measure the neck relief, you’ll need a capo and a feeler gauge or straight edge. Place the capo on the first fret and press down the low E string at the fret where the neck meets the body (usually the 14th or 15th fret). Use the feeler gauge or straight edge to measure the distance between the bottom of the string and the top of the 6th or 7th fret. This gap is your neck relief.
4.4 Determine The Direction Of Adjustment
Based on your neck relief measurement, you’ll need to determine whether to tighten or loosen the truss rod nut, because if the neck has too much upbow (excessive relief), you’ll need to tighten the truss rod to straighten the neck. If the neck is too straight or backbowed (not enough relief), you’ll need to loosen the truss rod to allow the neck to bow forward slightly.
4.5 Make Small Adjustments
Insert the correct size truss rod wrench or Allen key into the nut and make small adjustments, and only turn the wrench in small increments (no more than a quarter turn at a time) to avoid damaging the truss rod or neck.
4.6 Re-Measure And Repeat
After each adjustment, re-measure the neck relief to see if you’ve achieved the desired amount of bow, and allow the neck to settle for a few minutes before re-measuring, as the wood may take some time to respond to the adjustment. Repeat the process of adjusting and measuring until you reach the optimal neck relief.
4.7 Re-Tune And Check Playability
Once you’ve achieved the desired neck relief, remove the capo and re-tune the guitar, then check the playability by playing chords and scales across the fretboard.
5. Understanding Different Types Of Truss Rods
Different types of truss rods offer distinct adjustment capabilities, and understanding the differences between these types can help you troubleshoot issues and properly maintain your instrument.
5.1 Single-Action Truss Rods
Single-action truss rods are the most common type found in acoustic guitars, designed to counteract the forward bow (upbow) caused by string tension by straightening the neck. They can only adjust in one direction, so loosening the truss rod won’t correct a backbowed neck.
5.2 Double-Action Truss Rods
Double-action truss rods, also known as two-way truss rods, can correct both forward and backward bows in the guitar neck, and they are more versatile than single-action rods, especially for guitars prone to backbowing.
5.3 Heel-Adjust Truss Rods
Heel-adjust truss rods are located at the heel of the guitar neck, near the body joint, and are often found on vintage or traditional instruments, requiring a special tool or long screwdriver to access and adjust the nut.
5.4 Headstock-Adjust Truss Rods
Headstock-adjust truss rods are located at the headstock of the guitar, making them easily accessible for adjustments, and are the most common type found on modern guitars.
6. Common Problems And Solutions
Adjusting a truss rod can sometimes present challenges, but knowing how to troubleshoot common issues will help you achieve the desired results without damaging your instrument.
6.1 Stripped Truss Rod Nut
A stripped truss rod nut occurs when the wrench or Allen key damages the nut, making it difficult or impossible to turn, often caused by using the wrong size wrench or applying too much force. To solve this, use a nut extractor or consult a professional guitar technician to replace the nut.
6.2 Stuck Truss Rod
A stuck truss rod occurs when the truss rod is difficult to turn, often due to rust, corrosion, or excessive tension, requiring gentle, gradual adjustments to avoid breakage. Apply a lubricant like WD-40 to the nut and allow it to penetrate before attempting to turn the wrench.
6.3 Truss Rod Rattling
A rattling truss rod occurs when the rod is loose inside the neck, causing vibrations and unwanted noise, often due to loose components or improper installation. Tighten the truss rod nut slightly to secure the rod, or consult a professional for further inspection.
6.4 Uneven Fret Wear
Uneven fret wear can cause buzzing or intonation problems, even with a properly adjusted truss rod, often caused by inconsistent playing technique or varying string tension. Have a professional guitar technician level or replace the frets to ensure consistent playability.
7. Tips For Maintaining Your Guitar’s Neck
Maintaining your guitar’s neck is crucial for ensuring optimal playability, sound quality, and longevity, but with proper care and attention, you can keep your guitar playing its best for years to come.
7.1 Control Humidity Levels
Humidity levels can significantly affect the guitar’s neck, causing it to expand or contract with changes in moisture, so maintain a consistent humidity level (around 45-55%) in your guitar’s environment.
7.2 Use A Guitar Case
Always store your guitar in a case when not in use to protect it from temperature changes, humidity, and physical damage, because a well-padded case can help maintain a stable environment for your instrument.
7.3 Loosen Strings During Storage
If you’re not planning to play your guitar for an extended period, consider loosening the strings to reduce tension on the neck. This can help prevent warping or bending over time, but don’t loosen the strings too much. Just enough to reduce the overall tension.
7.4 Regular Cleaning And Polishing
Regularly clean and polish your guitar’s neck to remove dirt, grime, and sweat, because buildup can affect playability and damage the finish. Use a soft cloth and a guitar-specific polish to keep the neck clean and smooth.
7.5 Professional Setups
Consider having your guitar professionally set up by a qualified technician periodically, and a professional setup includes adjusting the truss rod, action, intonation, and other components to optimize playability and sound quality.
8. When To Seek Professional Help
While adjusting a truss rod can be a straightforward process, there are situations where it’s best to seek professional help from a qualified guitar technician because attempting to fix certain problems yourself could cause further damage to your instrument.
8.1 If You’re Not Comfortable Doing It Yourself
If you’re unsure about any part of the adjustment process or feel uncomfortable working on your guitar, it’s best to leave it to a professional because they have the expertise and experience to handle delicate adjustments without causing damage.
8.2 If The Truss Rod Is Stuck Or Damaged
If the truss rod is stuck, stripped, or otherwise damaged, don’t attempt to force it, because doing so could cause further damage to the neck or truss rod. Take your guitar to a professional who can assess the problem and perform the necessary repairs.
8.3 If You’re Experiencing Unusual Problems
If you’re experiencing unusual problems with your guitar’s neck, such as severe warping, cracking, or twisting, consult a professional technician immediately, because these issues may require specialized repair techniques or replacement parts.
8.4 If You’re Unsure About The Correct Adjustment
If you’ve made adjustments to the truss rod but are still experiencing playability issues or are unsure about the correct amount of relief, seek guidance from a professional, who can assess the neck and make the necessary adjustments to optimize playability.
By understanding when to seek professional help, you can avoid potential damage to your guitar and ensure that it remains in top playing condition for years to come.
9. The Role Of String Gauge In Truss Rod Adjustment
String gauge plays a significant role in truss rod adjustment, as different string gauges exert varying amounts of tension on the guitar’s neck, affecting the amount of bow and overall playability, so understanding the relationship between string gauge and truss rod adjustment is essential for maintaining optimal neck health.
9.1 Lighter Gauge Strings
Lighter gauge strings exert less tension on the neck, potentially resulting in less upbow (forward bow) and requiring loosening of the truss rod. Using lighter strings can make the guitar easier to play, especially for beginners, but may also reduce sustain and volume.
9.2 Heavier Gauge Strings
Heavier gauge strings exert more tension on the neck, potentially resulting in more upbow and requiring tightening of the truss rod. Heavier strings can provide a fuller, more robust tone, but may also make the guitar harder to play, especially for those with weaker hands.
9.3 Adjusting For Different Gauges
When switching to a different string gauge, it’s essential to adjust the truss rod accordingly to maintain optimal neck relief. If switching from lighter to heavier strings, tighten the truss rod slightly to counteract the increased tension. If switching from heavier to lighter strings, loosen the truss rod slightly to allow the neck to relax.
9.4 Consulting A Professional
If unsure about the correct truss rod adjustment when changing string gauges, consult a professional guitar technician, who can assess the neck and make the necessary adjustments to ensure proper playability and prevent damage.
10. Truss Rod Adjustment And Guitar Setup
Truss rod adjustment is an integral part of a comprehensive guitar setup, which involves optimizing various components to achieve the best possible playability, sound quality, and intonation.
10.1 Action Adjustment
Adjusting the action involves setting the height of the strings above the frets, and the truss rod adjustment affects the overall neck relief, which in turn affects the action. The bridge saddle height may also need adjustment to achieve the desired action.
10.2 Intonation Adjustment
Intonation refers to the accuracy of pitch as you move up the fretboard, and a properly adjusted truss rod and action are essential for accurate intonation. The bridge saddle position may also need adjustment to ensure that notes are in tune across the entire neck.
10.3 Nut Height Adjustment
The nut is a slotted piece at the headstock that supports the strings, and adjusting the nut height ensures that the strings are at the correct height above the first fret. An improperly adjusted nut can cause buzzing or difficulty playing open chords.
10.4 Fret Leveling
Fret leveling involves ensuring that all the frets are at the same height, which is essential for consistent playability and avoiding buzzing or dead spots. Uneven frets can cause intonation problems and make the guitar difficult to play.
By understanding the relationship between truss rod adjustment and guitar setup, you can ensure that your instrument is optimized for peak performance and enjoyment.
FAQ: Adjusting Your Acoustic Guitar Truss Rod
1. What Is The Purpose Of A Truss Rod In An Acoustic Guitar?
The primary purpose of a truss rod in an acoustic guitar is to counteract the tension exerted by the strings, preventing the neck from bending or warping over time. The truss rod ensures that the neck remains straight, allowing for proper action, intonation, and overall playability.
2. How Do I Know If My Acoustic Guitar Needs A Truss Rod Adjustment?
Common signs that your acoustic guitar needs a truss rod adjustment include high action (strings too high above the frets), fret buzz (strings buzzing against the frets), a noticeable change in neck relief (amount of bow in the neck), difficulty playing certain chords or notes, and visible warping or bending of the neck.
3. What Tools Do I Need To Adjust My Acoustic Guitar’s Truss Rod?
The essential tools for adjusting an acoustic guitar’s truss rod include a truss rod wrench or Allen key (of the correct size for your guitar), a capo, a feeler gauge or straight edge (for measuring neck relief), a tuning fork or electronic tuner (for tuning the guitar), and a protective cloth or padding (to protect the guitar’s finish).
4. Which Direction Should I Turn The Truss Rod Nut To Correct An Upbowed Neck?
To correct an upbowed neck (where the neck bows forward excessively), you should tighten the truss rod nut by turning it clockwise. This will increase tension on the truss rod and straighten the neck.
5. Which Direction Should I Turn The Truss Rod Nut To Correct A Backbowed Neck?
To correct a backbowed neck (where the neck bows backward), you should loosen the truss rod nut by turning it counterclockwise. This will decrease tension on the truss rod and allow the neck to relax into a slight upbow.
6. How Much Should I Turn The Truss Rod Nut At One Time?
When adjusting a truss rod, it’s essential to make small adjustments, turning the nut no more than a quarter turn at a time, because this prevents over-adjustment and potential damage to the truss rod or neck.
7. Can I Damage My Guitar By Adjusting The Truss Rod Incorrectly?
Yes, adjusting the truss rod incorrectly can damage your guitar, so using the wrong size wrench, applying too much force, or over-adjusting the truss rod can lead to stripping the nut, breaking the truss rod, or even damaging the neck.
8. How Often Should I Adjust The Truss Rod On My Acoustic Guitar?
The frequency of truss rod adjustments depends on factors such as climate, humidity, string gauge, and playing style. It’s best to monitor your guitar regularly and adjust the truss rod as needed to maintain optimal playability.
9. Is It Better To Have A Professional Adjust My Guitar’s Truss Rod?
If you’re unsure about any part of the adjustment process or feel uncomfortable working on your guitar, it’s best to seek professional help from a qualified guitar technician. They have the expertise and experience to handle delicate adjustments without causing damage.
10. How Does String Gauge Affect Truss Rod Adjustment?
String gauge affects truss rod adjustment because different string gauges exert varying amounts of tension on the guitar’s neck, and heavier gauge strings exert more tension, potentially requiring tightening of the truss rod, while lighter gauge strings exert less tension, potentially requiring loosening of the truss rod.
We at guitarplayers.net believe that mastering truss rod adjustments empowers you to take control of your instrument’s playability and longevity. Remember, a well-maintained neck translates to a happier playing experience.