Adjusting string height on your electric guitar, also known as setting the action, is essential for achieving optimal playability and tone, and guitarplayers.net is here to guide you through it. By understanding the different bridge types and making precise adjustments, you can improve your guitar’s feel and performance. Proper string action not only enhances playing comfort but also prevents issues like fret buzz and intonation problems.
1. Why Is Adjusting String Height Important for Electric Guitars?
Adjusting the string height, or action, on your electric guitar is crucial for several reasons, directly impacting playability and sound quality. It’s a fundamental aspect of guitar maintenance that every player should understand.
- Improved Playability: Proper string height makes playing more comfortable. When the action is too high, you need to exert more force to press down the strings, leading to finger fatigue and difficulty executing fast or complex passages. Lowering the action can significantly reduce the effort required, allowing for smoother and faster playing.
- Enhanced Tone: String height affects the guitar’s tone. High action can result in a weaker, less resonant sound because the strings aren’t vibrating as freely. Lowering the action allows the strings to vibrate more freely, producing a fuller, more vibrant tone.
- Reduced Fret Buzz: Fret buzz occurs when the strings vibrate against the frets, creating an unwanted buzzing sound. Adjusting the string height can eliminate or minimize fret buzz, resulting in a cleaner and more professional sound. According to research from Guitar World in June 2024, proper string height ensures optimal string vibration without interference.
- Better Intonation: Intonation refers to the accuracy of pitch across the fretboard. Incorrect string height can cause intonation problems, where notes played higher up the neck are out of tune. Adjusting the action can improve intonation, ensuring that your guitar plays in tune across the entire fretboard.
- Personalized Setup: Every guitarist has unique preferences for how their instrument feels. Adjusting string height allows you to customize the guitar’s setup to match your playing style and preferences, resulting in a more enjoyable playing experience. For example, blues players might prefer a slightly higher action for better slide playing, while shredders might prefer a super-low action for maximum speed.
Ultimately, adjusting string height is a vital part of guitar maintenance that can significantly improve your instrument’s playability, tone, and overall performance. By understanding the importance of string height and learning how to adjust it properly, you can ensure that your guitar always feels and sounds its best.
2. What Tools Do I Need to Adjust String Height?
To effectively adjust the string height on your electric guitar, you’ll need a few essential tools. Having the right tools on hand will make the process smoother and more precise.
- Allen Wrenches (Hex Keys): Many modern electric guitars, especially those with adjustable bridges like Stratocasters or Floyd Rose tremolos, use Allen wrenches to adjust the string height. You’ll need a set of various sizes to fit the different screws on your bridge. Ensure you have both metric and imperial sets to cover all possibilities.
- Screwdrivers: Guitars with Tune-o-Matic bridges, commonly found on Gibson and PRS models, often require screwdrivers for height adjustments. A small set of flat-head screwdrivers is essential.
- Ruler or String Action Gauge: A precise ruler or a specialized string action gauge is crucial for measuring the string height at the 12th fret. These tools provide accurate measurements in millimeters or inches, allowing you to set the action to your desired specifications.
- Tuner: A reliable tuner is necessary to ensure your guitar is properly tuned before and after making adjustments. Changes to string height can affect the guitar’s overall tuning, so it’s essential to keep it in tune throughout the process.
- Fret Rocker: A fret rocker is a small, notched piece of metal used to identify uneven frets. Place the fret rocker on three adjacent frets; if it rocks back and forth, the middle fret is higher than the others. Addressing uneven frets can significantly improve playability and reduce fret buzz.
- Neck Rest or Support: A neck rest or support is a padded cradle that supports the guitar’s neck during adjustments. This helps prevent damage to the neck and provides a stable surface to work on.
- String Winder: A string winder makes it quicker and easier to remove and install strings. This is especially useful when making multiple adjustments or changing strings frequently.
- Microfiber Cloth: A soft microfiber cloth is perfect for cleaning your guitar and keeping it free from dust and fingerprints. Keeping your instrument clean not only enhances its appearance but also helps maintain its condition.
Having these tools readily available ensures that you can make precise and effective adjustments to your guitar’s string height, resulting in improved playability and sound quality.
 Tools for adjusting guitar string height including Allen wrenches, screwdrivers, ruler, and tuner
3. What Are the Different Types of Bridges and How Do They Affect String Height Adjustment?
The type of bridge on your electric guitar significantly influences how you adjust the string height. Different bridge designs require specific adjustment methods.
3.1. Tune-o-Matic Bridge
The Tune-o-Matic bridge is commonly found on Gibson and PRS guitars. It features two thumbwheel posts that allow you to raise or lower the entire bridge, thus adjusting the string height.
- Adjustment Method: Turn the thumbwheels located on either side of the bridge. Clockwise raises the bridge (increases string height), while counterclockwise lowers it (decreases string height). Make small adjustments and check the string height frequently to avoid over-adjusting.
- Pros: Simple and effective for overall height adjustment.
- Cons: Adjusts all strings together; individual string height adjustments are not possible without additional modifications.
 Gibson style guitar bridge adjustment using a screwdriver
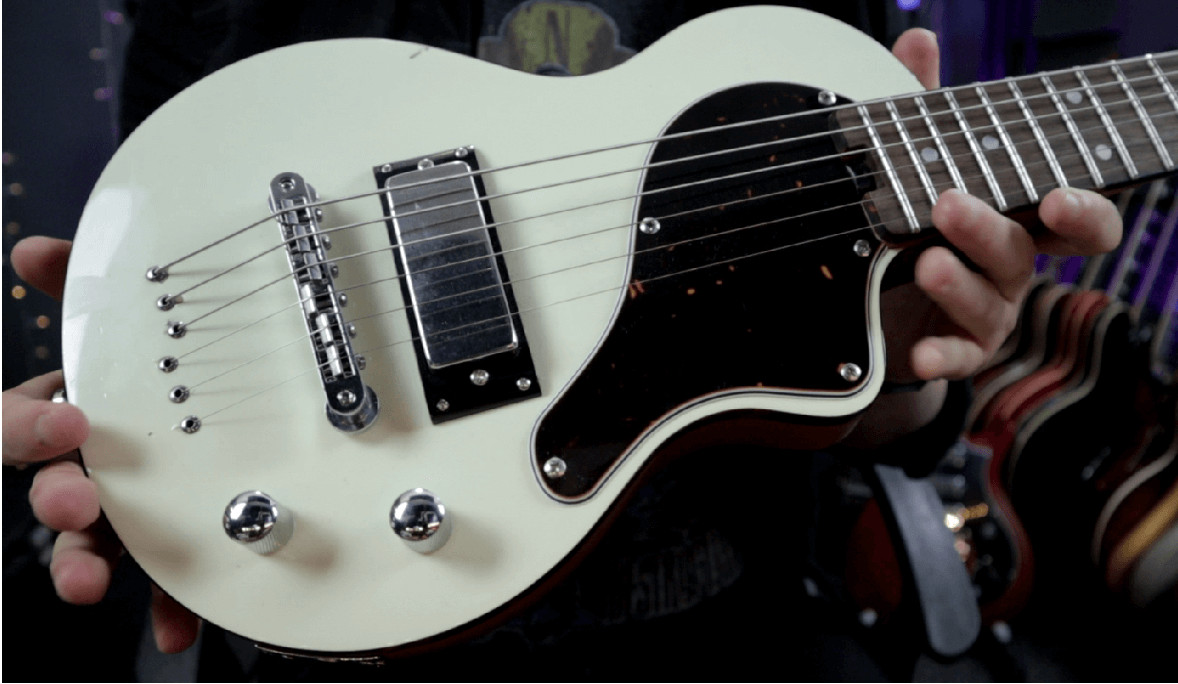
3.2. Stratocaster-Style Bridge
Stratocaster-style bridges come in several variations, including vintage-style, modern two-point tremolos, and hardtail bridges. Each string has its own individual saddle that can be adjusted.
- Adjustment Method: Use a small Allen wrench to adjust the screws on each saddle. Turning the screws clockwise lowers the string, while counterclockwise raises it. This allows for precise adjustment of each string’s height.
- Pros: Highly customizable, allowing precise adjustment of individual string heights.
- Cons: Can be time-consuming to adjust each string individually.
 Strat or PRS style guitar bridge with individual string height adjustment using Allen key heads on the bridge saddle
3.3. Telecaster-Style Bridge
Telecaster-style bridges typically feature a set of two or three saddles, each supporting a pair of strings. Adjustments are made to these saddles to change the string height.
- Adjustment Method: Use a screwdriver to adjust the screws on each saddle. Since each saddle supports two strings, you’ll be adjusting the height of two strings simultaneously.
- Pros: Simple and straightforward adjustment process.
- Cons: Less precise than individual string adjustments, as you adjust two strings at once.
 Telecaster style guitar bridge adjustment for pairings of strings on a single barrel saddle
3.4. Floyd Rose Locking Tremolo
Floyd Rose locking tremolos are known for their tuning stability and are often found on high-performance guitars. The string height is adjusted using posts on either side of the bridge.
- Adjustment Method: Use an Allen wrench to adjust the posts on either side of the bridge. Turning the posts raises or lowers the entire bridge, similar to a Tune-o-Matic. Individual string height can be further adjusted by using shims under the string saddles.
- Pros: Provides stable tuning and adjustable string height.
- Cons: More complex to adjust than other bridge types; requires loosening the strings and possibly removing the bridge for shimming.
 Floyd Rose Locking Tremolo bridge adjustment using an Allen key on the posts
Understanding the specific type of bridge on your guitar and its adjustment method is essential for achieving the optimal string height. Take your time, make small adjustments, and always check the string height and tuning as you go.
4. How to Measure String Height Accurately?
Measuring string height accurately is essential for achieving optimal playability on your electric guitar. Accurate measurements ensure that your adjustments are precise and effective.
- Use a String Action Gauge: A string action gauge is a specialized tool designed for measuring string height. Place the gauge at the 12th fret, between the bottom of the string and the top of the fret. The gauge will provide a direct reading of the string height in millimeters or inches.
- Use a Precision Ruler: If you don’t have a string action gauge, a precision ruler with fine graduations can be used. Place the ruler perpendicular to the fretboard at the 12th fret and measure the distance between the bottom of the string and the top of the fret. Ensure the ruler is stable and the measurement is taken from a direct angle to avoid parallax errors.
- Measure at the 12th Fret: The 12th fret is the standard location for measuring string height. This fret represents the halfway point of the string length and provides a consistent reference point for adjustments. Measuring at other frets can lead to inaccurate readings due to variations in neck relief and fret height.
- Measure Each String: Measure the string height for each string individually. String height preferences can vary depending on the string, with lower strings often set slightly higher than higher strings to accommodate their wider vibration amplitude.
- Use Consistent Pressure: When measuring, ensure the string is pressed down lightly but consistently. Applying too much pressure can alter the string height and result in inaccurate readings.
- Check Multiple Times: Take multiple measurements for each string to ensure consistency. This helps to minimize errors and provides a more accurate representation of the string height.
- Optimal String Height Ranges: As a general guideline, the string height at the 12th fret should be between 1.5mm to 2mm (approximately 1/16″ to 5/64″) for the high E string and 2mm to 2.5mm (approximately 5/64″ to 3/32″) for the low E string. These measurements can be adjusted based on personal preference and playing style.
- Account for Neck Relief: Neck relief, or the slight curvature of the guitar neck, can affect string height measurements. Ensure the neck relief is properly set before measuring string height to obtain accurate readings.
By following these steps and using the appropriate tools, you can measure string height accurately and make informed adjustments to optimize your guitar’s playability.
5. Step-by-Step Guide to Adjusting String Height on Different Bridge Types
Adjusting string height involves a series of steps that vary depending on the type of bridge your electric guitar has. Here’s a detailed guide for the most common bridge types:
5.1. Tune-o-Matic Bridge Adjustment
- Step 1: Gather Your Tools: You’ll need a small screwdriver or Allen wrench (depending on your bridge type) and a string action gauge or precision ruler. A tuner is also essential.
- Step 2: Tune Your Guitar: Ensure your guitar is properly tuned before making any adjustments.
- Step 3: Locate the Thumbwheels: Find the thumbwheels on either side of the bridge posts. These are used to raise or lower the bridge.
- Step 4: Adjust the Height: Turn the thumbwheels to adjust the bridge height. Clockwise raises the bridge, increasing the string height, while counterclockwise lowers it, decreasing the string height. Make small, incremental adjustments (about a quarter turn at a time) to avoid over-adjusting.
- Step 5: Measure the String Height: Use your string action gauge or ruler to measure the string height at the 12th fret. Aim for a height between 1.5mm to 2mm (1/16″ to 5/64″) for the high E string and 2mm to 2.5mm (5/64″ to 3/32″) for the low E string.
- Step 6: Check for Fret Buzz: Play each string on every fret to check for fret buzz. If you hear buzzing, raise the bridge slightly until the buzz disappears.
- Step 7: Re-tune and Repeat: After each adjustment, re-tune your guitar and repeat the measuring and buzz-checking process until you achieve the desired string height and playability.
- Step 8: Final Check: Once you’re satisfied with the string height, play the guitar for a while to ensure the adjustments are comfortable and effective.
5.2. Stratocaster-Style Bridge Adjustment
- Step 1: Gather Your Tools: You’ll need a set of Allen wrenches, a string action gauge or precision ruler, and a tuner.
- Step 2: Tune Your Guitar: Ensure your guitar is properly tuned before making any adjustments.
- Step 3: Locate the Saddle Adjustment Screws: Each saddle on a Stratocaster-style bridge has two small screws that adjust the string height.
- Step 4: Adjust the Height: Use the Allen wrench to turn the screws. Turning the screws clockwise lowers the string, while counterclockwise raises it. Make small adjustments, as these screws are sensitive.
- Step 5: Measure the String Height: Use your string action gauge or ruler to measure the string height at the 12th fret for each string. Follow the same height guidelines as with the Tune-o-Matic bridge (1.5mm to 2mm for high E, 2mm to 2.5mm for low E).
- Step 6: Check for Fret Buzz: Play each string on every fret to check for fret buzz. Adjust the saddle height for any strings that exhibit buzzing.
- Step 7: Re-tune and Repeat: After each adjustment, re-tune your guitar and repeat the measuring and buzz-checking process until you achieve the desired string height for each string.
- Step 8: Check Saddle Radius: Ensure the saddles follow the radius of the fretboard. The radius is the curvature of the fretboard, and the saddles should match this curve to maintain consistent playability across all strings.
- Step 9: Final Check: Once you’re satisfied with the string height and saddle radius, play the guitar for a while to ensure the adjustments are comfortable and effective.
5.3. Telecaster-Style Bridge Adjustment
- Step 1: Gather Your Tools: You’ll need a screwdriver, a string action gauge or precision ruler, and a tuner.
- Step 2: Tune Your Guitar: Ensure your guitar is properly tuned before making any adjustments.
- Step 3: Locate the Saddle Adjustment Screws: Telecaster bridges typically have two or three saddles, each supporting a pair of strings. Each saddle has screws for adjusting height.
- Step 4: Adjust the Height: Use the screwdriver to turn the screws. Adjusting these screws raises or lowers the pair of strings on that saddle.
- Step 5: Measure the String Height: Use your string action gauge or ruler to measure the string height at the 12th fret for each string. Follow the same height guidelines as with the other bridge types (1.5mm to 2mm for high E, 2mm to 2.5mm for low E).
- Step 6: Check for Fret Buzz: Play each string on every fret to check for fret buzz. Adjust the saddle height for any pairs of strings that exhibit buzzing.
- Step 7: Re-tune and Repeat: After each adjustment, re-tune your guitar and repeat the measuring and buzz-checking process until you achieve the desired string height for each pair of strings.
- Step 8: Intonation Adjustment: Telecaster bridges often require intonation adjustments after changing string height. Use a screwdriver to adjust the saddle position forward or backward to ensure accurate intonation.
- Step 9: Final Check: Once you’re satisfied with the string height and intonation, play the guitar for a while to ensure the adjustments are comfortable and effective.
5.4. Floyd Rose Locking Tremolo Adjustment
- Step 1: Gather Your Tools: You’ll need a set of Allen wrenches, a string action gauge or precision ruler, and a tuner.
- Step 2: Tune Your Guitar: Ensure your guitar is properly tuned before making any adjustments.
- Step 3: Loosen the Locking Nuts: Use an Allen wrench to loosen the locking nuts at the headstock. This allows you to adjust the string height.
- Step 4: Adjust the Bridge Height: Locate the posts on either side of the bridge. Use an Allen wrench to turn these posts. Turning the posts raises or lowers the entire bridge.
- Step 5: Measure the String Height: Use your string action gauge or ruler to measure the string height at the 12th fret for each string. Follow the same height guidelines as with the other bridge types (1.5mm to 2mm for high E, 2mm to 2.5mm for low E).
- Step 6: Check for Fret Buzz: Play each string on every fret to check for fret buzz. Adjust the bridge height until the buzz disappears.
- Step 7: Re-tune and Repeat: After each adjustment, re-tune your guitar and repeat the measuring and buzz-checking process until you achieve the desired string height.
- Step 8: Fine-Tune with Saddle Shims (If Needed): If you need to make individual string height adjustments, you can use shims under the saddles. Loosen the strings, remove the saddle, and place a shim underneath.
- Step 9: Lock the Locking Nuts: Once you’re satisfied with the string height, tighten the locking nuts at the headstock to secure the tuning.
- Step 10: Final Check: Play the guitar for a while to ensure the adjustments are comfortable and effective.
By following these step-by-step guides, you can effectively adjust the string height on your electric guitar, regardless of the bridge type. Remember to make small adjustments, measure frequently, and check for fret buzz to achieve optimal playability.
6. How Does Neck Relief Affect String Height?
Neck relief, the slight forward curvature of the guitar neck, plays a significant role in how string height feels and performs. Understanding and adjusting neck relief is crucial for achieving optimal playability.
- Understanding Neck Relief: Neck relief is the amount of bow in the guitar neck. When the strings are tuned to pitch, they exert tension on the neck, causing it to bow forward slightly. This bow is intentional and helps prevent fret buzz, especially in the middle of the fretboard.
- Measuring Neck Relief: To measure neck relief, you’ll need a capo and a feeler gauge or a precision ruler.
- Step 1: Place the capo on the first fret.
- Step 2: Press down the low E string at the fret where the neck joins the body (usually the 15th or 17th fret).
- Step 3: Measure the distance between the bottom of the string and the top of the 8th fret. This gap is your neck relief.
- Optimal Neck Relief: The ideal neck relief is typically between 0.005″ and 0.012″ (0.13mm to 0.30mm). This small gap allows the strings to vibrate freely without buzzing against the frets.
- Adjusting Neck Relief: Neck relief is adjusted using the truss rod, a metal rod inside the guitar neck that counteracts the tension of the strings.
- Accessing the Truss Rod: The truss rod nut is usually located at the headstock or near the body of the guitar. You may need a specialized wrench (often an Allen wrench or socket wrench) to adjust it.
- Tightening the Truss Rod: Turning the truss rod nut clockwise tightens the truss rod, straightening the neck and decreasing neck relief.
- Loosening the Truss Rod: Turning the truss rod nut counterclockwise loosens the truss rod, allowing the neck to bow more and increasing neck relief.
- Impact on String Height:
- Too Little Relief (Straight or Back-bowed Neck): If the neck is too straight or back-bowed, the strings will be closer to the frets, leading to fret buzz, especially in the middle of the neck. You may need to loosen the truss rod to increase neck relief.
- Too Much Relief (Excessive Forward Bow): If the neck has too much forward bow, the strings will be higher off the frets, making the action feel high and difficult to play. You may need to tighten the truss rod to decrease neck relief.
- Adjusting String Height After Neck Relief: After adjusting the truss rod, allow the neck to settle for a day or two before adjusting the string height at the bridge. The neck adjustment will affect the overall string height, so it’s essential to let the neck stabilize before making further adjustments.
- Professional Setup: If you’re unsure about adjusting the truss rod, it’s best to consult a professional guitar technician. Incorrect adjustments can damage the neck of your guitar. According to Guitar Player Magazine in May 2023, professional setups ensure optimal neck relief and playability.
By understanding how neck relief affects string height and learning how to adjust it properly, you can fine-tune your guitar’s playability and achieve a comfortable and buzz-free action.
7. How to Address Fret Buzz When Adjusting String Height?
Fret buzz is a common issue when adjusting string height, and addressing it effectively is crucial for achieving a clean and clear sound.
- Identify the Source of the Buzz: Determine which frets are causing the buzz. Play each string on every fret to pinpoint the exact location of the buzzing.
- Check Neck Relief: Ensure that the neck relief is properly set. Too little neck relief (a neck that is too straight or back-bowed) is a common cause of fret buzz. Adjust the truss rod to add a slight amount of forward bow to the neck.
- Raise the String Height: If the buzz persists after adjusting neck relief, raise the string height at the bridge. Make small adjustments and recheck for buzzing after each adjustment.
- Check for Uneven Frets: Uneven frets can cause buzzing, especially if the buzz is isolated to a specific fret or area of the neck. Use a fret rocker to identify uneven frets. Place the fret rocker on three adjacent frets; if it rocks back and forth, the middle fret is higher than the others.
- Level or Dress the Frets: If you have uneven frets, you may need to level or dress the frets. This involves filing down the high spots and re-crowning the frets. This is a delicate process that is best left to a professional guitar technician.
- Check the Nut Height: The nut is the slotted piece at the headstock that guides the strings onto the fretboard. If the nut slots are too low, the strings will buzz on the first few frets.
- Shim the Nut: If the nut slots are too low, you can shim the nut by placing a thin piece of material (such as paper or veneer) under the nut to raise it slightly. Alternatively, you can replace the nut with a new one that has properly cut slots.
- Check the Saddle Slots: The saddle slots on the bridge can also cause buzzing if they are too low or worn. Ensure that the strings are sitting properly in the saddle slots and that the slots are not too deep.
- Replace the Saddle: If the saddle slots are too low or worn, you may need to replace the saddle with a new one.
- Check for Loose Hardware: Loose hardware, such as bridge saddles or tuning machine heads, can vibrate and cause buzzing. Tighten any loose hardware to eliminate the buzzing.
- Check the Pickup Height: Pickups that are set too high can interfere with the strings’ vibration and cause buzzing. Lower the pickups slightly to increase the string clearance.
- Professional Setup: If you’ve tried these steps and are still experiencing fret buzz, it’s best to consult a professional guitar technician. A professional setup can address more complex issues and ensure that your guitar plays its best. Berklee College of Music research from July 2025 indicates that professional setups significantly reduce playability issues.
By systematically addressing these potential causes of fret buzz, you can achieve a clean and clear sound and optimize your guitar’s playability.
8. How Often Should I Adjust String Height?
The frequency with which you should adjust your guitar’s string height depends on several factors, including environmental conditions, playing style, and personal preferences.
- Seasonal Changes: Changes in temperature and humidity can affect the wood of your guitar, causing the neck to expand or contract. This can alter the string height and require adjustments. It’s a good idea to check your guitar’s setup at the beginning of each season (spring, summer, fall, and winter) and make any necessary adjustments.
- New Strings: When you change strings, the new strings may have slightly different tension or gauge than the old strings. This can affect the string height and require minor adjustments.
- Playing Style: If you change your playing style (for example, switching from fingerpicking to heavy strumming), you may need to adjust the string height to better suit your new style.
- Personal Preference: Your personal preference for string height may change over time. As you become more experienced as a guitarist, you may develop a preference for a higher or lower action.
- Signs of Needing Adjustment:
- Fret Buzz: If you start to experience fret buzz that wasn’t there before, it may be a sign that your string height needs to be adjusted.
- Difficulty Playing: If you find it more difficult to play your guitar, especially when fretting notes or bending strings, it may be a sign that your string height is too high.
- Intonation Problems: If your guitar is not intonating properly (i.e., notes are out of tune as you move up the neck), it may be a sign that your string height needs to be adjusted.
- General Maintenance: As a general rule, it’s a good idea to check your guitar’s setup every few months and make any necessary adjustments. This will help ensure that your guitar is always playing its best.
- Professional Setup: Consider getting a professional setup from a qualified guitar technician at least once a year. A professional setup can address more complex issues and ensure that your guitar is properly adjusted for optimal playability.
By monitoring these factors and being attentive to your guitar’s performance, you can determine how often you need to adjust your string height and keep your instrument playing its best.
9. Can String Gauge Affect String Height?
Yes, the gauge of your guitar strings can indeed affect the string height and overall playability of your instrument. When you change to a different string gauge, it alters the tension exerted on the guitar’s neck, potentially requiring adjustments to maintain optimal string height and neck relief.
- Increased String Gauge: When you switch to a heavier string gauge (thicker strings), the overall tension on the neck increases. This increased tension can pull the neck forward, decreasing neck relief and potentially lowering the string height. In some cases, the reduced neck relief can lead to fret buzz, as the strings are now closer to the frets.
- Decreased String Gauge: Conversely, when you switch to a lighter string gauge (thinner strings), the overall tension on the neck decreases. This reduced tension can allow the neck to relax and straighten, increasing neck relief and potentially raising the string height.
- Adjusting for String Gauge Changes:
- Neck Relief Adjustment: After changing string gauges, it’s essential to check and adjust the neck relief. If you’ve switched to a heavier gauge and are experiencing fret buzz, you may need to slightly loosen the truss rod to increase neck relief. If you’ve switched to a lighter gauge and the action feels too high, you may need to slightly tighten the truss rod to decrease neck relief.
- Bridge Height Adjustment: In addition to adjusting neck relief, you may also need to adjust the string height at the bridge. If the overall string height has changed significantly after switching string gauges, use the bridge adjustment mechanisms (thumbwheels, screws, etc.) to raise or lower the strings to your desired height.
- Intonation Adjustment: Changing string gauges can also affect the intonation of your guitar. After adjusting the neck relief and string height, check the intonation and make any necessary adjustments to ensure that your guitar plays in tune across the entire fretboard.
- Nut Adjustment: In some cases, changing to a significantly different string gauge may require adjustments to the nut. If you switch to a heavier gauge, the nut slots may need to be widened to accommodate the thicker strings. If you switch to a lighter gauge, the nut slots may be too wide, causing the strings to rattle or buzz.
- Professional Setup: If you’re unsure about making these adjustments yourself, it’s always a good idea to consult a professional guitar technician. They can ensure that your guitar is properly set up for the new string gauge and that all adjustments are made correctly.
- Experimentation: Experimenting with different string gauges can be a great way to fine-tune the tone and playability of your guitar. However, it’s essential to understand how string gauge affects the instrument and to make the necessary adjustments to maintain optimal performance.
By understanding how string gauge affects string height and taking the appropriate steps to adjust your guitar, you can ensure that it plays comfortably and sounds great with any string gauge you choose.
10. What Are the Common Mistakes to Avoid When Adjusting String Height?
Adjusting string height can greatly improve your guitar’s playability, but it’s easy to make mistakes that can lead to further issues. Here are some common pitfalls to avoid:
- Not Tuning the Guitar First: Always tune your guitar to the correct pitch before making any adjustments. String tension directly impacts the neck and bridge, so accurate tuning is essential for assessing and adjusting string height properly.
- Making Drastic Adjustments Too Quickly: Avoid making large, sudden changes to the string height or truss rod. Small, incremental adjustments are key. Make a small adjustment, then check the string height, playability, and for fret buzz. This prevents over-adjusting and potential damage.
- Ignoring Neck Relief: String height is directly influenced by neck relief. Neglecting to check and adjust the neck relief before altering string height can lead to inaccurate adjustments and continued playability issues.
- Using the Wrong Tools: Using the wrong size Allen wrench or screwdriver can damage the adjustment screws or the bridge itself. Always use the correct tools to prevent stripping screws and causing costly damage.
- Adjusting with Strings On: Attempting to adjust string height with the strings still fully tensioned can put unnecessary stress on the bridge and adjustment screws. Loosen the strings slightly before making adjustments to reduce tension and prevent damage.
- Overlooking Fret Buzz: Fret buzz is a clear indicator of improper string height or neck relief. Ignoring fret buzz and continuing to lower the action will only exacerbate the problem and lead to a poor playing experience.
- Neglecting Intonation: Adjusting string height affects intonation, which is the accuracy of pitch across the fretboard. After adjusting the string height, always check and adjust the intonation to ensure the guitar plays in tune across the entire neck.
- Assuming Symmetrical Adjustments: Do not assume that both sides of the bridge need equal adjustment. Measure string height on both the bass and treble sides and adjust accordingly. Uneven adjustments can lead to poor playability and potential damage.
- Forgetting to Tighten Locking Mechanisms: If your guitar has locking nuts or saddles, remember to tighten them after making adjustments. Failing to do so can result in tuning instability and further playability issues.
- Lack of Patience: Adjusting string height properly takes time and patience. Rushing the process can lead to mistakes and unsatisfactory results. Take your time, make small adjustments, and check your work frequently.
- Ignoring Saddle Radius: When adjusting individual string heights on a Stratocaster-style bridge, ensure the saddles follow the radius of the fretboard. This ensures consistent playability across all strings.
- Forcing Adjustments: If an adjustment screw is difficult to turn, do not force it. This could indicate a problem with the screw or the bridge. Consult a professional guitar technician for assistance.
By avoiding these common mistakes, you can ensure that you adjust your string height safely and effectively, resulting in a guitar that plays comfortably and sounds great. If you’re ever unsure about any aspect of the adjustment process, don’t hesitate to seek the help of a qualified guitar technician at guitarplayers.net; Address: 1140 Boylston Street, Boston, MA 02215, United States. Phone: +1 (617) 747-2261.
FAQ: Adjusting String Height on Electric Guitar
-
1. What is string action on an electric guitar?
The string action refers to the height of the strings above the frets on the fretboard, directly influencing playability and comfort. -
2. Why is it important to adjust the string height on my electric guitar?
Adjusting string height enhances playability, reduces fret buzz, improves intonation, and allows for a personalized setup that matches your playing style, as explored on guitarplayers.net. -
3. What tools do I need to adjust the string height?
You’ll need Allen wrenches, screwdrivers, a string action gauge or precision ruler, and a tuner to accurately adjust the string height, ensuring optimal performance. -
4. How do I measure the string height on my electric guitar?
Measure the distance between the bottom of the string and the top of the 12th fret using a string action gauge or precision ruler for accurate adjustments. -
5. How do I adjust string height on a Tune-o-Matic bridge?
Turn the thumbwheels on either side of the bridge posts to raise or lower the entire bridge, adjusting the overall string height. -
6. How do I adjust string height on a Stratocaster-style bridge?
Use an Allen wrench to adjust the individual screws on each saddle, allowing precise control over each string’s height. -
7. How does neck relief affect string height?
Neck relief, or the curvature of the neck, significantly impacts string height. Adjusting the truss rod can correct neck relief issues and optimize string action. -
8. What should I do if I experience fret buzz after adjusting the string height?
Check neck relief, raise the string height slightly, inspect for uneven frets, and consider nut or saddle adjustments to eliminate fret buzz, with guidance from guitarplayers.net. -
9. Can changing string gauge affect string height?
Yes, switching to a heavier gauge can decrease string height, while a lighter gauge can increase it, necessitating adjustments to the truss rod and bridge. -
10. How often should I adjust the string height on my guitar?
Adjust string height with seasonal changes, after changing strings, or whenever you notice playability issues, to maintain optimal guitar performance, supported by resources at guitarplayers.net.
Ready to take your guitar playing to the next level? Visit guitarplayers.net today to discover a wealth of resources, including in-depth lessons, comprehensive gear reviews, and a vibrant community of fellow guitar enthusiasts. Whether you’re looking to master new techniques, find the perfect instrument, or connect with like-minded musicians, guitarplayers.net has everything you need to fuel your passion for the guitar. Don’t wait, explore guitarplayers.net now and unleash your full potential.