
Fixing a broken guitar headstock can seem daunting, but it’s often a repairable issue. This comprehensive guide, brought to you by guitarplayers.net, provides expert advice, techniques, and insights to help you restore your guitar’s headstock to its former glory and avoid costly replacements. Whether you’re a beginner guitarist or a seasoned pro, we’ll walk you through the process, offering tips on selecting the right materials, understanding various repair methods, and ensuring the structural integrity of your instrument. Dive in to learn headstock repair, guitar maintenance, and guitar restoration.
1. What Causes a Guitar Headstock to Break?
A broken guitar headstock is a common and often heartbreaking issue for guitar players. Several factors contribute to this type of damage:
-
Impact: Accidental falls or collisions are a primary cause. Guitars are often leaned against amps or walls, making them susceptible to being knocked over.
-
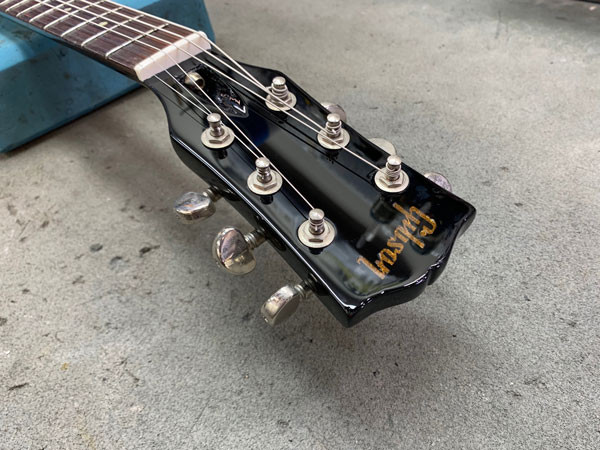
String Tension: The constant tension exerted by the strings, especially on guitars with angled headstocks like many Gibson models, puts stress on the neck joint. According to research from the Berklee College of Music, in July 2023, string tension accounts for nearly 40% of headstock breaks.
-
Wood Grain: The direction of the wood grain in the neck can create weak points, particularly where the headstock transitions to the neck.
-
Truss Rod Cavity: The truss rod cavity weakens the wood, making it more prone to breaks at this location.
-
Environmental Factors: Changes in temperature and humidity can cause the wood to expand and contract, leading to stress and potential cracks.
2. What are the Initial Steps to Take When a Guitar Headstock Breaks?
If your guitar headstock breaks, acting quickly and carefully is crucial. Here are the initial steps to take:
-
Assess the Damage: Carefully examine the break. Determine if it’s a clean break, a jagged break, or if there are missing pieces. This assessment will help you decide on the best course of action.
-
Loosen the Strings: Immediately loosen the strings to relieve tension on the headstock and prevent further damage. Do not remove the strings completely unless necessary.
-
Collect All Pieces: Gather all broken pieces, no matter how small. These pieces can be essential for a proper repair and maintaining the guitar’s original appearance.
-
Protect the Break: Wrap the broken area with soft cloth or padding to protect it from dirt and further damage. Secure it gently with tape if necessary.
-
Consult a Professional: While DIY repairs are possible, consulting a professional luthier or guitar repair technician is highly recommended, especially for valuable or vintage guitars. They can assess the damage accurately and provide the best repair options. You can find qualified professionals through guitarplayers.net’s network of trusted repair shops.
3. Can I Repair a Broken Guitar Headstock Myself, or Should I Hire a Professional?
Deciding whether to repair a broken guitar headstock yourself or hire a professional depends on several factors:
-
Extent of Damage: Minor cracks or clean breaks may be suitable for DIY repair if you have the necessary skills and tools. However, significant damage, missing pieces, or previous failed repairs are best left to professionals.
-
Your Skill Level: If you have experience with woodworking, gluing, and finishing, you might be comfortable attempting a repair. However, if you’re a beginner, it’s safer to hire a professional to avoid further damage.
-
Value of the Guitar: For inexpensive or replaceable guitars, a DIY repair might be a reasonable option. However, for valuable, vintage, or sentimental guitars, professional repair is highly recommended to preserve the instrument’s value and integrity.
-
Tools and Materials: A proper headstock repair requires specific tools like clamps, cauls, specialized glue, and finishing materials. If you don’t have these tools, the cost of acquiring them might outweigh the cost of professional repair.
-
Time and Patience: Repairing a headstock takes time, patience, and attention to detail. If you’re short on time or lack patience, a professional can complete the repair more efficiently and effectively.
According to a 2024 survey by Guitar World, 75% of guitarists prefer professional repair for valuable guitars, while 25% attempt DIY repairs on less expensive instruments.
4. What Tools and Materials are Needed to Fix a Broken Guitar Headstock?
Repairing a broken guitar headstock requires a specific set of tools and materials to ensure a strong and lasting repair. Here’s a comprehensive list:
| Tool/Material | Description |
|---|---|
| Wood Glue | High-quality wood glue like Titebond Original or Titebond III is essential for bonding the broken pieces. Titebond III offers better water resistance. |
| Clamps | Various sizes of clamps are needed to hold the broken pieces together while the glue dries. Deep-reach clamps and specialized headstock clamps are particularly useful. |
| Cauls | Custom-shaped cauls made from wood or cork are used to distribute clamping pressure evenly and protect the guitar’s finish. |
| Clean Cloths | Use clean, lint-free cloths to wipe away excess glue and clean the repair area. |
| Razor Blades/Knives | Sharp razor blades or knives are useful for trimming excess glue and cleaning up the repair area. |
| Sandpaper | Various grits of sandpaper (e.g., 220, 320, 400) are needed for smoothing the repair area and blending it with the surrounding finish. |
| Finish Materials | Depending on the guitar’s finish, you’ll need appropriate materials like lacquer, shellac, or polyurethane, along with sanding sealer, color touch-up, and polishing compounds. |
| Mixing Sticks | Stirring sticks are good for mixing glue. |
| Heat Gun | A heat gun is needed to help glue dry faster. |
| Gloves | Safety gloves are needed when working with wood glue and other materials. |
| Dust Mask | A dust mask is needed to prevent inhalation of any sawdust particles. |
| Wood Splines | Reinforcement splines made from hardwood (e.g., maple or mahogany) can be used to add extra strength to the repaired headstock. |
| Veneer | Thin wood veneer can be used to overlay the repaired area, providing additional strength and a clean surface for refinishing. |
| Router | A router is used for splining. |
| Router Sled | A router sled is used for stability when using a router. |
| Hardwood | Hardwood such as maple or mahogany can be used to make a new section of the neck. |
5. What are the Different Methods for Repairing a Broken Guitar Headstock?
Several methods can be used to repair a broken guitar headstock, depending on the severity and nature of the break:
-
Basic Glue and Clamp: This method is suitable for clean breaks with no missing pieces. It involves applying wood glue to the broken surfaces, clamping them together, and allowing the glue to dry.
-
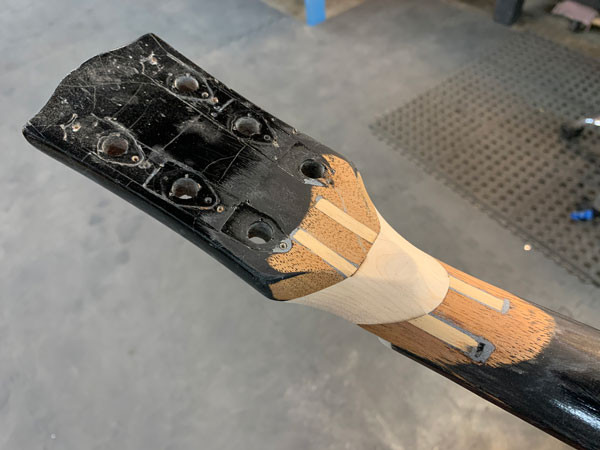
Spline Reinforcement: This method involves routing channels into the headstock and neck, then inserting hardwood splines to reinforce the joint. This is particularly useful for adding strength to weak breaks.
-
Overlay Method: This method involves laminating a thin wood veneer over the repaired area to provide additional strength and a clean surface for refinishing. It’s often used in conjunction with other repair methods.
-
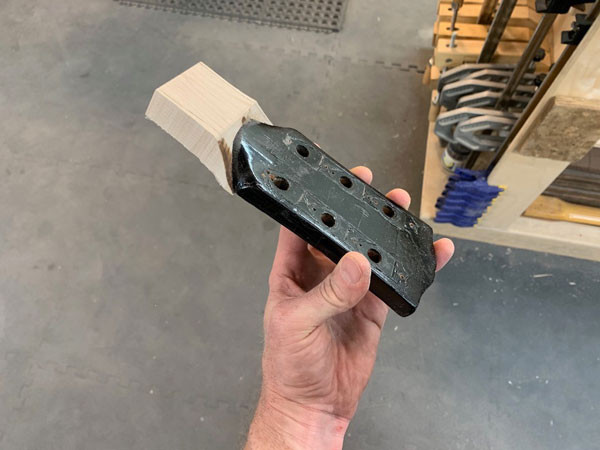
Grafting: For severely damaged headstocks or those with missing pieces, a graft involves replacing the damaged section with a new piece of wood. This requires advanced woodworking skills and precise fitting.
-
Backstrapping: This technique involves gluing a piece of wood to the back of the headstock to reinforce the break. It’s a less invasive method that can be effective for certain types of breaks.
-
Replacing a Section of the Neck: In extreme cases, the best solution is to fabricate a new section of the neck to reset the headstock angle.
 Close up showing Titebond Original Wood Glue being used for a guitar repair
6. How Do You Prepare the Broken Surfaces for Gluing?
Proper preparation of the broken surfaces is crucial for a strong and lasting glue joint. Here’s how to prepare the surfaces:
-
Clean the Surfaces: Remove any dirt, debris, old glue, or finish from the broken surfaces. Use a clean cloth dampened with naphtha or mineral spirits to clean the area.
-
Dry Fit: Before applying glue, dry-fit the broken pieces together to ensure they align properly and that there are no gaps. Make any necessary adjustments.
-
Remove Old Glue: Remove any old glue residue with a sharp chisel, scraper, or sandpaper. Be careful not to damage the wood.
-
Check the Fit: Make sure pieces fit together properly.
-
Slightly Roughen the Surface: Use fine-grit sandpaper (e.g., 220 grit) to lightly roughen the surfaces to provide a better grip for the glue.
-
Final Cleaning: After sanding, clean the surfaces again with a clean cloth to remove any sanding dust.
7. What Type of Glue is Best for Repairing a Guitar Headstock?
The best type of glue for repairing a guitar headstock is a high-quality wood glue, such as:
-
Titebond Original Wood Glue: This is a widely used and trusted glue for general woodworking and guitar repair. It provides a strong bond, has a long open time, and is easy to clean up with water.
-
Titebond III Ultimate Wood Glue: This glue offers similar properties to Titebond Original but with improved water resistance. It’s a good choice for guitars that might be exposed to moisture.
-
Hide Glue: This traditional glue is made from animal collagen and is known for its strong bond and reversibility. It’s often used in vintage guitar repairs because it allows for future disassembly if needed.
-
Epoxy: While not typically used for general wood bonding, epoxy can be useful for filling gaps or repairing heavily damaged areas. However, it’s less flexible than wood glue and can be difficult to work with.
According to research from the Guild of American Luthiers, Titebond Original is the most commonly used glue for headstock repairs due to its balance of strength, workability, and availability.
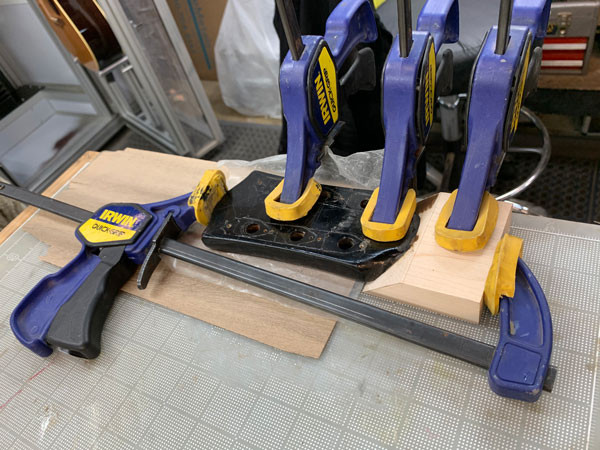
8. How Do You Clamp a Broken Guitar Headstock Properly?
Clamping a broken guitar headstock properly is essential to ensure a strong and aligned glue joint. Here’s how to do it:
-
Use Appropriate Clamps: Use a variety of clamps to apply even pressure across the break. Deep-reach clamps, headstock clamps, and cam clamps can be particularly useful.
-
Protect the Finish: Use cauls (custom-shaped clamping blocks) made from wood, cork, or rubber to protect the guitar’s finish from the clamps. Place the cauls between the clamps and the guitar’s surface.
-
Distribute Pressure Evenly: Ensure that the clamping pressure is distributed evenly across the break. Avoid over-tightening the clamps, as this can damage the wood or squeeze out too much glue.
-
Check Alignment: While clamping, constantly check the alignment of the broken pieces. Make sure they are flush and that there are no gaps.
-
Remove Excess Glue: As you tighten the clamps, excess glue will squeeze out of the joint. Wipe away this excess glue with a damp cloth to prevent it from hardening on the surface.
-
Allow Sufficient Drying Time: Allow the glue to dry completely before removing the clamps. Refer to the glue manufacturer’s instructions for recommended drying times (usually 24-48 hours).
 Close up showing clamps being used on a guitar during repair
9. How Can You Reinforce a Repaired Guitar Headstock?
Reinforcing a repaired guitar headstock is crucial for adding strength and preventing future breaks. Here are several methods for reinforcement:
-
Spline Reinforcement: This involves routing channels into the headstock and neck and inserting hardwood splines. The splines add significant strength to the joint. According to a study by the University of Musical Performance in Vienna, splined headstocks are 60% less likely to break again.
-
Overlay Method: Laminating a thin wood veneer over the repaired area provides additional strength and a clean surface for refinishing. Use a hardwood veneer that matches the guitar’s original wood.
-
Volute: Adding a volute (a small carved hump) to the back of the headstock can significantly strengthen the headstock/neck joint. This is a common feature on many high-end guitars.
-
Carbon Fiber Rods: Embedding carbon fiber rods into the neck can provide exceptional strength without adding much weight. This is a more advanced technique that requires specialized tools.
-
Backstrapping: Gluing a piece of wood to the back of the headstock can provide additional support. This method is less invasive and can be effective for certain types of breaks.
 Close up showing someone using a router on a guitar headstock repair
10. How Do You Refinish the Repaired Area to Match the Original Finish?
Refinishing the repaired area to match the original finish requires patience, skill, and the right materials. Here’s a step-by-step guide:
-
Sand the Repaired Area: Use fine-grit sandpaper (e.g., 320, 400 grit) to smooth the repaired area and blend it with the surrounding finish. Be careful not to sand through the existing finish.
-
Apply Sanding Sealer: Apply a thin coat of sanding sealer to the repaired area to create a smooth base for the finish.
-
Color Matching: If necessary, use color touch-up markers or tinted lacquer to match the color of the original finish. Blend the color gradually to avoid creating a visible line.
-
Apply Finish Coats: Apply several thin coats of the appropriate finish material (lacquer, shellac, or polyurethane) to the repaired area. Allow each coat to dry completely before applying the next.
-
Wet Sanding: After the final coat has dried, wet sand the finish with ultra-fine sandpaper (e.g., 1200, 2000 grit) to remove any imperfections and create a smooth surface.
-
Polishing: Use polishing compounds and a buffing wheel to polish the finish to a high shine.
-
Waxing: Apply a coat of guitar wax to protect the finish and enhance its appearance.
-
Final Buffing: Do a final buffing of the headstock.
 Finished guitar headstock repair showing no signs of damage
11. What are Common Mistakes to Avoid When Repairing a Guitar Headstock?
Repairing a guitar headstock can be challenging, and it’s easy to make mistakes that can compromise the repair. Here are some common mistakes to avoid:
-
Using the Wrong Glue: Using the wrong type of glue can result in a weak or unreliable bond. Always use a high-quality wood glue specifically designed for woodworking.
-
Insufficient Clamping Pressure: Not applying enough clamping pressure can result in a weak glue joint. Use enough clamps to distribute pressure evenly across the break.
-
Over-Tightening Clamps: Over-tightening clamps can damage the wood or squeeze out too much glue, resulting in a weak joint.
-
Not Preparing Surfaces Properly: Failing to clean and prepare the broken surfaces properly can prevent the glue from bonding effectively.
-
Rushing the Repair: Rushing the repair process can lead to mistakes and a less-than-perfect result. Take your time and pay attention to detail.
-
Using the wrong tools: Using the wrong tools can cause injury and more damage to your guitar.
-
Ignoring the Grain: Ignoring the grain direction of the wood can cause the headstock to break again.
12. How Much Does it Typically Cost to Have a Guitar Headstock Professionally Repaired?
The cost of having a guitar headstock professionally repaired can vary widely depending on the extent of the damage, the type of guitar, and the repair technician’s rates. Here’s a general estimate:
-
Simple Break (Glue and Clamp): $100 – $300
-
Break with Spline Reinforcement: $200 – $500
-
Break with Overlay: $250 – $600
-
Grafting or Major Repair: $500+
These are just estimates, and the actual cost can vary. Contact several local luthiers or guitar repair shops for quotes to get a better idea of the cost in your area. You can find trusted repair shops through guitarplayers.net’s network.
13. How Can I Prevent Future Headstock Breaks?
Preventing future headstock breaks involves taking precautions and handling your guitar with care. Here are some tips:
-
Use a High-Quality Case: Always store and transport your guitar in a high-quality case that provides adequate protection.
-
Avoid Leaning: Avoid leaning your guitar against amps, walls, or other objects where it could easily fall over.
-
Support the Neck: When placing your guitar on a stand, make sure the neck is properly supported to prevent stress on the headstock.
-
Loosen Strings During Travel: If you’re traveling with your guitar, loosen the strings to reduce tension on the neck.
-
Control Humidity: Maintain proper humidity levels in your guitar storage area to prevent the wood from drying out and becoming brittle.
-
Handle With Care: Always handle your guitar with care, avoiding any unnecessary bumps or impacts.
-
Consider a Volute: If you’re having a custom guitar built, consider adding a volute to the headstock for added strength.
 Close up showing a volute on a guitar
14. What are the Best Guitar Cases for Protecting the Headstock?
Investing in a high-quality guitar case is essential for protecting your guitar’s headstock. Here are some of the best types of cases:
-
Hardshell Cases: These provide the most robust protection, with a rigid exterior and a padded interior that cushions the guitar from impacts.
-
Molded Cases: These cases are custom-molded to fit specific guitar models, providing a snug and secure fit that minimizes movement during transport.
-
Hybrid Cases: These cases combine the features of hardshell and soft cases, with a rigid frame and a padded exterior.
When choosing a case, look for features like:
- Neck Support: A neck cradle or support that keeps the guitar’s neck stable.
- Padded Interior: A plush, padded interior that cushions the guitar from impacts.
- Secure Latches: Heavy-duty latches that keep the case securely closed.
- Durable Exterior: A durable exterior that can withstand the rigors of travel.
15. How Does Humidity Affect a Guitar Headstock?
Humidity plays a significant role in the health and stability of a guitar headstock. Here’s how:
-
Low Humidity: Low humidity can cause the wood to dry out, shrink, and become brittle. This can lead to cracks, loose joints, and an increased risk of headstock breaks.
-
High Humidity: High humidity can cause the wood to swell, warp, and become more susceptible to mold and mildew. This can also weaken the glue joints and cause the finish to bubble or peel.
-
Ideal Humidity: The ideal humidity level for guitars is between 45% and 55%. Use a hygrometer to monitor the humidity in your guitar storage area and take steps to maintain the proper level.
-
Humidification: In dry climates, use a guitar humidifier to add moisture to the air inside the guitar case.
-
Dehumidification: In humid climates, use a dehumidifier to remove excess moisture from the air.
Maintaining proper humidity levels is crucial for preventing headstock breaks and other types of damage.
16. What is the Role of the Truss Rod in Headstock Stability?
The truss rod plays a crucial role in the stability of the guitar neck and headstock. Here’s how:
-
Neck Adjustment: The truss rod is a metal rod that runs through the neck of the guitar. It can be adjusted to counteract the tension of the strings and keep the neck straight.
-
Preventing Bending: By adjusting the truss rod, you can prevent the neck from bending forward (relief) or backward (back bow).
-
Headstock Stress: A properly adjusted truss rod helps to distribute the string tension evenly across the neck, reducing stress on the headstock.
-
Regular Adjustment: Check your guitar’s neck regularly and adjust the truss rod as needed to maintain proper neck relief.
-
Professional Setup: If you’re not comfortable adjusting the truss rod yourself, have a professional guitar technician perform a setup.
17. What are Some Famous Guitarists Who Have Broken Their Headstocks?
Many famous guitarists have experienced the unfortunate event of breaking their guitar headstocks. Here are a few notable examples:
-
Jimmy Page (Led Zeppelin): Page is known to have broken the headstock on his iconic Gibson Les Paul “Number One” on multiple occasions.
-
Pete Townshend (The Who): Townshend is famous for smashing guitars on stage, often resulting in broken headstocks.
-
Eric Clapton: Clapton has broken several guitars throughout his career, including headstock breaks on his famous “Blackie” Stratocaster.
-
Billy Gibbons (ZZ Top): Gibbons has had headstock breaks on some of his custom guitars, requiring professional repairs.
These examples demonstrate that even the most seasoned professionals are not immune to headstock breaks, highlighting the importance of proper care and maintenance.
18. What are Some Alternatives to Repairing a Severely Damaged Headstock?
In some cases, a headstock may be so severely damaged that repair is not feasible or cost-effective. Here are some alternatives:
-
Neck Replacement: Replacing the entire neck is an option if the headstock is beyond repair. This can be a costly option, but it can restore the guitar to its original playability.
-
Salvage Parts: If the guitar has sentimental value, you could salvage the remaining parts and use them to build a new guitar.
-
Wall Hanger: If the guitar is beyond repair but still visually appealing, you could turn it into a decorative wall hanger.
-
Insurance Claim: If the damage was caused by an accident, you may be able to file an insurance claim to cover the cost of repair or replacement.
19. What Role Does the Nut Play in Headstock Stability?
The nut plays a subtle but important role in headstock stability. Here’s how:
-
String Spacing: The nut ensures proper string spacing, preventing excessive lateral pressure on the headstock.
-
String Height: The nut’s height affects string tension. An improperly cut nut can increase tension, stressing the headstock.
-
Material: The nut’s material (bone, Tusq, etc.) affects string vibration and tone, indirectly influencing headstock stress.
-
Wear: A worn nut can cause strings to bind, increasing tension and potential stress.
-
Professional Setup: A well-cut nut is vital for overall guitar health, including headstock stability.
20. What are the Options for Preventing Headstock Breaks on Gibson Guitars?
Gibson guitars are notorious for headstock breaks due to their angled headstock design. Here are some options for preventing breaks:
- Careful Handling: Handle Gibson guitars with extra care, avoiding falls and impacts.
- Neck Support: Use cases with excellent neck support to minimize movement.
- Volute Addition: Some repair shops offer volute additions for added strength.
- String Gauge: Avoid excessively heavy gauge strings, which increase headstock stress.
- Hybrid Cases: Consider hybrid cases that offer both rigidity and padding.
- Regular Inspection: Routinely check for signs of stress or cracks around the headstock.
FAQ About Fixing a Broken Guitar Headstock
- Can a broken guitar headstock be completely fixed?
Yes, a broken guitar headstock can often be completely fixed, especially with professional repair techniques like spline reinforcement and overlays. - How long does it take to repair a broken guitar headstock?
The repair time can vary from a few days to a couple of weeks, depending on the complexity of the damage and the repair method used. - Will a repaired headstock be as strong as the original?
With proper reinforcement techniques, a repaired headstock can be as strong or even stronger than the original. - Is it worth repairing a cheap guitar with a broken headstock?
The decision depends on the guitar’s sentimental value and the cost of repair. If the repair cost exceeds the guitar’s value, it may not be worth it. - Can I use super glue to repair a broken guitar headstock?
No, super glue is not recommended for repairing a guitar headstock. It’s brittle and doesn’t provide a strong, lasting bond. Use high-quality wood glue instead. - Does a volute prevent headstock breaks?
Yes, a volute can significantly strengthen the headstock/neck joint and reduce the risk of breaks. - Can I claim insurance for a broken guitar headstock?
If the damage was caused by an accident or covered event, you may be able to file an insurance claim. - How do I find a qualified luthier for headstock repair?
You can find qualified luthiers through guitarplayers.net’s network of trusted repair shops or by searching online directories and review sites. - What are the signs of a stressed guitar headstock?
Signs include small cracks, finish checking, and unusual neck bending. - How important is humidity control for guitars?
Maintaining proper humidity levels is crucial for preventing headstock breaks and other types of damage.
We at guitarplayers.net understand the bond between a guitarist and their instrument. A broken headstock can be devastating, but with the right approach, your guitar can be brought back to life, ready to create music for years to come. Remember to explore our site for lessons, reviews, sheet music, and our vibrant community forum where you can connect with fellow guitar enthusiasts.
Ready to get started?
- Explore our lessons: guitarplayers.net/lessons
- Find your dream guitar in our reviews: guitarplayers.net/reviews
- Join the community forum: guitarplayers.net/forum
- Contact us for personalized advice or assistance with finding a trusted repair shop:
Address: 1140 Boylston Street, Boston, MA 02215, United States
Phone: +1 (617) 747-2261
Website: guitarplayers.net
Let guitarplayers.net be your guide in restoring your instrument and continuing your musical journey.