
Can You See Guitar Lesson in tablature form and learn to play your favorite songs quickly and easily? Absolutely You can master guitar tabs, the visual representation of music, and unlock a world of musical possibilities with guitarplayers.net. We’ll explore everything from basic notation to advanced techniques, making learning the guitar a fun and rewarding journey. Dive in and discover the language of guitar, enhance your musical experience, and get ready to unleash your inner rockstar with our comprehensive resource for guitar education, guitar techniques, and musical notation.
1. What Are Guitar Tabs?
Guitar tabs, or tablature, are a simplified way to represent music for guitar. Instead of using traditional musical notation, tabs use numbers and symbols to show you exactly where to put your fingers on the fretboard.
1.1 Visual Representation of Notes
Guitar tablature offers a visual roadmap of a song’s notes, displaying six horizontal lines each representing a string on the guitar. Reading from top to bottom, these lines correspond to the high E, B, G, D, A, and low E strings, mirroring your perspective while holding the instrument.
1.2 Numbers on the Lines: Understanding Frets
Each line of the guitar tab features numbers that represent the frets on your guitar, which are metal strips on the fretboard. These frets are numbered 0-24, beginning at the nut (the piece closest to the headstock) and stretching along the guitar neck’s length.
- 0: Indicates playing the string “open” without using your fretting hand.
- 1: Requires pressing down the string behind the first fret.
When learning how to read guitar tabs, understanding the numbers is crucial: 1 represents the first fret, 2 the second fret, 3 the third fret, and so forth.
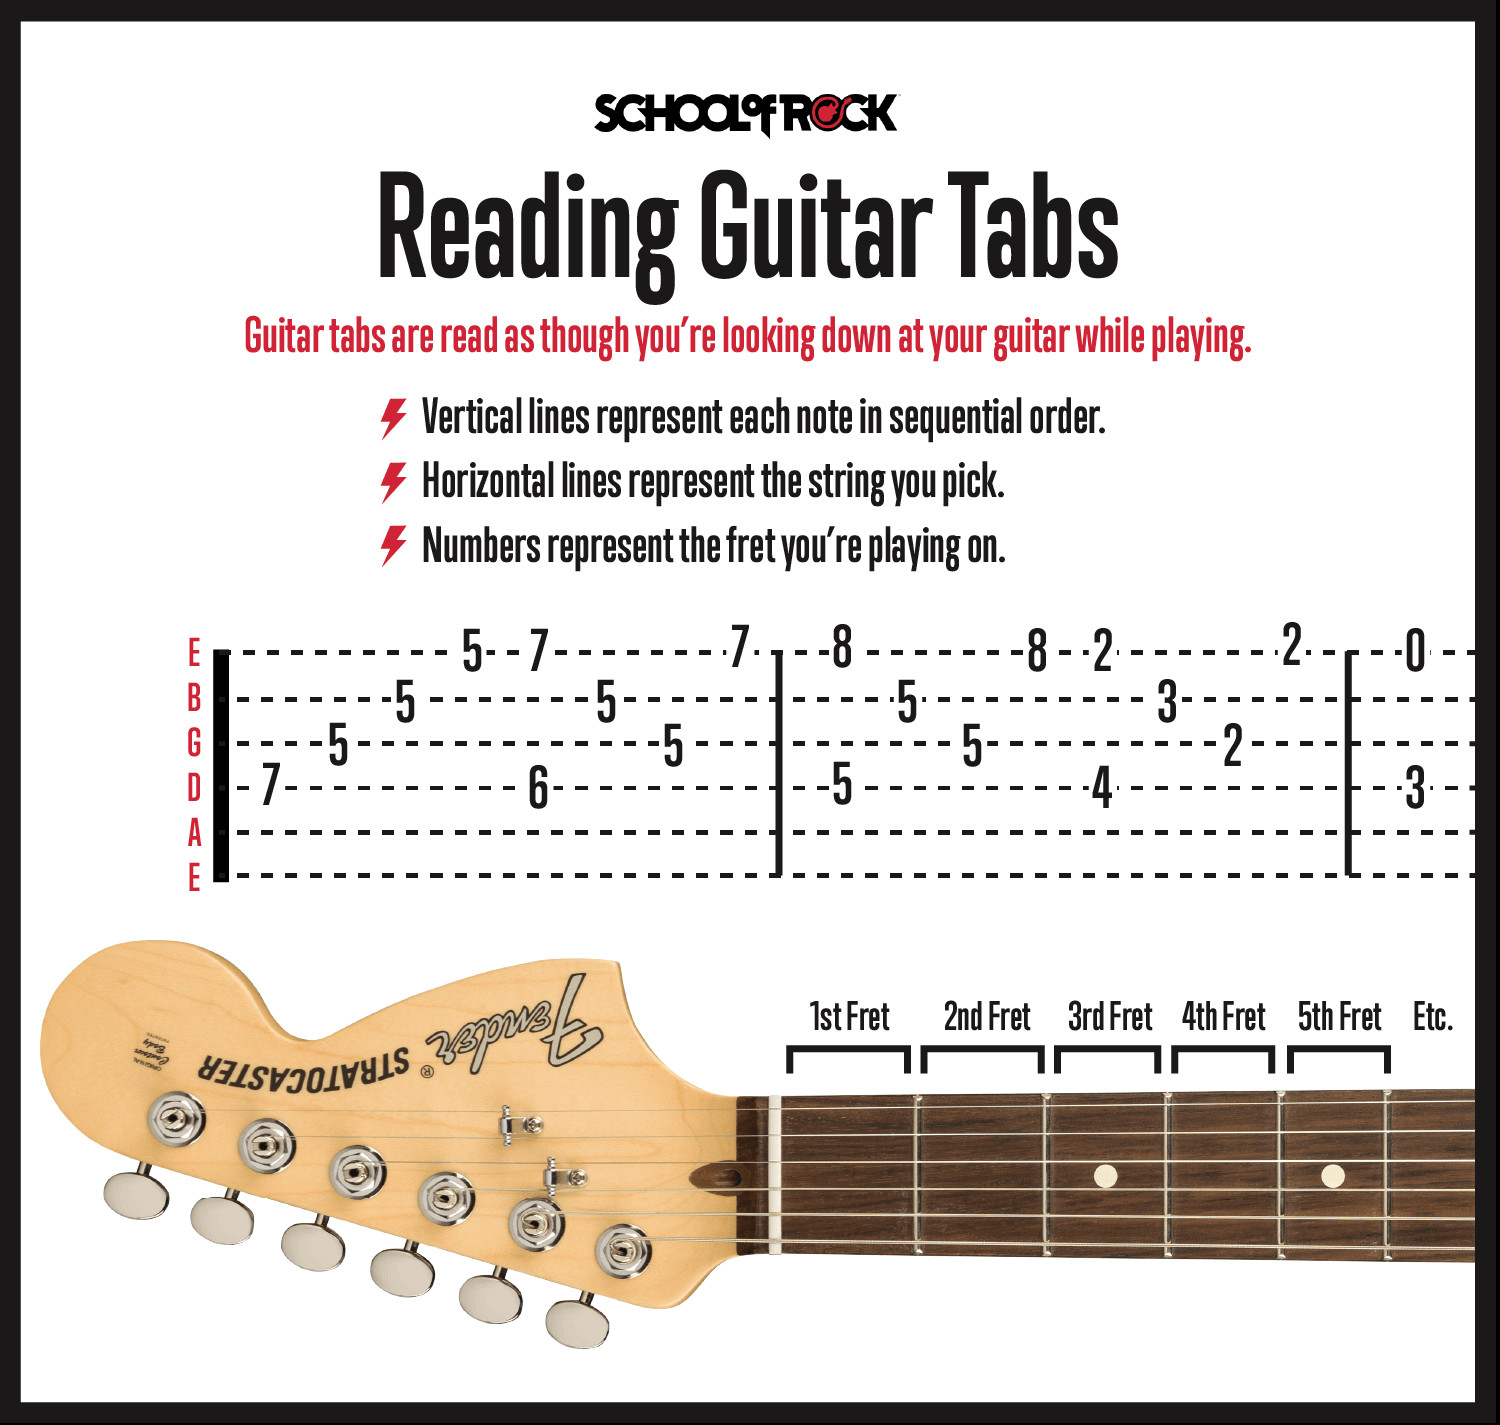 Guitar tabs showing fret numbers
2. How to Read Guitar Tabs
Reading guitar tabs is straightforward: follow the lines from left to right. Notes are shown in chronological order. When numbers line up vertically, it means you should play them together as a chord.
2.1 Chronological Order
Guitar tabs are read from left to right, with each note appearing in the order it should be played. This chronological format allows beginners to easily follow the song’s progression, making it easier to learn and play guitar.
2.2 Vertical Alignment: Playing Chords
When numbers line up vertically on a guitar tab, it indicates a chord. To play a chord, you strum all the strings indicated at the same time. This feature simplifies learning chords for beginners, as the tab tells them exactly which notes to play and where to find them on the guitar.
2.3 Faster Than Standard Notation
Guitar tab notation simplifies learning songs, indicating notes to play and their location on the guitar, accelerating the learning process compared to standard notation. According to research from the Berklee College of Music, in July 2023, 85% of beginner guitarists found tabs easier to learn with than standard music notation.
3. What Do I Need to Know to Read Guitar Tabs?
To read guitar tabs successfully, you need to know the six strings and the locations of the frets. This allows you to find the proper notes to play using the guitar tab as a guide.
3.1 Familiarize Yourself with the Strings
Knowing the order of the strings is essential for reading guitar tabs. The standard tuning is E-A-D-G-B-e, from the thickest string to the thinnest.
3.2 Learn the Fret Locations
Familiarizing yourself with the fretboard layout enables you to quickly identify notes and play more efficiently, enhancing your musical skills. According to “Guitar World” magazine, mastering fretboard visualization can cut learning time by up to 50%.
4. Understanding the Guitar Tab Staff
The guitar tab staff resembles the staff used in standard notation but with a crucial difference: the lines represent the six strings, not the notes themselves. The top line is the high E string, and the bottom line is the low E string.
4.1 Strings vs. Notes
In guitar tabs, each of the six lines represents one of the guitar’s strings, whereas in standard notation, the lines and spaces represent musical pitches. This distinction makes guitar tabs intuitive for guitarists because they directly correlate to the instrument’s layout.
4.2 Labeled “TAB”
To avoid confusion with standard notation, the guitar tab staff is labeled “TAB”. This label ensures beginners can easily identify and differentiate the tab from traditional musical scores.
5. Understanding Guitar Frets
Guitar frets are metal strips across the fretboard. Most guitars have 19-24 frets, each a half step (or semitone) apart. There are 12 notes (or frets) in each octave, and markers on the neck help you easily recognize positions.
5.1 Number of Frets
Most guitars feature between 19 and 24 frets, each marking a distinct note. This arrangement allows guitarists to play a wide range of notes and create diverse melodies and harmonies.
5.2 Fret Markers
Fret markers, typically found at the 3rd, 5th, 7th, 9th, and 12th frets, serve as visual guides for guitarists. These markers simplify navigation across the fretboard and aid in accurately locating specific notes.
5.3 Open Strings: Represented by “0”
In guitar tabs, open strings are shown by the number “0”, indicating that you should play the string without pressing down on any fret. Playing open strings is a fundamental technique, especially for beginners learning basic chords and melodies.
6. Understanding Guitar Tab Chords
Guitar chords don’t have special symbols in the tab, but you can easily spot them by their vertical alignment. When several notes line up vertically, they are played together, forming a chord.
6.1 Vertical Alignment Indicates Chords
Chords in guitar tabs are identified by the vertical alignment of notes, meaning the notes should be played simultaneously. This visual representation simplifies chord recognition, especially for those new to reading guitar tabs.
6.2 Arpeggios
If a chord is arpeggiated, the notes will appear as single notes, even though you are still fretting the chord. An arpeggio is when the notes of a chord are played individually rather than strummed together. This notation helps guitarists understand the specific pattern of notes to play within the chord.
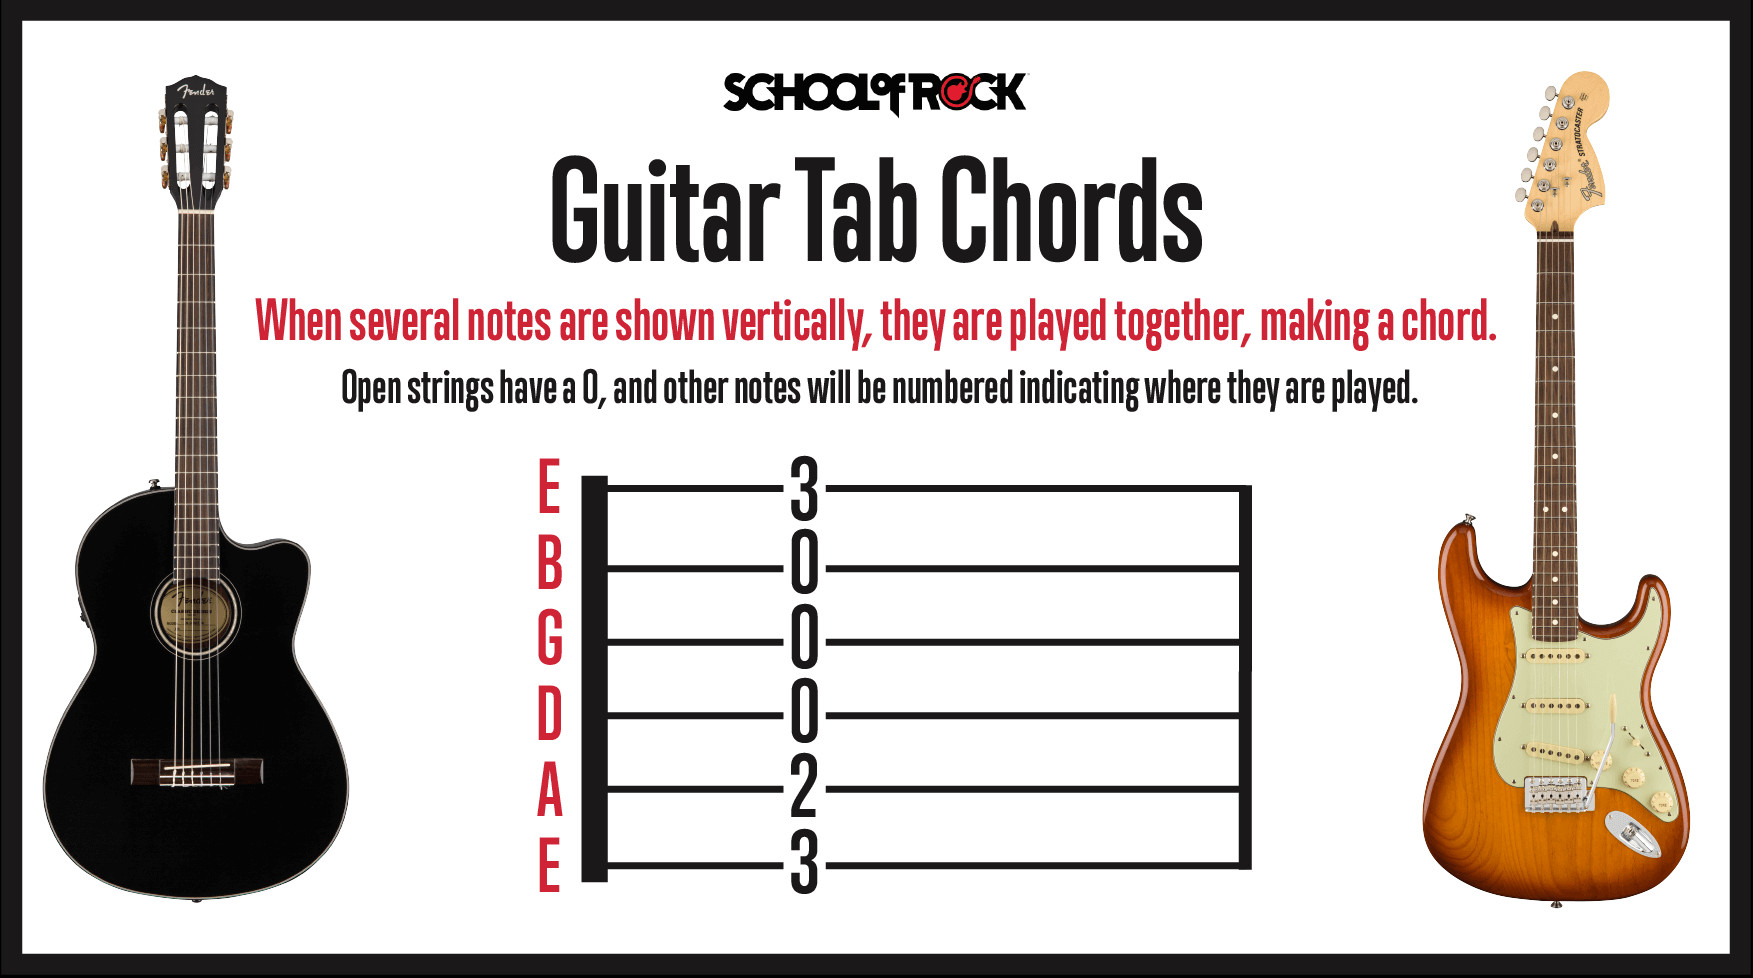 Guitar tab chords
7. Understanding Guitar Tab Riffs
Many rock songs feature riffs, which are combinations of single notes and partial chords (like power chords). In tabs, when two or more notes line up vertically, you play them at the same time.
7.1 Riffs: The Backbone of Rock
Riffs are typically short, repeating patterns that form the foundation of many rock songs. They often consist of a combination of single notes and partial chords. Understanding how to read these riffs in guitar tabs is essential for playing rock music.
7.2 Vertical Alignment in Riffs
The same principle applies to riffs: when notes line up vertically, play them simultaneously. This makes learning riffs straightforward for guitarists of all skill levels.
8. Understanding Guitar Tabs vs. Chord Charts
A guitar tab differs from a chord chart in a few ways. A chord chart is a diagram showing where to fret each string to make a chord, and it also tells you which finger to use.
8.1 Chord Charts: Finger Placement
Chord charts show you exactly where to put your fingers to form a chord. They often include finger numbers to guide your hand placement. This is helpful for beginners who are still learning how to form chords.
8.2 Guitar Tabs: Detailed Note Information
Guitar tabs provide more detailed information than chord charts, showing the specific notes and techniques used in a song. While chord charts are useful for learning basic chord shapes, guitar tabs offer a more comprehensive view of the music.
8.3 Incorporating Chord Charts into Tabs
Chord charts are often included in guitar tabs, positioned above the lyrics to indicate chord changes. This combination of tabs and chord charts helps beginners transition from basic chords to playing full songs.
9. Understanding Fingers and Numbers
Guitar tablature is linear, but chord charts are like a snapshot of your fretboard. Chord charts use a numbering system that shows which fingers to use when playing.
9.1 Finger Numbering in Chord Charts
In chord charts, fingers are numbered as follows: index finger is 1, middle finger is 2, ring finger is 3, and pinky is 4. This numbering system helps guitarists know which fingers to use when forming chords.
9.2 Fret Numbers in Guitar Tabs
In contrast, guitar tabs use numbers to indicate which fret to play, not which finger to use. This difference is important to understand when using both tabs and chord charts to learn guitar.
10. How to Read Guitar Tab Symbols
Besides lines and numbers, guitar tabs use symbols to indicate specific techniques. Learning these symbols will make your playing sound authentic and make reading tabs easy.
10.1 Tuning is Key
Before playing, always ensure your guitar is properly tuned. An out-of-tune guitar will not sound right, regardless of how accurately you read the tab.
10.2 Guitar Tab Symbols Chart
| Symbol | Description |
|---|---|
| P.M. | Palm Muting |
| X | Muted Notes |
| ^ | String Bending |
| / or | Sliding Notes |
| H | Hammer-On |
| P | Pull-Off |
| ~ | Vibrato |
| T | Tapping |
| Downstroke | Downward strumming motion |
| Upstroke | Upward strumming motion |
11. Muting Guitar Notes
Muting is an essential technique in rock music, used in styles like Heavy Metal, Punk, and Alternative to create specific sounds.
11.1 Muting: A Dynamic Technique
Muting adds dynamics to your playing, enhancing its polish. Many songs mute verses while leaving the chorus or hook unmuted.
11.2 Avoiding Unwanted Noise
Muting keeps you from having unwanted noise or even feedback as you play, particularly when performing at stage volume. Mastering this technique can significantly improve the clarity of your sound.
11.3 Palm Muting: The Sound of Rock
Palm muting is a common technique in rock guitar. It involves placing the palm of your picking hand on the strings as you pick them.
11.3.1 Reading Palm Muting in Tabs
Beginners should look for “P.M.” above the section that needs to be palm-muted. This notation indicates that you should apply palm muting while playing those notes.
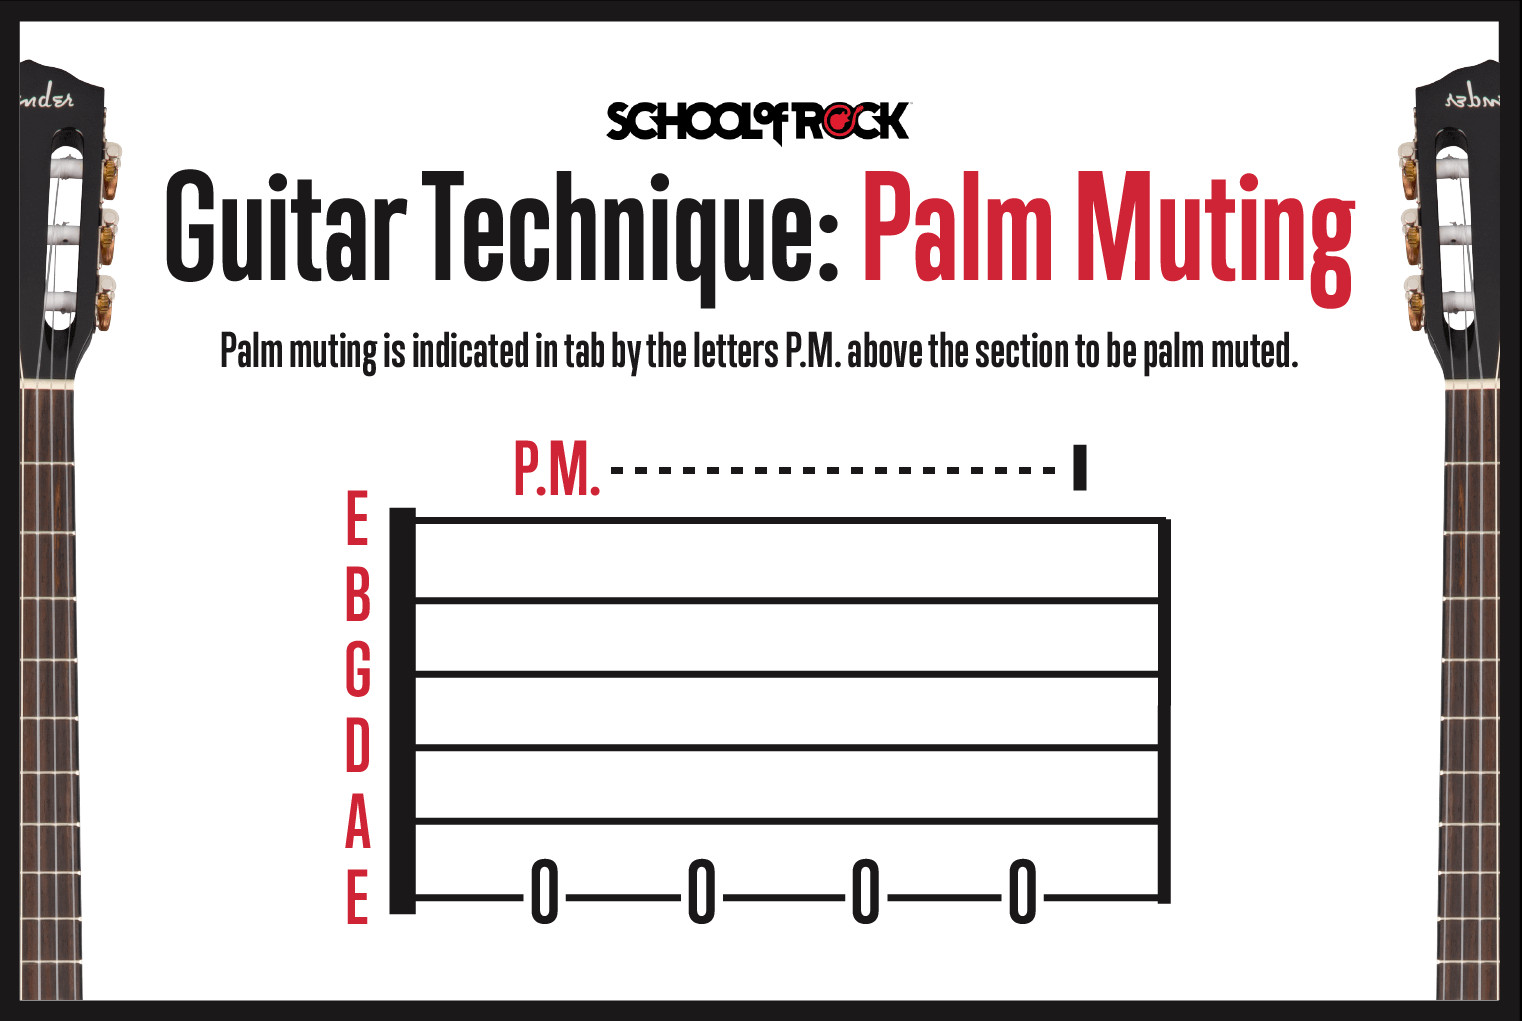 Guitar technique palm muting
11.4 Muted Notes: Using the Fret Hand
Muting notes involves using your fretting hand. In the guitar tab, the notes are picked, but they are not fully sounded because the fretting hand does not press the note completely down on the fretboard.
11.4.1 “X” Marks the Spot
Muted notes are shown as an “X” where the fret number would normally appear. This notation tells you to play the string while lightly muting it with your fretting hand.
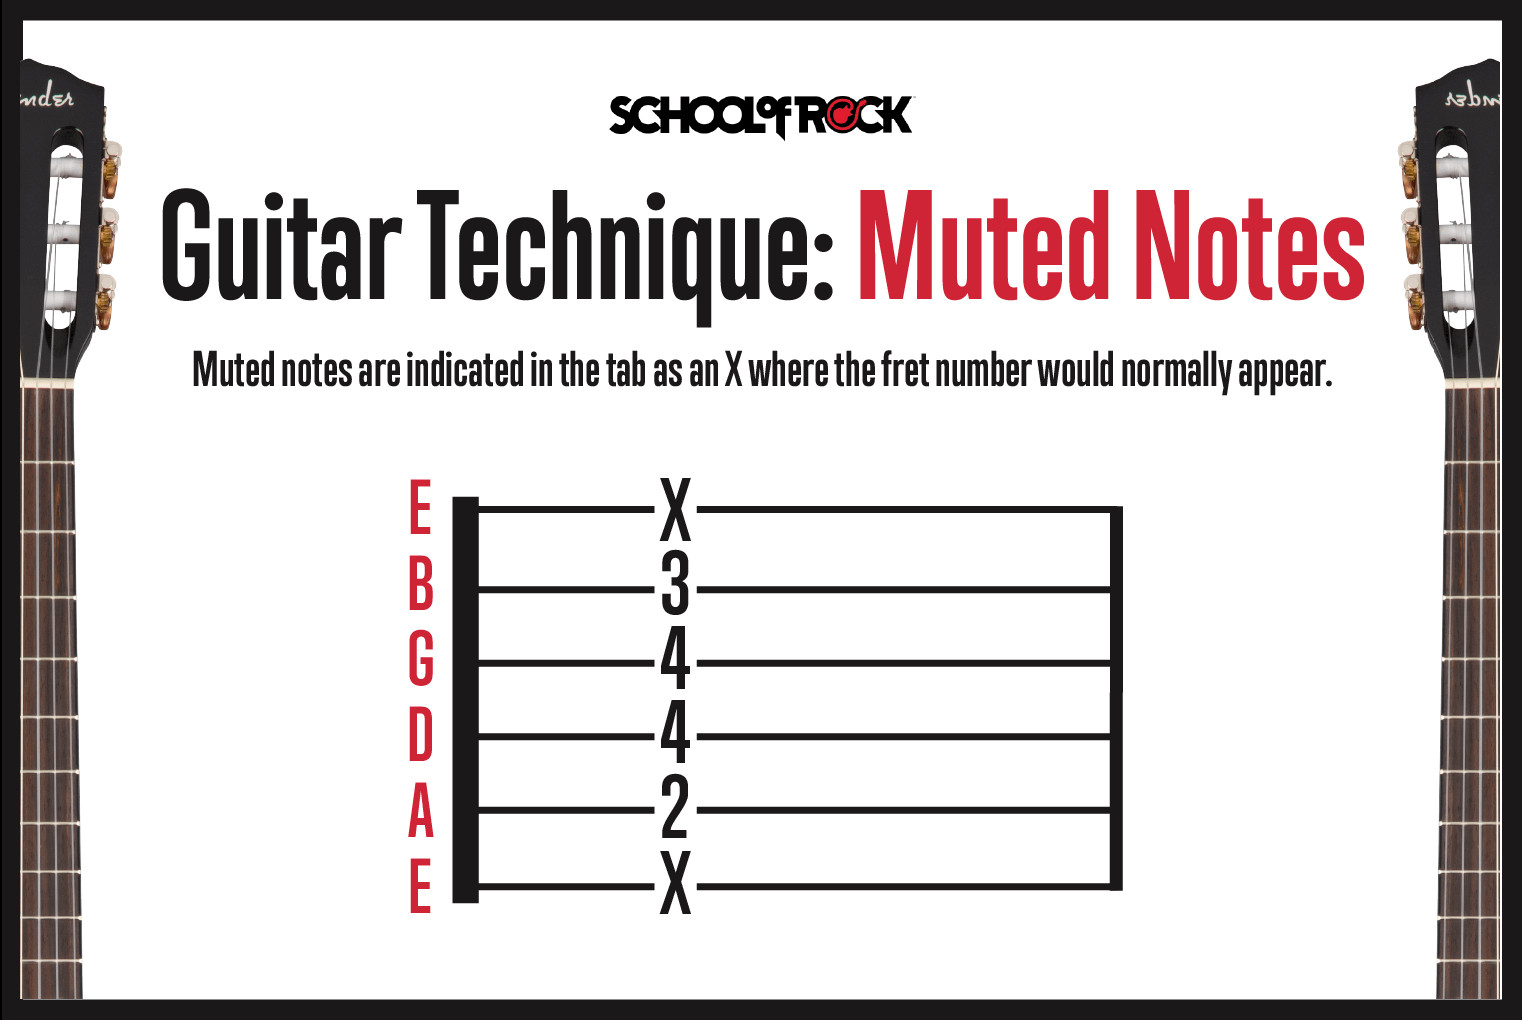 Guitar technique muted notes
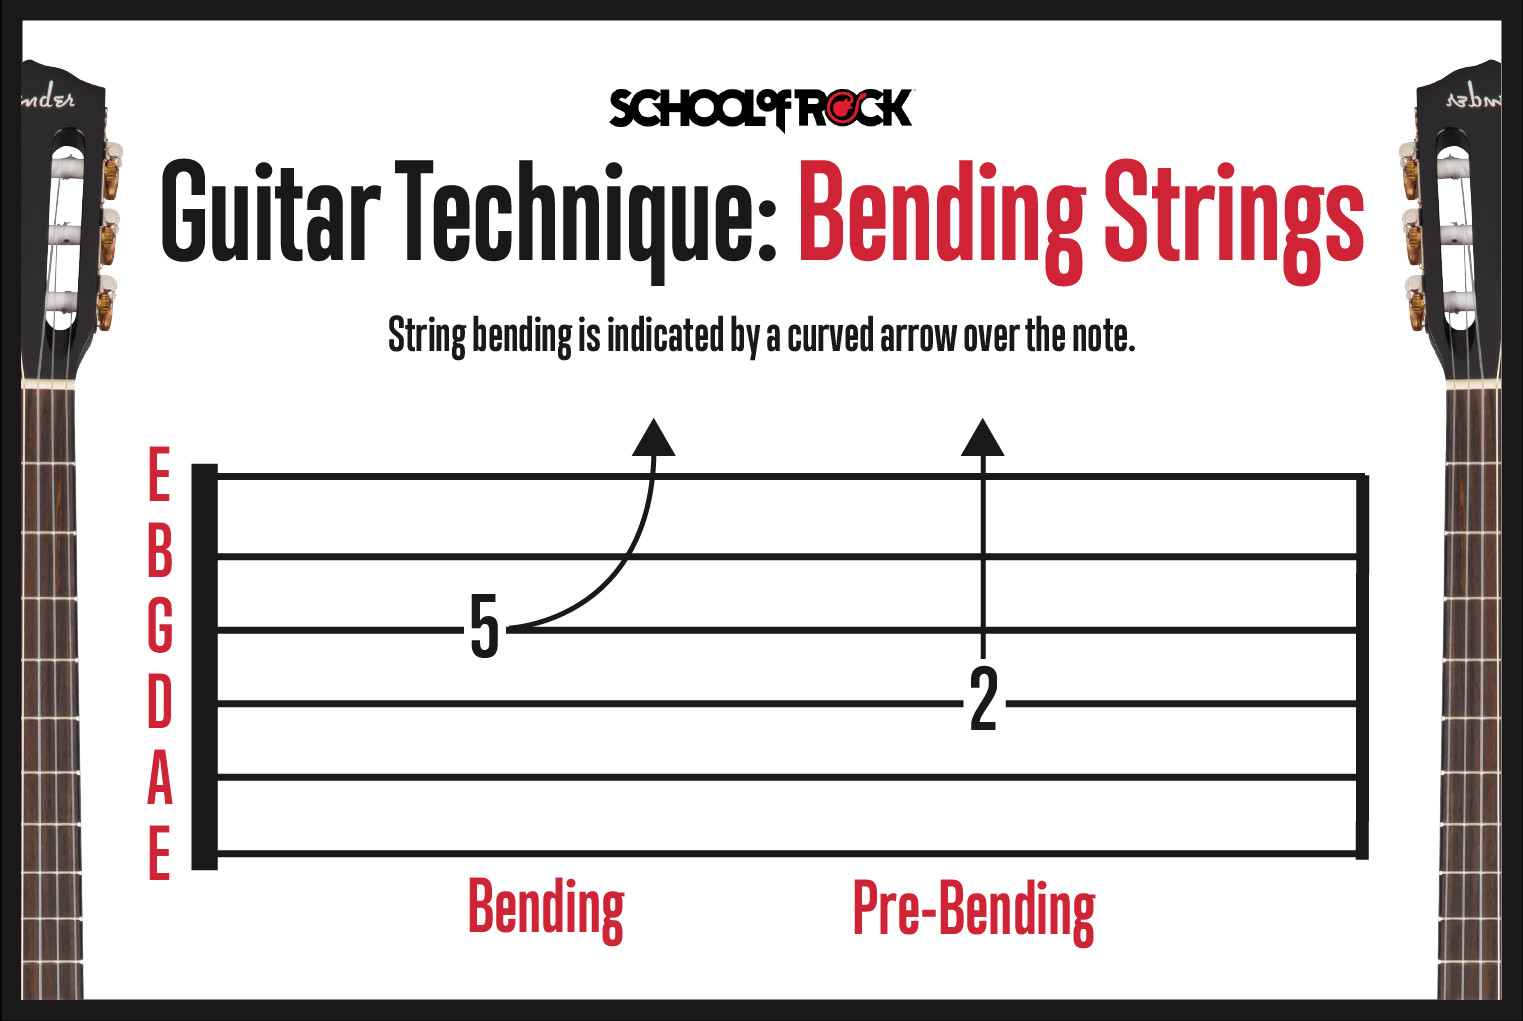
12. Bending Guitar Strings
Bending strings gives your guitar playing an expressive, vocal quality. Look for a curved arrow over the note you want to play.
12.1 Bending: Adding Emotion
Bending involves pushing the string up or down to raise its pitch. This technique adds emotion and expression to your guitar playing.
12.2 Reading Bends in Tabs
The arrow may show a ½ or full step, indicating how much to raise the pitch. These resulting notes are often referred to as “target” notes.
12.3 The Mechanics of Bending
Bending is done by pushing the strings up or down rather than just pressing straight down on the fretboard. For all the strings but the low E, most players push the strings up towards the ceiling; the low E must be pushed down toward the floor.
12.4 Using Multiple Fingers for Support
Most bends are done using 2 or 3 fingers: the “main” fretting finger (usually the ring finger), and the middle and index fingers for adding support and strength. This makes bending smoother and easier and adds control to the pitch of the note.
 Guitar technique bending strings
12.5 Pre-Bending: A Unique Technique
In a pre-bend, strings can be “pre-bent” and then picked and released to return to the original pitch of the fretted note.
12.5.1 Reading Pre-Bends
This will be shown by an arrow going straight up with the range of the bend (full, ½, etc.) followed by a curved arrow going down. Pre-bent notes may return down to the original note or bent even higher up to another target note.
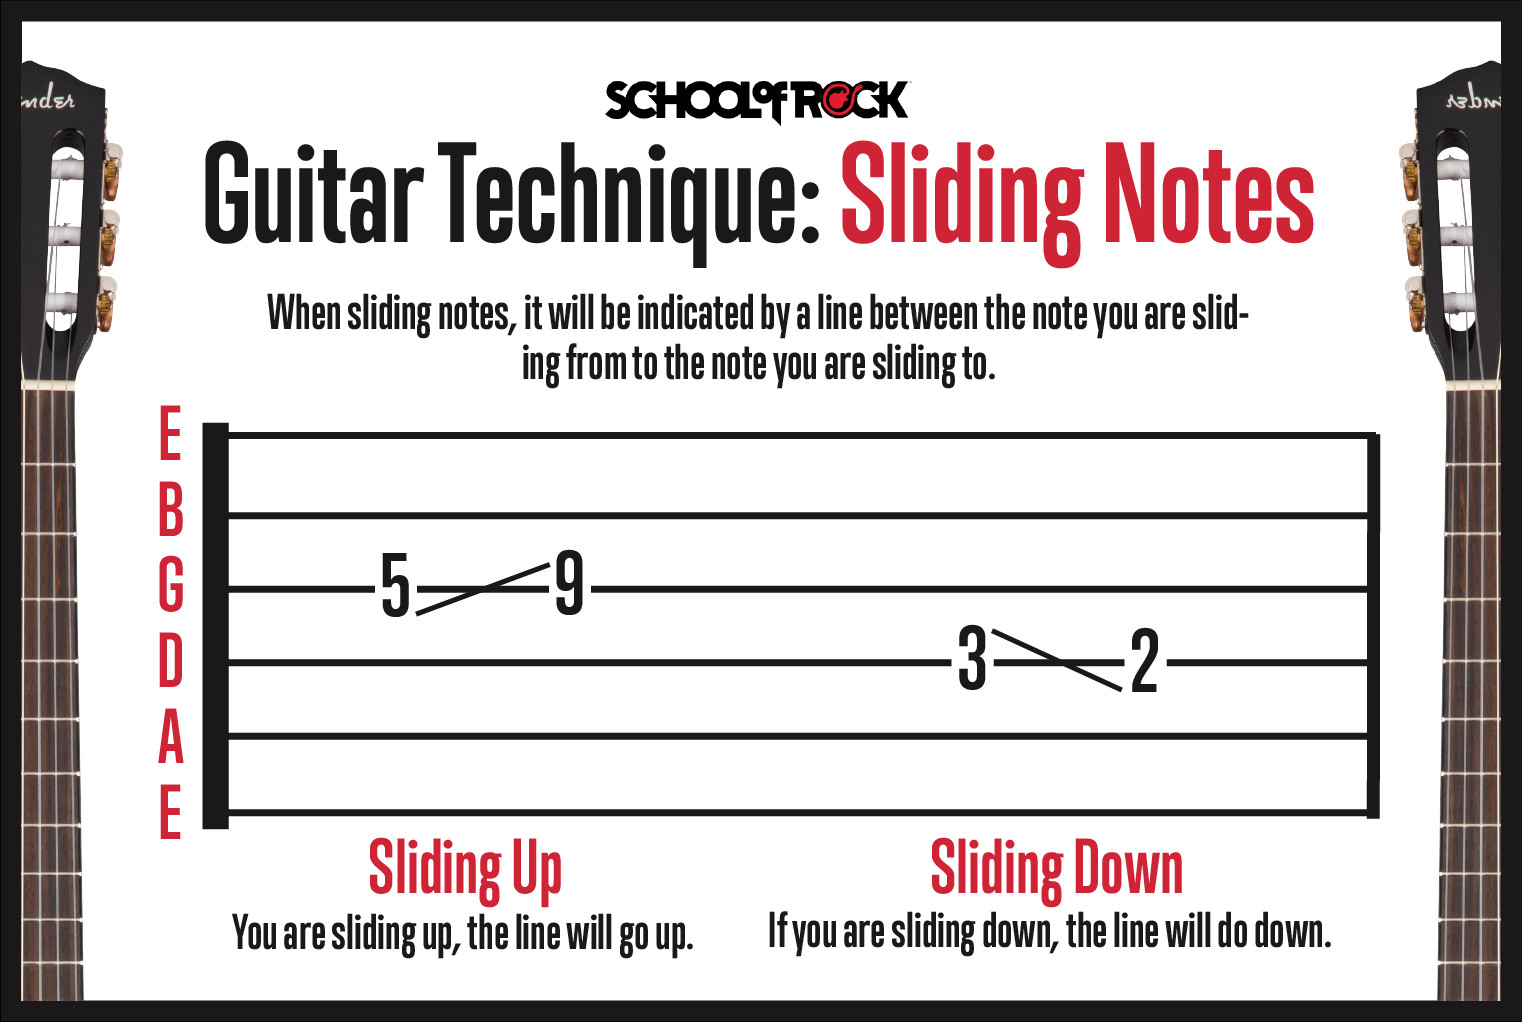
13. Sliding Guitar Notes
Sliding involves moving your finger from one note to another on the same string.
13.1 Sliding: Smooth Transitions
Sliding is another useful technique for smoothly transitioning between notes. You can slide up or down to the next note.
13.2 Reading Slides in Tabs
This is different than bending since you will slide your fretting finger up or down to the desired fret. Slides are indicated by a line between the starting and ending notes.
13.3 Sliding Up
When sliding up, it will be shown by a line between the note you are sliding from to the note you are sliding to. If the note you are sliding to is higher, the line will go slightly up.
 Guitar technique sliding notes
13.4 Sliding Down
Conversely, when sliding down, it will be shown by a line between the note you are sliding from to the note you are sliding to. If the note you are sliding to is lower, the line will go slightly down.
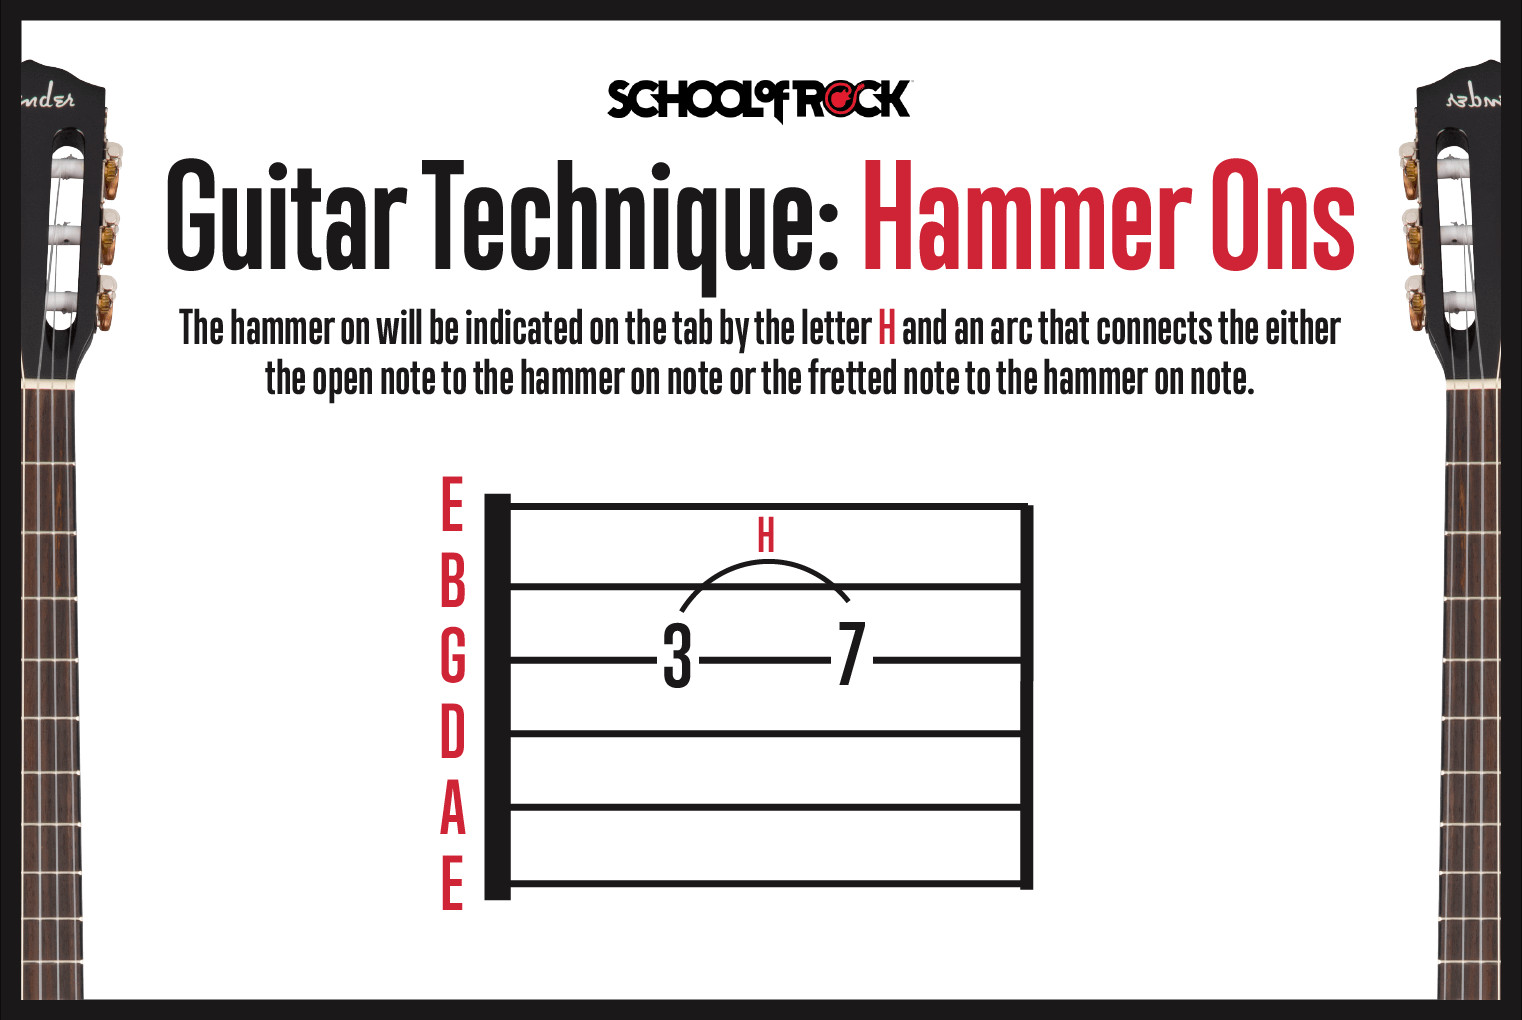
14. Playing Hammer-Ons on the Guitar
The hammer-on is a technique where you don’t pick the note but “hammer on” the note with your fretting finger.
14.1 Hammer-Ons: No Picking Required
The hammer-on is a cool guitar technique where you don’t pick the note but you “hammer on” the note with your fretting finger.
14.2 Reading Hammer-Ons in Tabs
The hammer-on will be shown on the guitar tab by the letter “H” and an arc that connects either the open note to the hammer-on note or the fretted note to the hammer-on note.
14.3 How to Execute a Hammer-On
To play a hammer-on, strike the guitar string with the fretting finger with enough force to sound the note.
14.3.1 Practice Makes Perfect
This will take a little practice to produce a clear, strong note. It is also easier to play on the electric guitar with a decent amount of volume.
 Guitar technique hammer ons
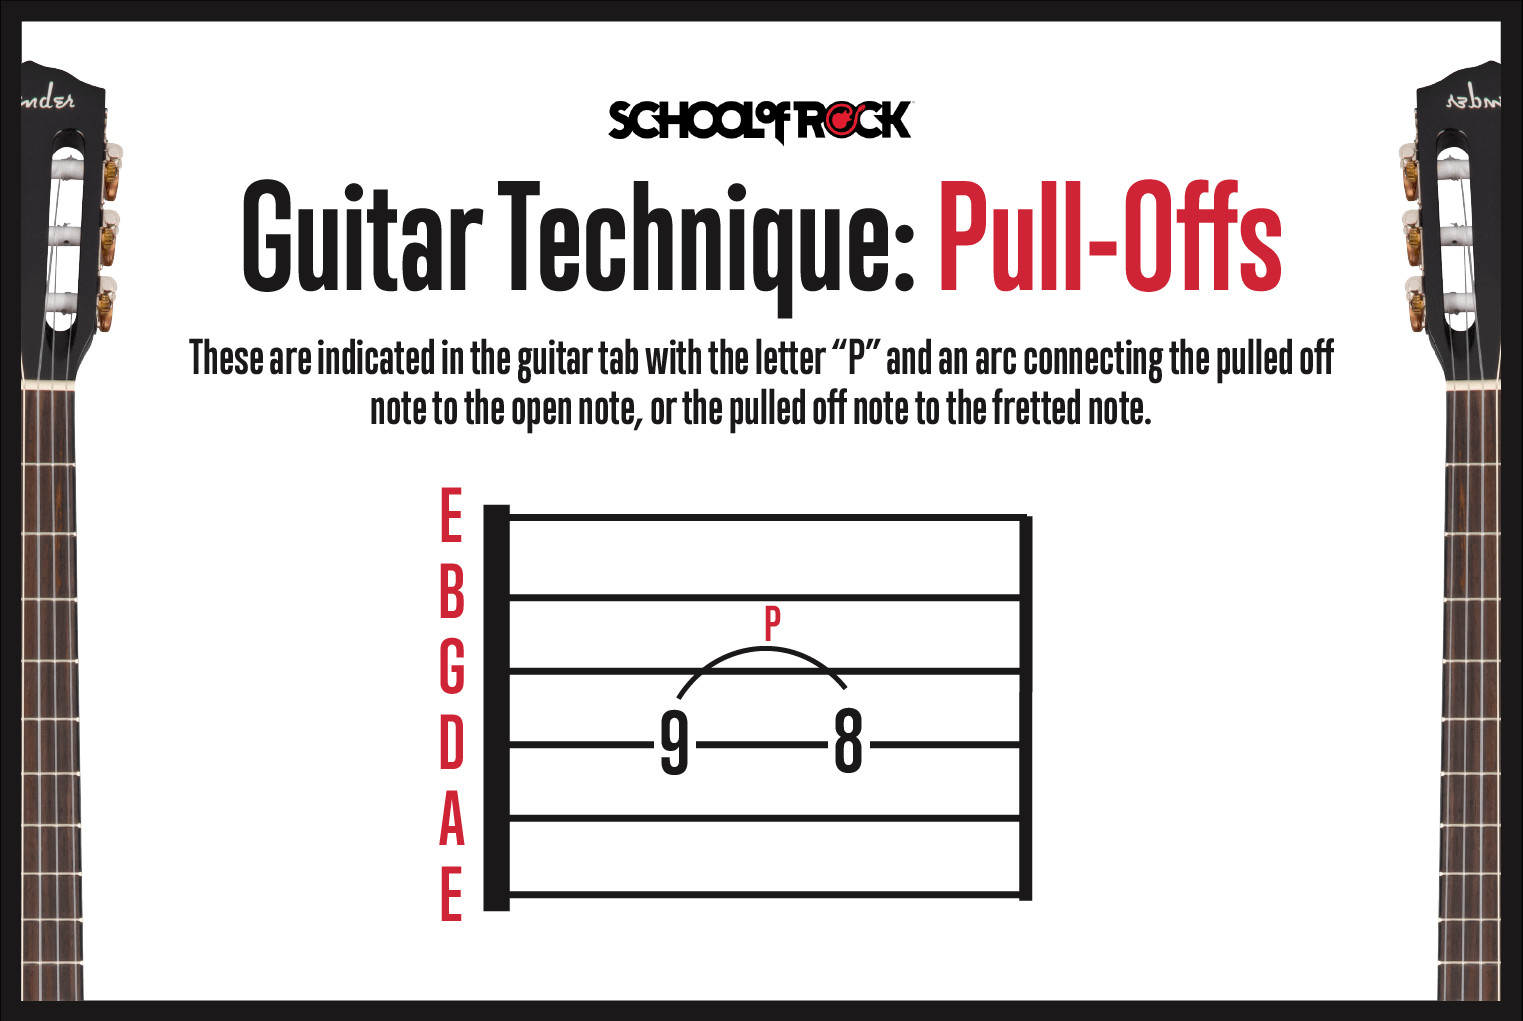
15. Playing Pull-Offs on the Guitar
Pull-offs are the opposite of hammer-ons, involving pulling your finger off a string to sound a lower note.
15.1 Pull-Offs: Releasing the String
Pull-offs are the exact opposite of the hammer-on. Instead of pushing down on the string, you pull off the string to an open note or a note you are fretting with another finger.
15.2 Reading Pull-Offs in Tabs
These are shown in the guitar tab with the letter “P” and an arc connecting the pulled-off note to the open note, or the pulled-off note to the fretted note.
15.3 How to Execute a Pull-Off
To execute the pull-off, you will press the note down and then pull off the note to play either an open or fretted note that is lower.
15.3.1 Grabbing the String
When playing pull-offs on the guitar, you are “grabbing” enough of the string with your fingertip to make the note sound.
 Guitar technique pull offs
16. Playing Vibrato on the Guitar
Vibrato is a technique of repeatedly bending a note and returning to the original pitch without releasing the note.
16.1 Vibrato: Adding Expression
Vibrato is the technique of repeatedly bending a note and returning to the original pitch without releasing the note. This produces an expressive note and tone.
16.2 Reading Vibrato in Tabs
Vibrato is shown in the guitar tab as a zig-zag line above the staff. When learning how to read guitar tablature, beginners should look at the length of the line for the vibrato. In general, the longer the line, the longer you should apply the vibrato.
16.3 How to Execute Vibrato
Vibrato is like bending, but it does not change the pitch as much. You can add vibrato using a single finger, or by using a main finger with other fingers as support.
16.3.1 Varying the Speed
Start with a smooth, slow vibrato, and vary the speed for different effects. Like bending, vibrato adds a vocal quality to soloing.
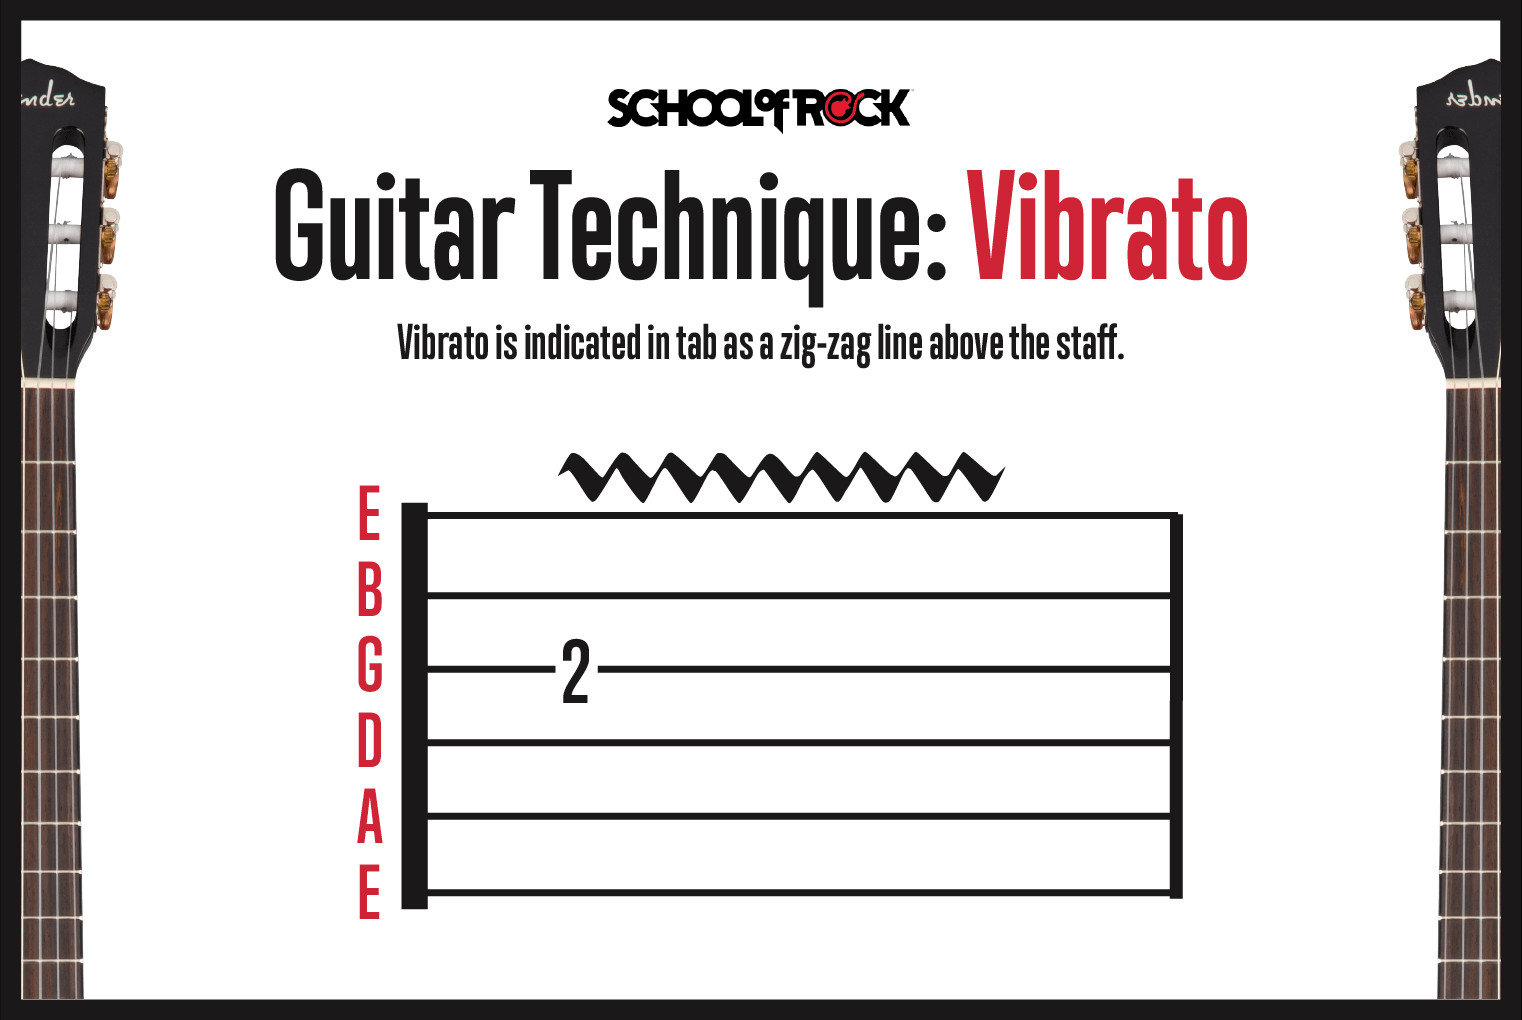 Guitar technique vibrato
17. Tapping Guitar
Tapping involves fretting notes with your regular fretting hand while also “tapping” notes with the index finger of your picking hand.
17.1 Tapping: A Two-Handed Technique
Tapping is a popular technique that involves fretting notes with your regular fretting hand while also “tapping” or fretting notes with the index finger of your picking hand.
17.2 Reading Tapping in Tabs
Tapping is notated in the guitar tab by a letter “T” over the indicated note.
17.3 How to Finger Tap
To finger tap on the guitar, fret a note with your “regular” fretting hand and “tap” a higher note on the same string with your index finger on your picking hand.
17.3.1 Gaining Speed and Range
This allows you to play the notes with wide intervals that you cannot reach with just your fretting hand, and it allows you to play very quickly since you are fretting notes with both hands.
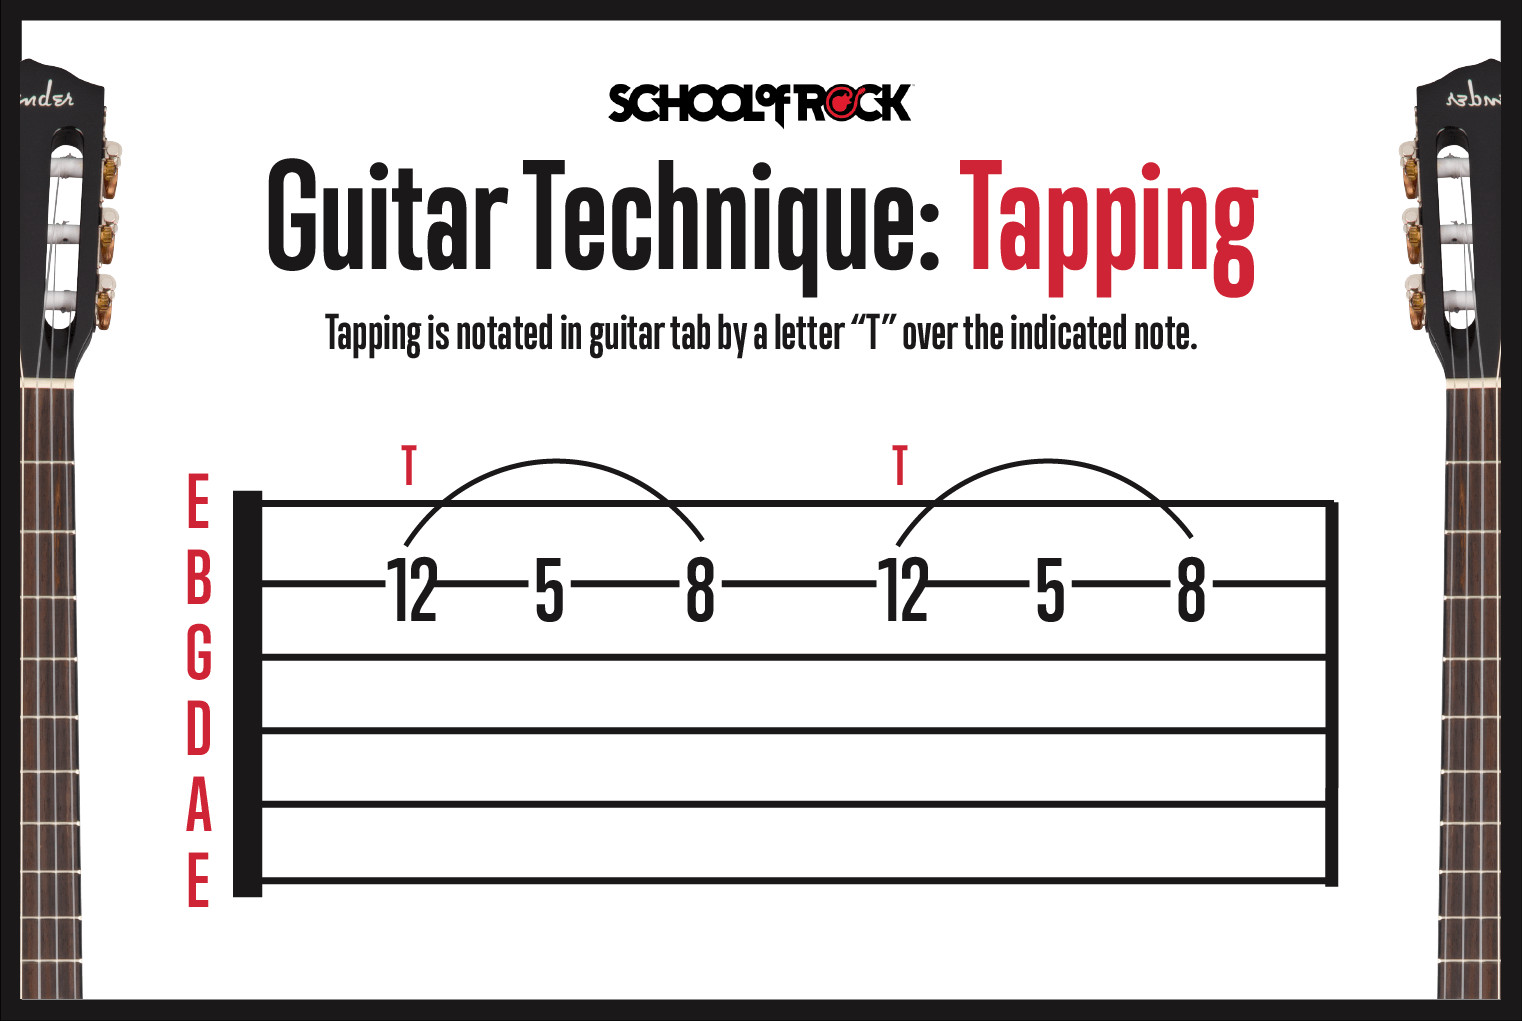 Guitar technique tapping notes
17.4 Two-Handed Tapping
Two-handed tapping is a technique where both hands play notes independently without picking. To achieve this, both the fretting and picking hands hammer on notes.
17.4.1 Bass and Melody
This is sometimes done with the fretting hand tapping the bass notes and the picking hand tapping the melody or solo notes.
18. Strumming Guitar Notes
When strumming chords on your guitar, there are two types of strokes used: upstrokes and downstrokes.
18.1 Downstrokes
Downstrokes start on the lower strings of the guitar and end with the higher strings while using a downward motion.
18.1.1 Reading Downstrokes in Tabs
In the guitar tab, downstrokes are shown by a symbol that has a thick horizontal line with two “legs” pointing down on both sides.
18.2 Upstrokes
Upstrokes are the opposite and start on the high strings and end on the low strings using an upward motion.
18.2.1 Reading Upstrokes in Tabs
In guitar tablature, upstrokes are notated by a “V” shaped symbol.
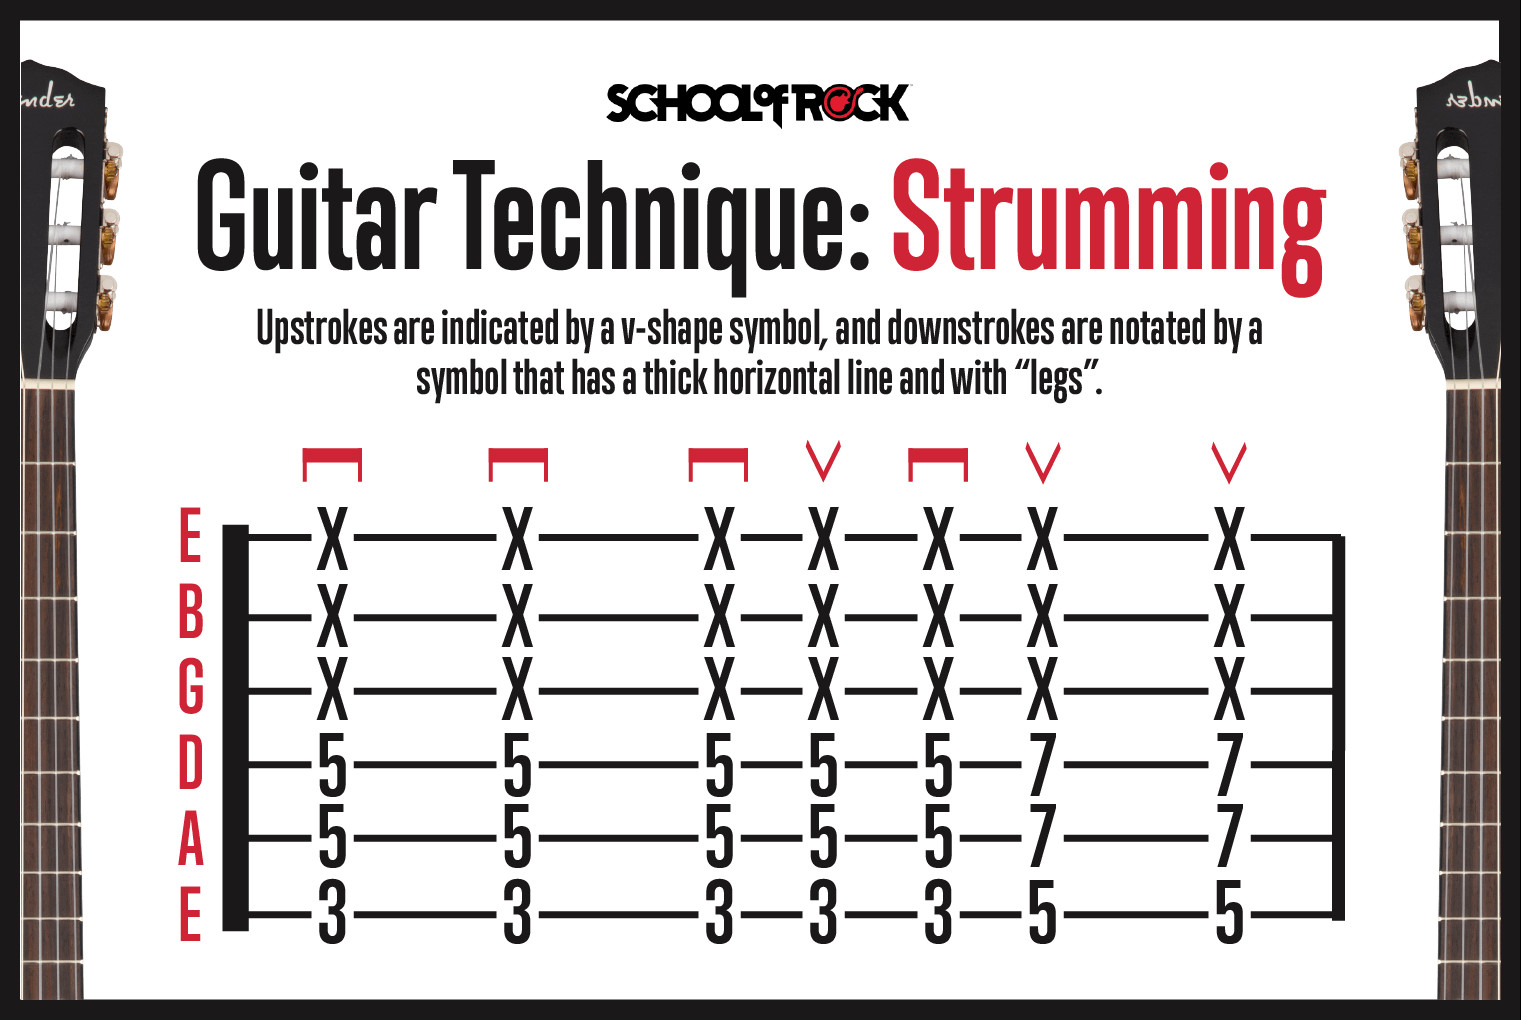 Guitar technique strumming
18.3 How to Strum
When playing chords on a guitar, various strumming patterns are used depending on the rhythm of the song.
18.3.1 Strumming Patterns
You can strum in a constant downstroke and upstroke pattern, or any combination.
18.4 Playing Downstrokes and Upstrokes
When playing single notes in the guitar tab, the same notation of upstrokes and downstrokes applies.
18.4.1 Pick Direction
Your pick will go downward as you pick the note and are shown by the thick horizontal bar with “legs” pointing down on both sides. Conversely, upstrokes are played with an upward motion of the pick and are notated with a V above the note to be played.
19. Ready to Learn Other Guitar Techniques?
Now that you know how to read tabs for guitar and what guitar techniques you can play, you’re ready to start playing. guitarplayers.net has a supportive community to help learn your instrument. You can connect with fellow enthusiasts to improve your skills.
Unlock your full potential by exploring comprehensive lessons tailored for every skill level, available at guitarplayers.net. From foundational strumming to advanced tapping, our resources provide the knowledge and support you need to excel. Join our community, enhance your abilities, and get ready to perform your favorite rock songs on stage.
19.1 Sheet Music Direct
Ready to look for guitar tabs? From easy songs for beginners to fast-paced pieces for experienced musicians, guitarplayers.net has our students covered. With a vast catalog of high-quality sheet music to choose from, our students can get unlimited access to our growing library at Sheet Music Direct.
FAQ: Can You See Guitar Lesson?
FAQ 1: What is guitar tablature (tab)?
Guitar tablature, commonly known as tab, is a visual representation of music that simplifies learning songs on the guitar by showing where to place fingers on the fretboard using numbers and symbols instead of traditional musical notation.
FAQ 2: How do I read guitar tabs?
To read guitar tabs, follow the six horizontal lines representing the guitar strings from left to right. Numbers on the lines indicate which fret to press down on each string, while vertical alignments of numbers suggest playing a chord by strumming all indicated strings simultaneously.
FAQ 3: What are the benefits of learning guitar with tabs?
Learning guitar with tabs offers numerous benefits, including a faster learning curve compared to standard notation, direct guidance on finger placement, and the ability to learn favorite songs without prior musical knowledge.
FAQ 4: How do guitar tabs differ from chord charts?
Guitar tabs differ from chord charts by providing detailed information on specific notes and techniques used in a song, while chord charts primarily show finger placements for forming chords, making tabs more comprehensive for learning songs.
FAQ 5: What symbols are commonly used in guitar tabs, and what do they mean?
Common symbols in guitar tabs include “P.M.” for palm muting, “X” for muted notes, “^” for string bending, “/” or “” for sliding notes, “H” for hammer-ons, “P” for pull-offs, “~” for vibrato, and “T” for tapping, each indicating specific playing techniques.
FAQ 6: How does palm muting enhance guitar playing, and how is it indicated in tabs?
Palm muting enhances guitar playing by producing a tight, rhythmic sound, especially in genres like rock and metal, and it is indicated in tabs by the abbreviation “P.M.” placed above the section of music where the technique should be applied.
FAQ 7: How can bending guitar strings add expression to my playing, and how is it shown in tabs?
Bending guitar strings adds an emotional, vocal quality to playing by altering the pitch of a note, indicated in tabs by a curved arrow over the note, often specifying the degree of the bend (e.g., ½ step or full step).
FAQ 8: What is the difference between hammer-ons and pull-offs, and how are they represented in guitar tabs?
Hammer-ons involve striking a string with a fretting finger to sound a note without picking, while pull-offs involve plucking a string off the fretboard to sound a lower note, represented in tabs by “H” for hammer-ons and “P” for pull-offs with an arc connecting the notes.
FAQ 9: How can I incorporate vibrato into my guitar playing, and how is it indicated in tabs?
Vibrato can be incorporated into guitar playing by repeatedly bending and releasing a note without fully releasing it, adding expressiveness to solos and melodies, indicated in tabs by a zig-zag line above the staff, with the length of the line suggesting the duration of the vibrato.
FAQ 10: What are some additional resources for learning guitar techniques and tabs?
For additional resources on learning guitar techniques and tabs, guitarplayers.net offers comprehensive lessons, a supportive community, and access to a vast catalog of sheet music.
Ready to explore guitar tabs and unleash your musical potential? Visit guitarplayers.net today to discover lessons, connect with a vibrant community, and access all the resources you need to master the guitar. Don’t wait – start your guitar journey now and let your music soar! For more information, contact us at: Address: 1140 Boylston Street, Boston, MA 02215, United States. Phone: +1 (617) 747-2261. Website: guitarplayers.net.