
Are you a budding guitarist eager to express your love for music through art? At guitarplayers.net, we believe combining passions is the key to unlocking creativity. Learning how to draw a simple guitar is a fantastic way for guitar players to visualize their favorite instrument, understand its components, and even design their dream guitar. This guide will break down the process into easy-to-follow steps, perfect for artists of all levels. You’ll discover the joy of sketching while deepening your appreciation for the guitar. So grab your pencil, and let’s create some musical art. You will soon master acoustic guitar drawing, guitar sketch, and guitar diagrams.
1. What Makes Drawing a Guitar Simple?
Drawing a guitar simply involves breaking down the instrument into basic shapes and gradually adding details. According to art education experts, simplifying complex objects into manageable forms is a cornerstone of drawing for beginners. This approach makes the task less daunting and more enjoyable.
- Start with Basic Shapes: Begin with ovals, rectangles, and circles to represent the body, neck, and headstock.
- Focus on Key Features: Emphasize the soundhole, bridge, and strings.
- Gradual Detailing: Add tuning pegs, frets, and other details as you progress.
- Proportion Matters: Keep an eye on the relative sizes of different parts of the guitar.
- Practice Regularly: Consistent practice is key to improvement.
2. What Materials Do I Need to Draw a Guitar?
Having the right materials can significantly enhance your drawing experience. Here’s a list of essential tools:
- Pencils:
- HB Pencil: For sketching light outlines.
- 2B or 4B Pencil: For adding darker shades and details.
- Eraser:
- Kneaded Eraser: For lifting graphite without damaging the paper.
- Pencil Eraser: For precise corrections.
- Paper:
- Sketchbook: A dedicated sketchbook is ideal for practicing and keeping your drawings organized.
- Drawing Paper: Smooth drawing paper with a weight of 90gsm or higher.
- Ruler:
- Transparent Ruler: Useful for drawing straight lines and maintaining proportions.
- Optional Tools:
- Compass: For drawing perfect circles for the soundhole.
- Blending Stump: For creating smooth transitions between shades.
- Reference Images: Photos of guitars to guide your drawing.
3. What are the Key Components of a Guitar to Focus On?
Understanding the key components of a guitar is crucial for accurately depicting it in your drawing. Here’s a breakdown:
- Headstock: The top part of the guitar where the tuning pegs are located.
- Tuning Pegs: Used to adjust the tension of the strings and tune the guitar.
- Neck: The long, slender part of the guitar where the frets are located.
- Frets: Metal strips that divide the neck into specific intervals.
- Body: The main resonating part of the guitar.
- Soundhole: The opening in the body that allows sound to project.
- Bridge: The part of the guitar that holds the strings in place on the body.
- Strings: The vibrating elements that produce sound when plucked or strummed.
4. How Do I Start Drawing the Basic Shape of a Guitar?
Starting with the basic shape is crucial for creating a well-proportioned guitar drawing. Follow these steps:
- Lightly sketch a large oval: This will form the main body of the guitar.
- Add a smaller connecting oval: Position it slightly above and overlapping the larger oval.
- Draw a long, thin rectangle: Extending from the top of the smaller oval to represent the neck.
- Sketch a headstock: A stylized shape at the end of the neck.
- Adjust the curves: Refine the lines to create the guitar’s distinctive curves.
- Ensure symmetry: Check that both sides of the guitar body are relatively even.
5. How to Draw a Guitar Simple Step-by-Step Tutorial
This comprehensive tutorial will guide you through each step of drawing a simple guitar.
5.1. Step 1: Sketch the Headstock Outline
Start by drawing the outline of the headstock, the topmost part of the guitar where the tuning pegs are located. Position it on the top middle portion of your paper. To ensure correct placement, lightly draw horizontal and vertical reference lines across the paper. The headstock outline should be above the horizontal line.
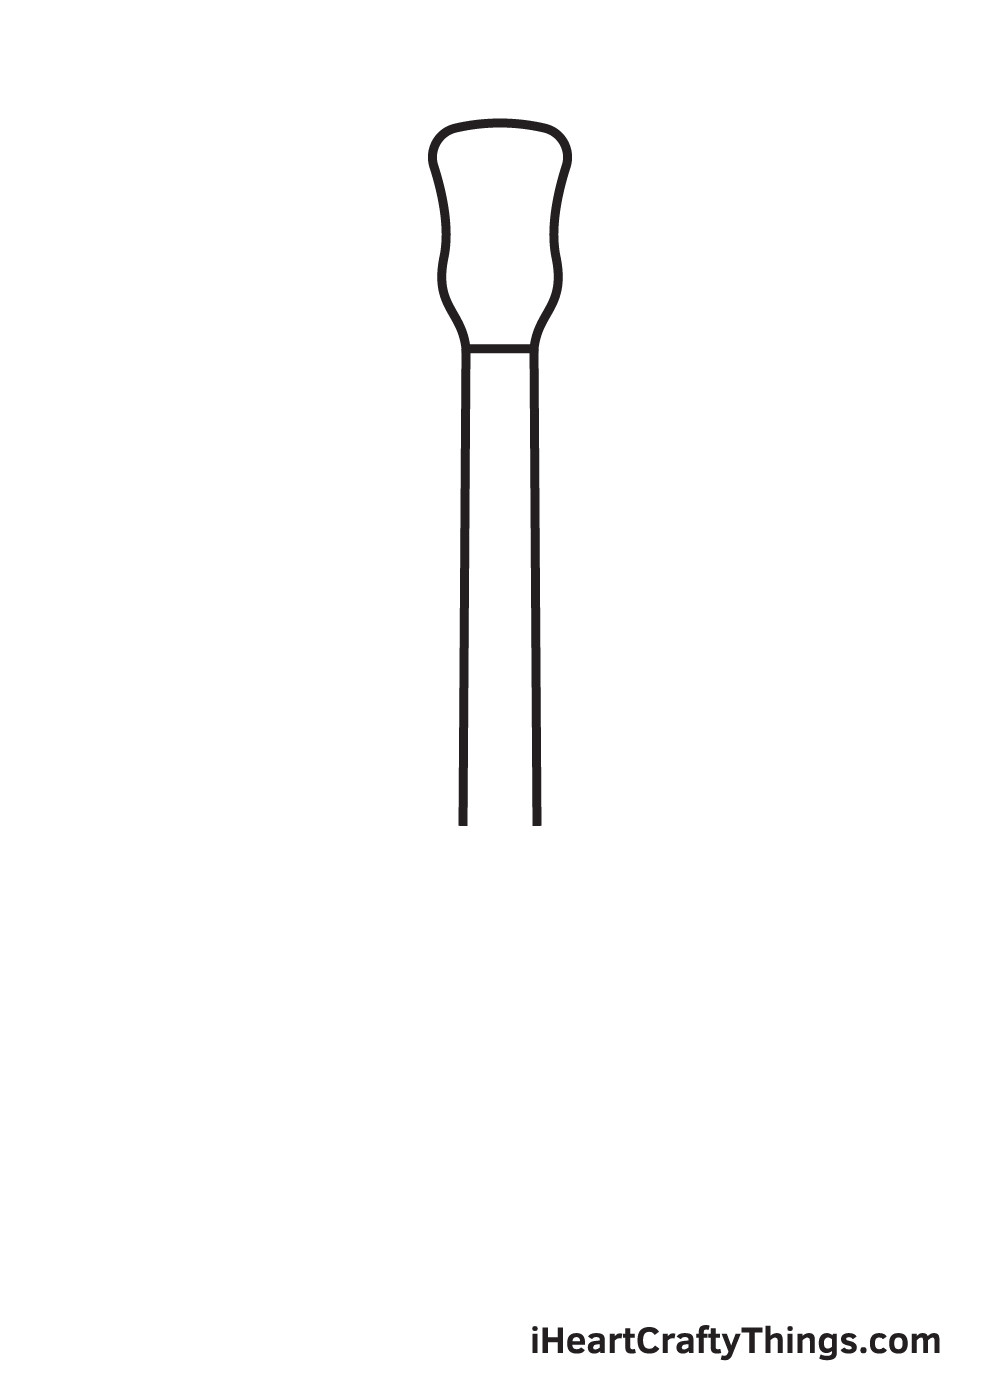 Guitar Headstock Outline
5.2. Step 2: Draw the Neck
Draw two long vertical lines directly underneath the headstock to create the neck. These lines should connect seamlessly to the bottom of the headstock, leaving a gap between them. This gap will later accommodate the guitar strings.
5.3. Step 3: Add the Sound Hole
At the bottom of the guitar’s neck, draw a perfect circle to represent the sound hole. Inside this circle, draw another circle, tracing the outline of the outer circle. If you struggle with freehand circles, a compass can be helpful.
5.4. Step 4: Complete the Guitar Body
Now, complete the guitar’s outline by drawing the lower portion of the body. Start from the neck and extend downwards past the sound hole. The guitar’s body should feature an upper bout, a waist in the middle, and a lower bout, which is the widest part of the guitar.
5.5. Step 5: Draw the Bridge
Below the sound hole, draw the bridge. Create a horizontal rectangular shape connected to a smaller rectangular shape underneath it. Position the bridge in the middle, between the sound hole and the edge of the body.
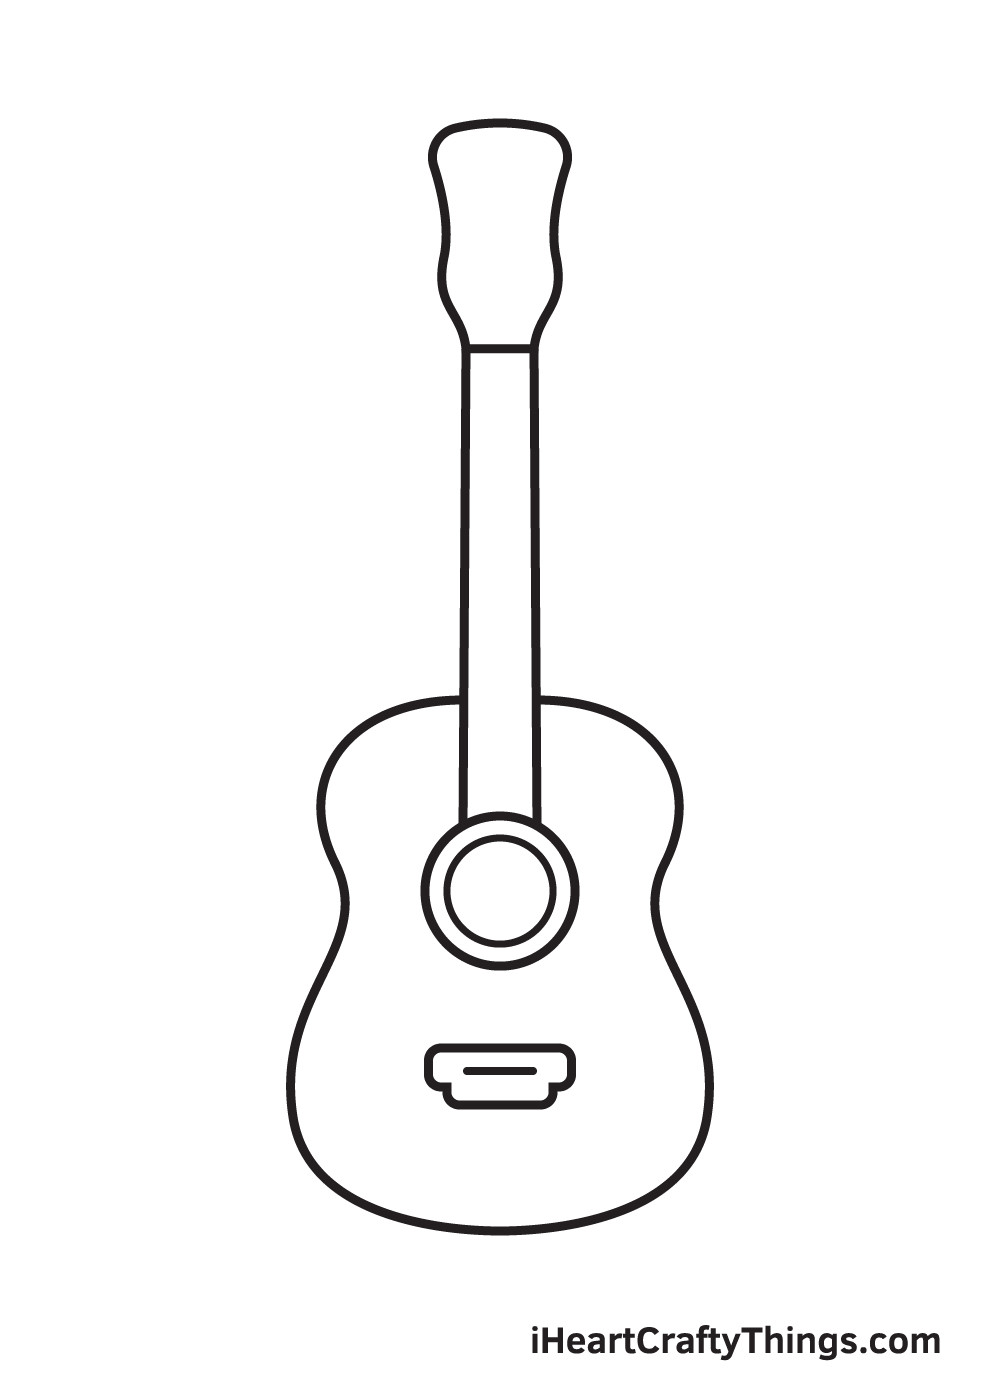 Guitar Bridge
5.6. Step 6: Add the Left Tuning Pegs
On the left side of the headstock, draw three tiny circles to represent the tuning pegs. Leave a slight gap between the pegs and the headstock. Connect the tuning pegs to the headstock by drawing short horizontal lines.
5.7. Step 7: Complete the Tuning Pegs Set
Repeat the previous step on the opposite side of the headstock to complete the set of tuning pegs.
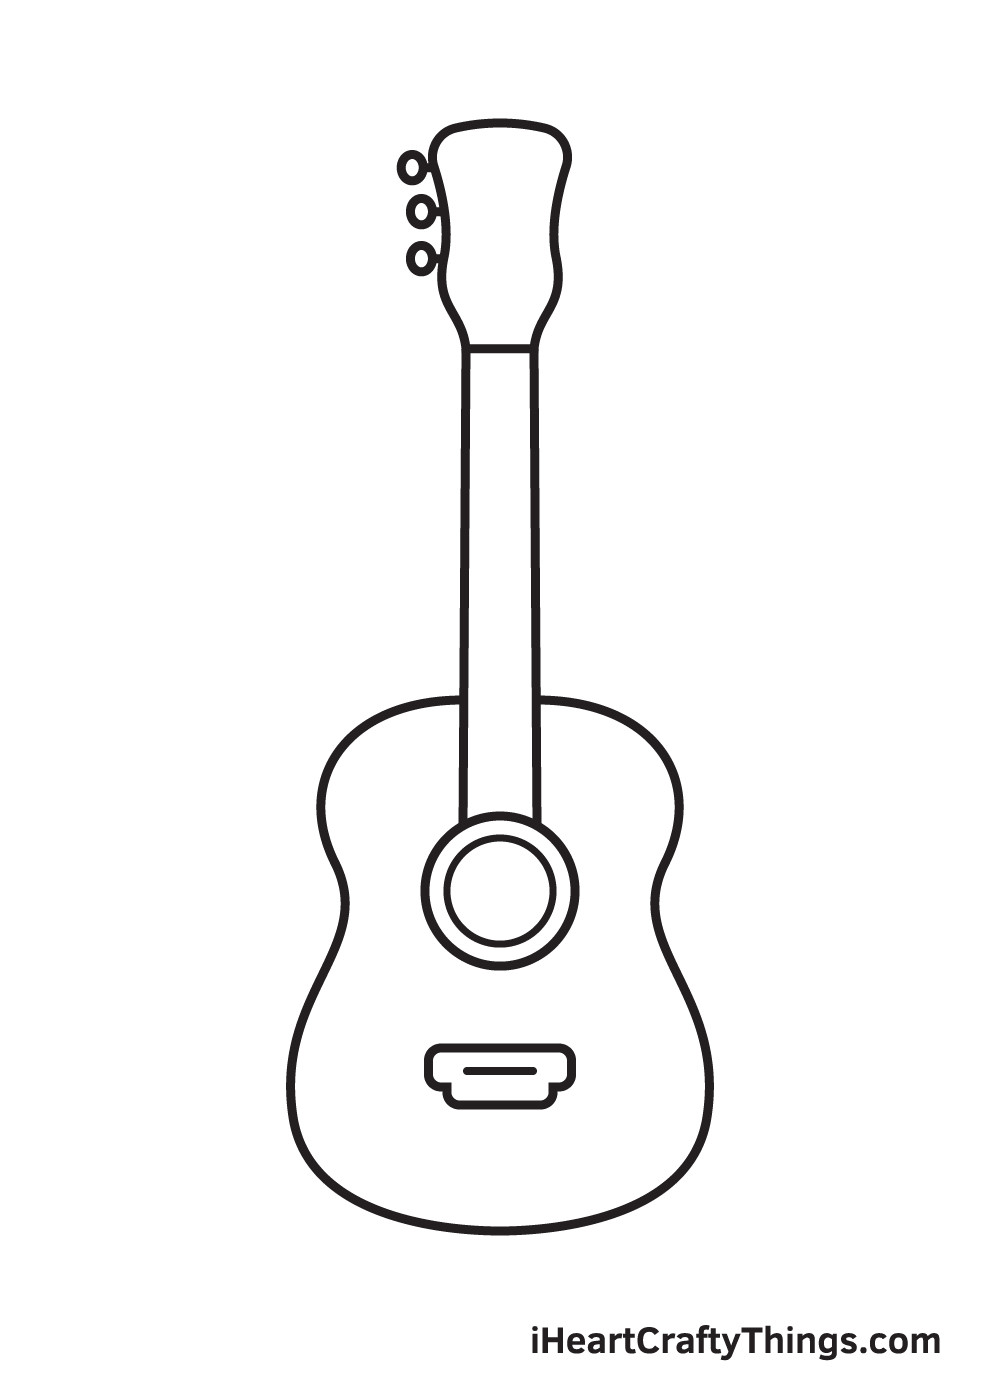 Guitar Tuning Pegs
5.8. Step 8: Add String Posts
Draw six small circles within the headstock, aligning each circle with a tuning peg. These represent the string posts.
5.9. Step 9: Draw the Strings
To finalize the guitar drawing, draw six vertical lines starting from the circle shapes inside the headstock, extending down to the bridge. Each string should connect to a string post in the headstock.
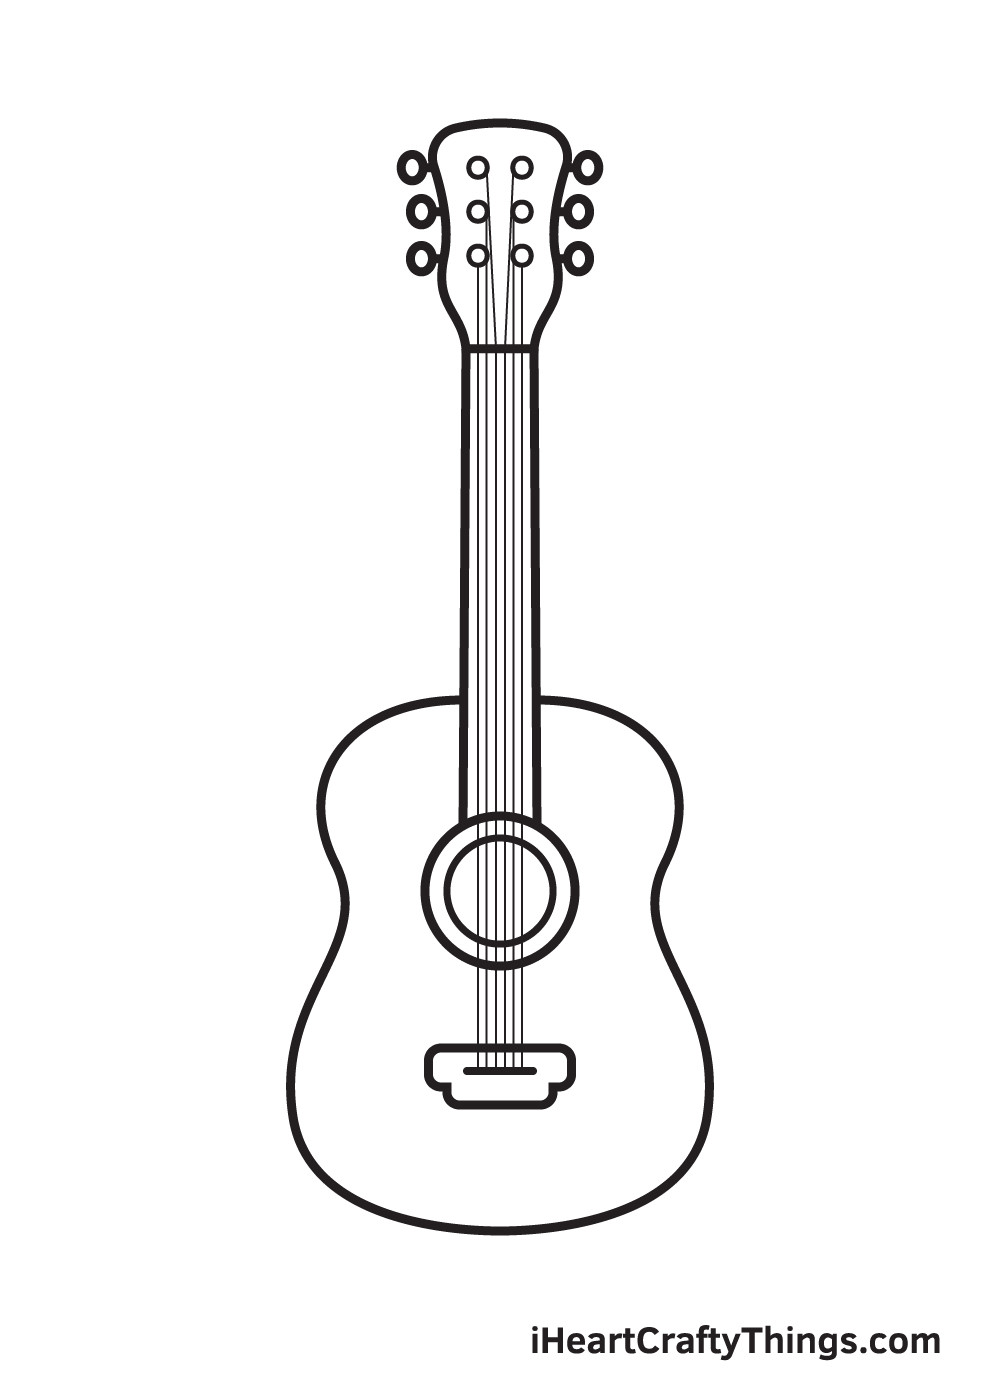 Guitar Strings
6. What Are Some Tips and Tricks for Simplifying the Guitar Drawing Process?
Simplifying the guitar drawing process involves using effective techniques to manage the complexity of the instrument.
- Use a Real Guitar as a Model: Having a real guitar to reference can make the process much easier.
- Simplify Details: Reduce the number of strings or simplify the shape of the headstock.
- Break Down Shapes: Use basic shapes like ovals and rectangles to construct the guitar.
- Start with Light Sketches: Use light pencil strokes for initial outlines.
- Erase and Refine: Don’t be afraid to erase and adjust your lines as you go.
- Focus on Proportions: Ensure that the different parts of the guitar are proportional to each other.
- Practice Regularly: Consistent practice will improve your skills over time.
7. How Can I Add Shading and Depth to My Guitar Drawing?
Adding shading and depth can transform a flat drawing into a more realistic and visually appealing artwork. Here’s how:
- Identify Light Source: Determine the direction of the light.
- Lightly Shade: Start with light shading in areas away from the light source.
- Build Up Layers: Gradually add darker shades in areas that are further from the light.
- Use Blending Tools: Use a blending stump or your finger to smooth out the shading.
- Highlight Areas: Leave some areas completely white to represent highlights.
- Consider Material: Different materials reflect light differently.
- Add Shadows: Add shadows beneath the guitar to ground it on the surface.
8. How Do I Draw Different Types of Guitars (Acoustic vs. Electric)?
Drawing different types of guitars requires understanding their unique features. Here’s a comparison:
| Feature | Acoustic Guitar | Electric Guitar |
|---|---|---|
| Body | Hollow body, typically larger | Solid or semi-hollow body, often smaller |
| Soundhole | Prominent soundhole | May have no soundhole or smaller f-holes |
| Pickups | No pickups | Prominent pickups |
| Controls | No controls | Knobs and switches for volume and tone |
| Headstock | Typically symmetrical | Can be more varied in shape |
| Bridge | Simpler bridge design | More complex bridge design with adjustable saddles |
| Overall Shape | More rounded and organic | More angular and stylized |
9. How Do I Color My Guitar Drawing?
Coloring your guitar drawing can bring it to life and add a personal touch. Here’s a guide:
- Choose Your Medium:
- Colored Pencils: Great for detail and control.
- Markers: Bold and vibrant, but can be less forgiving.
- Watercolor: Soft and translucent, ideal for creating depth.
- Plan Your Color Scheme:
- Realistic: Use colors that match real guitar finishes.
- Creative: Experiment with unique and imaginative color combinations.
- Start with Base Colors:
- Apply a base layer of color to the body, neck, and headstock.
- Add Shading and Highlights:
- Use darker shades to create shadows and lighter shades to create highlights.
- Blend Colors:
- Use blending techniques to create smooth transitions between colors.
- Add Details:
- Color the tuning pegs, strings, and other small details.
- Experiment:
- Don’t be afraid to try new techniques and color combinations.
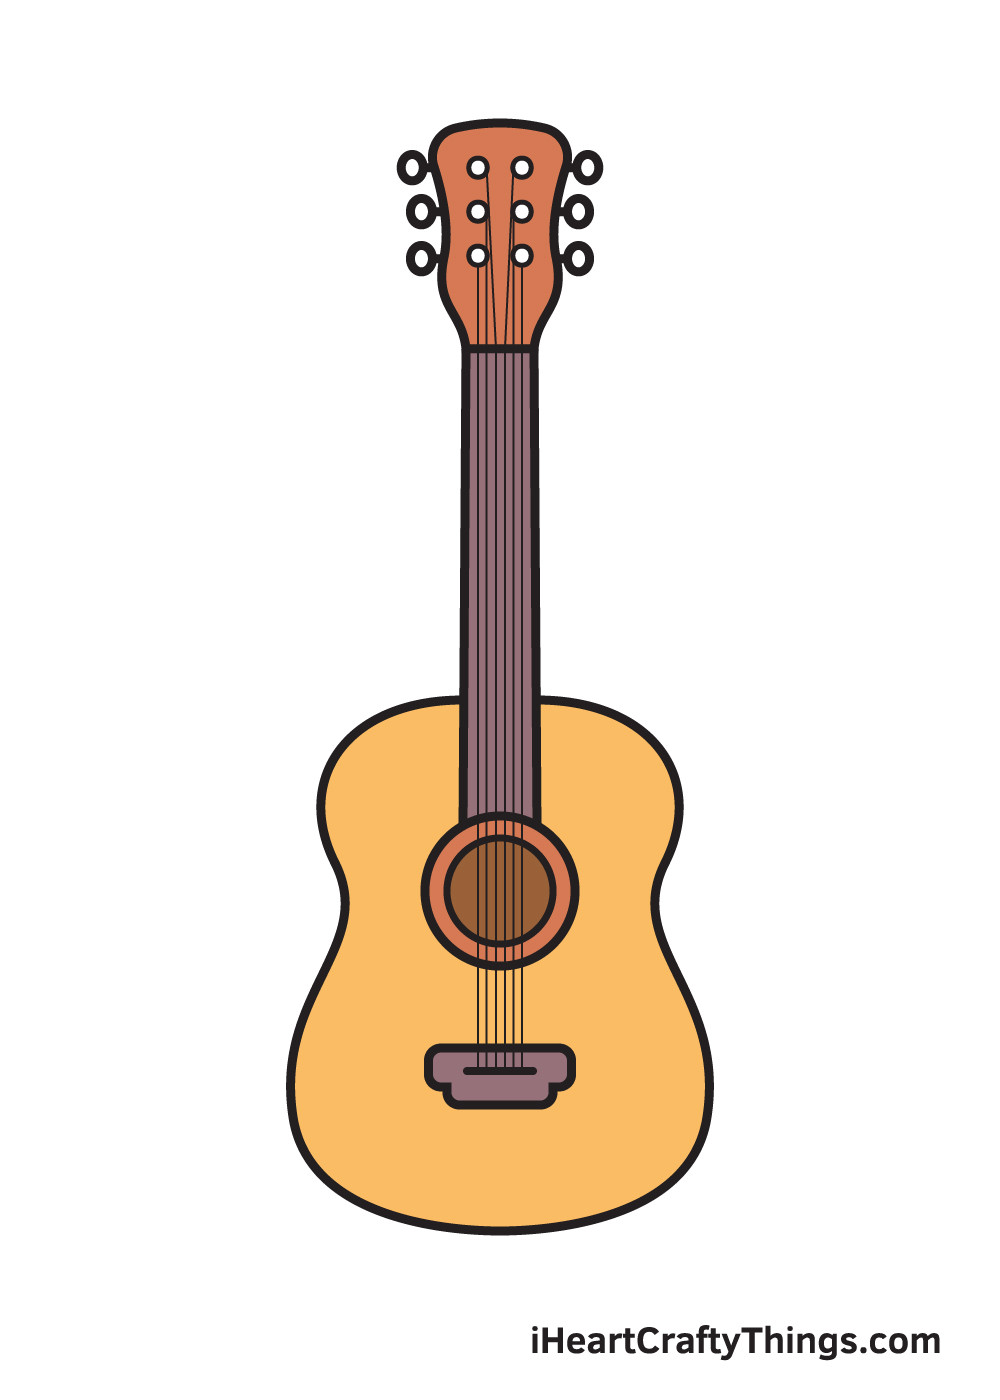 Colored Guitar Drawing
10. How Can I Find Inspiration for My Guitar Drawings?
Finding inspiration is essential for fueling your creativity and developing your unique artistic style. Here are some ideas:
- Look at Real Guitars:
- Study different types of guitars and their features.
- Browse Online:
- Explore online art communities and galleries for guitar drawings.
- Follow Artists:
- Follow artists on social media who specialize in instrument drawings.
- Visit Music Stores:
- Take photos and sketch guitars in music stores.
- Attend Concerts:
- Sketch guitars being played at live performances.
- Listen to Music:
- Let music inspire your drawings and color choices.
- Experiment:
- Try different styles, techniques, and mediums to find what you enjoy.
11. What Are Common Mistakes to Avoid When Drawing a Guitar?
Avoiding common mistakes can significantly improve the quality of your guitar drawings. Here are some pitfalls to watch out for:
- Proportion Issues:
- Incorrectly sized body, neck, or headstock.
- Symmetry Errors:
- Uneven sides of the guitar body.
- Incorrect Angles:
- Misaligned neck or headstock.
- Poorly Drawn Curves:
- Inaccurate or unnatural curves in the body.
- Lack of Detail:
- Omitting important features like the soundhole or bridge.
- Inconsistent Shading:
- Uneven or unrealistic shading.
- Rushed Work:
- Not taking enough time to refine the drawing.
12. How Can I Practice and Improve My Guitar Drawing Skills?
Consistent practice is key to improving your guitar drawing skills. Here’s a structured approach:
- Set Goals:
- Define specific, achievable goals for each practice session.
- Warm-Up:
- Start with basic sketching exercises to loosen up your hand.
- Study References:
- Analyze photos and drawings of guitars to understand their structure.
- Practice Regularly:
- Set aside dedicated time for drawing each day or week.
- Vary Your Subjects:
- Draw different types of guitars from various angles.
- Seek Feedback:
- Share your drawings with other artists and ask for constructive criticism.
- Experiment:
- Try new techniques, mediums, and styles to expand your skills.
- Be Patient:
- Improvement takes time and effort, so don’t get discouraged by mistakes.
- Join a Community:
- Engage with other artists online or in person to share tips and inspiration.
13. How to Create a Cartoon Guitar Drawing
Creating a cartoon guitar drawing is a fun way to simplify and stylize the instrument. Here’s how:
- Exaggerate Features: Make the headstock larger or the body rounder.
- Simplify Shapes: Use basic shapes for the body, neck, and headstock.
- Add Personality: Include details like eyes, a mouth, or other cartoonish features.
- Use Bold Outlines: Create clear and defined outlines for each element.
- Bright Colors: Use vibrant and playful colors to make the drawing pop.
- Add Accessories: Include fun accessories like sunglasses, hats, or musical notes.
 Cartoon Guitar Drawing
14. What are Some Resources for Learning More About Guitar Drawing?
Numerous resources can help you learn more about guitar drawing and improve your skills. Here are some recommendations:
- Online Tutorials: Websites like YouTube and Skillshare offer video tutorials on guitar drawing.
- Drawing Books: Books on drawing techniques often include sections on drawing musical instruments.
- Online Courses: Platforms like Udemy and Coursera offer comprehensive drawing courses.
- Art Communities: Websites like DeviantArt and ArtStation provide platforms for sharing and receiving feedback on your artwork.
- Museums and Galleries: Visit art museums and galleries to study the techniques of master artists.
- Local Art Classes: Enroll in local art classes to receive in-person instruction and feedback.
- Guitarplayers.net: Explore our website for more articles, tutorials, and resources on guitar playing and related topics.
15. What are the Benefits of Learning to Draw a Guitar?
Learning to draw a guitar offers numerous benefits, both artistic and musical. Here are some advantages:
- Improved Observation Skills: Drawing requires careful observation of shapes, proportions, and details.
- Enhanced Creativity: Drawing allows you to express your creativity and imagination.
- Better Understanding of the Instrument: Drawing a guitar helps you understand its components and construction.
- Relaxation and Stress Relief: Drawing can be a relaxing and meditative activity.
- Increased Appreciation for Music: Combining art and music can deepen your appreciation for both.
- New Creative Outlet: Drawing provides a new way to express your passion for music.
- Improved Hand-Eye Coordination: Drawing requires precise hand movements and coordination.
FAQ: How to Draw a Guitar Simple
1. What is the easiest way to start drawing a guitar?
The easiest way to start drawing a guitar is to break it down into basic shapes like ovals and rectangles, then gradually add details.
2. What materials do I need for drawing a guitar?
You’ll need pencils (HB and 2B or 4B), an eraser, drawing paper, and a ruler. A compass can also be helpful for drawing the soundhole.
3. How do I make my guitar drawing look realistic?
To make your guitar drawing look realistic, focus on accurate proportions, shading, and adding details like the bridge, tuning pegs, and strings.
4. How do I draw an acoustic vs electric guitar?
Draw an acoustic guitar with a hollow body, prominent soundhole, and simpler bridge. For an electric guitar, draw a solid or semi-hollow body, visible pickups, and more complex controls.
5. What are common mistakes when drawing a guitar?
Common mistakes include proportion issues, symmetry errors, incorrect angles, and a lack of detail.
6. How can I improve my guitar drawing skills?
Improve your guitar drawing skills through regular practice, studying references, seeking feedback, and experimenting with different techniques.
7. How do I add shading and depth to my guitar drawing?
Add shading and depth by identifying a light source, lightly shading areas away from the light, building up layers, and using blending tools to smooth out the shading.
8. Can I draw a guitar if I’m not good at drawing?
Yes, you can draw a guitar even if you’re not good at drawing. Start with simple shapes and focus on the basic structure. Practice regularly, and you’ll improve over time.
9. Where can I find inspiration for guitar drawings?
Find inspiration by looking at real guitars, browsing online art communities, following artists on social media, and visiting music stores.
10. Is drawing a guitar good for guitar players?
Yes, drawing a guitar can be beneficial for guitar players as it improves their understanding of the instrument’s components and enhances their appreciation for music.
Drawing a guitar is a rewarding experience that combines artistic expression with a love for music. By following this step-by-step guide and practicing regularly, you can develop your skills and create beautiful guitar drawings. Remember to visit guitarplayers.net for more lessons, reviews, sheet music, and to connect with a vibrant community of guitar enthusiasts. Whether you’re a beginner or an experienced artist, the joy of drawing a guitar is within your reach. So grab your pencil, unleash your creativity, and start drawing your musical masterpiece today. You can find Address: 1140 Boylston Street, Boston, MA 02215, United States. Phone: +1 (617) 747-2261. Website: guitarplayers.net.