Dive into the melancholic beauty of Pink Floyd’s “Wish You Were Here” by learning its unforgettable intro solo. This lesson, brought to you by GuitarControl.net, will guide you through each note of this classic guitar piece. Get ready to explore the techniques and nuances that make this solo so iconic, and download the free guitar tab to start playing today.
 Learn to Play Pink Floyd's Wish You Were Here Intro Solo with Guitar Tab – Guitar Lesson by GuitarControl.com
Breaking Down the “Wish You Were Here” Intro Solo
Hello everyone, Darrin from GuitarControl.net here, ready to help you master a truly special piece of music. “Wish You Were Here” by Pink Floyd is more than just a song; it’s an emotional journey, and the intro solo is your first step on that path. While I may not be the biggest Pink Floyd devotee, this song’s intro is undeniably captivating and a favorite among guitarists. Let’s get started and learn how to play this beautiful solo. Remember to grab the free guitar tab using the link in the description – it will be your best companion as we break down each section.
Measures 1-2: The Opening Phrase and Slide
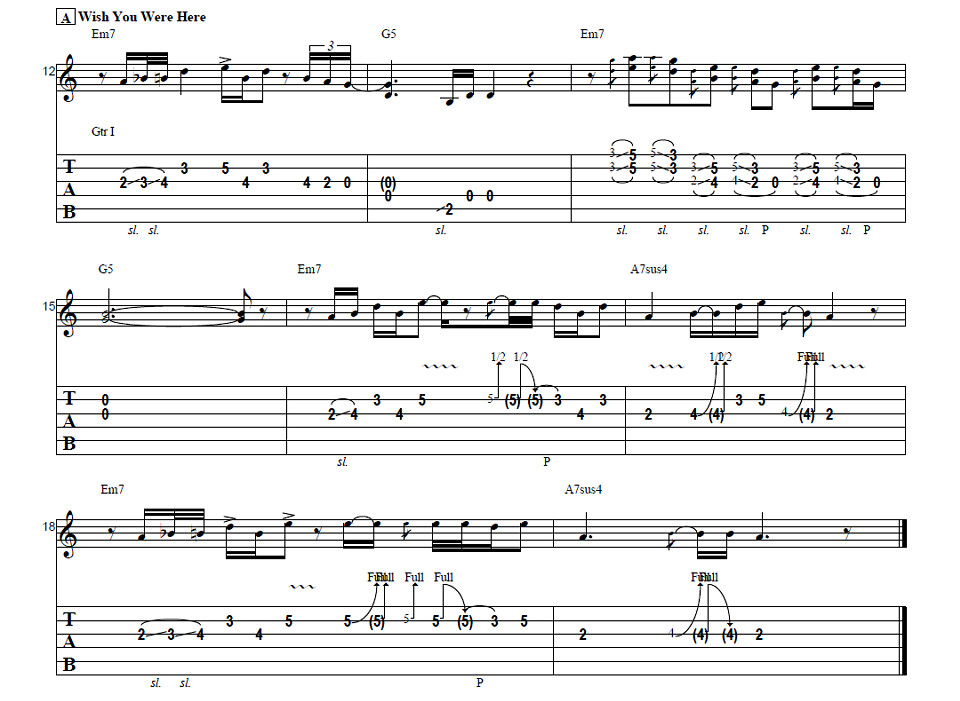
We begin on the second fret of the G string. Use your middle finger to pick this note and immediately slide up to the fourth fret. The slide isn’t perfectly smooth; aim for a slightly staggered feel, allowing you to subtly hear the note at the third fret as you transition. This nuanced slide adds character to the opening. The timing here is less about strict counting and more about feeling the rhythm. Think of it as a rest on the downbeat of one, with the slide starting on the “and” of one. The notes that follow are quick, almost like 32nd notes, so focus on feeling the musical phrase rather than over-analyzing the count.
After the slide, the next crucial note is on the third fret of the B string. Position your first finger to be ready for this note immediately after the slide. This transition should be seamless. Following this, we move to the fifth fret of the B string, keeping that first finger anchored on the third fret as a reference. Then, your second finger comes into play on the fourth fret of the G string, before returning to the third fret of the B string again. This sequence requires a bit of finger agility, but with practice, it will become fluid. Between these notes, you’ll find very brief rests – these are not just silences but moments to prepare your hand for the next movement, ensuring a clean and articulate performance.
Measures 3-4: Double Stops and Harmonic Texture
For the third measure, we encounter what many students find the trickiest part: the double stops. The technique I find most effective involves using your third finger to barre across the third fret of both the B and high E strings. Pick these two strings together and slide up to the fifth fret. The slide should feel like it starts from “nowhere,” meaning a smooth transition without emphasizing the starting fret. Immediately after the slide, come back down to the first fret and repeat the same slide up to the third fret. This creates a distinctive, almost weeping sound characteristic of the solo.
Next, we shift our focus to the G and B strings, maintaining a similar sliding double-stop technique but now staggered by a half step. I recommend using your second and third fingers for this, placing them on the third fret of the G string and the fourth fret of the B string respectively. Slide this double stop up a half step, landing on the fourth fret of the G string and the fifth fret of the B string. The reason I favor these fingers is due to the natural hand position it encourages, with the slightly longer middle finger (your third finger in this case) providing a comfortable stretch. After this upward slide, descend to the second fret of the G string and the third fret of the B string. This is followed by an open G string note. Repeat the double stop on the G and B strings (second and third frets), then another open G string, and finally, an open B string to conclude the fourth measure. Allow the open B string to ring out for the entire measure, creating a sustained and resonant sound that marks the end of the first half of the solo riff.
Measures 5-8: Echoes of the Beginning and Building Intensity
Starting from the fifth measure, we revisit the familiar territory of the opening phrase, but with subtle variations that build intensity. Begin again on the second fret of the G string with your middle finger, sliding to the fourth fret, followed by the third fret of the B string, and then back to the fourth fret of the G string and up to the fifth fret of the B string. The finger positioning remains consistent with the beginning, ensuring a sense of familiarity and flow.
However, this time, when you reach the fifth fret of the B string, let it ring out with a touch of vibrato. This adds emotion and sustain. From this sustained note, we introduce a bend and pull-off technique. Bend the note at the fifth fret, release the bend, and then pull-off to the third fret of the B string. Immediately following this, return to the fourth fret of the G string and then the third fret of the B string. This sequence of bend, pull-off, and descending notes adds a dynamic element to this section, increasing the emotional depth.
Moving into the next measure, transition smoothly to the second fret of the G string. Now, we ascend to the fourth fret of the G string. To prepare for a bend coming up, position your fingers by placing your first finger on the second fret, second finger on the third, and third finger on the fourth fret of the G string. This finger placement provides support and makes the upcoming bend easier to execute. Shift up to the third and fifth frets on the B string, then descend back to the same second through fourth fret positions on the G string. Perform a bend on the fourth fret of the G string and conclude on the second fret. This bending phrase adds a bluesy, expressive quality to the solo.
The subsequent measure mirrors the very beginning of the solo. Execute the slide from the second fret through the third and fourth frets on the G string, followed by the third fret of the B string, and then back to the fourth fret of the G string and finally to the fifth fret of the B string. This cyclical return to the opening motif creates a sense of unity and resolution within the solo.
For the very last phrase, bend the fifth fret of the B string and release the bend, pulling off back to the fifth fret and then to the second fret of the G string. Conclude with the fourth fret of the G string, perform a final bend and release, ending on the second fret of the G string. This final bending phrase provides a conclusive and emotionally resonant ending to the intro solo.
Timing and Practice Tips
To nail the timing and rhythm of this solo so it locks in perfectly with the backing track, practice along with the original Pink Floyd recording. Listen to the song and notice that the chord progression plays through twice before the intro solo enters on the second repetition. Use this second chord progression as your cue to begin practicing the solo along with the lead guitar part. Playing in unison with David Gilmour’s original solo is invaluable for internalizing the timing and phrasing.
Once you feel comfortable playing along with the lead guitar track, try practicing from the very beginning of the song, where only the rhythm guitar part is playing. This will help you develop your internal clock and sense of timing, as you’ll need to count yourself in and start the solo at the precise moment it enters in the song. Listen for the rhythm guitar cues – those distinct strums just before the solo comes in. These act as your pickup notes, signaling the start of your solo.
Conclusion
And there you have it – the intro solo to “Wish You Were Here” by Pink Floyd, ready for you to play. As you’ve seen, while it’s not incredibly complex technically, it’s full of nuances and techniques that are fantastic practice, including slides, double stops, bends, and pull-offs. While originally played on acoustic guitar, it arguably feels more comfortable on an electric guitar. However, learning it on acoustic, as in the original, certainly adds to the authenticity. If you’re newer to guitar or have an acoustic that’s less than forgiving, don’t hesitate to learn it on electric – it will still sound amazing.
If you found this lesson helpful, give us a thumbs up and drop a comment below if you have any questions or suggestions for other guitar lessons. Don’t forget to subscribe to our channel and hit the notification bell so you never miss out on our new content. Thanks for watching, and happy playing!


