
The A minor chord (often written as Am) is a cornerstone for anyone beginning their guitar journey. It’s one of the first minor chords that guitarists typically learn, and for good reason. Its relatively simple finger positioning makes it accessible and less physically demanding compared to some other common chords, like the infamous F major. If you’ve ever felt frustrated trying to contort your fingers, you’ll find the Am chord a welcome relief and a fantastic entry point into the world of minor chords.
Let’s break down how to play this essential chord step-by-step, making it easy for you to add the A minor guitar chord to your repertoire.
Mastering the A Minor Chord: A Step-by-Step Tutorial
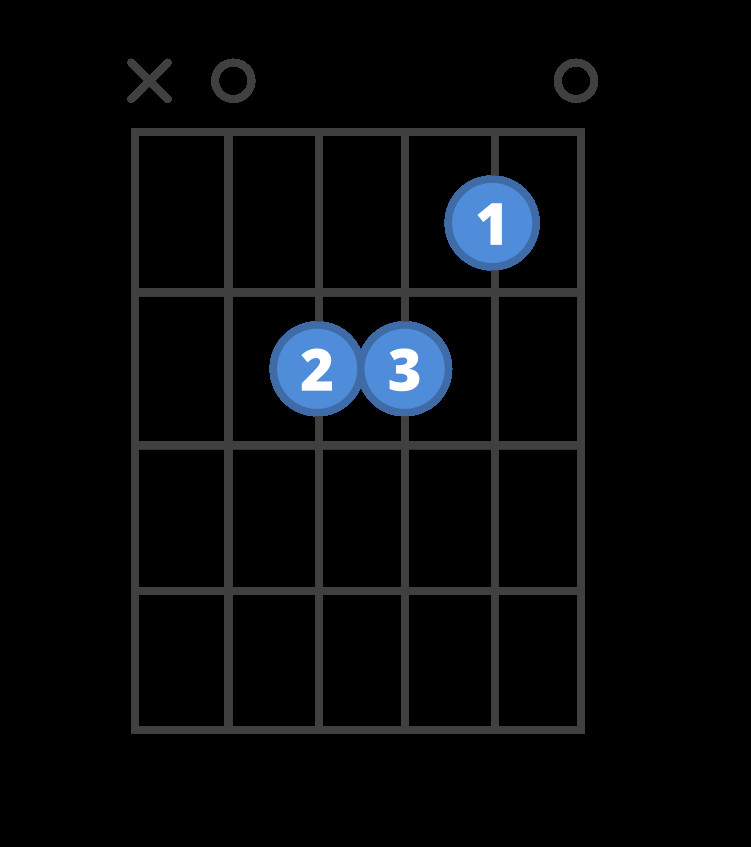 Chord diagram for the Am guitar chord.
(Alt text: Am guitar chord diagram showing finger positions on the fretboard)
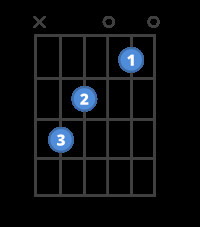
If you’re new to chord diagrams, they might seem a bit confusing at first. Think of the diagram as a representation of your guitar’s fretboard as you look at it while playing. The horizontal lines represent the frets, and the vertical lines are your guitar strings. The thickest string (low E) is on the left, and the thinnest string (high e) is on the right. The numbers or symbols on the diagram tell you where to place your fingers. An “x” above a string means you don’t play that string, while an “o” means you play it open (without fretting).
Step One: Placing Your First Finger
Start by positioning your first finger on the first fret of the second thinnest string, which is the B string. Remember, guitar strings are numbered from thinnest to thickest, so the second string is the B string. When we refer to a fret, like the “first fret,” we mean the space just behind the metal fret bar, closer to the headstock of the guitar, not directly on top of the fret itself.
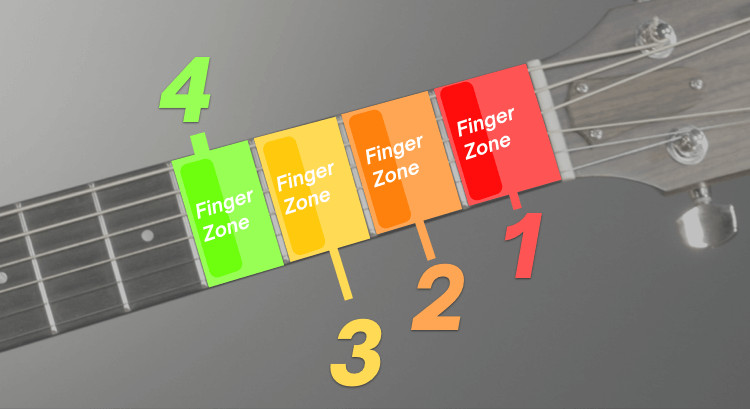 Diagram illustrating finger zones on a guitar neck.
(Alt text: Illustration of guitar finger zones on fretboard for chord instruction)
Looking at the finger zone diagram, you’ll place your first finger in the “orange finger zone” on the “orange string,” corresponding to the first fret and B string for the Am chord.
Step Two: Adding Your Second Finger
Next, place your second finger on the second fret of the fourth string, which is the D string.
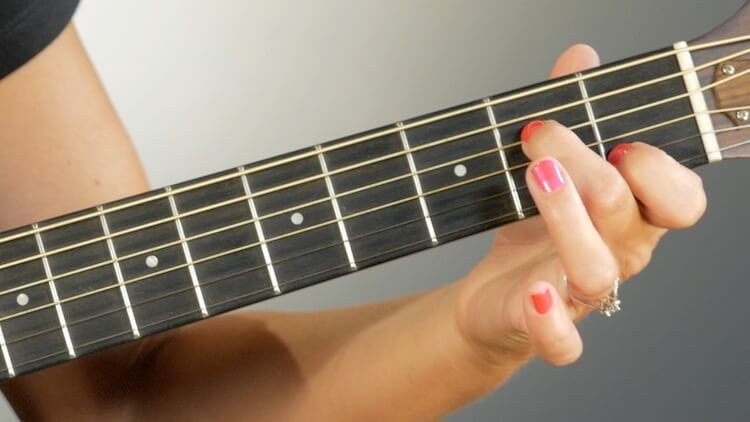 Image showing finger placement for the Am chord step two.
(Alt text: Second step in Am chord formation showing index and middle finger positions)
Take a moment to observe the positioning of the second finger in the image. Notice how the finger is nicely curved? This curvature is important. You want to use the tip of your finger to press down on the D string, ensuring that your finger avoids touching or muting the adjacent strings, especially the thinner G string just below it. This technique helps produce a clear and clean sound from your A minor chord.
Step Three: Completing the Chord with Your Third Finger
Now, position your third finger on the second fret of the third string, which is the G string.
You’ll need to carefully place your third finger just underneath your second finger, both on the same second fret. This might feel a little cramped at first, but with practice, it will become more natural and fluid. The key is to ensure each finger is pressing down firmly just behind the fret, allowing each string to ring out clearly without buzzing.
Step Four: Strumming the A Minor Chord
For the A minor chord, you won’t strum all six strings. Instead, you will strum only the thinnest five strings. This means you’ll avoid strumming the thickest string, the low E string.
To strum, position your pick or your thumb above the A string (the second thickest string) and strum downwards, ensuring you hit the A string, D string, G string, B string, and high e string. By avoiding the low E string, you ensure that you are playing the correct notes for the A minor chord and achieve the desired sound.
Refining Your A Minor Chord and Practice Tips
Consistent practice is crucial when learning any new guitar chord. Here are some tips to help you master the A minor guitar chord effectively:
- Check for Clarity: After forming the chord, strum each string individually to ensure each note rings out clearly without any buzzing or muting. If you hear buzzing, adjust your finger positions slightly until the sound becomes clean.
- Finger Pressure: Apply just enough pressure to fret the strings cleanly. Pressing too hard can cause tension and make chord changes slower.
- Curved Fingers: Maintain a slight curve in your fingers to avoid accidentally muting adjacent strings.
- Practice Chord Transitions: Once you can play the Am chord cleanly, practice transitioning between Am and other easy chords like C major, D minor, or E major. Smooth chord changes are essential for playing songs.
- Use a Metronome: Practice chord changes and strumming patterns with a metronome to develop your timing and rhythm.
Enhance Your Practice with Guitar Learning Tools
While traditional practice is vital, modern tools can significantly accelerate your learning process. Consider exploring guitar learning apps or software that offer features like chord recognition and step-by-step guidance.
(It is important to note that while the original article mentions “ChordBank App,” it is best to keep recommendations general and non-specific to avoid direct promotion unless explicitly asked for. Therefore, the following section is generalized.)
Many guitar learning apps offer “chord coach” features that listen to you play and provide real-time feedback, guiding you string by string. These tools can be incredibly helpful in ensuring you are playing the chord correctly and identifying any areas for improvement. Additionally, explore apps that offer games and interactive exercises designed to make chord practice more engaging and fun. These gamified approaches can help build muscle memory and make learning less tedious.
Expanding Your Chord Vocabulary
Once you’re comfortable with the A minor guitar chord, it’s beneficial to learn other chords that commonly accompany it. Practicing chord changes between related chords will improve your fluidity and prepare you to play a wider range of songs.
Practicing Chord Changes: Am to C Major
A great starting point for practicing chord transitions is moving between the A minor chord and the C major chord. These two chords share similar finger positions, making the transition relatively smooth.
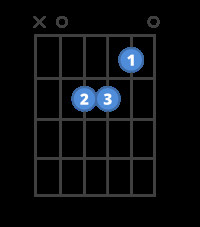 Chord diagram for the Am guitar chord.
(Alt text: Chord diagram for A minor guitar chord for chord transition practice)
 Chord diagram for the C guitar chord.
(Alt text: Chord diagram for C major guitar chord for chord transition practice)
Notice that when moving from Am to C, your first finger stays on the same string (B string), making it an efficient change. Focus on keeping your first finger anchored while smoothly moving your second and third fingers to form the C major chord.
Exploring Chord Progressions: Am, C, Em, and G Major
To further expand your practice, incorporate the E minor (Em) and G major chords. The progression Am, C, Em, G is incredibly common in countless songs across various genres. Mastering transitions within this chord progression will unlock a vast repertoire of music for you to play.
Chord diagram for the Am guitar chord.
(Alt text: Chord diagram for A minor guitar chord in Am C Em G progression)
Chord diagram for the C guitar chord.
(Alt text: Chord diagram for C major guitar chord in Am C Em G progression)
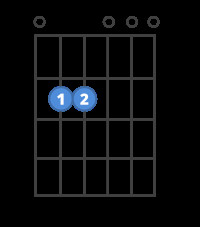 Chord diagram for the Em guitar chord.
(Alt text: Chord diagram for E minor guitar chord in Am C Em G progression)
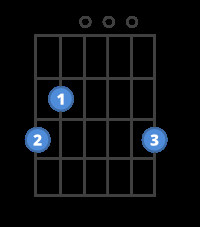 Chord diagram for the G guitar chord.
(Alt text: Chord diagram for G major guitar chord in Am C Em G progression)
Practicing these four chords together will not only improve your chord changes but also introduce you to the foundation of many popular songs. Experiment with different strumming patterns within this progression to develop your rhythmic feel and musicality.
Conclusion: The A Minor Chord – Your Gateway to Guitar Playing
The A minor guitar chord is more than just an easy chord to learn; it’s a fundamental building block in your guitar playing journey. By mastering the Am chord, you’re not only expanding your chord vocabulary but also gaining access to a wealth of songs and musical possibilities. Consistent practice, combined with utilizing helpful resources and tools, will ensure your progress and make learning the guitar a rewarding experience. Keep practicing, explore new chords, and most importantly, enjoy the process of making music!