
If you’re just starting your guitar journey, you might be wondering about a seemingly simple accessory: the guitar strap. While it might seem straightforward, knowing how to properly attach and use a guitar strap is essential for comfortable and confident playing, especially when you want to stand up and rock out. This guide will walk you through the process of putting a guitar strap on your guitar, ensuring it’s secure and allows you to play with ease.
Understanding Guitar Strap Attachment Methods
There are primarily two common methods to attach a guitar strap to your instrument. The method you use will depend on the type of guitar you have and the hardware it features. Most guitars come equipped with buttons, also known as strap pins, designed specifically for strap attachment. However, some guitars, particularly acoustic models, might only have one button or none at all. Let’s explore both methods:
Method 1: Utilizing Guitar Strap Buttons
This is the most common and generally preferred method for attaching a guitar strap. Most electric guitars and many acoustic guitars come with at least one, if not two, strap buttons.
-
Identifying Strap Buttons: Typically, you’ll find strap buttons in these locations:
- Bottom of the Guitar Body: This is almost always present on guitars designed for strap use.
- Heel of the Neck or Upper Bout: The second button can be located where the neck joins the body (the heel) or on the upper curve of the guitar’s body (upper bout). Acoustic guitars sometimes have the button on the heel, while electric guitars often have it on the upper bout.
-
Attaching the Strap: Guitar straps have leather or synthetic ends with buttonholes. To attach the strap using buttons:
- Locate the Strap Buttons: Identify the strap buttons on your guitar.
- Position the Strap End: Take one end of your guitar strap and locate the buttonhole.
- Slide the Strap onto the Button: Firmly push and maneuver the buttonhole over the guitar strap button. Newer straps might be a snug fit, requiring a bit of effort. Ensure the strap end is securely fastened around the button, encompassing the button’s neck to prevent slippage.
- Repeat for the Other End: Repeat steps 2 and 3 for the other end of the strap and the remaining strap button on your guitar.
 Guitar with strap buttons on the body and neck heel showing typical strap attachment points.
-
Troubleshooting Tight Straps: If your strap is new or made of thick material, fitting it onto the buttons can be challenging. You can try:
- Working the Leather/Material: Gently flex and massage the strap end to soften the material around the buttonhole.
- Using a Strap Button Installation Tool: These tools can help stretch the strap end and ease it over the button.
- Patience: With use, the strap will naturally stretch slightly, making attachment easier over time. However, ensure it doesn’t become too loose, as this could lead to the strap slipping off.
-
What if you’re missing a button? If your guitar lacks a button, particularly at the bottom of the body or the neck heel, it’s crucial to get one installed. Do not attempt to drill into your guitar yourself unless you have experience with guitar repair. The safest and most recommended approach is to take your guitar to a reputable music store or a qualified luthier (guitar technician). They can professionally install a strap button without damaging your instrument.
Method 2: Using a String or Tie for Guitars with One Button
Some acoustic guitars, especially older or budget models, might only feature a single strap button, usually located at the bottom of the guitar body. In such cases, you’ll need to employ a string or a similar tie to secure the other end of your strap.
-
Materials You Can Use:
- Shoelace: A sturdy shoelace works well.
- String or Twine: A strong, non-slip string or twine is suitable.
- Paracord: Durable and reliable, paracord is a good option.
-
Attaching the Strap with a String:
- Prepare your String: Cut a length of your chosen material, about 12-18 inches should suffice.
- Attach One Strap End to the Button: Secure one end of your guitar strap to the existing strap button on the guitar body as described in Method 1.
- Thread the String: Take your string and thread it through the buttonhole at the other end of your guitar strap.
- Tie the String to the Guitar Neck: Position the other end of the string around the guitar neck, above the nut (the small piece at the top of the fretboard where the strings pass through). Crucially, thread the string underneath the guitar strings, between the strings and the fretboard.
- Securely Tie the String: Tie the string firmly and securely around the neck. Ensure it’s tight enough to hold the strap end in place but not so tight that it digs into the neck. A simple knot like a square knot or a bowline knot will work well.
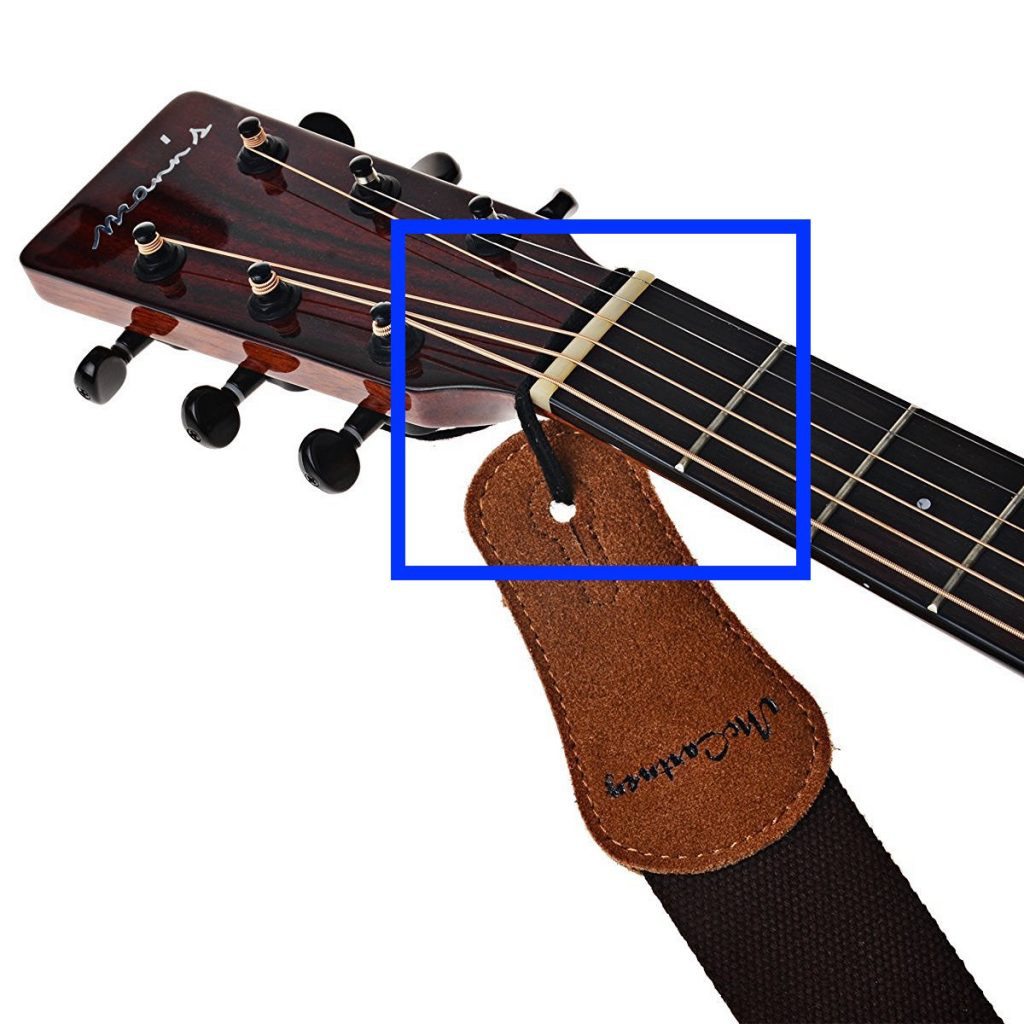 Acoustic guitar with a strap tied to the headstock using a string as an alternative attachment method.
- Important Note: When tying the string, make absolutely sure it goes underneath the guitar strings. Tying it on top of the strings will interfere with their vibration, causing buzzing and tuning instability.
Essential Tips for Comfortable and Secure Strap Use
Once you’ve successfully attached your guitar strap, there are a few key practices to adopt to ensure comfortable playing and prevent any mishaps.
1. Practice Standing Up with Your Strap
If you intend to perform standing up, it’s vital to practice standing while playing, even during your regular practice sessions. Playing while standing is a different experience than sitting. Your balance, posture, and even the reach to the fretboard can feel altered.
- Early Habit Formation: Getting used to playing standing up early in your guitar learning journey is highly beneficial. It develops the necessary muscle memory and coordination for standing performances.
- Performance Readiness: If you have a gig or plan to play with others while standing, practicing beforehand will prevent discomfort, fatigue, and potential playing errors during your performance.
2. Regularly Test Your Strap’s Security
Before each playing session, especially if you’re standing, make it a habit to test your guitar strap’s security.
- Check Button Connections: Ensure the strap ends are still firmly attached to the strap buttons. Give them a gentle tug to confirm they are securely in place.
- Inspect String Ties: If you’re using a string, check the knot for tightness and wear. Replace the string if it appears frayed or weakened.
- Consider Strap Locks: For extra security, especially with valuable guitars, consider using strap locks. These replace your existing strap buttons and strap ends with a locking mechanism that prevents accidental strap detachment. While slightly more effort to install and remove, they offer significant peace of mind.
3. Adjust the Strap Length for Your Playing Style
The length of your guitar strap is a matter of personal preference and playing style. Experiment to find what feels most comfortable and allows you to play effectively.
- Typical Guitar Height: A common starting point is to adjust the strap so that your guitar hangs around your waist level, perhaps near your belt buckle or belly button.
- Experiment with Different Lengths: Don’t hesitate to try different strap lengths.
- Lower Guitar Position: Some players prefer a lower guitar position for a particular aesthetic or playing style. However, excessively low guitar positions can strain your wrist and make fretting more challenging.
- Higher Guitar Position: A higher guitar position can be ergonomically beneficial, reducing wrist strain and making it easier to reach all parts of the fretboard. Classical guitarists often play with the guitar in a higher position.
- Acoustic vs. Electric Guitar Height: You might find you prefer slightly different strap lengths for acoustic and electric guitars. Acoustic guitars, being larger, might feel more comfortable slightly higher, while electric guitars can sometimes be played lower for style or comfort.
4. Explore Different Types of Guitar Straps
Guitar straps are not just functional; they can also be an expression of your personal style.
- Material: Straps come in various materials like leather, nylon, cotton, and suede, each offering different levels of comfort, durability, and aesthetics.
- Width and Padding: Wider straps and those with padding can distribute the weight of heavier guitars more comfortably across your shoulder.
- Style and Design: From simple, understated straps to colorful, patterned, or even personalized straps, you can find one that matches your taste and guitar. Having a few different straps allows you to change your look or have backups readily available.
Conclusion
Putting a guitar strap on your guitar is a fundamental skill for any guitarist who wants to play standing up. By understanding the different attachment methods, prioritizing strap security, and finding your ideal strap length and style, you’ll be well-equipped to play comfortably and confidently, whether you’re practicing at home or performing on stage. Don’t be afraid to experiment and find what works best for you and your guitar!