Guitar tablature, commonly known as “guitar tabs,” is a revolutionary way for aspiring guitarists to quickly and easily learn to play their favorite songs. Think of guitar tabs as a simplified roadmap for music notation. While sharing some similarities with traditional music notation in that they indicate notes, rhythm, and techniques, guitar tabs offer a distinct advantage, especially for beginners: they show you exactly where to play those notes on the guitar fretboard.
This is incredibly useful because, unlike many other instruments, the guitar allows you to play the same note in multiple positions across the neck. Learning How To Read Tabs Guitar unlocks a world of musical possibilities, allowing you to bypass the complexities of standard musical notation and dive straight into playing music.
At websites like GuitarPlayers.net, we understand the power of guitar tabs. We believe learning how to read guitar tabs is the most efficient way to learn songs, whether you’re interested in chords or single-note melodies. Guitar tabs are beginner-friendly because they require no prior musical knowledge beyond understanding the layout of your guitar strings and frets.
If you’re eager to understand what guitar tabs are, how they work, and how they can accelerate your guitar learning journey, you’ve come to the right place. Let’s explore the world of guitar tabs together.
Decoding Guitar Tabs: A Visual Guide to Music
Guitar tablature is essentially a visual representation of music specifically tailored for guitar. A standard guitar tab is composed of six horizontal lines, each representing one of the six strings on a guitar. When learning how to read tabs for guitar, it’s crucial to understand that these lines are read from top to bottom, corresponding to the guitar strings from the high E string (thinnest) to the low E string (thickest).
Imagine looking down at your guitar in playing position – that’s how guitar tablature is oriented. Think of it as a direct map of your fretboard, guiding you to play songs faster than you ever thought possible.
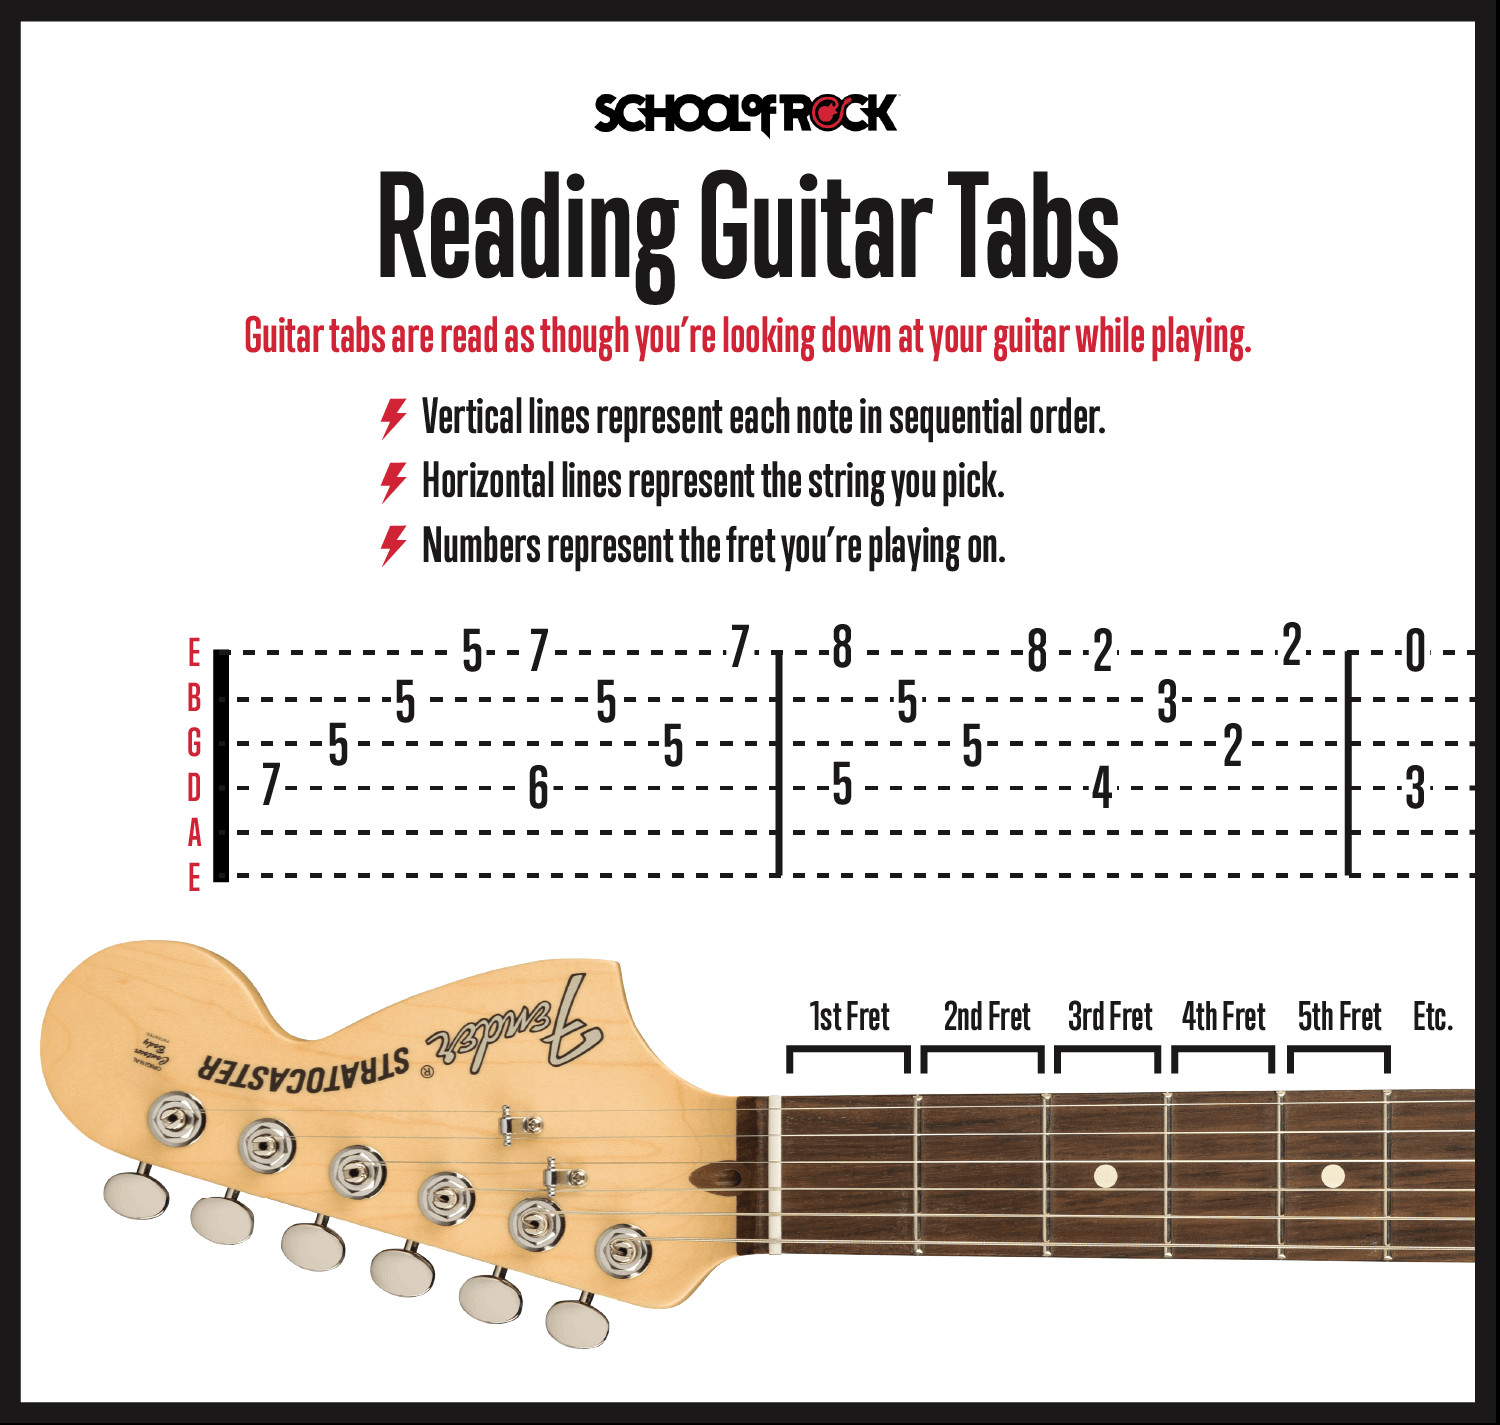 Reading guitar tabs
Image alt text: A diagram illustrating how to read guitar tabs, showing the six horizontal lines representing guitar strings and numbers indicating frets.
Within these six lines, you’ll notice numbers. These numbers are your fret markers, indicating which fret to press down on your guitar’s fretboard. Frets are the metal strips running perpendicular to the strings along the neck. They are numbered 0-24, starting from the nut (closest to the headstock) and extending down the neck.
A ‘0’ on a string in a guitar tab means you play that string “open,” without pressing down any fret. A ‘1’ indicates playing at the first fret, ‘2’ at the second fret, and so on. When learning how to read guitar tabs, remember that these numbers directly correspond to the fret number on your guitar.
Step-by-Step Guide: How to Read Guitar Tabs
Guitar tabs are read linearly, from left to right, representing the chronological order of notes in a song. When numbers are stacked vertically, they indicate a chord – notes played simultaneously by strumming all the specified strings. Guitar tab notation is often considered more accessible for beginners than standard notation because it visually represents where to place your fingers to form chords and play melodies.
Essential Knowledge for Reading Guitar Tabs
To effectively learn how to read guitar tabs, beginners should first familiarize themselves with the names and order of the 6 guitar strings, and understand the numbering system of the frets. This foundational knowledge will enable you to quickly locate the correct notes indicated in the tab and translate them onto your guitar.
Understanding the Guitar Tab Staff: Strings, Not Notes
The guitar tab staff visually resembles the staff used in standard music notation, but with a crucial difference. Instead of representing musical pitches, the lines in a guitar tab staff symbolize the 6 guitar strings.
The topmost line represents the high E string, and descending downwards, the lines represent B, G, D, A, and the bottom line is the low E string. This direct string-to-line correspondence makes reading guitar tabs intuitive for beginners. You’ll often see “TAB” clearly labeled to avoid confusion with standard notation.
Decoding Guitar Frets: Numbered Positions
Guitar frets, the metal strips across the fretboard, are the key to producing different notes on the guitar.
Most guitars feature between 19 and 24 frets. Each fret represents a semitone, or half step, in pitch. Within each octave, there are 12 semitones (or frets). Many guitars have fret markers – dots or inlays – typically located at the 3rd, 5th, 7th, 9th, and 12th frets. These markers act as visual aids for navigating the fretboard.
Remember, in guitar tabs, numbers represent fretted notes, while “0” indicates an open string. Playing an open string means plucking or picking the string without pressing down on any fret, allowing it to vibrate freely.
Reading Guitar Tab Chords: Vertical Harmony
Guitar chords in tablature are easily recognizable by their vertical arrangement. When multiple numbers are aligned vertically in a tab, it signifies a chord, meaning all these notes should be played together simultaneously. Even if a chord is arpeggiated (played one note at a time), in guitar tab, it will appear as individual notes, even though you might be holding down a chord shape.
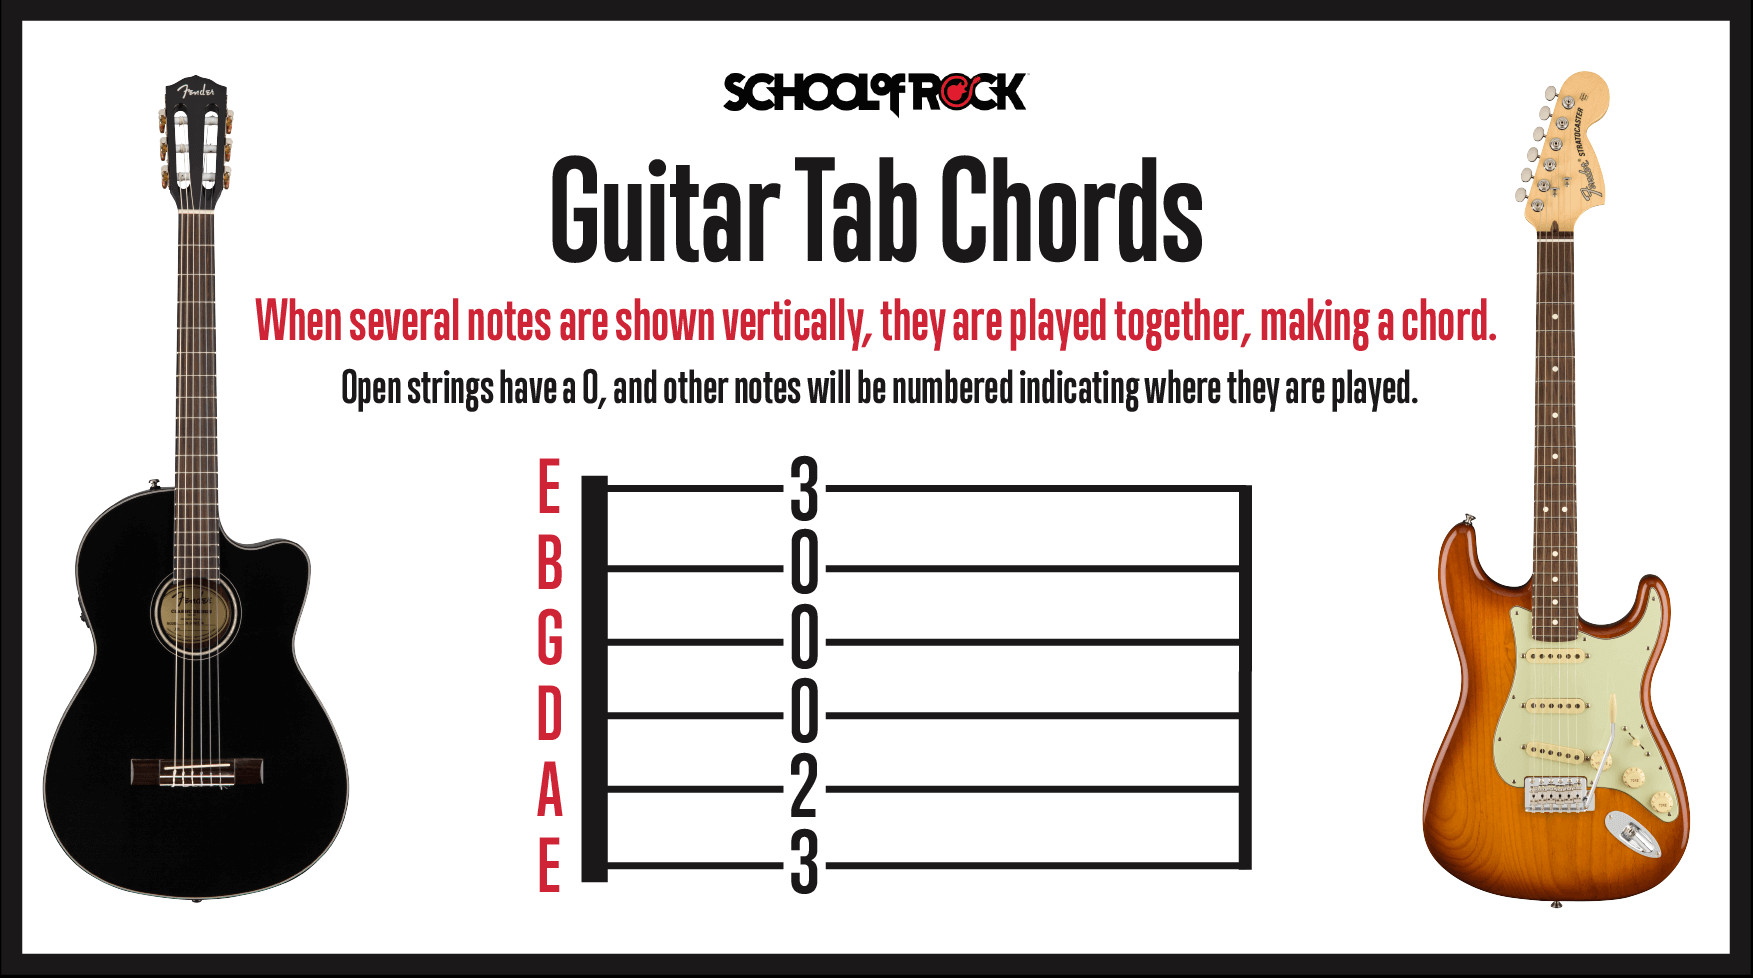 How to read guitar tab chords
Image alt text: An example of guitar tab chords, demonstrating vertically aligned numbers indicating notes to be played together as a chord.
Interpreting Guitar Tab Riffs: Melodies and Power
Many genres, especially rock music, heavily feature “riffs.” Riffs are short, repeating musical phrases, often combining single notes and partial chords, such as power chords. When reading guitar tabs for riffs, the same principle applies: vertically aligned notes are played together. This consistent notation makes learning how to read guitar tablature efficient and enjoyable.
Guitar Tabs vs. Chord Charts: Understanding the Difference
Guitar tabs and chord charts serve different but complementary purposes. A chord chart is a diagram that visually represents a chord shape, showing where to place your fingers on the fretboard and often indicating which fingers to use. Chord charts are frequently placed above song lyrics to indicate chord changes.
However, chord charts typically only show the root chords of a song. Guitar tabs offer a more detailed representation, including single notes, melodic lines, and variations that go beyond basic chords. For this reason, chord charts are often used alongside guitar tabs to provide a comprehensive learning experience, especially for beginner guitarists transitioning from basic chords to playing full songs.
Fingers and Numbers: Tablature vs. Chord Charts
Chord charts and guitar tabs use numbers, but in different contexts. Chord charts use numbers to represent fingers of the fretting hand: 1 for index, 2 for middle, 3 for ring, and 4 for pinky finger.
In contrast, guitar tabs use numbers to indicate frets, not fingers. Therefore, while chord charts guide finger placement, guitar tabs guide fret and string selection. Often, easy guitar tabs include chord charts to assist beginners with hand positioning and chord shapes.
Guitar Tab Symbols: Unlocking Techniques
Beyond lines and numbers, guitar tabs utilize symbols to represent various guitar techniques. Understanding these symbols is crucial for authentic and nuanced playing. Mastering how to read guitar tabs and their associated symbols will greatly enhance your playing and make interpreting tabs much easier.
Before diving into techniques, always ensure your guitar is properly tuned. Refer to a guide on guitar tuning to avoid playing out of pitch.
Muting Guitar Notes: Controlling Dynamics
Muting is a fundamental technique, particularly in genres like rock, metal, and punk, where it’s used to create rhythmic and dynamic textures.
How to Mute Guitar Notes
Muting can be achieved with either the picking hand, the fretting hand, or both. It adds dynamic variation and polish to your playing. Verses in songs might be muted, while choruses are open and ringing.
Experienced guitarists often incorporate muting instinctively to control unwanted noise and feedback, especially at higher volumes.
Guitar Technique: Palm Muting (P.M.)
Palm muting is a widely used rock guitar technique. It involves resting the edge of your picking hand’s palm lightly on the strings near the bridge while picking. Heavy palm muting creates a tight, percussive sound, while lighter palm muting allows more sustain. In guitar tabs, “P.M.” above the tab section indicates palm muting.
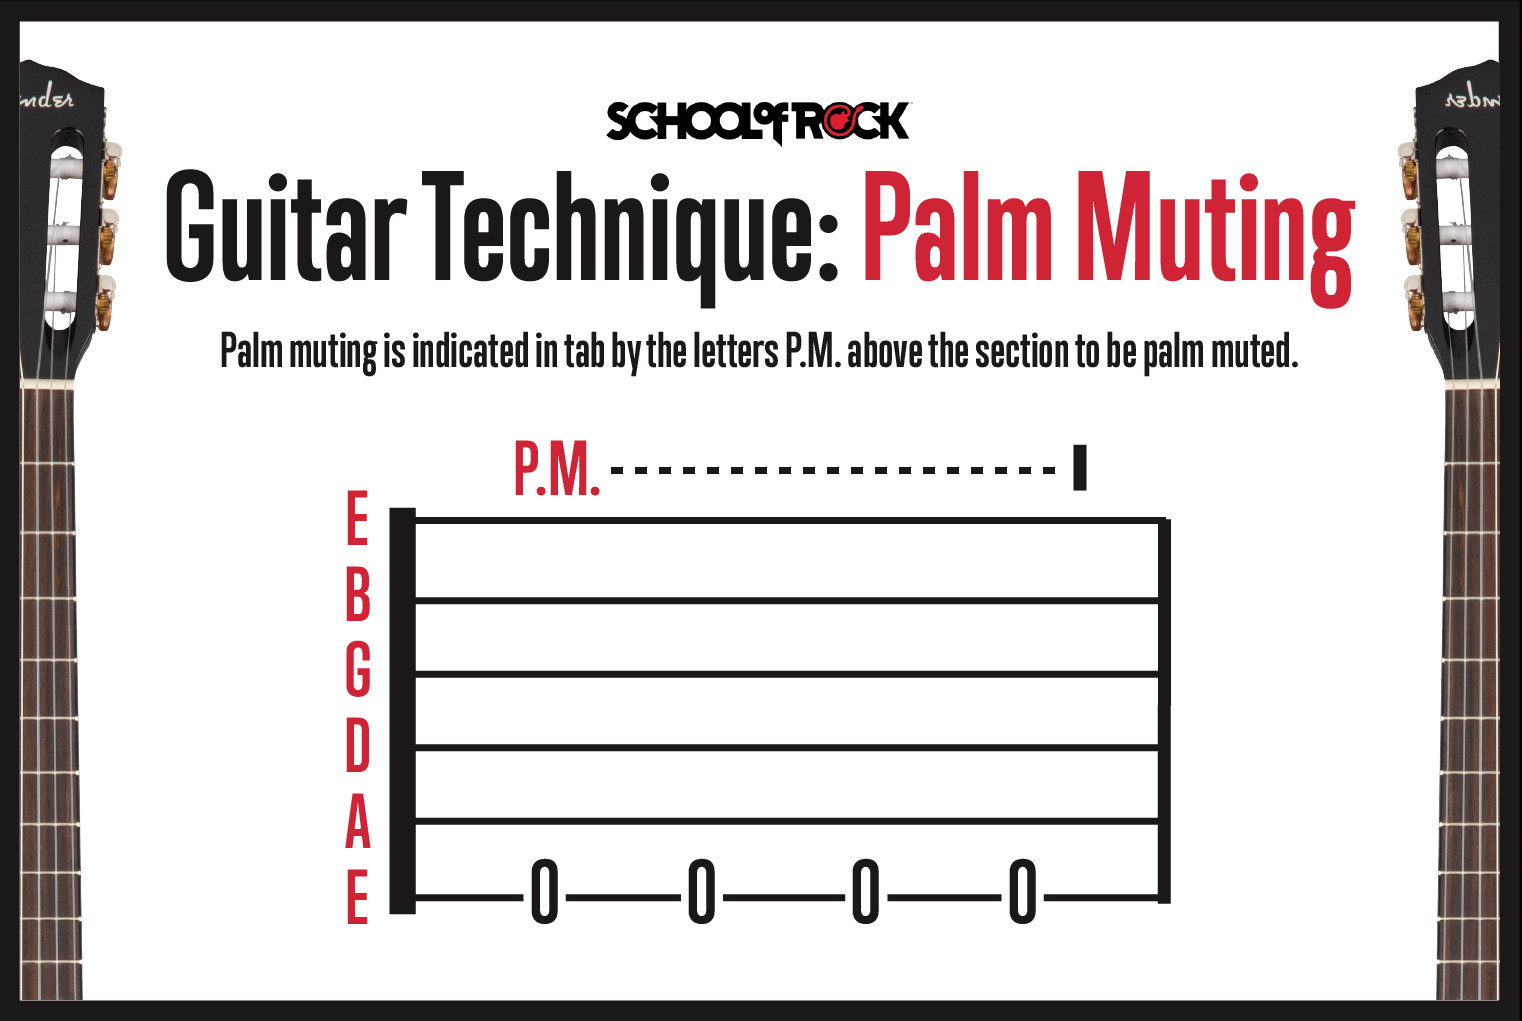 Guitar technique palm muting
Image alt text: Illustration of palm muting technique on guitar, showing the picking hand’s palm resting on the strings near the bridge.
Guitar Technique: Muted Notes (X)
Muted notes, notated with an “X” in guitar tabs, are different from palm muting. They are created by lightly touching the string with the fretting hand without pressing down enough to produce a clear pitch. The string is still picked, but the sound is percussive and indistinct.
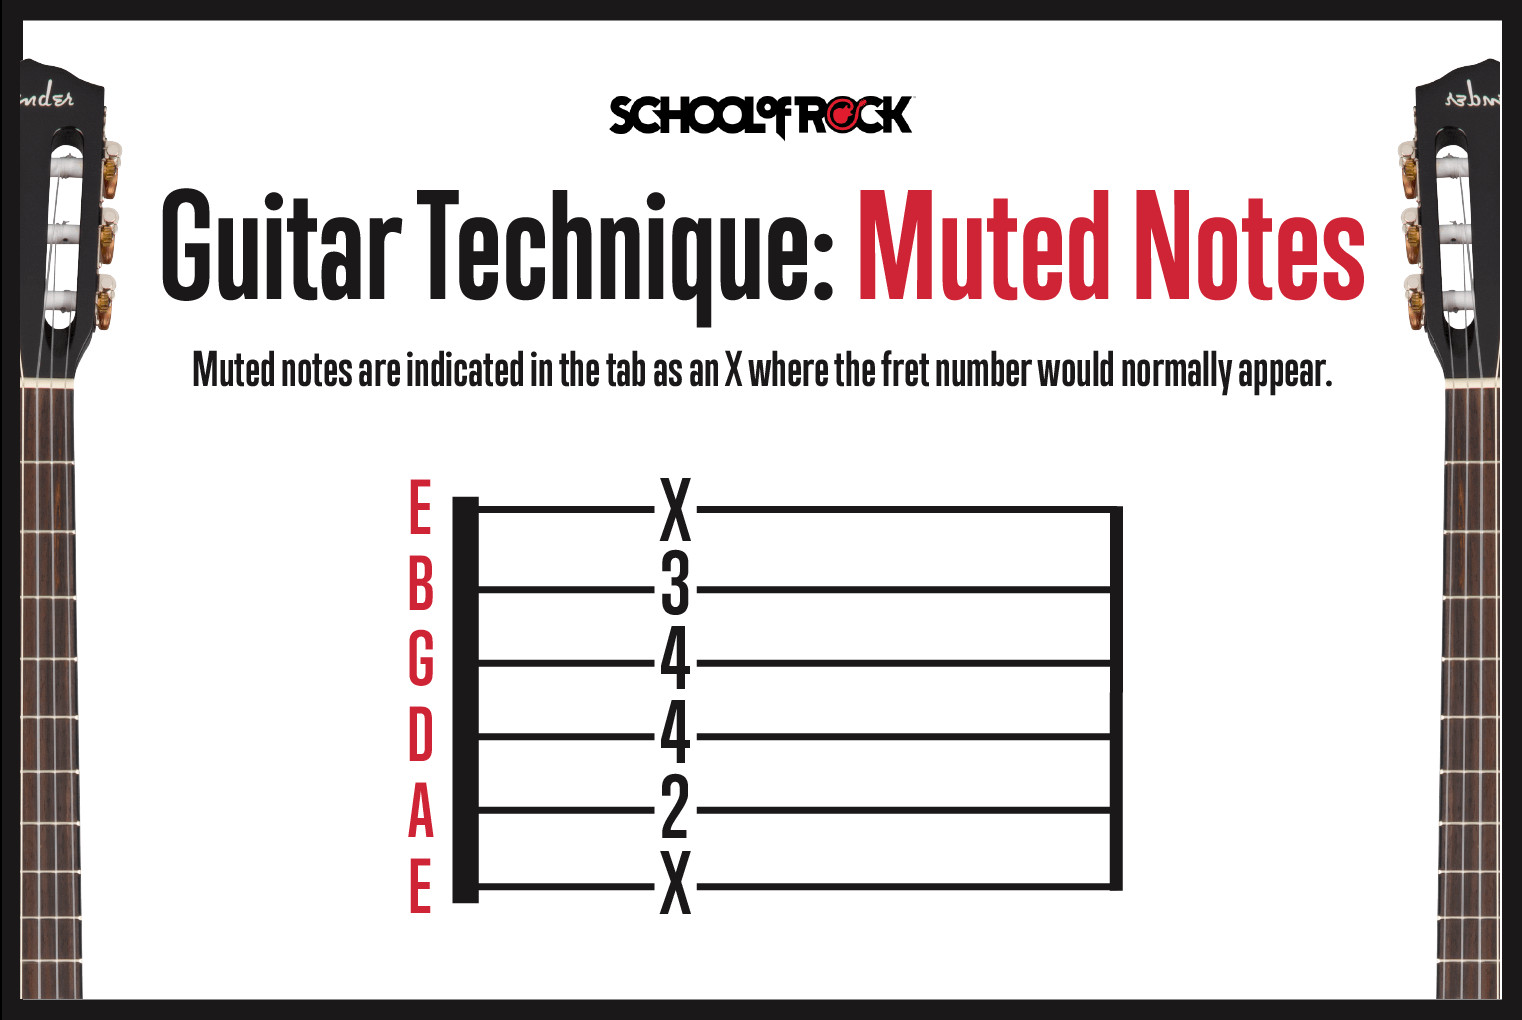 Guitar technique muted notes
Image alt text: Example of muted notes in guitar tab, showing ‘X’ symbols on the tab staff indicating muted string.
Bending Guitar Strings: Adding Vocal Expression
String bending adds an expressive, vocal-like quality to guitar playing. In guitar tabs, bends are indicated by a curved arrow above the note. The arrow often includes “½” or “full,” indicating a half-step (one fret) or full-step (two frets) bend respectively. These target pitches are crucial for accurate bending.
How to Bend Guitar Strings
Bending involves pushing or pulling the string sideways along the fretboard, rather than pressing straight down. For most strings (except the low E), you push upwards towards the ceiling; the low E string is pushed downwards towards the floor. Consistent pressure is key for smooth, controlled bends.
Guitar Technique: Bending Guitar Strings
Most bends utilize 2-3 fingers: the main fretting finger (often the ring finger) supported by the middle and index fingers. This provides strength and control, leading to smoother bends and accurate pitch.
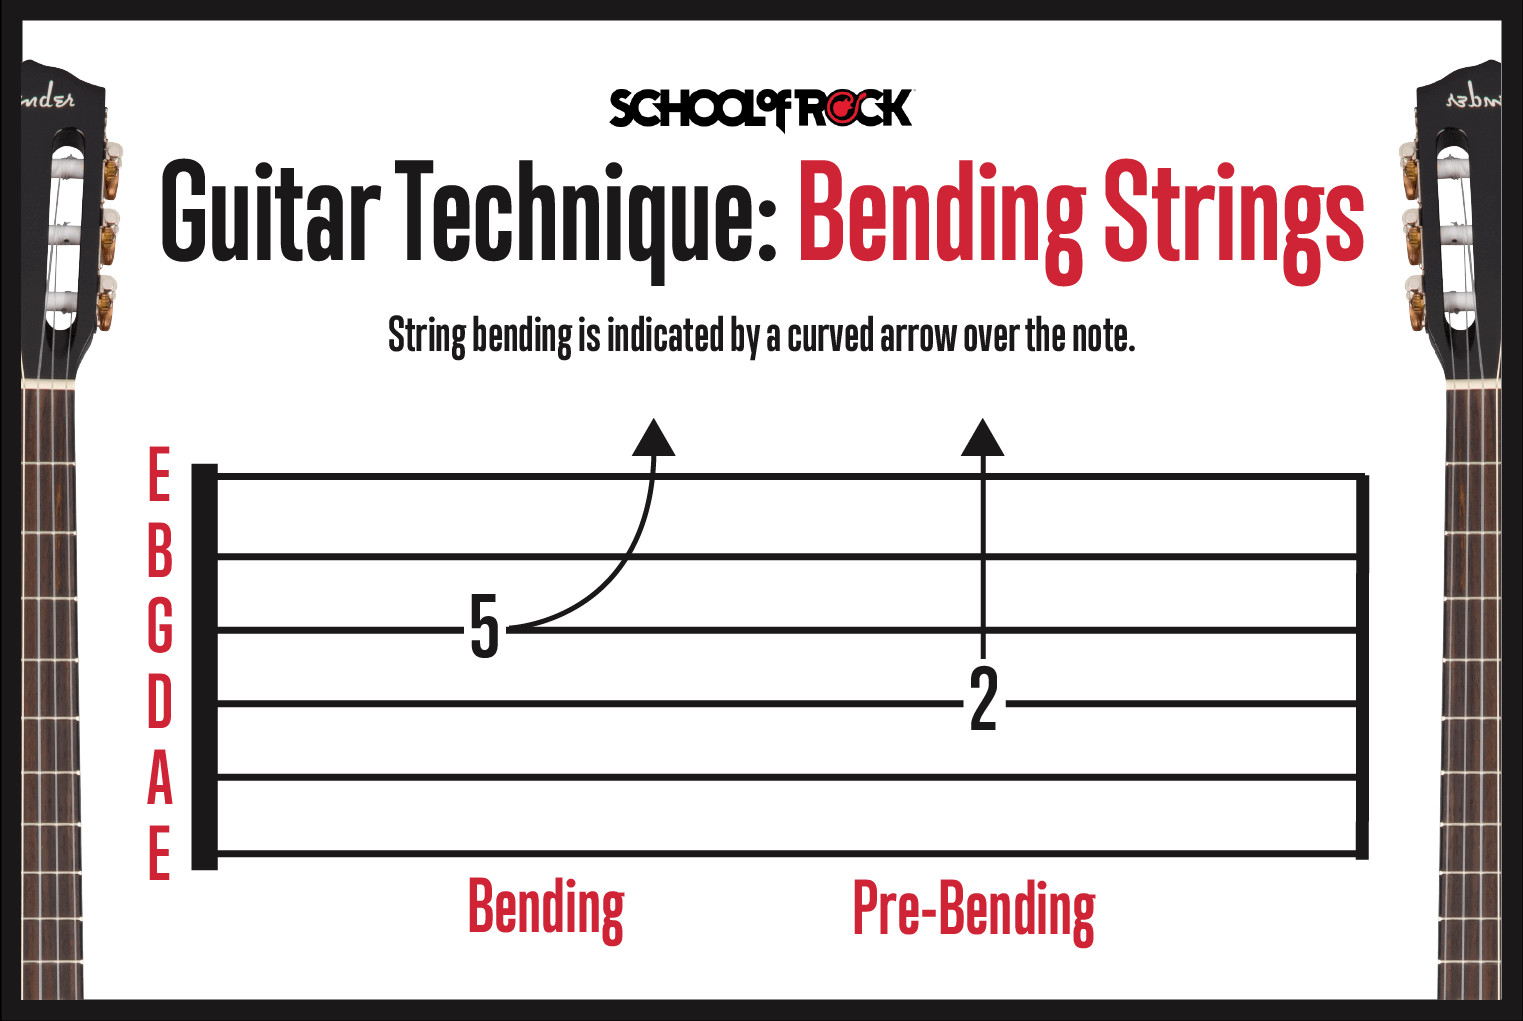 Guitar technique bending strings
Image alt text: Diagram demonstrating guitar string bending technique, showing fingers pushing the string sideways on the fretboard.
Guitar Technique: Pre-Bending Guitar Strings
Pre-bends, often encountered when learning how to read tabs on a guitar, involve bending a string before picking it. They are shown with an upward arrow indicating the bend amount (full, ½, etc.) followed by a downward curved arrow indicating the release back to the original pitch. Pre-bends can resolve back to the original note or bend further to a new target note.
Sliding Guitar Notes: Seamless Transitions
Sliding is another essential technique for smooth transitions between notes. You can slide up to a higher note or down to a lower note.
Guitar Technique: Slide Up
Slide-ups are represented in guitar tabs by a line connecting the starting note to the higher destination note. The line often slants upwards slightly to visually indicate an upward slide.
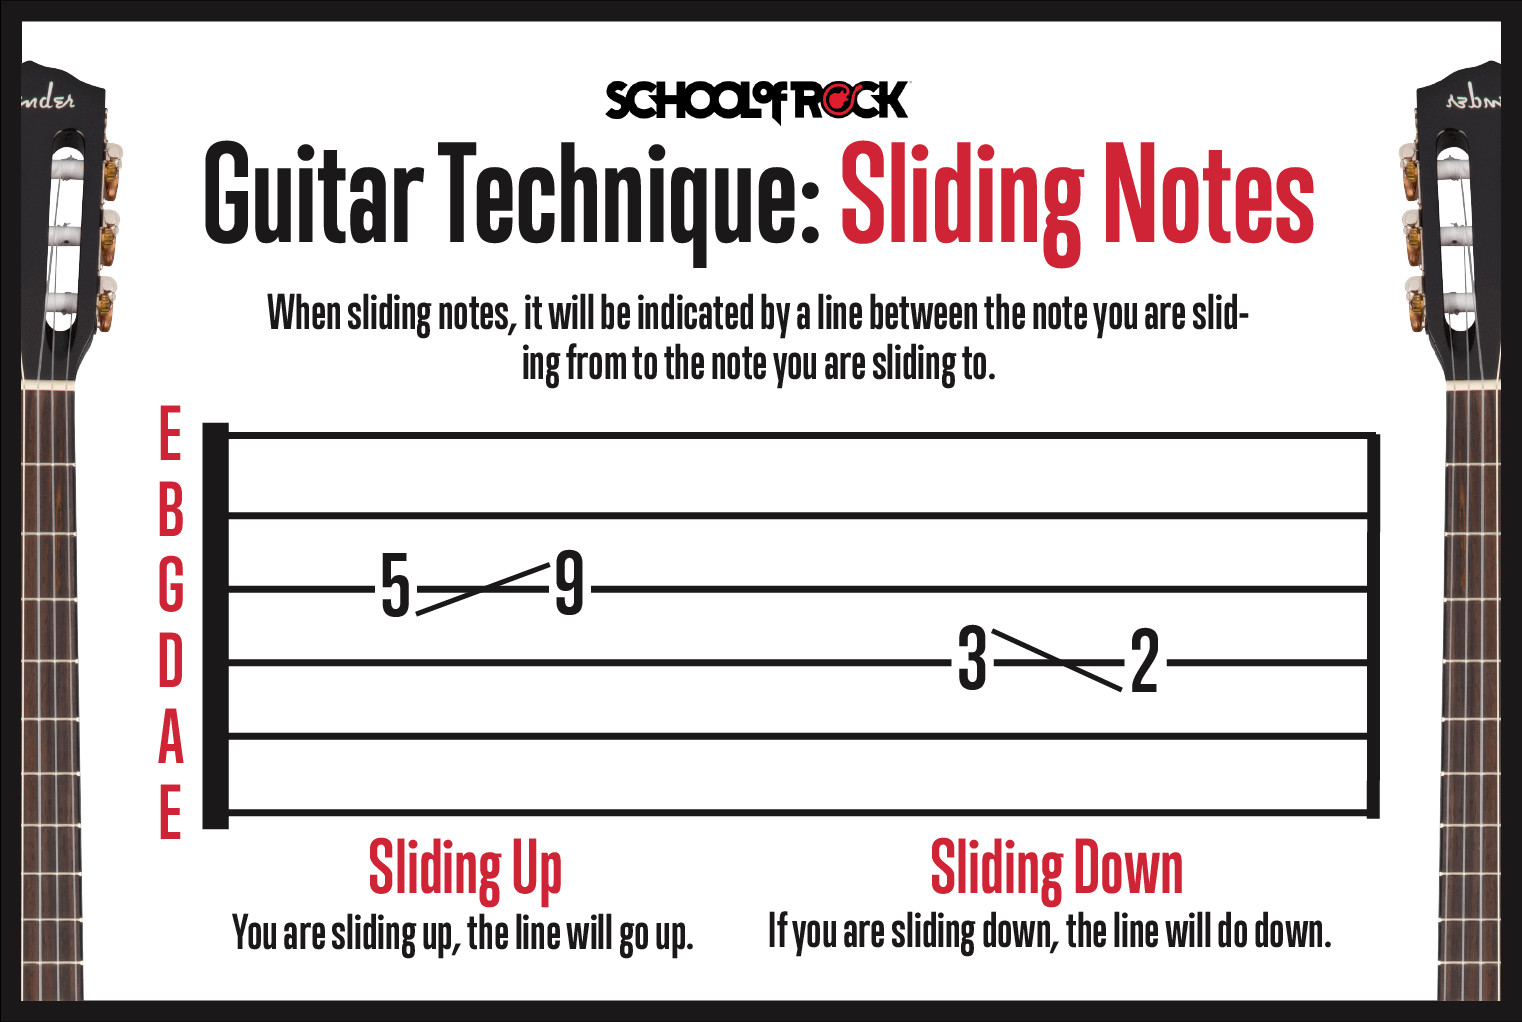 Guitar technique sliding notes
Image alt text: Illustration of guitar slide technique in tablature, showing a line connecting two notes indicating a slide.
Guitar Technique: Slide Down
Slide-downs are similarly represented by a line connecting the starting note to a lower destination note, often with a slight downward slant.
Playing Hammer-ons on the Guitar (H)
Hammer-ons are a technique where you fret a note with your fretting hand by “hammering” down on the string, without picking it. The resulting note is always higher in pitch than the preceding note (either open or fretted). Hammer-ons are notated in guitar tabs with an “H” and an arc connecting the notes.
How to Play Hammer-ons on the Guitar
To execute a hammer-on, strike the string with your fretting finger with enough force to sound the note clearly. This requires practice for a clean, strong sound. Electric guitars with some volume make hammer-ons easier. Start by hammering onto the 3rd fret from an open low E string and let the note ring.
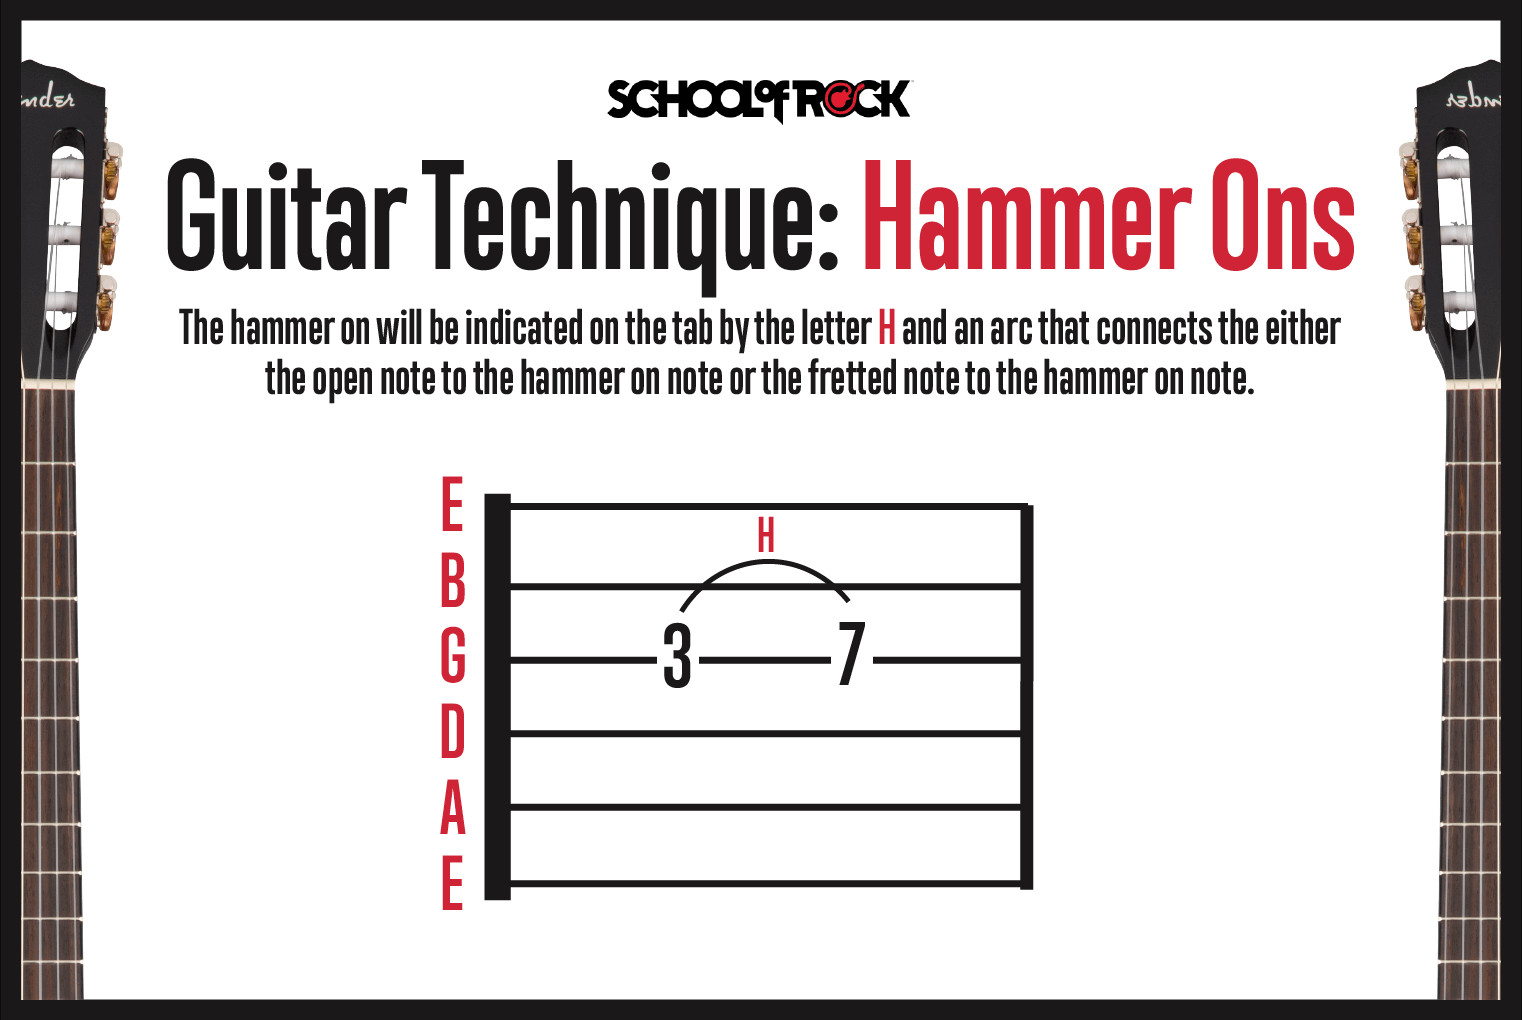 Guitar technique hammer ons
Image alt text: Example of hammer-on notation in guitar tab, showing ‘H’ and an arc connecting notes.
Playing Pull-offs on the Guitar (P)
Pull-offs are the opposite of hammer-ons. You pluck a fretted note by “pulling off” the string with your fretting finger, causing it to ring at a lower pitch (either open or another fretted note). Pull-offs are shown in guitar tabs with a “P” and an arc connecting the notes.
How to Play Pull-offs on the Guitar
To perform a pull-off, fret a note and then pull your finger off the string in a sideways or downward motion, causing the string to vibrate and sound a lower note. You need to “grab” enough of the string with your fingertip to create a clear sound.
Hammer-ons and pull-offs can be combined in alternation to create trills and fast legato passages.
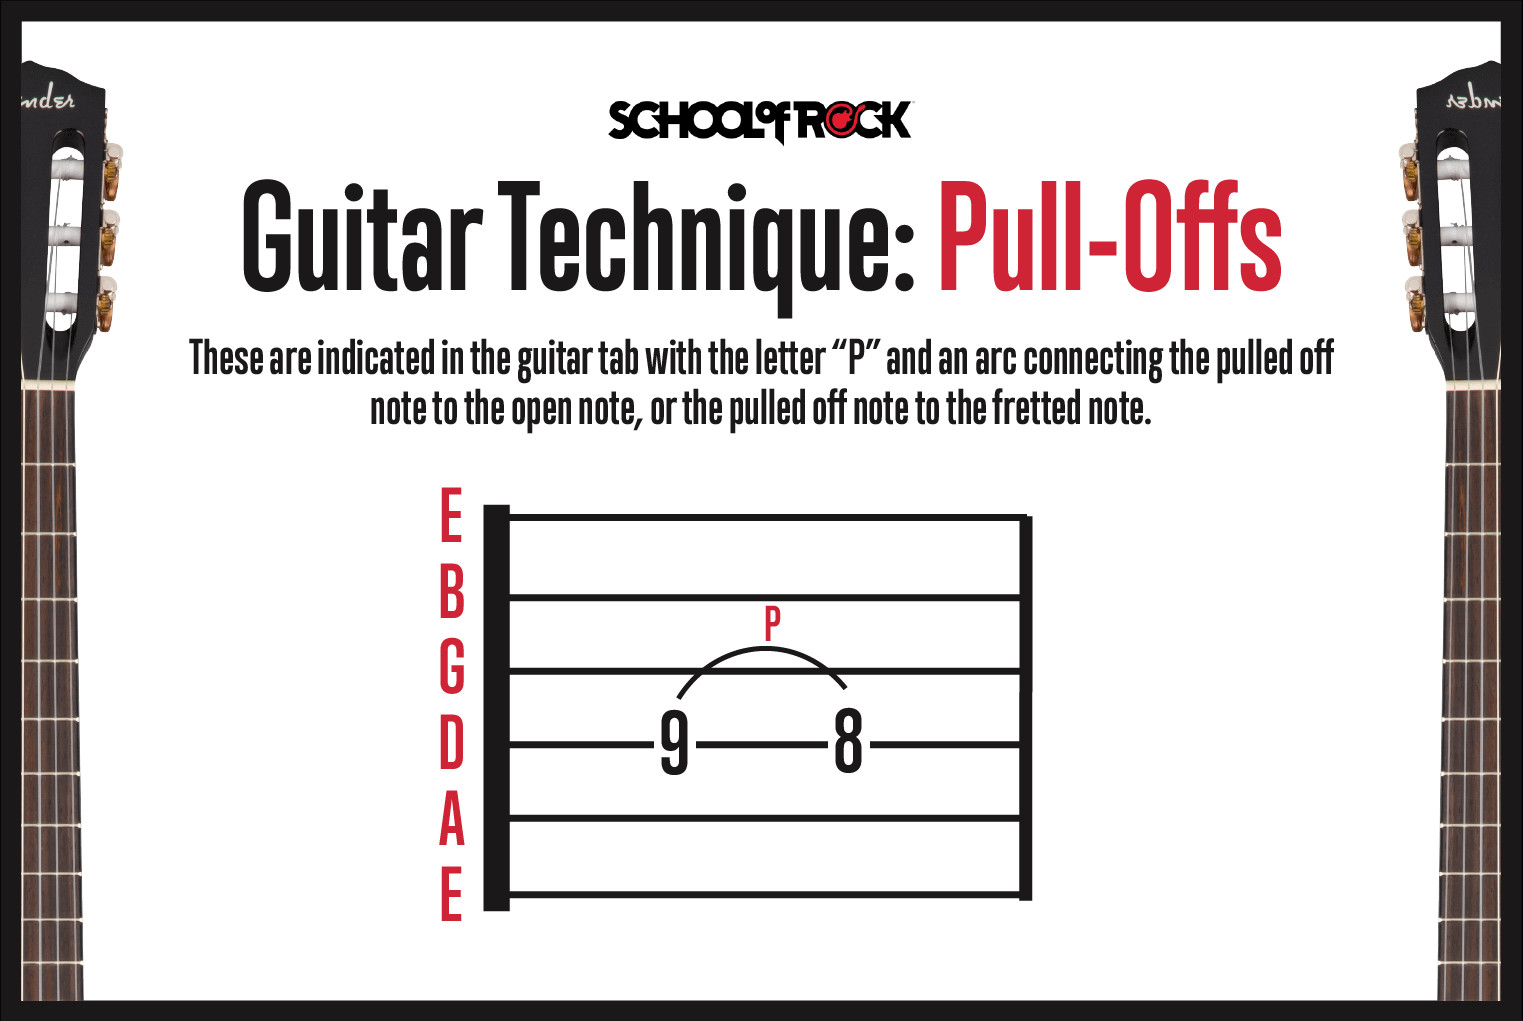 Guitar technique pull offs
Image alt text: Illustration of pull-off technique in guitar tab, showing ‘P’ and an arc connecting notes.
Playing Vibrato on the Guitar (Zig-zag)
Vibrato is a technique of subtly and repeatedly bending a note and returning to its original pitch without releasing it. This creates a wavering, expressive tone, and is represented in guitar tabs by a zig-zag line above the staff. The length of the zig-zag line often indicates the duration of the vibrato.
How to Play Vibrato on the Guitar
Vibrato is similar to bending but with a smaller pitch variation. It can be performed with a single finger or with support from other fingers. Start with a slow, smooth vibrato and gradually vary the speed for different expressive effects. Vibrato is a highly personal technique, contributing to a guitarist’s unique sound.
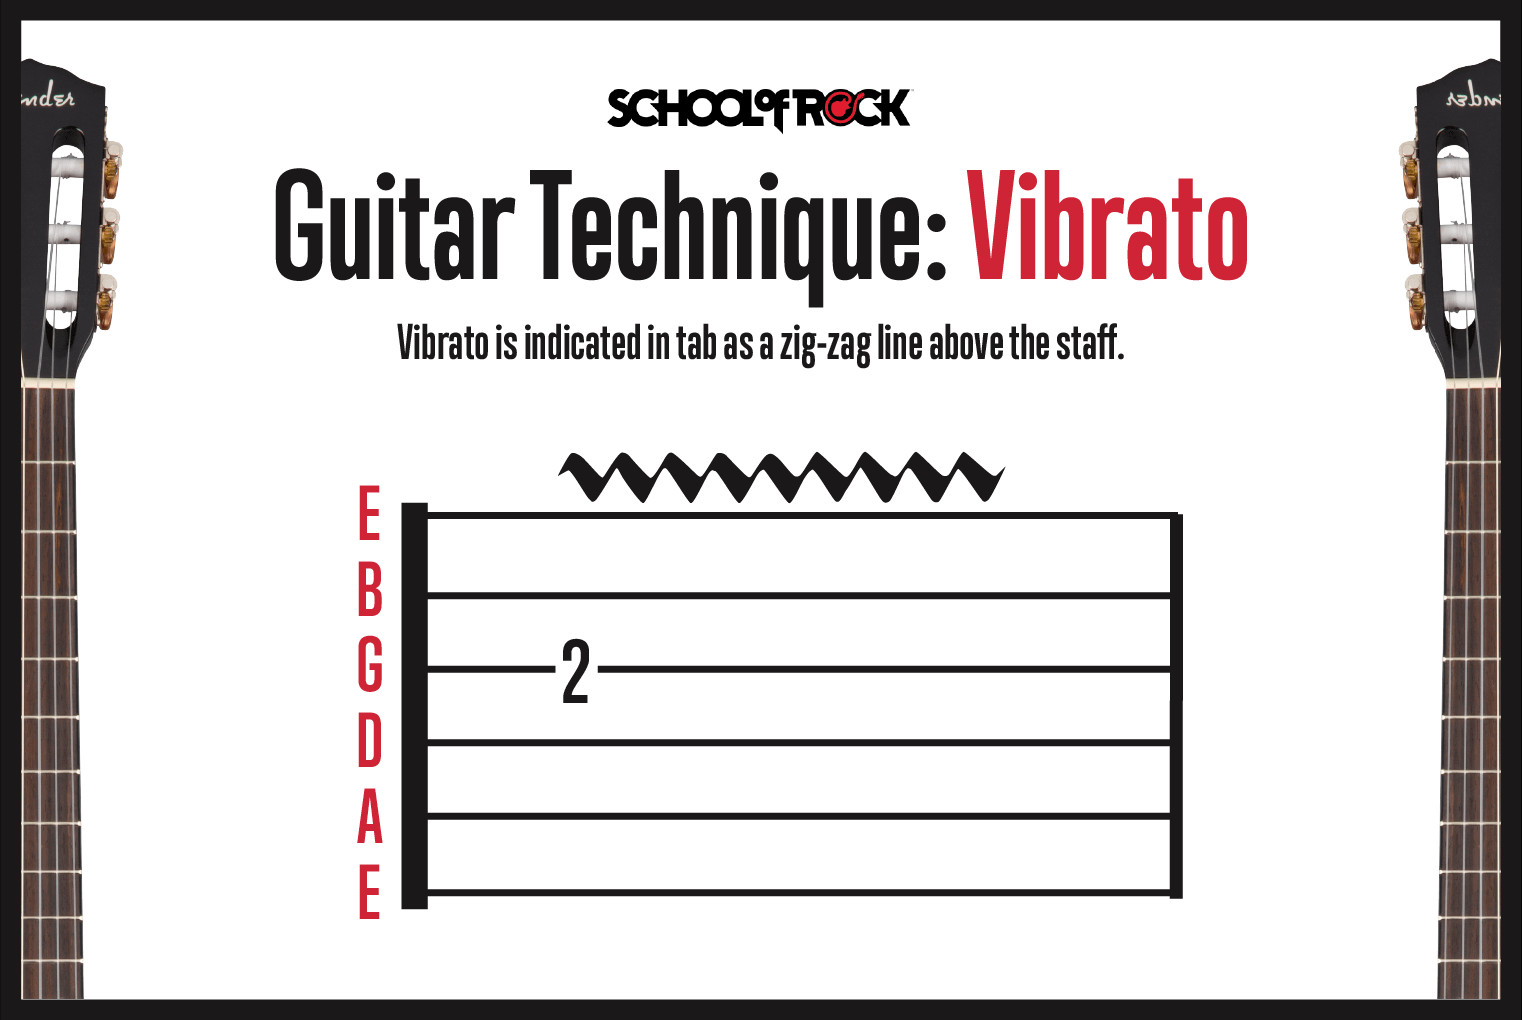 Guitar technique vibrato
Image alt text: Vibrato notation in guitar tab, depicted by a zig-zag line above the tab staff.
Tapping Guitar (T)
Tapping involves using the index finger of your picking hand to fret notes on the fretboard, in addition to your regular fretting hand. It’s a percussive hammer-on technique. Tapping is notated in guitar tabs with a “T” above the tapped note.
How to Finger Tap Guitar
Popularized by Eddie Van Halen, tapping allows for wide intervals and fast playing. Fret a note with your fretting hand, then “tap” a higher note on the same string with your picking hand’s index finger.
Tapping is essentially a hammer-on performed by the picking hand. It expands your reach on the fretboard and allows for rapid, two-handed playing. Higher gain and volume often enhance the sound and ease of tapping.
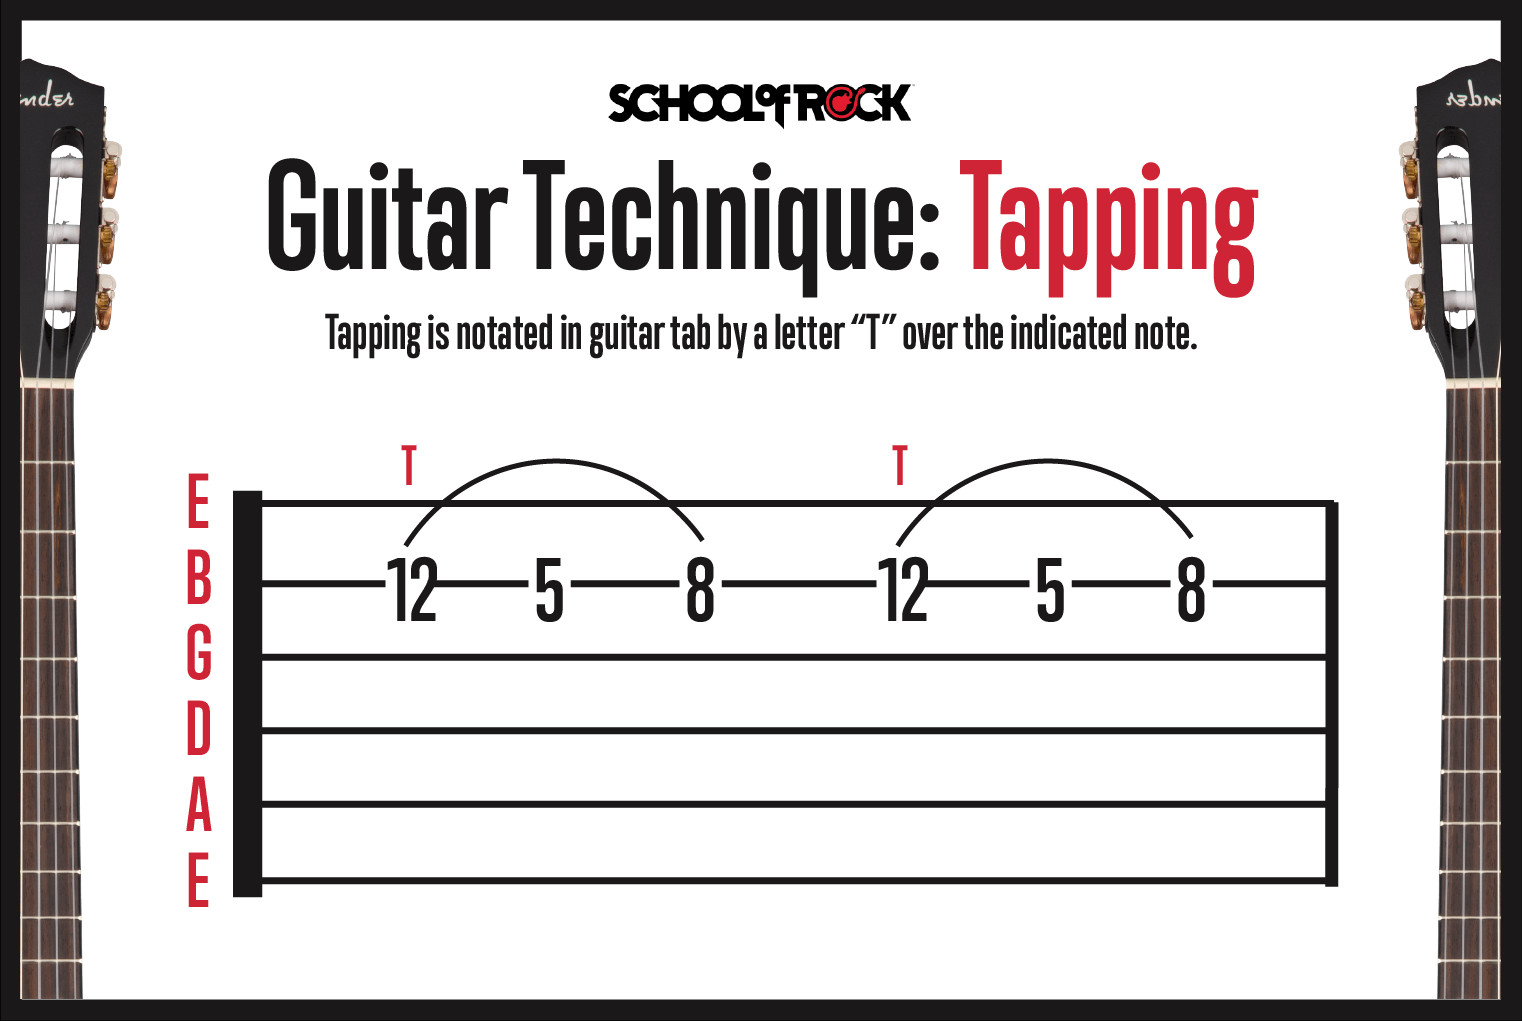 Guitar technique tapping notes
Image alt text: Guitar tapping technique illustrated in tablature, showing ‘T’ above notes to indicate tapping.
Guitar Technique: Two-Handed Tapping
Two-handed tapping extends the technique, with both hands independently tapping notes on the fretboard without traditional picking. Often, the fretting hand taps bass notes while the picking hand taps melody or solo lines.
Strumming Guitar Notes: Rhythm and Patterns
Strumming chords involves two primary strokes: downstrokes and upstrokes.
Downstrokes, indicated by a symbol with a thick horizontal line and downward “legs,” begin on the lower strings and move downwards to the higher strings.
Upstrokes, notated by a “V” symbol, are the opposite, starting on the higher strings and moving upwards towards the lower strings.
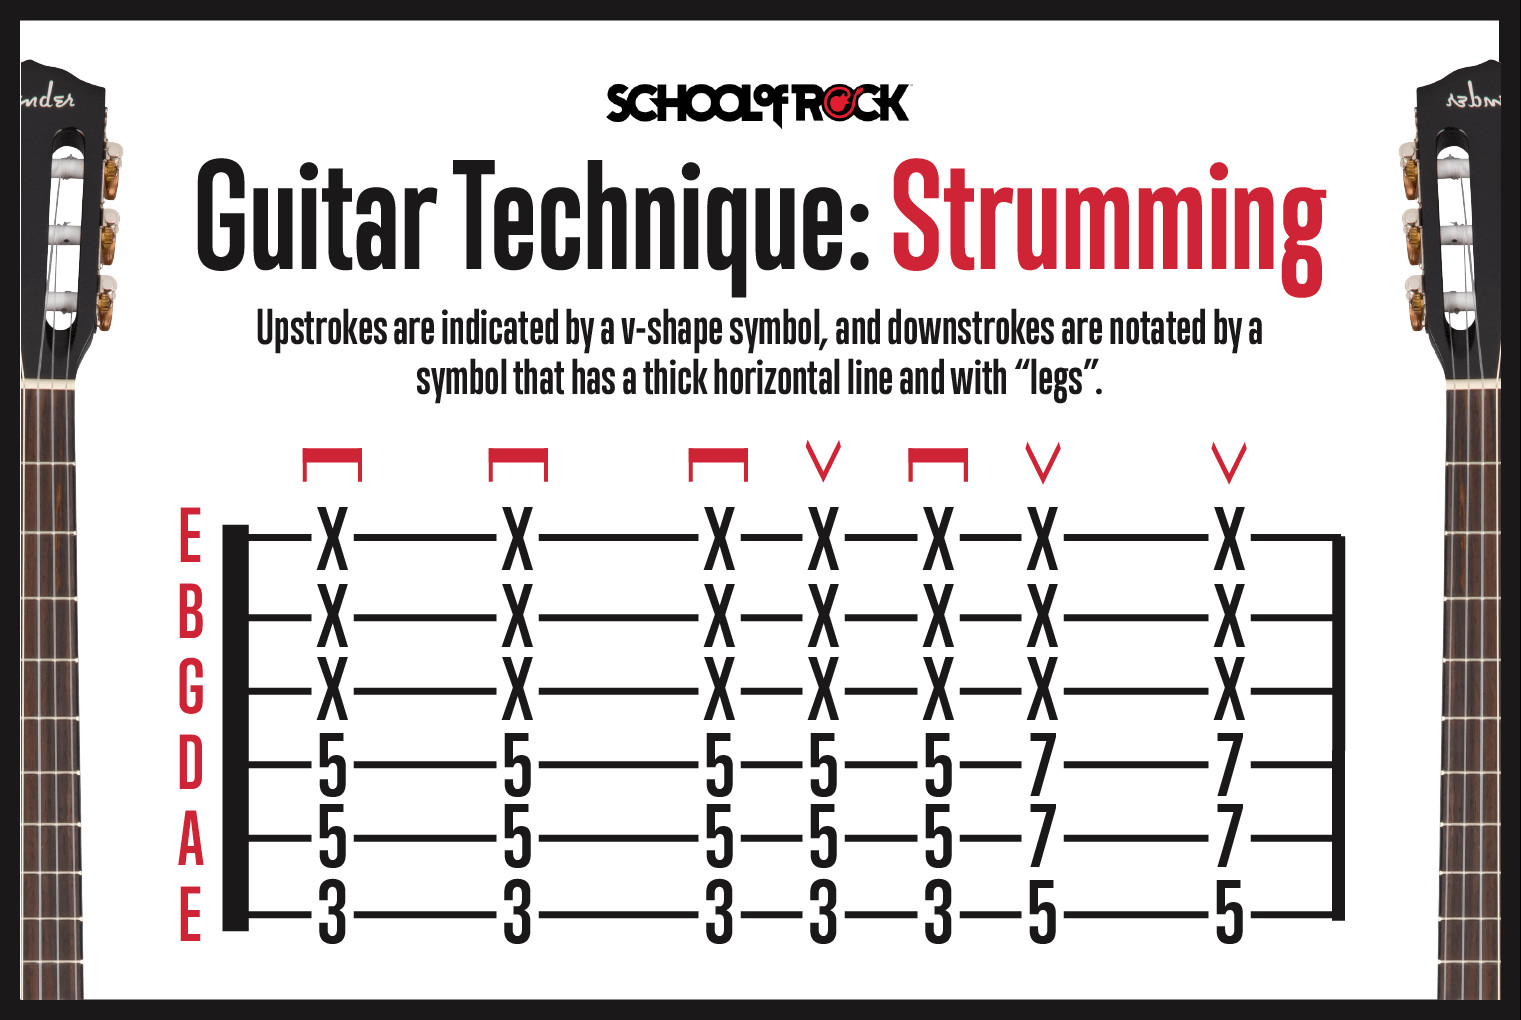 Guitar technique strumming
Image alt text: Strumming notation in guitar tab, showing symbols for downstrokes and upstrokes.
How to Strum Guitar Notes
Strumming patterns vary based on the song’s rhythm. You can use constant downstrokes, upstrokes, or combinations. Eighth-note rhythms are often counted as “one and two and three and four and.” Many songs use alternating downstrokes (on beats 1, 2, 3, 4) and upstrokes (on the “ands”) in an eighth-note rhythm.
Guitar Technique: Playing Downstrokes and Upstrokes
The same downstroke and upstroke notation applies to single notes in guitar tabs, indicating the direction of your pick stroke. Downstrokes (horizontal bar with legs) are played with a downward pick motion, and upstrokes (V symbol) with an upward motion.
Ready to Explore More Guitar Techniques?
Now that you understand how to read tabs guitar and recognize common guitar techniques, you’re well-equipped to start playing! guitarplayers.net is dedicated to helping guitarists of all levels reach their musical goals. From basic strumming to advanced tapping, our resources and guides are here to support your journey.
Eager to find guitar tabs and start playing? Explore online resources for a vast library of tabs, from beginner-friendly songs to challenging pieces for experienced players. Start your musical adventure today!

