Locking tuners are often hailed as one of the greatest innovations for guitarists, especially for those who dread restringing. The simplicity they offer is undeniable: insert the string, lock it in place, and tune. No more tedious winding and tucking! For years, I’ve been a convert, fitting locking tuners on almost all my guitars, from Sperzels to budget-friendly options. My method was always straightforward, perhaps too straightforward: align the tuner holes roughly, insert the string, and tighten. It turns out, I, like many others, have been missing a crucial step.
Recently, my new Fender Elemental Jazzmaster, equipped with locking tuners and a top-loading tailpiece, highlighted a tuning instability issue I hadn’t encountered before. After restringing with my usual approach, during a soundcheck, the high E string was drastically out of tune and alarmingly loose. Then, disaster struck – the string popped right out of the tuner mid-performance. This wasn’t the first sign; a similar slip occurred during a rehearsal bend. This experience led me down a rabbit hole of online forums and videos, revealing a tuning method specifically for locking tuners that I, embarrassingly, had been unaware of: the “123345 method.”
It turns out that simply installing locking tuners isn’t the entire solution for tuning stability. The direction in which you orient the tuner holes before locking the strings matters significantly, especially for guitars with top-loading bridges. The “123345 method,” popularized by guitarists like Jay Leonard J, provides a solution to prevent string slippage, particularly on the thinner strings. This method isn’t some obscure secret; it’s a practical technique endorsed even by Fender themselves. By slightly angling the tuner holes before locking, you can increase the number of winds around the tuning post for specific strings, ensuring they remain secure even under heavy bending and aggressive playing. This is particularly crucial for the high E and B strings, which are more prone to slipping out of locking tuners, especially on guitars without the added string tension from a string-through-body design.
The numbers in the “123345 method” correspond to clock-face positions for the tuner holes as you insert the string. For a standard six-in-line headstock like on a Fender Stratocaster or Jazzmaster, the recommended positions are:
- High E string: 1 o’clock
- B string: 2 o’clock
- G and D strings: 3 o’clock
- A string: 4 o’clock
- Low E string: 5 o’clock
For guitars with a 3+3 headstock configuration, such as a Gibson Les Paul, Jay Leonard J suggests slightly different positions to accommodate the headstock angle:
- Low E string: 5 o’clock
- A string: 4 o’clock
- D string: 3 o’clock
- G string: 9 o’clock
- B string: 10 o’clock
- High E string: 11 o’clock
By using these angles, you effectively increase the wrap of the string around the tuning post for the thinner strings (E, B, and G), providing extra security and preventing slippage when you bend strings or play aggressively. While thicker strings are less likely to slip due to their higher gauge and tension, this method ensures optimal stability across all strings.
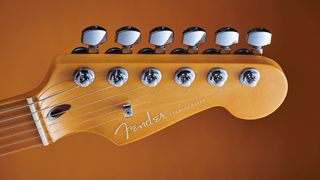 Close-up of Fender locking tuners headstock
The image above shows a close-up of a guitar headstock with Fender locking tuners, illustrating how the strings are secured.
This technique is especially beneficial for guitars with top-loading bridges, where the string tension is solely managed at the headstock and bridge. String-through-body designs, like on a Stratocaster, inherently provide more string tension and might be more forgiving of less-than-perfect locking tuner technique. However, adopting the “123345 method” ensures maximum tuning stability regardless of your guitar’s bridge type.
Fender officially recommends this method, highlighting its importance for maintaining tuning stability, especially on guitars equipped with locking tuners. It’s a testament to the fact that even with advanced hardware like locking tuners, technique still plays a crucial role in achieving optimal performance.
To implement the “123345 method” effectively, follow these simple steps when restringing your locking tuner-equipped guitar:
- Insert the String: Place the string through the bridge and up to the corresponding tuning machine.
- Orient the Tuner Hole: Turn the tuning peg so that the string hole is facing the appropriate clock position according to the “123345 method” for that string.
- Insert and Lock: Feed the string into the tuner hole and tighten the locking mechanism (thumbwheel or screw, depending on your tuners).
- Tune Up: Bring the string up to pitch. The slight extra winding created by the angled tuner position will provide added security.
- Repeat: Follow steps 1-4 for all strings.
By adopting the “123345 method,” you can eliminate frustrating string slippage and ensure your locking tuners perform at their best. It’s a small adjustment to your restringing routine that makes a significant difference in tuning stability and overall playing confidence. So, take a moment to re-evaluate your locking tuner technique and embrace this simple yet effective method – your tuning stability will thank you, and you can finally unleash those wild bends without fear of your strings giving way.
The image above shows the headstock of a Fender Elemental Jazzmaster, a guitar model that benefits from the 123345 tuning method with locking tuners.
This image provides a detailed view of the locking tuners mechanism on a guitar headstock, emphasizing the point of string insertion and locking.