The B minor (Bm) guitar chord is a common yet notoriously challenging chord for beginner guitarists. Many aspiring players find themselves intimidated by its barre chord shape, often encountering it early in their learning journey.
By the end of this guide, you will understand:
- Why the standard barre chord version of Bm is often too difficult for beginners.
- Two simplified, beginner-friendly versions of the Bm chord you can learn quickly.
- Step-by-step instructions on how to progress to the full barre chord Bm when you are ready.
Why the B Minor Barre Chord Presents a Challenge
When you first search for the Bm chord, you’re likely to encounter the barre chord diagram. This version, while fundamental, is often a stumbling block for new players.
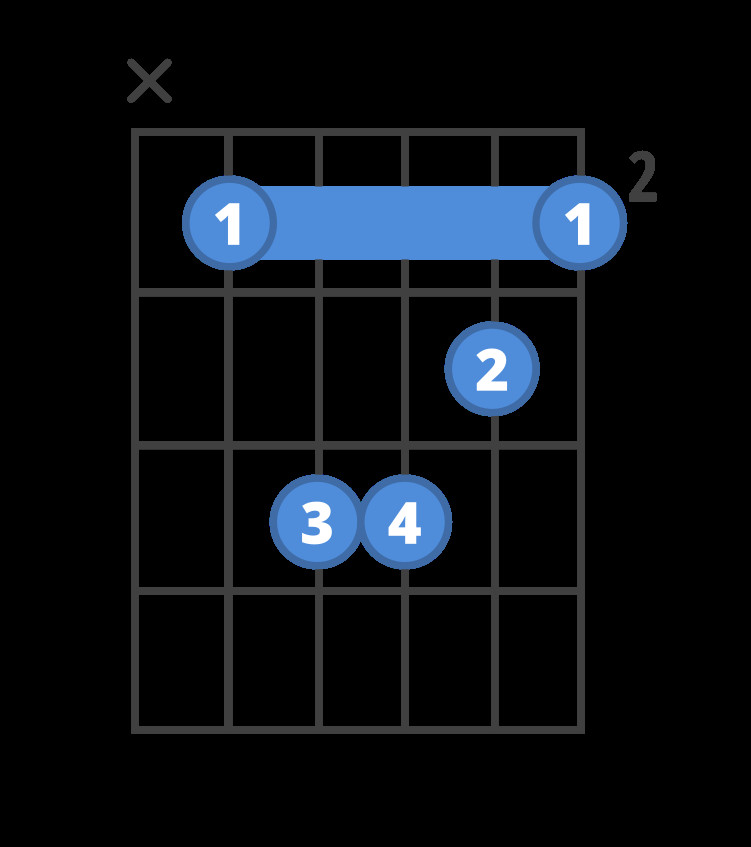 Chord diagram for the standard Bm barre chord.
This diagram can look daunting if you’re just starting out. The thick line across the fretboard indicates a barre, requiring your index finger to press down multiple strings at once.
Here’s what the barre Bm chord looks like on the guitar:
As you can see, the index finger is flattened across the fretboard, pressing down all six strings at the second fret. This “barre” technique is a common hurdle for beginners. Chords using this technique are known as barre chords, and they often cause frustration in the initial stages of learning guitar.
Understanding Barre Chords vs. Open Chords
Most beginner guitar chords, such as D, G, and A major, are generally easier to play. These chords typically involve only a few fingers and incorporate open strings, making them more forgiving for developing fingers.
 Chord diagram for the D major guitar chord.
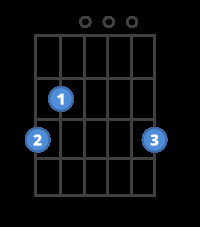 Chord diagram for the G major guitar chord.
 Chord diagram for the A major guitar chord.
With these easier chords, each finger typically presses down on a single string. In contrast, barre chords require you to use one finger to press down multiple strings simultaneously. You must flatten your index finger across the fretboard while also positioning your other fingers to form the rest of the chord shape. This combination of actions can be physically demanding for beginners, requiring strength and dexterity that develop over time.
Beginner-Friendly Bm Chord Variations
Fortunately, there are easier ways to play the Bm chord, allowing you to incorporate it into your playing without immediately tackling the full barre version. Here are two simplified versions of the Bm chord that are excellent starting points.
The Easiest B Minor Chord for Beginners: The 3-Finger Bm
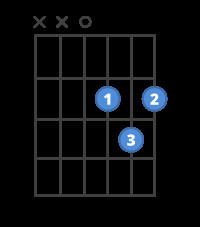
If the barre chord seems too challenging right now, don’t worry. There’s a 3-finger version of B minor that is as easy to play as other beginner chords you may already know.
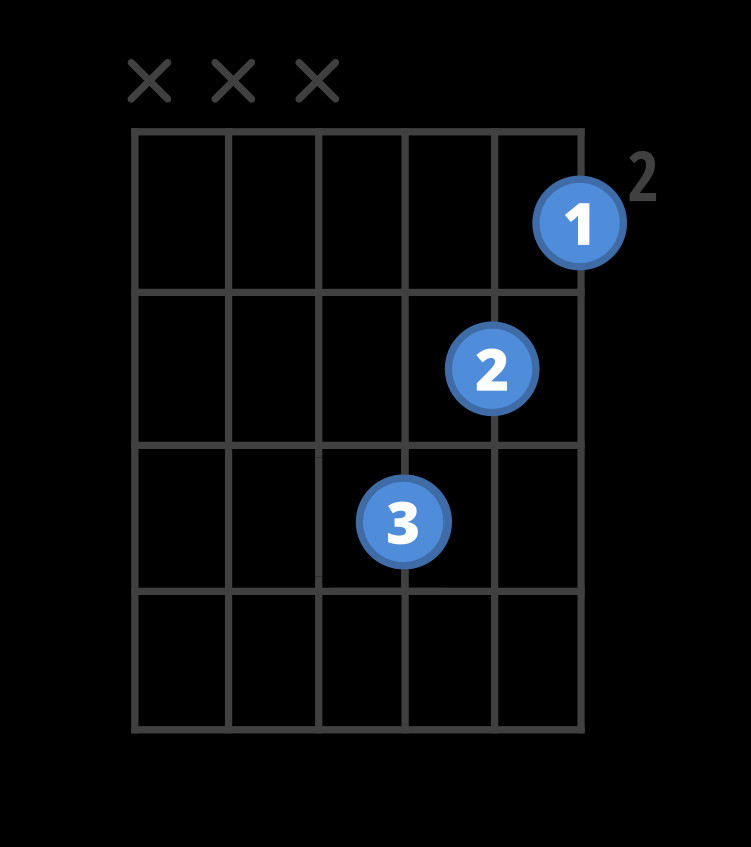 Chord diagram for the 3-finger B minor chord variation, an easier way to play Bm for beginners.
This simplified Bm chord focuses on the higher-pitched strings, omitting the lower strings to make it easier to finger.
As you can see in the diagram, this version only uses the top three strings (thinnest strings). It’s essentially a condensed version of the full chord, focusing on the essential notes of the B minor chord.
Think of it like this: a piano has 88 keys, but you rarely use them all at once. Similarly, on guitar, you don’t always need to play all six strings for every chord.
Expanding to a 4-Finger Bm Chord
Once you’re comfortable with the 3-finger Bm, you can expand to a 4-finger version for a richer sound. This version introduces your pinky finger and provides a fuller representation of the Bm chord without the barre.
While using your pinky might feel awkward at first, most players can learn this version relatively quickly, usually within 5 to 10 minutes of practice.
In this version, you add your pinky finger to the 3rd string at the fourth fret, while repositioning your ring finger.
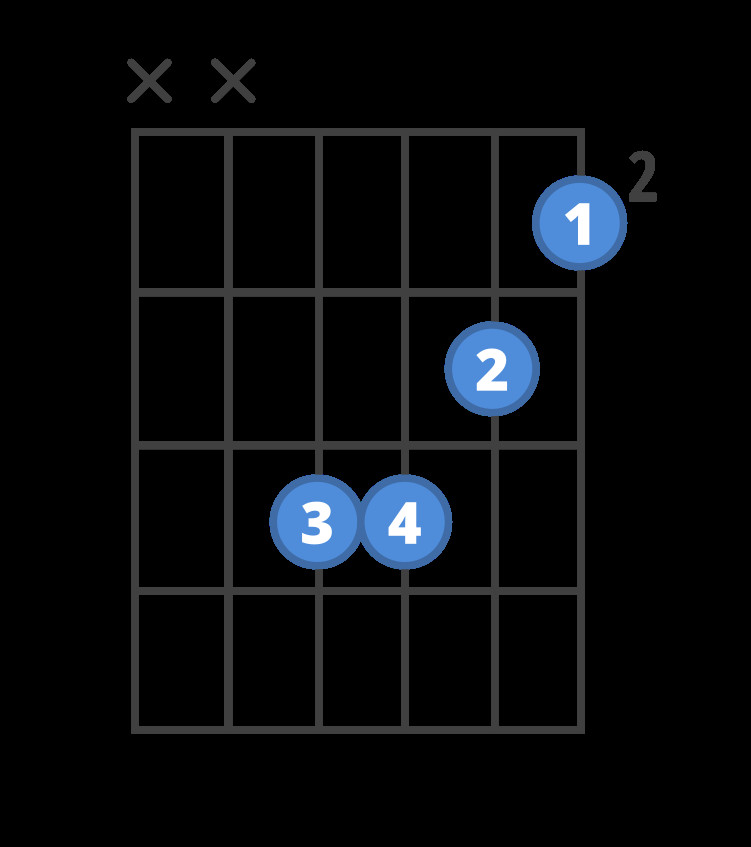 Chord diagram for the 4-finger B minor chord variation, a slightly fuller sounding Bm chord for beginner guitarists.
Tip: When placing two fingers on the same fret, it’s generally easier to position the stronger, thicker finger on the lower (thicker) string.
Here’s a comparison of the 3-finger, 4-finger, and full barre Bm chords:
Chord diagram for the 3-finger B minor chord variation, an easier way to play Bm for beginners.
As you can see, the 4-finger version gets you even closer to the full barre chord, with only one string difference!
This 4-finger Bm chord is a great version to use as you continue learning. You can use it in songs and chord progressions while you build the strength and technique needed for the barre chord. Remember to strum only the top four strings to maintain the correct sound of this version.
Mastering the Barre Bm Chord
When you feel ready for the full challenge, it’s time to tackle the barre Bm chord. This is the standard version that unlocks the full potential of the chord.
Here’s the barre Bm chord diagram again:
Chord diagram for the standard Bm barre chord.
Start by placing your index finger across all six strings just behind the second fret. Focus on flattening your finger and applying even pressure across all strings.
With the barre in place, position your remaining fingers as they were in the 4-finger version of the Bm chord.
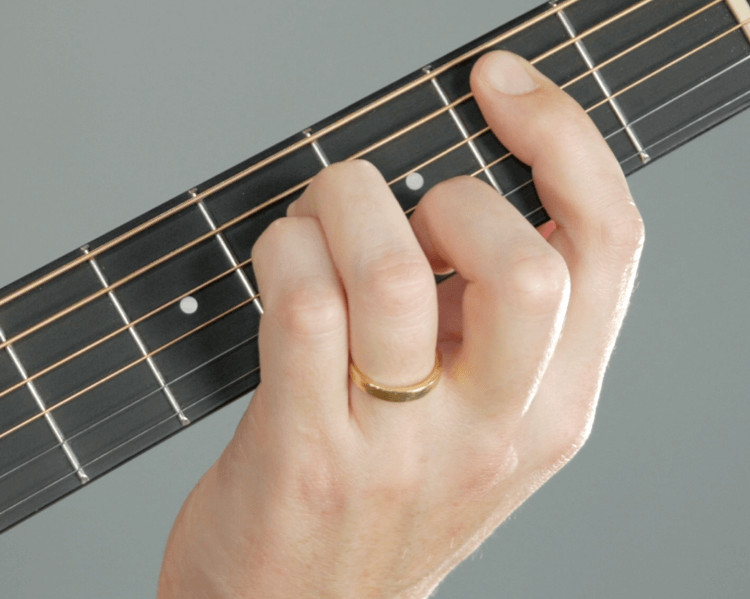 Photo showing hand position for the barre Bm chord on guitar.
The only difference from the easier versions is that your index finger now covers all strings at the second fret, effectively replacing the nut of the guitar for this chord shape.
Strum all six strings (or at least the top five) and listen for a clear sound. Barre chords often produce buzzing sounds initially, which is normal. Don’t get discouraged! Consistent practice is key to developing the strength and technique needed for clean barre chords.
Most importantly, don’t let the challenge of barre chords stop you from playing guitar. Continue using the easier versions of Bm and gradually work towards the barre chord as your strength and technique improve.
Further Lessons and Practice Tools
Barre chords can seem intimidating, but with the right guidance, they become manageable. There are excellent resources available to help you demystify barre chords. Consider exploring video lessons specifically designed to teach barre chords, which can provide visual demonstrations and helpful tips for overcoming common challenges like fret buzz and chord changes.
Practice Effectively
To solidify your Bm chord skills, utilize practice tools and drills. ChordBank offers practice drills and games specifically designed for learning chords like Bm. These interactive tools can make practice more engaging and effective.
Smart Chord Flashcards
 Screenshot of ChordBank Smart Flashcards on an iPhone, showing a practice tool for guitar chords.
Consistent practice and clean chord changes are crucial steps in transitioning from simply owning a guitar to truly playing it. Chord flashcards are a valuable tool for developing smooth and accurate chord transitions.
Practicing Bm with Am Chord
A helpful exercise for getting comfortable with the Bm barre chord shape is to practice transitioning between Bm and its related Am chord.
Am
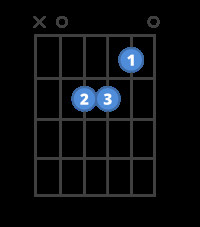 Chord diagram for the Am guitar chord, useful for practicing barre chord shapes.
Bm
 Chord diagram for the Bm guitar chord, practicing with Am helps understand movable chord shapes.
This exercise helps you recognize barre chord shapes as movable versions of open chords you already know. The shape for Am and Bm barre chords is the same, just moved up the fretboard.
Practicing Bm in Common Chord Progressions
To apply your Bm chord in a musical context, practice chord progressions that commonly use Bm, such as Bm, D, G, and A.
Bm
Chord diagram for the Bm guitar chord, practicing with Am helps understand movable chord shapes.
D
Chord diagram for the D major guitar chord.
G
Chord diagram for the G major guitar chord.
A
Chord diagram for the A major guitar chord.
Gamified Practice
Screenshot of ChordBank Smart Flashcards on an iPhone, showing a practice tool for guitar chords.
Screenshot of ChordBank Smart Flashcards on an iPhone, showing a practice tool for guitar chords.
Make practice enjoyable with guitar learning games. ChordBank’s ChordPOP! and Blackjack games listen to your guitar playing and provide interactive feedback, making chord practice fun and motivating.
By starting with easier versions and gradually progressing to the barre Bm chord, combined with consistent and engaging practice, you’ll master this essential chord and expand your guitar playing abilities.