
The D9 chord is a captivating and colorful chord that adds depth and sophistication to your guitar playing. Belonging to the family of dominant chords, the D9 is a favorite in genres ranging from smooth jazz to soulful blues and even dynamic rock. This chord, built with the notes D, F#, A, C, and E, based on the 1st, 3rd, 5th, b7th, and 9th intervals, offers a richer harmonic texture compared to simpler chords.
If you’re just beginning to explore chord construction and the role of intervals, it might be beneficial to first check out our comprehensive guide on building guitar chords with intervals. Understanding these fundamental concepts will make grasping the D9 chord much easier and more rewarding.
The D9 chord is defined by a specific set of intervals: the root (1), the major third (3), the perfect fifth (5), the minor seventh (b7), and the major ninth (9). It’s these intervals working together that give the D9 its distinctive and lush sound. For a deeper dive into fretboard intervals and their practical application, our tutorial on fretboard intervals is an invaluable resource.
As a dominant chord, the D9 shares common ground with other dominant chords, particularly dominant 7th chords. If you’re keen to expand your understanding of this essential chord family, our tutorial on dominant (7) guitar chords will provide you with a solid foundation.
In this guide, we’ll explore the D9 chord in detail. We’ll provide clear chord diagrams and fretboard patterns to help you learn various ways to play it. We’ll also touch upon chord notation, ensuring you can confidently understand and communicate about this chord in any musical context. For more information on chord naming conventions, you can refer to our tutorial on how to denote chords.
Mastering the D9 chord, along with other intermediate guitar chords, is a significant step in your musical journey. It unlocks a broader palette of sounds and allows you to express yourself with greater nuance and creativity. So, let’s dive in and discover the beauty of the D9 guitar chord!
Decoding the D9 Chord: Notes and Formula
The D9 chord is composed of five distinct notes:
- D – Root (1)
- F# – Major Third (3)
- A – Perfect Fifth (5)
- C – Minor Seventh (b7)
- E – Major Ninth (9)
These notes are derived from the Dominant Ninth chord formula, which outlines the specific intervals from the root note that create this chord type.
Dominant Ninth Chord Formula:
| Interval | Degree |
|---|---|
| Root | 1 |
| Major Second | 9 |
| Major Third | 3 |
| Perfect Fourth | 11 |
| Perfect Fifth | 5 |
| Major Sixth | 13 |
| Minor Seventh | b7 |
| Major Seventh | 7 |
In the context of the D9 chord, we select the 1st, 3rd, 5th, b7th, and 9th intervals from the D major scale to construct its unique sound. This formula is consistent across all dominant ninth chords, simply changing the root note.
Exploring D9 Chord Positions on the Guitar Fretboard
The D9 chord can be played in numerous positions across the guitar fretboard, each offering a slightly different voicing and feel. Below, we’ll explore some of the most useful and common positions. Chord diagrams are presented from easiest to more challenging, with a reminder to consult our guide on reading chord diagrams if you’re new to them. If barre chords present a challenge, our Bar Chords Tips tutorial is there to assist you.
For a text-based representation of these chord diagrams, you can also visit our accessible chords page.
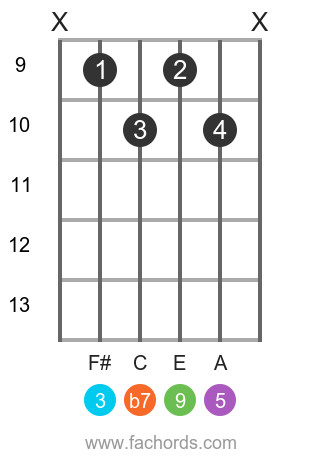
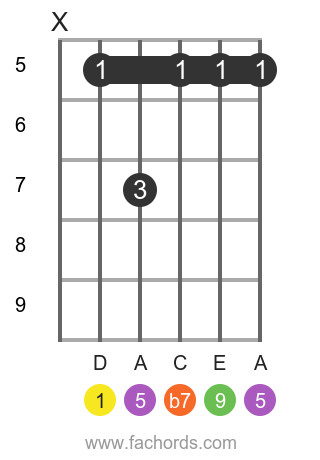
Position 1: Open D9 Chord
This is often the first D9 position guitarists learn due to its use of open strings, making it relatively easier to fret.
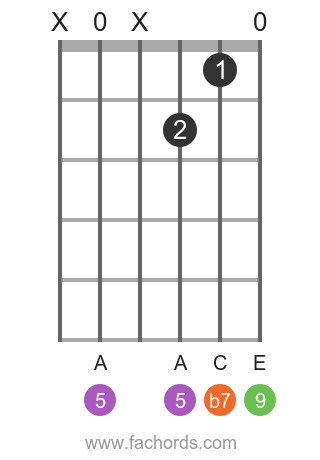 D 9 position 1 guitar chord diagram
Alt text: D9 chord diagram position 1, open voicing, showing finger placement on guitar fretboard.
This open position provides a bright and resonant D9 sound, ideal for rhythm guitar playing and adding a jazzy flavor to open chord progressions.
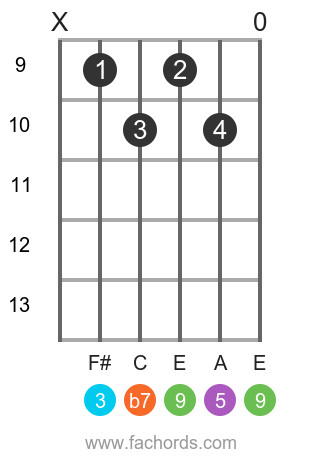
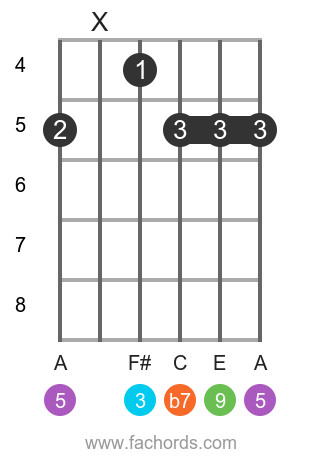
Position 2: Another Open D9 Voicing
This second open position offers a different voicing of the D9 chord, utilizing different string combinations for a slightly altered sonic texture.
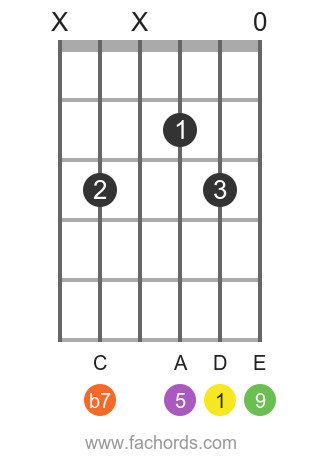 D 9 position 6 guitar chord diagram
Alt text: D9 chord diagram position 2, open shape with thumb over neck, different voicing option.
This voicing can be particularly useful when transitioning from other open chords and offers a fuller sound compared to position 1.
Position 3: Movable D9 Barre Chord Shape
This position introduces a movable barre chord shape, allowing you to play the 9th chord with different root notes up and down the neck.
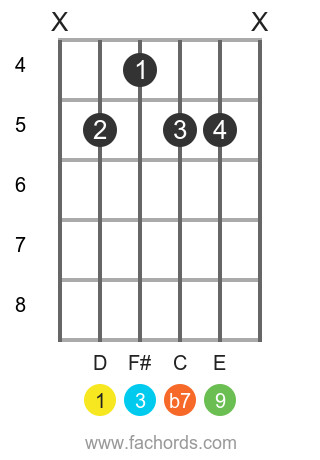 D 9 position 2 guitar chord diagram
Alt text: D9 chord diagram position 3, movable barre chord shape, enabling playing D9 in different keys.
Movable shapes are essential for expanding your chord vocabulary and playing in various musical contexts. Mastering this barre chord shape unlocks D9 chords across the entire fretboard.
(Other Positions – Consider removing some to keep article concise and focus on key positions. For now, keep a few more for variety but be mindful of length)
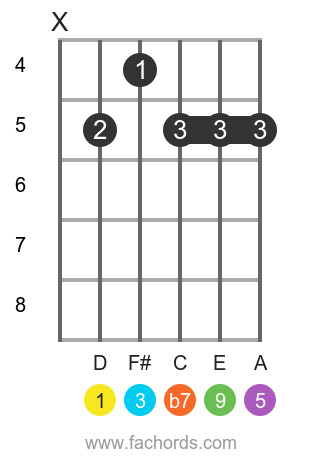
Position 4: Open Position D9 with Root on 5th String
 D 9 position 4 guitar chord diagram
Alt text: D9 chord diagram position 4, open position with root on the A string, bass note variation.
Position 5: Movable D9 Shape Based on E Shape Barre Chord
 D 9 position 12 guitar chord diagram
Alt text: D9 chord diagram position 5, movable shape derived from E barre chord form, higher fretboard position.
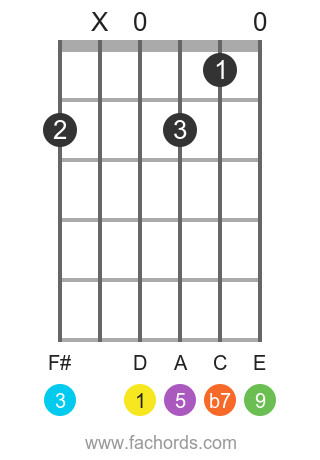
Position 6: Open D9 with 6th String Root
 D 9 position 3 guitar chord diagram
Alt text: D9 chord diagram position 6, open shape with root on low E string, lower register voicing.
Position 7: Barre D9 Chord based on A Shape
 D 9 position 9 guitar chord diagram
Alt text: D9 chord diagram position 7, barre chord shape from A shape, versatile movable form.
Position 8: Another Barre D9 Voicing
 D 9 position 5 guitar chord diagram
Alt text: D9 chord diagram position 8, barre chord with root on 5th string, alternative barre voicing.
Position 9: Movable D9 Shape Higher Up the Neck
 D 9 position 8 guitar chord diagram
Alt text: D9 chord diagram position 9, higher fretboard movable shape, brighter tonal quality.
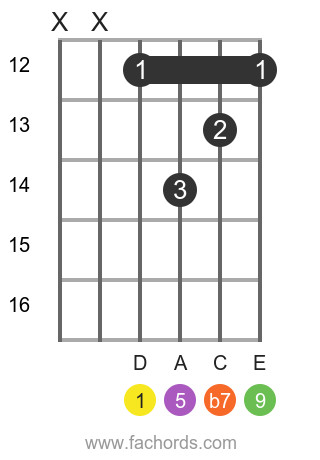
Position 10: D9 Barre Chord on the Top Strings
 D 9 position 13 guitar chord diagram
Alt text: D9 chord diagram position 10, barre chord focused on higher strings, cutting through mix voicing.
Explore our all guitar chords library for even more chord shapes. For a handy printable resource, download our Free Guitar Chords Chart Pdf.
Play D9 with Different Root Notes
Expand your musical vocabulary by exploring the 9th chord with other root notes:
C 9 | D 9 | E 9 | F 9 | G 9 | A 9 | B 9 | C#9 | D#9 | F#9 | G#9 | A#9 | Ab9 | Bb9 | Db9 | Eb9 | Gb9
D9 Chord Tone Fretboard Map
This fretboard map visually represents all the notes within the D9 chord across the guitar neck. Use this to understand the chord’s construction and create your own voicings.
0
1
2
3
4
5
6
7
8
9
10
11
12
13
14
15
9
3
5
b7
1
9
3
5
b7
1
9
3
5
b7
1
9
3
5
b7
1
9
5
b7
1
9
3
5
b7
1
9
3
5
b7
1
9
3
By understanding and practicing the D9 chord in its various forms, you’ll add a valuable and expressive tool to your guitar playing repertoire. Experiment with these positions, listen to how the D9 chord functions in different musical styles, and enjoy the rich harmonic color it brings to your music!