The A# minor chord (A#m), a member of the Minor Chords family, is a versatile and essential chord for guitarists across various genres. Composed of the notes A#, C#, and E#, the A#m chord is built upon specific musical intervals: the root (1), minor third (b3), and perfect fifth (5). Understanding these intervals not only unlocks the A#m chord but also provides a foundational knowledge for grasping guitar chord theory in general.
For those new to chord construction and intervals, delving into resources that explain building chords by stacking intervals can be incredibly beneficial. This theoretical understanding will enrich your appreciation and mastery of the A#m chord and beyond.
Once you’re comfortable with the theory underpinning the A#m chord, we’ll guide you through playing it with the help of chord diagrams and fretboard patterns. These visual tools clearly illustrate finger placement on the fretboard. If you’re unfamiliar with reading chord diagrams and patterns, resources dedicated to guitar chord notation can provide the necessary clarity.
Learning the A#m chord expands your musical vocabulary, opening doors to a vast repertoire of songs and styles, including rock, pop, and jazz. After mastering A#m, exploring jazz chord progressions can be a rewarding next step, as this chord frequently appears in jazz compositions.
Remember, the journey of learning guitar is built one chord at a time. Each new chord you master is a significant step forward. So, let’s embark on learning the A#m chord and enrich your guitar playing experience. Happy strumming!
Understanding the Notes of the A#m Chord
The A# minor chord is formed by three notes:
- A# (Root)
- C# (Minor Third)
- E# (Perfect Fifth)
These notes, arranged in this specific combination, create the characteristic sound of the A#m chord.
Minor Chord Construction: Intervals Explained
Minor chords, like A#m, follow a consistent interval pattern:
| Interval | Degree |
|---|---|
| Root | 1 |
| Minor Third | b3 |
| Perfect Fifth | 5 |
This pattern is fundamental to understanding how minor chords are built and how they function within music theory.
Exploring Different Positions for Playing the A#m Chord
Chord diagrams are read from top to bottom, representing the nut to the bridge of your guitar, and left to right, showing the thickest string (6th) to the thinnest (1st). Dots indicate where to place your fingers, and numbers within the dots suggest which finger to use (1=index, 2=middle, 3=ring, 4=pinky). “X” above a string means that string should not be played, while “O” indicates an open string.
If barre chords present a challenge, numerous resources offer tips and techniques for mastering barre chords, which are essential for playing many guitar chords, including some positions of A#m.
For those who prefer text-based instructions, accessible chord pages offer written diagrams for the A#m chord.
Position 1: Movable Shape
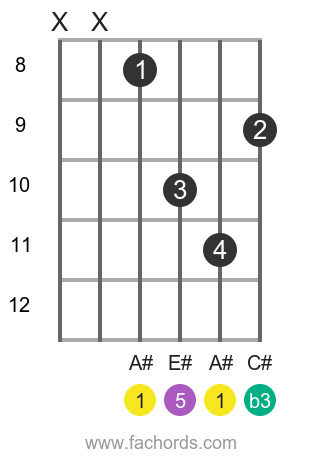 A#m Position 1 Guitar Chord Diagram
This position is a movable shape, meaning you can slide it up and down the neck to play other minor chords. It’s a great starting point for learning A#m and understanding movable chord shapes.
Position 2: Barre Chord Shape (Movable)
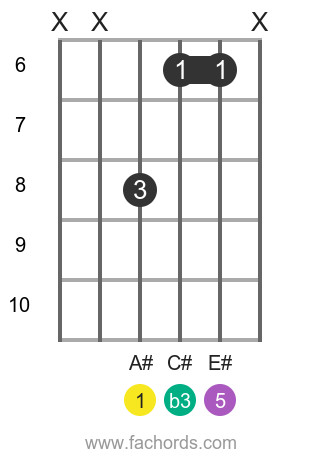 A#m Position 2 Guitar Chord Diagram
This is a barre chord position, requiring you to barre across multiple strings. Barre chords offer versatility and are crucial for expanding your chord vocabulary.
Position 3: Barre Chord Shape (Movable)
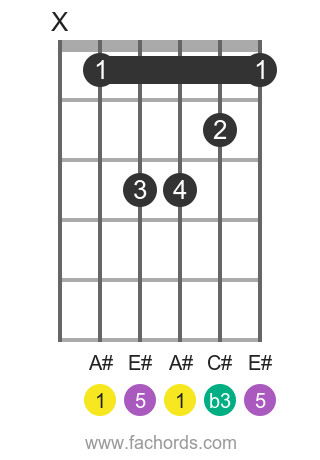 A#m Position 3 Guitar Chord Diagram
Another barre chord variation, this position provides a different voicing of the A#m chord, adding tonal variety to your playing.
Position 4: Barre Chord Shape (Movable)
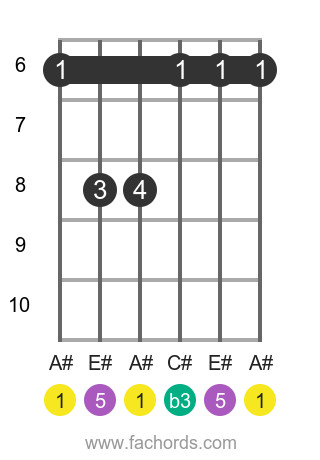 A#m Position 4 Guitar Chord Diagram
This fourth position is yet another barre chord shape, offering further options for playing the A#m chord across the fretboard.
Explore a comprehensive library of guitar chords to discover even more shapes and voicings. For a handy reference, download a free guitar chords chart PDF for offline access.
Playing the A#m Chord with Different Roots
Expanding your chord knowledge involves exploring how chord shapes can be adapted to create chords with different root notes. Below are links to minor chords with various roots, allowing you to apply the A#m shapes you’ve learned to other minor chords:
Cm | Dm | Em | Fm | Gm | Am | Bm | C#m | D#m | F#m | G#m | A#m | Abm | Bbm | Dbm | Ebm | Gbm
Experimenting with the Fretboard
The fretboard map below visually represents the notes on the guitar neck. Use it to identify different locations for the notes of the A#m chord (A#, C#, E#) and experiment with creating your own voicings and variations of the chord.
[Fretboard Map Image Placeholder – Consider adding an interactive fretboard map if possible]
By understanding the theory, practicing the different positions, and experimenting on the fretboard, you’ll confidently master the A#m guitar chord and expand your musical horizons.