
In our exploration of guitar wiring switches, we previously delved into on-on and on-off-on switches. Now, we turn our attention to the final piece of the puzzle: the on-on-on DPDT switch, a powerful tool for expanding your guitar’s sonic capabilities.
This three-position switch offers a unique set of connection possibilities across its positions, making it incredibly versatile for various guitar wiring modifications. Let’s examine the internal workings of this switch:
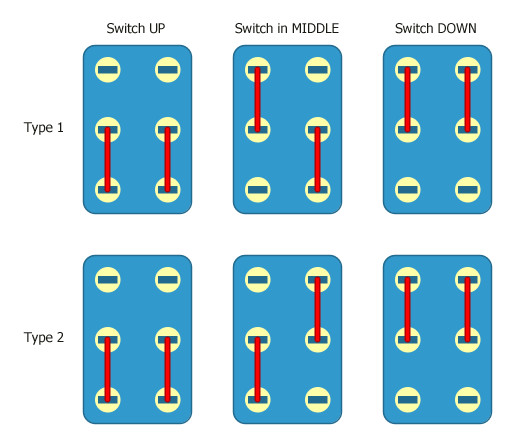 Diagram illustrating the internal connections of a Type I On On On DPDT switch in its three positions: up, middle, and down.
As you can see, there are actually two wiring configurations available for on-on-on switches, commonly referred to as Type I and Type II. When embarking on any wiring project using these switches, it’s crucial to identify which type you have. A multimeter is an invaluable tool for this – if you’re serious about guitar wiring, investing in a multimeter is highly recommended due to its affordability and utility. For the purpose of this guide, we will focus on the Type I configuration due to its widespread use and availability. However, it’s essential to remain aware of the two types when consulting wiring diagrams online and ensure you can adapt your wiring accordingly based on the switch type specified in the diagram.
Let’s explore two practical applications of the on-on-on switch in guitar wiring.
Unleashing Three Tonal Options: Series, Split, and Parallel Wiring
Our first example demonstrates how an on-on-on switch can be used to create a series/split/parallel switch for a humbucker pickup. This modification provides you with three distinct tonal variations from a single humbucker:
- Series (Standard Humbucker): The classic humbucker sound, characterized by its thick, powerful tone.
- Split (Single Coil): Disables one coil of the humbucker, resulting in a brighter, single-coil-esque tone.
- Parallel (Dual Single Coil): Engages both coils of the humbucker but wired in parallel, producing a brighter and more open sound compared to series, often described as similar to two single coils played together.
Here’s the wiring diagram to achieve this versatile setup:
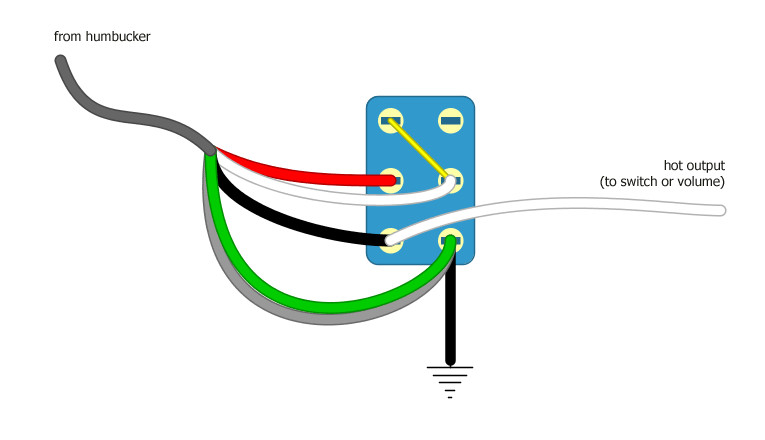 Wiring diagram for connecting an On On On DPDT switch to enable Series/Split/Parallel options for a humbucker pickup.
While this diagram might initially appear complex, it’s more straightforward than it seems. Notice the yellow line – this represents a jumper wire, a short piece of wire used to bridge two terminals on the switch. In all switch positions, the green and bare wires from your humbucker are grounded, and the black wire serves as the hot output.
Let’s break down each switch position:
-
Down Position (Series): In this position, the red and white wires of the humbucker are connected together via the jumper wire. This completes the standard series wiring of the humbucker, delivering its full, powerful tone.
-
Middle Position (Split): Here, the red and white wires remain connected by the jumper, maintaining the series link between the coils. However, a new connection is established, grounding the white wire. This ground connection effectively “splits” the humbucker, deactivating one coil (typically the screw coil) and leaving the other coil (slug coil) active as a single coil pickup.
-
Up Position (Parallel): In the up position, the connection between the red and white wires is broken. Instead, the red wire is now connected to the hot output, and the white wire is connected to ground. This configuration creates a parallel circuit where the signal from ground now splits, passes through both coils of the humbucker separately, and then rejoins at the hot output. Wiring the coils in parallel results in a brighter, more articulate tone that retains hum-canceling properties, offering a unique sonic alternative to both series humbucker and split-coil sounds.
Three Pickups, One Switch: Streamlined Pickup Selection
Another ingenious application of the on-on-on switch is to use it as a three-way pickup selector for guitars equipped with three pickups, all using a compact mini toggle switch. This eliminates the need for a larger, more complex lever switch. The wiring for this configuration is as follows:
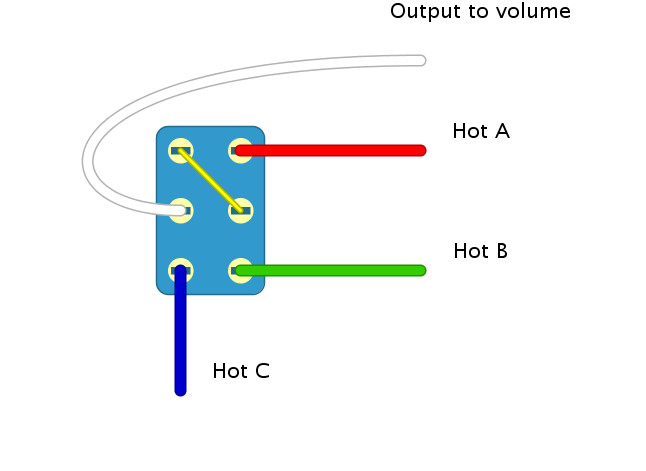 Wiring diagram illustrating how to use an On On On DPDT switch to select between three different pickups: A, B, and C.
Again, we utilize a jumper wire on the switch. The hot output wires from your three pickups (labeled A, B, and C) are connected to the switch. In this setup, only one pickup’s hot output is routed to the main output of the guitar at any given time, depending on the switch position:
- Up Position: Pickup C is active and connected to the output.
- Middle Position: Pickup B is active and connected to the output.
- Down Position: Pickup A is active and connected to the output.
By mastering the on-on-on DPDT switch, you significantly expand your guitar wiring toolkit. You now possess the knowledge to implement versatile modifications like series/split/parallel switching and streamlined three-pickup selection, empowering you to achieve a wider range of tones and sonic textures from your instrument. This switch type, along with the on-on and on-off-on switches, provides you with the fundamental building blocks to create custom wiring schemes and unlock the sounds you’ve always envisioned.
To further explore tonal variations, consider listening to audio demonstrations comparing series, split, and parallel wiring configurations to hear the distinct sonic characteristics of each. In our next exploration, we’ll shift our focus from switches to understanding the principles of hum-canceling and how it contributes to a quieter and more enjoyable playing experience.