For guitar enthusiasts venturing into the world of building their own instruments, the journey often begins with sourcing the essential components, and the body blank is paramount. Creating a guitar from scratch using a CNC machine opens up exciting possibilities, but the cost of commercially available Guitar Body Blanks can be a significant hurdle, especially when you’re in the learning phase. This guide explores a budget-friendly approach to crafting your own guitar body blanks, ensuring you have ample material to practice and perfect your CNC guitar building techniques without breaking the bank.
Why Make Your Own Guitar Body Blanks?
Opting for DIY guitar body blanks offers several compelling advantages, particularly for those new to guitar making or those experimenting with CNC machining:
- Cost Savings: Purchasing pre-made body blanks can be expensive. By sourcing rough-cut lumber and preparing it yourself, you can drastically reduce material costs, freeing up your budget for other essential components like hardware and electronics.
- Customization and Control: Making your own blanks gives you complete control over wood selection, dimensions, and grain orientation. This is especially valuable if you have specific tonal qualities or aesthetic preferences in mind.
- Learning and Skill Development: The process of preparing a body blank – from selecting wood to flattening and joining – is a valuable learning experience in woodworking. It provides hands-on practice with essential skills that are transferable to other aspects of guitar building and general woodworking.
- Reduced Risk in Experimentation: When learning to use a CNC machine for guitar building, mistakes are inevitable. Using cost-effective, DIY blanks minimizes the financial risk associated with these learning curves. You can practice your CNC techniques and designs without the constant worry of ruining expensive materials.
Choosing the Right Wood: Poplar and Alternatives
For budget-conscious guitar body blanks, poplar emerges as an excellent choice. It’s readily available, relatively inexpensive, and machines well, making it ideal for practice and learning. Poplar is a lightweight hardwood with a closed grain, offering a balanced tonal foundation that is often described as neutral, providing a good canvas for pickups and electronics to shape the final sound.
While poplar is a great starting point, especially for DIY blanks, it’s worth noting other wood options that are commonly used for guitar bodies, each offering unique tonal characteristics and aesthetic qualities:
- Alder: A popular choice for its balanced tone, light weight, and closed grain. Alder is known for its clear and resonant sound, making it a favorite for Fender-style guitars.
- Ash: Offers a brighter and snappier tone compared to alder, with pronounced grain patterns that can be visually appealing, especially swamp ash, which is lightweight and resonant.
- Mahogany: A denser hardwood that delivers a warm, rich tone with good sustain. Mahogany is often used for Gibson-style guitars and is prized for its tonal depth and sustain.
- Basswood: Very lightweight and soft, basswood is easy to work with and provides a neutral tone, similar to poplar. It’s often used for guitars designed for high-gain music due to its ability to handle distortion well.
For beginners focused on cost-effectiveness and ease of workability, poplar remains a highly recommended choice. As you gain experience, you can explore other tonewoods to achieve specific sonic goals.
Sourcing and Understanding Rough-Cut Wood
To maximize cost savings, sourcing rough-cut lumber directly from a sawmill or lumberyard is the most economical approach. Rough-cut wood is unprocessed lumber straight from the sawmill, meaning it’s typically cheaper than surfaced or dimensioned lumber available at big box stores.
When purchasing rough-cut wood, understanding how it’s measured and priced is crucial. Lumber is often priced by the “board foot,” a unit of volume measurement.
Board Foot Calculation:
(Width in inches x Length in inches x Thickness in inches) / 144 = Board Feet
Sawmills often measure thickness in quarter-inch increments, which can seem a bit unusual at first. Here’s a common conversion:
- 4/4 = 1 inch thick
- 8/4 = 2 inches thick
- 6/4 = 1.5 inches thick
For guitar body blanks aiming for a standard thickness of around 1.75 inches, 8/4 lumber is a good starting point, allowing for planing and flattening to the desired dimension. Keep in mind that rough-cut lumber comes in varying widths depending on how the log was sawn. You might need to join two pieces to achieve the desired width for a guitar body blank, which is a common practice and part of the DIY blank-making process.
In the original example, the author purchased poplar lumber described as “8/4 thick” and “just over 7 inches wide,” and approximately 160 inches long for around $65. This quantity was estimated to yield six guitar body blanks, bringing the material cost down to just over $10 per blank – a significant saving compared to pre-made blanks.
Step-by-Step Guide to Preparing Your Blanks
Transforming rough-cut lumber into usable guitar body blanks involves several key steps: cutting to size, flattening, and joining for width.
1. Cutting to Size
Begin by cross-cutting the lumber into pieces of roughly the desired length and width for your guitar bodies. A circular saw or hand saw can be used for this step. For a typical guitar body blank, aim for pieces around 20 inches in length. Remember to account for some extra length for trimming and shaping later on.
2. Flattening the Wood with a Router Sled
Rough-cut lumber is often uneven, warped, and cupped. To create a flat and smooth surface for your guitar body blank, a router sled is an invaluable tool. A router sled is a jig that allows you to guide a router in a controlled manner to shave off thin layers of wood, effectively flattening the surface.
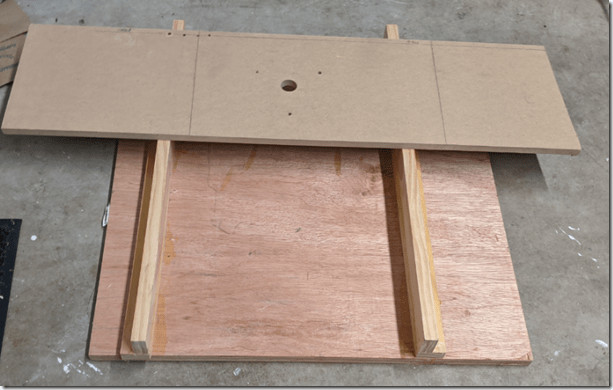
Building a Simple Router Sled:
You can easily build a router sled using readily available materials:
- Base: A flat piece of plywood or MDF (medium-density fiberboard) larger than your workpiece.
- Rails: Straight pieces of wood (like 1x2s) to create elevated rails along the sides of the base. These rails will guide your router.
- Router Platform: A flat piece of MDF or plywood with a hole in the center for your router bit and mounting holes to attach your router base.
Flattening Process:
- Secure the Wood: Place your rough-cut wood piece onto the sled base and secure it. In the original example, hot glue was used to temporarily hold the wood in place, but clamps or double-sided tape can also be used.
- Router Setup: Mount a flat bottom router bit (a planing bit is ideal) in your router and attach the router to the router platform. Adjust the bit depth to take a shallow cut (around 1/16th to 1/8th of an inch per pass).
- Flatten One Side: Rest the router platform on the sled rails and move the router back and forth, overlapping each pass, to plane the entire surface of the wood. Lower the router bit incrementally for each pass until the entire surface is flattened.
- Flatten the Other Side: Remove the wood piece from the sled, flip it over, and repeat the flattening process on the other side. The first flattened side will now rest securely on the sled base, ensuring the second side is flattened parallel to the first.
 Rough cut poplar wood for guitar body blanks
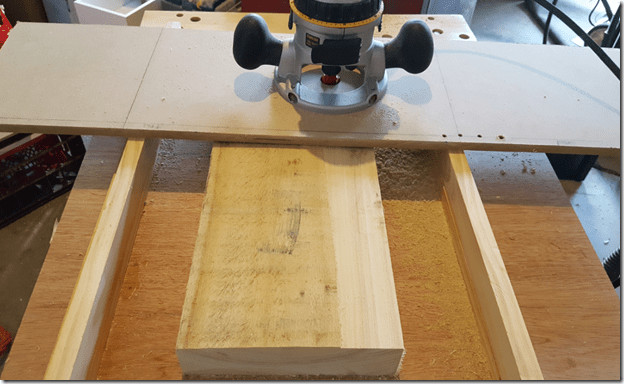 Router sled flattening poplar wood
3. Gluing for Width
If your lumber isn’t wide enough for a guitar body blank, you’ll need to join two or more pieces together. After flattening the edges that will be joined, apply wood glue to the mating surfaces and clamp them together.
Clamping Techniques:
- Bar Clamps: Ideal for applying even pressure along the length of the joint.
- Pipe Clamps: Similar to bar clamps but often more affordable and versatile for longer lengths.
- Tie-Down Straps: As demonstrated in the original article, tie-down straps can be effectively used as clamps, especially for larger pieces. Protect the wood from the straps by using paper towels or cauls (pieces of wood) between the straps and the blank.
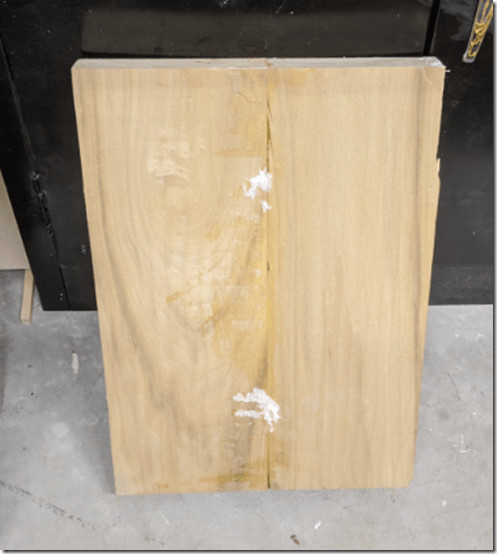 Glued and clamped guitar body blanks
Allow the glue to dry completely according to the manufacturer’s instructions, typically 24 hours, before proceeding to the next steps.
From Blank to Body: Next Steps
Once you have prepared your guitar body blanks – cut, flattened, and glued (if necessary) – they are ready for shaping into guitar bodies. This typically involves:
- Routing the Body Shape: Using templates and a router, or CNC machining, to cut out the desired guitar body shape.
- Neck Pocket and Cavities: Routing the neck pocket to precisely fit the guitar neck and creating cavities for pickups, electronics, and controls.
- Edge Rounding and Sanding: Rounding over the body edges for comfort and sanding the entire body blank smooth in preparation for finishing.
Addressing Common Challenges
The original author mentioned a few challenges that led to pausing the project, which are common for DIY guitar builders:
- Bandsaw Issues: Inaccurate cuts from a bandsaw can be frustrating. Ensure your bandsaw blade is sharp, properly tensioned, and use guide blocks correctly. For very precise cuts, consider using a jigsaw or coping saw for detailed work or relying on the router for shaping with templates.
- Router Safety: Routers are powerful tools that demand respect and caution. Always use appropriate safety gear (eye protection, hearing protection, dust mask), understand the direction of cut, and make sure your workpiece is securely clamped. Start with shallow cuts and gradually increase depth as needed.
- Neck Compatibility: Designing a guitar body requires considering the specific neck you intend to use. It’s best to have the neck on hand or have its exact specifications before finalizing the neck pocket dimensions on your body blank.
Conclusion
Creating your own guitar body blanks is a rewarding and cost-effective way to embark on your guitar building journey. By utilizing affordable lumber like poplar and mastering basic woodworking techniques like flattening and joining, you can produce high-quality blanks that are ready for shaping and finishing. This DIY approach not only saves money but also provides invaluable skills and a deeper connection to the craft of guitar making. So, gather your tools, source your lumber, and start crafting your own custom guitar body blanks – the foundation of your dream guitar awaits!