Barre chords. Just the mention of them can send shivers down a beginner guitarist’s spine. It’s almost a rite of passage – the struggle, the frustration, and then, finally, the breakthrough. If you’re finding barre chords tough, you’re definitely not alone. Almost every guitarist starting out faces this hurdle. But here’s the thing: mastering barre chords is absolutely essential. They are the gateway to playing a massive repertoire of songs. Seriously, a huge chunk of popular music, easily over half, relies on barre chords in some form or another.
Think of barre chords as a fundamental building block in your guitar journey. Once you conquer them, a whole new world of musical possibilities opens up. You’ll be able to play songs you previously thought were out of reach, and your understanding of the fretboard will deepen significantly.
Over the years, I’ve guided countless students through the barre chord learning curve. And one thing has become crystal clear: hand positioning is the secret weapon. Often, just by observing a student’s hand position before they even strum, I can predict whether that barre chord will ring out clear and strong, or fizzle into a muffled buzz.
It’s not just about finger placement. Success with barre chords hinges on a combination of factors: the precise curve of your fingers, where your thumb sits on the neck, and the subtle nuances of how you position that crucial barring finger.
In this guide, we’re going to break down the essential hand positioning techniques that will give you the leverage and strength you need to play barre chords with a clean, resonant sound. Let’s dive in and unlock the power of barre chords together!
The Foundation: Thumb Position for Barre Chords
Let’s start at the very base of it all: your thumb. Think of your thumb as the anchor for your entire hand when you’re playing guitar chords, especially barre chords. Its position dictates everything else. Correct thumb placement provides the leverage you need to press down effectively on the strings and also allows your fingers to spread and maneuver as required.
The ideal thumb position is remarkably consistent across most common barre chords. Take a look at this image illustrating the perfect thumb position:
Notice a few key elements in this picture. My thumb is straight, pointing upwards towards the headstock, and applying pressure roughly in the middle of the guitar neck. This is your target thumb position for almost all barre chords.
Now, let’s look at some thumb positions that are less than ideal, and why they can hinder your barre chord progress:
In this example, the thumb is positioned too high up the neck. This placement restricts the spread of your fingers and reduces the downward pressure you can apply to the strings, making it harder to achieve a clear sound.
Here, the thumb is too far to the side of the neck. This again compromises leverage and finger spread, making it a struggle to fret the chord cleanly.
Returning to the correct thumb position, there’s one more crucial detail to highlight. Let’s examine another view of my hand forming a barre chord, this time from above:
Observe how my thumb is positioned directly opposite my middle (2nd) finger on the other side of the neck. If your thumb is too far to the left or right relative to your fingers, it introduces unnecessary strain and tension throughout your hand. This tension makes fretting any chord, especially barre chords, significantly more difficult. Aim for that balanced, opposite positioning of the thumb and middle finger for optimal comfort and control.
Mastering the Barre: Positioning Your Index (1st) Finger
Next, let’s focus on your index finger, the finger responsible for the “barre” in barre chords. How you position this finger will vary slightly depending on the specific type of barre chord you’re playing.
Let’s start with the Bm chord, a common minor barre chord rooted on the 5th string. The principles we discuss here will also apply to other minor barre chords in this family:
Notice that my index finger isn’t perfectly flat across the strings. For the Bm chord shape, you primarily need to ensure solid pressure on the 1st and 5th strings (and the strings fretted by other fingers). Instead of rigidly flattening the entire index finger, I focus on applying sufficient pressure to those key strings while allowing a slight relaxation on the others. This reduces unnecessary tension and effort.
Also, take note of which part of my index finger is pressing down on the 1st string. I’m using the knuckle-side of my finger. This area is naturally harder and bonier, making it easier to apply the required pressure for a clean note on that string.
Now, let’s compare this to a visually similar chord, the F# major barre chord. This chord, and other major barre chords rooted on the 6th string, utilizes a full barre across all six strings:
The overall position of the index finger barre is remarkably similar to the Bm chord. However, in this case, the barre must cover all six strings effectively. You can see that the knuckle part of my finger is still engaging with the 1st and 2nd strings, ensuring those higher strings ring out clearly.
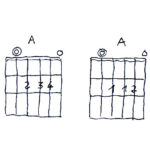
For some other barre chord variations, the index finger positioning needs to adjust slightly. Examine these three chords side-by-side: F#m (minor), F#7 (dominant 7th), and B7 (dominant 7th):
For all three of these chords, the 1st finger needs to fret more notes than in the Bm or F# examples. As a result, the index finger needs to be considerably straighter and flatter across the fretboard. While there’s still a slight curve at the lower joint of my index finger, the upper (distal) joint is almost completely flat. This flatness is crucial to ensure that all the notes being barred by the index finger ring out clearly and without buzzing.
There’s one more critical detail regarding index finger positioning for barre chords. Let’s revisit the F# chord, viewed from above:
Notice that my index finger is subtly rolled onto its left side (towards the headstock). This slight roll offers two key advantages:
- Ergonomics and Reduced Strain: Rolling the finger slightly is a more natural and ergonomic position. It reduces strain and tension in the hand and wrist, making barre chords less physically demanding over time.
- Increased Finger Hardness: The side of your index finger is naturally a bit harder and bonier than the flatter pad. This increased hardness makes it easier to apply adequate pressure to the strings, especially when barring across multiple strings.
You should aim to incorporate this slight roll of the index finger for any barre chord that requires a full or partial barre with this finger.
The Supporting Cast: Positioning Fingers 2, 3, and 4
Now, let’s turn our attention to the other fingers – the middle (2nd), ring (3rd), and pinky (4th) fingers – and their roles in barre chord hand positioning. Let’s go back to that top-down view of the F# chord:
Observe how these fingers are “fanned out” or symmetrically positioned. You can see my middle finger leaning ever so slightly to its left, while the ring and pinky fingers lean slightly to their right. This symmetrical arrangement of the fingers contributes to overall hand balance, ensuring good leverage and even pressure distribution across the strings. Remember that correct thumb positioning, as we discussed earlier, is fundamental to enabling this finger spread and symmetry.
Now, let’s examine the F# chord from the side:
Notice the pronounced curl in fingers 2, 3, and 4. There’s a significant bend in both joints of each finger. This curvature serves two important purposes: it helps these fingers avoid accidentally muting adjacent strings and also facilitates getting good, direct pressure on the specific strings they are intended to fret.
The Ring Finger Barre: A Unique Challenge
Certain barre chords, particularly major barre chords rooted on the 5th string (like the B major chord), require you to barre with your ring (3rd) finger. These chords can present a unique challenge, especially for beginners, because the ring finger is often naturally weaker and less independently controlled than the index or middle fingers.
Here’s a picture of me playing a B major chord:
Placement of the ring finger within the fret space is particularly important for ring finger barre chords. You want the segment of your ring finger that’s doing the barring to be positioned as close to, and as parallel to, the fret behind it as possible. This minimizes the distance the strings need to be pushed down to fret cleanly, reducing the pressure required and making the chord easier to play.
Also, notice in this B chord example that the index finger doesn’t need to be completely flat. Since its primary role here is to fret only the bass note of the chord, it can maintain a bit of a curve.
Now, let’s look at the B major chord from the side:
Pay close attention to the bends in both joints of the ring finger. While the lower, larger joint bends in the typical direction of joint movement, the upper (distal) joint is actually bent slightly backwards. This seemingly subtle finger position is key. It ensures that there is consistent downward pressure on the strings being barred by the ring finger, and that the pressure is distributed evenly across all three strings that need to be fretted by this finger.
By focusing on these hand positioning techniques – from thumb placement to the subtle curves and angles of each finger – you’ll be well on your way to conquering barre chords and unlocking a whole new dimension in your guitar playing. Remember, practice and patience are key! Keep these tips in mind, and you’ll be playing barre chords cleanly and confidently in no time.