
Welcome to your comprehensive guide on the F# dim guitar chord. This essential chord, residing within the family of diminished chords, offers a unique and evocative sound that can add depth and complexity to your guitar playing. The F# dim chord is constructed from three notes: F#, A, and C. These notes are arranged using specific musical intervals: the root (1), the minor third (b3), and the diminished fifth (b5).
Understanding musical intervals is foundational to grasping guitar chords, including the F# dim. If you’re new to this concept, we highly recommend exploring our detailed tutorial on fretboard intervals. This resource will provide you with a solid understanding of how intervals are arranged on the guitar and their importance in chord construction.
Diminished chords, like the F# dim, are characterized by their dissonant and tense quality. This distinctive sound makes them a powerful tool for creating musical interest and emotional depth in your compositions and improvisations. To delve deeper into the world of diminished chords and discover their various applications, be sure to check out our dedicated tutorial on diminished (dim) guitar chords.
Learning to play the F# dim chord effectively involves not only memorizing finger positions but also understanding the fretboard patterns and the arrangement of the chord tones. If you’re looking for clarity on chord diagrams and notation, our tutorial on how to denote chords is an invaluable resource.
For those curious about the theoretical underpinnings of chords like the F# dim, we offer a lesson that explains how to build chords by stacking intervals. This lesson unveils the mechanics of chord construction, empowering you to understand and create chords with greater confidence and knowledge.
We believe these resources will significantly aid your journey in mastering the F# dim chord. Now, let’s explore the different ways you can play this fascinating chord on your guitar. Happy playing!
F# Dim Chord: Unpacking the Notes
The F# dim chord is composed of the following notes:
- F#
- A
- C
These notes, when combined, create the characteristic diminished sound.
Understanding Diminished Chord Tones
Diminished chords are defined by a specific pattern of tones relative to the root. Here’s a breakdown for the F# dim chord and diminished chords in general:
| Degree | Interval |
|---|---|
| 1st (Root) | Root |
| b3rd | Minor Third |
| b5th | Diminished Fifth |
This unique combination of intervals is what gives diminished chords their signature sound and function in music.
Chord diagrams are presented from easiest to more challenging positions. If you need a refresher on reading chord diagrams, please refer to our guide on how to read chord diagrams.
If barre chords pose a challenge, our Bar Chords Tips tutorial offers helpful techniques and exercises to improve your barre chord skills.
For a text-based version of these chord diagrams with written instructions, visit our accessible chords page.
F# Dim Chord Position 1: Movable Shape
 F# dim position 4 guitar chord diagram
This movable F# dim chord shape is based on the E form barre chord. By moving this shape up and down the neck, you can play any diminished chord. To play F# dim in this position:
- Barre across all six strings at the 2nd fret with your index finger.
- Place your middle finger on the 3rd fret of the G string.
- Place your ring finger on the 4th fret of the B string.
- Place your pinky finger on the 5th fret of the high E string.
This position provides a full and resonant voicing of the F# dim chord.
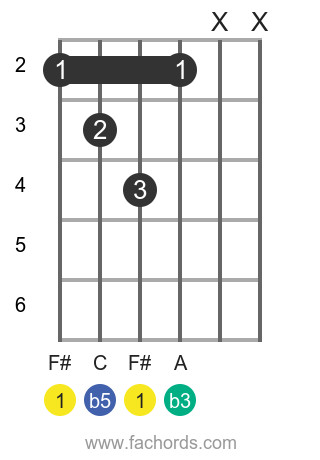
F# Dim Chord Position 2: Movable Shape
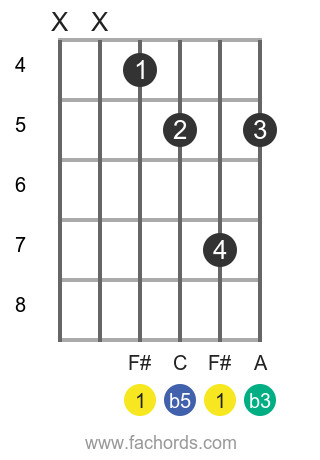 F# dim position 2 guitar chord diagram
Another movable shape, this F# dim position is derived from the A form barre chord family. Like the previous shape, you can transpose this shape to play other diminished chords. For F# dim:
- Barre across the top five strings (E, A, D, G, B) at the 4th fret with your index finger.
- Place your middle finger on the 5th fret of the D string.
- Place your ring finger on the 6th fret of the G string.
- Place your pinky finger on the 6th fret of the B string.
This position offers a slightly higher register voicing of the F# dim chord.
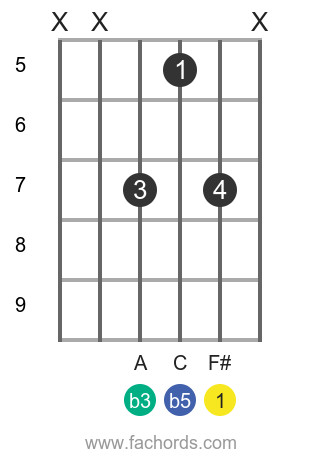
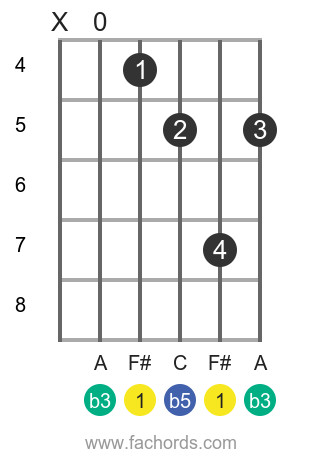
F# Dim Chord Position 3: Movable Shape
 F# dim position 3 guitar chord diagram
This F# dim chord shape is also movable and provides a different voicing option.
- Place your index finger on the 6th fret of the D string.
- Place your middle finger on the 7th fret of the G string.
- Place your ring finger on the 8th fret of the B string.
- Place your pinky finger on the 9th fret of the high E string.
This position is useful for chord melodies and when you want a higher, brighter diminished sound.
F# Dim Chord Position 4: Movable Shape
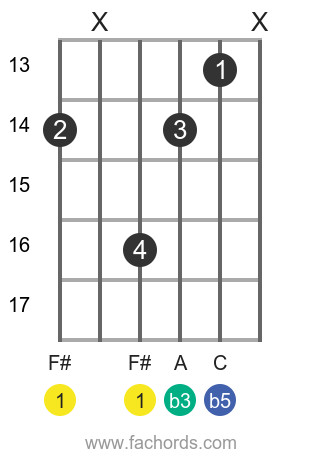 F# dim position 5 guitar chord diagram
This movable F# dim shape is another variation for your toolkit.
- Place your index finger on the 9th fret of the low E string.
- Place your middle finger on the 10th fret of the G string.
- Place your ring finger on the 10th fret of the B string.
- Place your pinky finger on the 10th fret of the high E string.
This position offers a lower, fuller sound, particularly useful in lower registers.
F# Dim Chord Position 5: Open Position
 F# dim position 6 guitar chord diagram
This “open” position is not truly open in the traditional sense (using open strings), but it’s presented as a simpler shape compared to barre chords.
- Place your index finger on the 1st fret of the B string.
- Place your middle finger on the 2nd fret of the G string.
- Place your ring finger on the 3rd fret of the D string.
This position is relatively easier to fret and good for beginners getting acquainted with diminished chords.
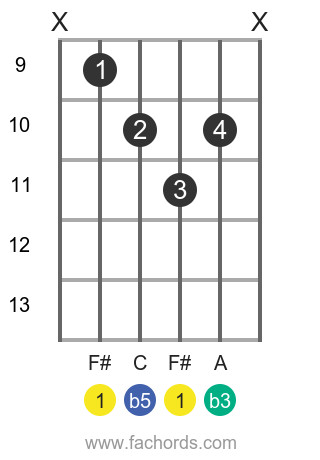
F# Dim Chord Position 6: Barre Movable Shape (Position 1 Repeated)
 F# dim position 1 guitar chord diagram
This position is a repetition of Position 1, emphasizing its importance and common usage. It’s a movable barre chord shape rooted on the 6th string.
- Barre across all six strings at the 9th fret with your index finger.
- Place your middle finger on the 10th fret of the G string.
- Place your ring finger on the 11th fret of the B string.
- Place your pinky finger on the 12th fret of the high E string.
By mastering these various positions, you’ll gain flexibility and control when playing the F# dim chord in different musical contexts.
Explore our extensive all guitar chords library for even more chord variations. For a handy printable resource, download our Free Guitar Chords Chart Pdf.
Practice the F# Dim with Other Root Notes
To further your understanding and dexterity with diminished chords, practice playing diminished chords with different root notes. Here are some common diminished chords to explore:
C dim | C#dim | Dbdim | D dim | D#dim | Ebdim | E dim | F dim | F#dim | Gbdim | G dim | G#dim | Abdim | A dim | A#dim | Bbdim | B dim
F# Dim Chord Tones Across the Fretboard
The fretboard map below illustrates where the root, minor third, and diminished fifth of the F# dim chord are located across the guitar neck. This visual tool can help you understand the chord’s construction and create your own voicings and variations.
[Fretboard Map Image Placeholder – Need to generate or link to a fretboard map image showing 1, b3, b5 for F# dim across the neck]
By studying this fretboard map, you can visualize the F