Slide guitar is an expressive and soulful technique, deeply rooted in blues music and loved by guitarists across genres. If you’re captivated by the wailing tones of Derek Trucks, the fiery licks of Duane Allman, or the raw emotion of early blues masters, learning slide guitar can unlock a new dimension in your playing. While often associated with complex open tunings, you can actually begin your slide journey right away in standard tuning. This guide will walk you through the essentials, making slide guitar accessible even if you’re just starting out.
Many slide guitar tutorials jump straight into open tunings, suggesting you need to relearn the fretboard and your hand techniques. However, to get you started quickly, we’ll first explore slide guitar in standard tuning. This way, all you need to begin is a slide itself. Open tunings, while offering unique sounds and advantages, aren’t always necessary, especially for electric guitar soloing. Legendary bluesmen like Muddy Waters frequently played slide in standard tuning, and even Duane Allman and Eric Clapton used it on certain tracks. The key in standard tuning is effective string damping, usually achieved with your picking hand. Fingerstyle playing is often favored by slide guitarists for this very reason, offering greater control over muting unwanted string vibrations, which is more critical in standard tuning to avoid dissonant sounds.
Choosing Your Guitar and Slide
Diverse selection of guitar slides made from glass and metal, showcasing varying lengths and thicknesses to produce different tones.
You can explore slide guitar on both acoustic and electric guitars, provided they are strung with steel strings – nylon strings won’t work. If you become seriously interested in slide playing, consider dedicating a guitar specifically to this technique. This allows you to set it up with heavier gauge strings and higher action (the string height above the fretboard), both of which are beneficial for slide guitar. Having a dedicated slide guitar also opens the door to experimenting with open tunings without disrupting your usual playing setup. For players who switch between standard and slide playing on a single guitar, sticking with standard tuning is often the most practical approach.
Resonator guitars, like Dobros, are excellent for acoustic slide, producing a loud, metallic, and distinct “Delta Blues” tone thanks to their built-in metal cones.
One surprising advantage of slide guitar is its forgiving nature regarding guitar condition. Older guitars with worn frets or even inexpensive guitars with poorly adjusted frets can be perfect for slide. Since you’re gliding over the strings rather than pressing down on the frets, minor fret imperfections become irrelevant.
Slides themselves are typically crafted from glass or metal. In the early blues era, players ingeniously used materials like bone (as Mississippi Fred McDowell famously did, sharing his slide secrets with Bonnie Raitt) or even knives. Glass and metal slides produce distinct tones, and preference is subjective. Generally, heavier slides tend to produce better sustain.
The easiest way to acquire a slide is to purchase one from a music store. However, for a more unconventional and bluesy approach, consider using a bottle neck.
Alternatively, you can search for suitable materials around you. Explore your garage for metal tubing, look for copper pipes at a hardware store (a meter of tubing can yield many slides!), or even check pharmacies for small glass pill bottles. The neck of a bottle is, in fact, where the term “bottleneck guitar” originates as another name for slide guitar. Many items can be repurposed as slides. Notably, Duane Allman, Derek Trucks, and Rory Gallagher favored a glass Coricidin medicine bottle, which, although no longer produced, has replicas available.
Here are some general guidelines when choosing a slide:
- Heavier slides produce louder tones because they vibrate less themselves, transferring more energy to the strings.
- Glass is generally harder than metal, resulting in smoother slides and a sharper tone.
- Metal slides typically offer a warmer, more mellow tone.
- Higher-pitched strings are generally easier to play with a slide than thicker bass strings.
Choosing the Right Finger for Slide
Deciding which finger to use for slide playing is a matter of personal preference. The common choices are the middle finger, ring finger, and pinky finger. The index finger is generally unsuitable because you need at least one finger free to mute strings behind the slide. Each finger offers different advantages and disadvantages:
- Middle finger: Being the largest finger, it can accommodate larger slides, potentially producing a fuller, “power slide” sound. However, using the middle finger often requires lifting the ring and pinky fingers, limiting your ability to play normally or mute effectively with those fingers.
- Ring finger: This was Duane Allman’s preferred method and is still used by Derek Trucks. It allows for a slide large enough for a good tone while leaving two fingers free for muting. However, transitioning between slide and standard fretting can be challenging.
- Pinky finger: This is often the preferred choice for players who want to seamlessly blend slide and standard playing. It leaves three fingers available for muting or playing without the slide. Pinky slides are typically smaller, which might mean they don’t cover all six strings as easily. Johnny Winter and Eric Clapton are known pinky slide players, and Muddy Waters also used this technique.
Exploring Tunings: Standard and Open
As previously mentioned, many slide guitarists, especially on acoustic guitar for accompaniment, utilize open tunings. In open tunings, the guitar is tuned so that strumming open strings creates a major (or sometimes minor) chord. This doesn’t necessarily mean every string is tuned to a chord tone, but rather that the open strings strongly imply a chord. Open tunings simplify playing basic chords with the slide, including bass notes, making them well-suited for rhythm and accompaniment. Conversely, slide guitar in standard tuning excels in soloing.
Helpful Hints for Tunings:
- Remember that enharmonic equivalents exist (e.g., Ab is the same note as G#).
- Multiple open tunings can exist for the same key.
- Never tune a string higher than standard tuning, especially on acoustic guitars or with heavy strings, as it can cause neck damage. Always tune down if possible.
Here are some common open tunings used for slide guitar:
- Standard Tuning Reference: E-A-D-G-B-E (Think: Eric And Duane’s Guitar Beats Everything)
- Open G: D-G-D-G-B-D (The most popular slide tuning, and Eric Clapton’s preferred tuning for Dobro).
- Open E: E-B-E-G#-B-E (Duane Allman’s favorite, common in Delta Blues, but puts more stress on the guitar neck). Alternatively, Open D tuning with a capo at the 2nd fret achieves the same pitches.
- Open D: D-A-D-F#-A-D (Also used with a capo at the 2nd fret to achieve Open E).
Resources for scales and chords in open tunings are readily available online, including scale generators specifically designed for guitar. These tools are particularly helpful when exploring open tunings, as they often include a “slide mode” visually displaying notes above the frets.
However, for this beginner’s guide, we are focusing on standard tuning. To play a chord with slide guitar, you generally need to sound at least three strings together for a full, rich sound.
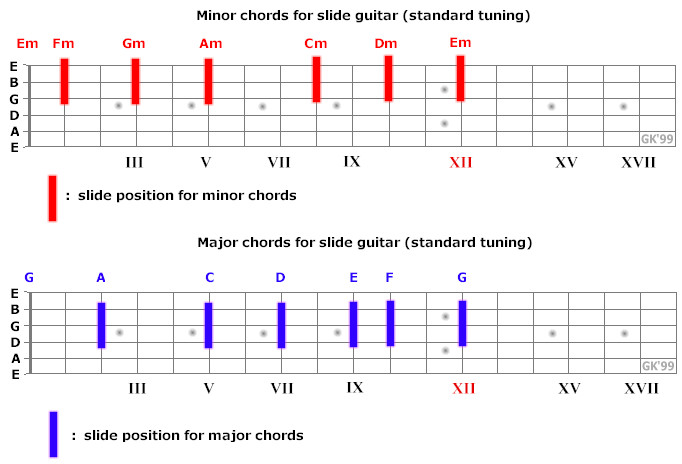
Which major chord uses three open strings in standard tuning? The G major chord utilizes the open D, G, and B strings. This means we can use these strings as a foundation for playing major chords with a slide in standard tuning. To play other major chords, simply position the slide above the corresponding fret and strum these strings. Commonly used major chords using these strings are:
G: open strings A: 2nd fret C: 5th fret D: 7th fret E: 9th fret F: 10th fretWe can apply the same principle to minor chords. E minor uses the open strings G-B-E. Extending this, we can find other minor chords:
Em: open strings Fm: 1st fret Gm: 3rd fret Am: 5th fret Cm: 8th fret Dm: 10th fretFor a visual aid, here’s a graphic representation of these chords:
 chords for slide guitar
This “starter kit” provides major and minor chords in standard tuning for slide guitar. When it comes to soloing, your existing knowledge of scales in standard tuning remains applicable. Scales themselves don’t change, but remember to position the slide directly over the fret, not between frets as you would when fretting normally.
Slide Guitar Technique: Getting Started
The first step is placing the slide on your chosen finger. Experiment with different slide sizes and fingers to find what feels most comfortable and allows for the best control. The slide should generally extend from around the middle finger knuckle to the fingertip end, just long enough to cover the strings you intend to play, without unnecessary extra length.
Next, muting is crucial. You must mute the strings behind the slide (between the slide and the guitar headstock) to prevent unwanted noise. Depending on which finger you’re using for the slide, use your remaining fingers to gently rest on the strings behind the slide, applying light pressure. It takes practice to find the right amount of pressure for effective muting without hindering your playing. This muting requirement is a primary reason why the index finger is not ideal for slide.
Now, let’s focus on the slide technique itself. Position the slide directly above a fret on a string, but avoid pressing down hard enough to make the string contact the fretboard. Pick the string and slowly move the slide up and down the fretboard. Practice this to develop a feel for the slide’s movement and pressure. Try playing simple licks you already know. Unlike standard fretted playing where you’re often confined to box patterns, slide guitar allows you to easily play multiple notes on a single string. Remember to keep muting the strings behind the slide throughout.
Here are some general tips to help you get started:
- Begin practicing blues in the key of G, focusing on the D and G strings. The open string is G (the I chord), the 5th fret is C (the IV chord), and the 7th fret is D (the V chord). Sliding into the IV and V chords on these strings together creates a powerful sound (power chords!), but can become repetitive if overused.
[Sound example suggestion: Include a short audio example here of a basic slide lick in G on the D and G strings. If audio embedding is not possible, describe the lick in more detail.]
- Play fingerstyle or use fingerpicks or a thumb pick. Most slide guitarists prefer this approach for better control. Slide guitar is less about speed and more about feel and tone, and the slide itself naturally limits fast playing.
- Slide into notes. Begin with the slide slightly below the desired fret and then slide up to the note directly over the fret. This is a different approach compared to standard fretting where your finger is placed between frets.
- Don’t forget vibrato. Slide vibrato is relatively easy to execute: make small, quick up-and-down movements with the slide, ensuring the highest point of the vibrato reaches the desired pitch (directly over the fret). You’re essentially creating vibrato by sliding slightly below and up to, but not beyond, the target pitch.
Let’s look at a simple slide guitar lick in E (standard tuning), presented in guitar tab:
E |------12------------|
B |--/12---------------|
G |---------/12--9~~~--|
D |--------------------|
A |--------------root--|
E |--------------note--|
This lick starts with a slide up to the 12th fret (B note) and lets it ring while picking the open E note. It concludes with a slide down to the root note (E) after sliding up to the G note (12th fret on the G string).
This example might sound simple, and it is intentionally so. It represents a very basic starting point. As you progress, your playing will naturally become more sophisticated. It’s important to remember that everyone starts as a beginner.
Here’s a variation inspired by Robert Johnson’s “I Believe I’ll Dust My Broom,” played in the style of Elmore James:
E |------12--12-----12-12-----12-12-----12-12-------------------------|
B |--/12-12--12-/12-12-12-/12-12-12-/12-12-12-------------------------|
G |--------------------------------------------/12-/12-/12-/12--9~~~~-|
D |-------------------------------------------------------------------|
A |-------------------------------------------------------------root--|
E |-------------------------------------------------------------note--|
Simple chords in the “Little Red Rooster” style:
E |-----------------------------------------|
B |-/3--0---/12~~----/3--0---/12~--(etc)----|
G |-/3--0---/12~~----/3--0---/12~-----------|
D |-/3--0---/12~~----/3--0---/12~-----------|
A |-----------------------------------------|
E |-----------------------------------------|
Now you’re ready to try playing Muddy Waters’ “Rollin’ and Tumblin'” (versions by Eric Clapton Unplugged/Cream Live, or Muddy Waters himself are great references):
G |----------------------------------------------------------------------|
D |----------------------------------------------------------------------|
A |--------/12-12-12-12~~-/12-1210----/10-------0-/3-0----0-/3-0--etc.--|
E |-12-12---------------------------12-----12~~---------/3---------------|
B |----------------------------------------------------------------------|
E |----------------------------------------------------------------------|
Let’s conclude with Eric Clapton’s acoustic intro to “Ramblin’ on My Mind.” Excellent versions can be found on bootlegs from his 1999 tour and the “Sessions for Robert J.” DVD. This is considered one of his finest “Robert Johnson style” slide performances:
E |------12~~---------------12-------12~~~-/12-12-12-/12-12-12-/12-12-12-1210------12-|
B |--/12-----------------------------------/12-12-12-/12-12-12-/12-12-12---------------|
G |----------------------------12/13------------------------------------------12/13----|
D |------------------------------------------------------------------------------------|
A |-------(4-4-2-2-4-4)----------------------------------------------------------------|
E |--------0-0-0-0-0-0)----------------------------------------------------------------|

E |--0-0-0-0-0-0--------------|
B |---------------0-----0------|
G |-----------------------/4---|
D |------------------/4---/4---|
A |--5-5-4-4-3-3-2------------|
E |----------------------------|
You might notice that this tab is not perfectly identical to the original recording. To get closer to that sound, you can use a “fake” open-G tuning by tuning the high E string down two semitones to D.
Example in Open-G Tuning: “Mean Old World”
For slide, I’ve always used a glass Coricidin bottle, just like Duane Allman. He told me that a bottle sounds different than a steel slide, and I think it does, so I copied him. Duane was one of my heroes and, in my opinion, he was the best slide player who ever lived. He had such a great touch. He was always on pitch – never sharp or flat – and that’s hard to do. – Gary Rossington (Lynyrd Skynyrd), Guitar Player Magazine 03/1999
“Mean Old World,” written by Marion Walter Jacobs, better known as the harmonica virtuoso Little Walter (1930-1968), gained wider recognition through recordings by Eric Clapton and Duane Allman during the Layla sessions in 1970. While not on the original Layla album, it was later released on Duane Allman’s Anthology, Eric Clapton’s Crossroads I collection, and various blues compilations. The 3-CD The Layla Sessions: 20th Anniversary Edition (1990) includes all three recorded versions.
Both Clapton and Allman played acoustic guitars in open G tuning for “Mean Old World.” Open G (D-G-D-G-B-D) is a very popular open tuning, used in countless blues songs (e.g., “Rollin’ and Tumblin’,” “Running On Faith,” “Walking Blues,” “I Can’t Be Satisfied,” “Little Red Rooster”). While Duane Allman favored open E on electric guitar, open G was often his choice for acoustic slide. Compared to standard tuning (E-A-D-G-B-E), open G keeps three strings the same (making scale patterns somewhat transferable), while both E strings and the A string are tuned down a whole step (two frets). Open G tuning allows for the use of heavier gauge strings because it reduces tension on three strings. You might need to adjust your guitar’s neck relief and raise the action to accommodate open G tuning.
To tune to open G, you can use an online scale generator or tune manually: tune the low E string down an octave below the D string, the A string down an octave below the G string, and the high E string down an octave above the D string. Double-check your tuning:
D |----------0----0--------|
B |--------0-3-------------|
G |------0-4-----------0---|
D |----0-5--------0--------|
G |--0-7---------------0---|
D |--5------------0--------|
   G D G B D D G
With open G tuning, standard scale patterns from standard tuning are no longer directly applicable. Here is the G minor Blues scale in open G tuning:
Diagram of the G minor blues scale in Open G tuning, illustrating note positions on the fretboard.
If you prefer a visual fretboard display of notes or want to explore slide mode, use an online scale generator tool.
You’ll recognize some familiar elements in open G. The interval between the two lowest bass strings is the same as in standard tuning, just a whole step lower. The next three strings (D-G-B) are tuned identically to standard tuning, and the high D string is the same pitch as the lowest D string. Experiment with playing familiar blues licks to get accustomed to this tuning. All open strings together create a G major chord (G-B-D), hence the name “open G tuning.” The IV (C) and V (D) chords are found at the 5th and 7th frets respectively, similar to standard tuning. A simple starting lick walks from the V chord (D) back to the root (G), using chord tones:
D |------12~~~--------------|
B |--/12--------/12---------|
G |-----------------12~~~---|
D |-------------------------|
G |-------------------------|
D |------V----------root----|
A variation:
D |------12~~~-10-------------|
B |--/12----------/12---------|
G |-------------------12~~~---|
D |---------------------------|
G |---------------------------|
D |---------------------------|
Now let’s look at the intro to “Mean Old World,” a quick-change 12-bar blues in G. The intro contains the main theme and can be played in two ways, depending on the strings used. The simpler version (ideal for beginners) is:
D |-------3---5~~~--3---------------|
B |-----3---3----------3-----------|
G |--/3-------------------/3--0-----|
D |---------------------------------|
G |---------------------------------|
D |---------------------------------|
0:00
The more complex version is:
D |-------3-------------------------|
B |-----3---3--8~~--6--3-----------|
G |--/3-------------------/3--------|
D |--------------------------5~~~---|
G |---------------------------------|
D |---------------------------------|
0:00
We’ll continue with the easier version, focusing on smaller fret distances.
E |---/5--/53---------------------|
B |------------3--3---------------|
G |------------------/3--0----0----|
D |-------------------------3------|
A |--------------------------------|
E |--------------------------------|
0:04
Now, the main theme, repeated throughout the song:
E |-----3---3-5-3---------5-3---/5--|
B |--/3---3-------3----------3-----|
G |-------------------/3------------|
D |---------------------------------|
A |---------------------------------|
E |---------------------------------|
0:06
During the vocal sections, chords are played with a slide, starting with a slide into the 12th fret (I chord, G, root) and incorporating the bass line (low G string!). It’s a quick-change blues, so the IV chord (C) at the 5th fret comes in the second bar. The V chord (D) at the 7th fret follows, and this pattern continues until around 1:15, where the first solo begins:
E |-----12-/1210---------5-53-3-------------------------------3-3-5-5-5---------------------------------|
B |-
-/12-----------/12-----5-53-3-/4-3----------------------3/5-----------/5-5-5-------------------------|
G |-------------------12----------/4-3---------main theme---3/5--------------------/3--------main theme---|
D |------------------------------------3-3/5~--see above----3/5-----------------------5-3-5---------------|
A |-See our first example!-------------3-3/5~-------------------------------------------------------------|
E |-------------------------------------------------------------------------------------------------------|
1:15

E |-----4-5-6-/12-3-0------8-8-8--5------------5~~~-------------------0-0--------------------------------|
B |--/3---------------/5---8-8-8------3-------------------------------0-0-------------------0/5-5-------|
G |-------------------/5-----------------32/3-----------main theme----0-0-------------------0/5-5-------|
D |-------------------/5-----------------------------------------------0-0-----------/5--3--0/5-5-------|
A |-------------------------------------------------------------------------5-0-3/4----------------------|
E |-------------------------------------------------------------------------------------------------------|
1:34

E |--------------------------------------------3-5~~~-----------------------------------------------------|
B |--3/5--53-3-0-3-0-----------------------/3--------------------5-/5-/5--0-/3-0-3-0------------------|
G |--3/5--53-3-0-3-0----------------------------------/5-5-/5-5--5-/5-/5--0-/3-0-3-0--main theme------|
D |--3/5--53-3-0-3-0---0-3-0-3-5-3-0------------------/5-5-/5-5--5-/5-/5--0-/3-0-3-0------------------|
A |------------------------------------53-------------/5-5-/5-5------------------------------------------|
E |---------------------main theme one octave-below-------------------------------------------------------|
1:48

E |------0---4--------------------------------------------------------------------------------------------|
B |--0-3---3-5---/5-/5--0--5--/3-0----------------------------------10/12-------------------------------|
G |--------------/5-/5--0--5--/3-0----------------------------------10/12-------------------------------|
D |---no slide---/5-/5--0--5--/3-0------3-0-3-5-3--------5-3-0-0----10/12-------------------------------|
A |------------------------------------/7-----------65-3--------------------Sometimes I wonder why...----|
E |------------------------------------main theme again---------------------------------------------------|
The second solo reuses themes from the first solo. Remember, these tabs are guides, not strict transcriptions. Aim to capture the feel and spirit, and develop your own interpretation.
“Statesboro Blues”
“Statesboro Blues” is a classic blues song, originally written and recorded in 1928 by William Samuel McTell, known as Blind Willie McTell (1901–1959). Statesboro is a town in Georgia, USA. Covered by many artists including Taj Mahal and David Bromberg, the most famous version is by the Allman Brothers Band, released on their iconic 1971 live album At Fillmore East, considered one of the greatest live blues-rock albums ever. Fillmore East was Bill Graham’s legendary rock venue in New York City’s East Village, hosting iconic performers like Jimi Hendrix, John Mayall, and Miles Davis.
Duane “Skydog” Allman became the benchmark for electric slide guitar. His work with the Allman Brothers Band and on the Layla album is legendary.
Duane primarily played slide in open E tuning, with only a few songs in standard tuning (“Dreams,” “Mountain Jam,” “Midnight Rider”). While he used a pick for standard fretted playing, he always played fingerstyle when using a slide. He played various guitars throughout his career, starting with a Telecaster, then moving to Stratocasters, and later to Gibson guitars, mainly ES-series, SGs, and Les Pauls.
While “Statesboro Blues” is traditionally played in open E, it’s also playable in standard tuning (as demonstrated effectively by some players on YouTube). For this beginner-focused guide, we’ll explore a standard tuning approach. Again, this is not a note-for-note transcription but rather a guide to the main theme (the intro), which you can then adapt and expand upon to create your version.
Intro to “Statesboro Blues” in Standard Tuning:
E |--------------------------------------------------------------10-108----/15-/14----|
B |---------------------------------------------------------8/10---------10------------|
G |----5---5-7----/11----/1110-------------------5---5-7-----------------------------|
D |--7---7-------------12---------10--7~~-------7---7---------------------------------|
A |--no slide--------------------------------------------------------------------------|
E |------------------------------------------------------------------------------------|

E |-108-----/10~----------------------------------------------------------------------|
B |------10------------------------/11------------------------------8/10----/108-7----|
G |------------------5---5-7---/11----10-----------------5---5-7-------11------------|
D |----------------7---7-------------------1110--7~~~---7---7-------------------------|
A |------------------------------------------------------------------------------------|
E |------------------------------------------------------------------------------------|

E |-------------------108---------------108-------------------10----/17-/15-108-----|
B |--8/10----/108-7-------10-----------------10~~~~~-8-7-8/10----10------------------|
G |--8----11------------------10~~-9---------------------------------------------------|
D |----------------------------------12------------------------------------------------|
A |------------------------------------------------------------------------------------|
E |------------------------------------------------------------------------------------|

E |-------/13~~~---/14-----------------------------------------------------------------|
B |--108---------------------------------------------10-----8/10----108--------------|
G |---------------------5--/11-/11107-------7--9/11----7--------11-------11---7~~~---|
D |---------------------7---------------107-------------------------------------------|
A |------------------------------------------------------------------------------------|
E |------------------------------------------------------------------------------------|
0:26
You’ll notice many in-between notes and nuances that are difficult to capture precisely in tab. During the song, sections of this intro are used as fills. The best approach is to learn by ear, developing your own feel for the song.
“He gets more of an open, slidey sound. But here’s the way to really tell: He played the Fender, and I played the Gibson. The Fender is a little bit thinner and brighter, a sparkling sound, while the Gibson is just a full-tilt screech.” – Duane Allman on Eric Clapton’s slide playing, interview
“This Boy, Willie Wilson, had a little thing on his finger like a small medicine bottle and he was zinging with it, you know. I said, ‘Jesus! Wonder what’s that he’s playing?’ I knew that guitars hadn’t usually been sounding like that. So I eases up close enough to look, and I see what he has on his finger. ‘Sounds good!’ I said. ‘Jesus! I like that!’ And from there, I got the idea and said, ‘I believe I want to play one of them things.’” – Son House [1]